Setting Up a Wireless Network Profile
Home > Setting Up a Profile > Setting Up a Wireless Network Profile
A profile is a group of settings which you can use to quickly set up a wireless connection. The Mediatek Utility lets you set up profiles based on settings for a wireless network and for WPS (Wi-Fi Protected Setup) settings. To set up a WPS profile, follow the instructions provided for connecting using WPS with the PIN method. To set up a wireless network profile, follow the instructions below to set up a wireless network profile either by applying the settings of an available connection, or by configuring settings manually.
Instructions
Follow these instructions to set up a profile based on the settings of an available wireless network, or to manually add or edit profile settings.
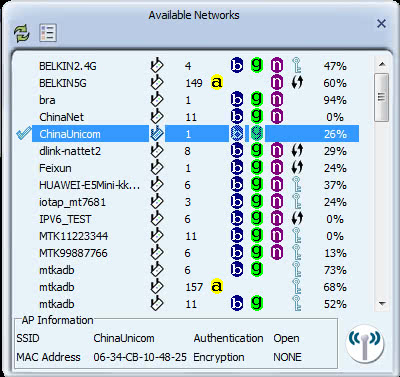
- To quickly set up a profile by using the settings of an available network, click the Available Networks button
 to display the Available Networks screen.
- In this screen, select a network and click on the Add to Profile button
 .
.
- The settings of the network you selected in the Available Networks screen are automatically displayed in the Profile Settings screens.
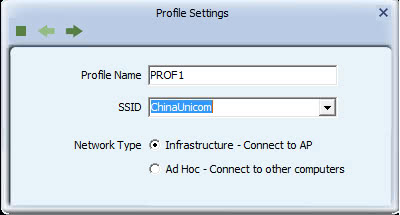
- Click the right arrow in these screens to accept all settings. If required, enter security settings such as the security key for your network.
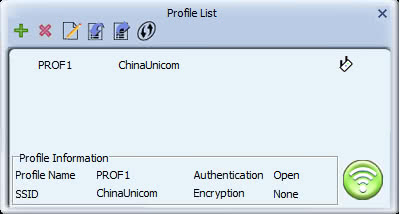
- After you have set up a profile, it appears in the Profile List screen.
Alternatively, follow these instructions to manually set up or edit a network settings profile.
- Click the Profile Settings button
 to display the Profile List screen.
- To configure a wireless security profile, click the Add button
 to add a new profile, or click the Edit button
  to edit an existing profile.

- In the Profile Settings screen, enter the following settings.
- For 'Profile Name', type a name for the profile, or leave at its default value.
- In the SSID field type the name of the network to which you are connecting, or select an existing network name from the drop-down list provided.
- For 'Network Type', select whether your network is an infrastructure or ad hoc network. If uncertain, leave at its default setting (Infrastructure).
- Select 'Infrastructure - Connect to AP' if you are connecting to a typical wireless network maintained by an AP or wireless router.
- Alternatively, select 'Ad Hoc - Connect to other computers' if you are connecting to a distributed network with no AP or router.
-
Click the right arrow to save your settings.
- Configure the strongest security supported by your wireless network from the list below. Click on the appropriate link below for instructions on configuring a specific method for your profile, or go to the next step if not configuring security.
-
After you have set up a profile, it appears in the Profile List screen.
- To connect to the network associated with the profile, click the Connect button
 . A tick icon
  appearing in the Profile List screen indicates a successful connection, while a cross icon
  indicates the connection was unsuccessful.
Troubleshooting
See Troubleshooting for suggestions on solving problems on connecting to a wireless network.
For further information on the screens used in this procedure, see the Profile Settings screens.