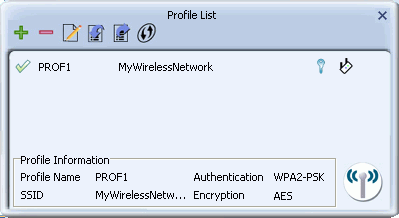
The Profile List Screen
The Profile List screen lets you add, edit and delete profiles, and find information on existing profiles. Use this screen to set up a profile and to configure WPS and wireless security for easy connection to frequently used wireless networks.
NOTE: When WZC is enabled, profile functions are unavailable.
Profile List Buttons
The Profile List screen provides the following buttons.
![]() - Click the Add Profile button to add a new profile to the profile list.
- Click the Add Profile button to add a new profile to the profile list.
![]() - Click the Delete Profile button to remove a profile from the profile list.
- Click the Delete Profile button to remove a profile from the profile list.
![]() - Click the Edit Profile button to change the details of the selected profile.
- Click the Edit Profile button to change the details of the selected profile.
![]() - Click the Import Profile button to import a profile in .prof file format.
- Click the Import Profile button to import a profile in .prof file format.
![]() - Click the Export Profile button to export the selected profile in .prof file format.
- Click the Export Profile button to export the selected profile in .prof file format.
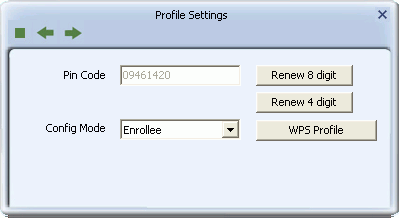
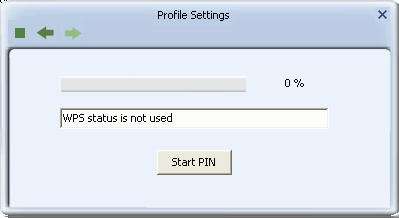
![]() - Click the Add WPS Profile to set up a profile with Wireless Protected Setup (WPS) security settings.
- Click the Add WPS Profile to set up a profile with Wireless Protected Setup (WPS) security settings.
![]() - Click to connect using the network settings in the selected profile.
- Click to connect using the network settings in the selected profile.
Profile Settings
The Profile List screen describes the following profile settings.
![]()
- Connection Status
 - Indicates if a connection made from the currently activated profile.
 - Indicates if the connection has failed on a currently activated profile.
 - Profile name: The name of this profile, default is PROF* (* indicating 1, 2, 3...).
- Network name/SSID: The name of your network.
- Security Status
 - Security is enabled.
 - Security is disabled.
 - Network Type:
 - Infrastructure: Indicates that you are connecting to a typical wireless network maintained by an AP or wireless router. if uncertain, select this option.
 - Ad Hoc: Indicates that you are connecting to a distributed network with no AP or router.
The Wireless Connection Profile Setting Screens
Use these screens to set up a profile or edit existing profile settings for a standard wireless connection.
Profile Buttons
![]()
![]() - Use the left and right arrows to navigate through the Profile Setting screens.
- Use the left and right arrows to navigate through the Profile Setting screens.
![]() - Click the Stop button to cancel setting up or editing a profile.
- Click the Stop button to cancel setting up or editing a profile.
The Profile Details Screen
Use this screen to add or edit the name of the profile and its network name and type.
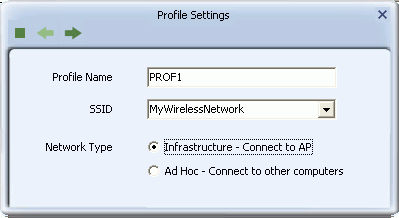
- Profile Name: Type a name for the profile, or leave at its default value: PROF*, where * is 1, 2, 3, and so on.
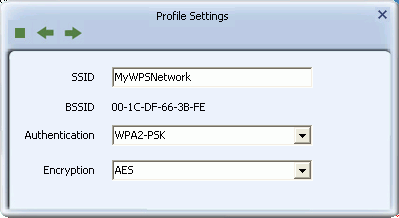
- SSID: Type the name of the network to which you are connecting, or select an existing network name from the drop-down list provided.
- Network Type
-
- Infrastructure: Select this if you are connecting to a typical wireless network maintained by an AP or wireless router. If uncertain, select this option.
- Ad Hoc: Select this if you are connecting to a distributed network with no AP or router.
- Channel: This drop-down list displays when the Ad Hoc radio button is selected.
The Profile Security Settings Screen
Use these screens to configure authentication and encryption settings on your profile.
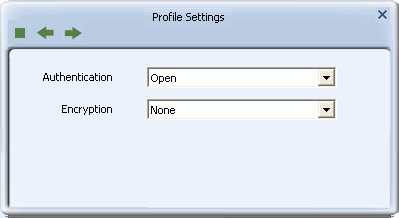
- Authentication: Select the strongest security method supported by your network. Options include Open, Shared, WPA, WPA-PSK, WPA2, WPA2-PSK, 802.1X, CCKM, WAPI-PSK, WAPI-CA.
- Encryption: Select the strongest encryption supported by your network and the selected authentication method. Encryption method options for each authentication method are as shown.
| Security Protocol | Encryption Method | Comments |
| Open
Shared |
None
WEP |
Not secure. WEP is an older standard and is easily decrypted. If using WEP select Open a the authentication method for slightly stronger security. |
| WPA (Wi-Fi Protected Access) | TKIP (Temporal Key Integrity Protocol)
AES (Advanced Encryption Standard) |
Designed for large enterprises. Requires an authentication server. AES is a stronger, more recent standard than TKIP. |
| WPA-PSK (Wi-Fi Protected Access - Pre-Shared Key) | TKIP, AES | Designed for home or small business wireless networks. AES is a stronger, more recent standard than TKIP. |
| WPA2 (Wi-Fi Protected Access 2) | TKIP, AES
TKIP MFP (Temporal Key Integrity Protocol (Management Frame Protection)) AES MFP (Advanced Encryption Standard (Management Frame Protection)) |
Designed for large enterprises. Requires an authentication server. WPA2 is a stronger, more recent standard than WPA. AES is a stronger, more recent standard than TKIP. MFP (management frame protection) offers more security than no MFP. |
| WPA2-PSK (Wi-Fi Protected Access 2 - Pre-Shared Key) | TKIP, AES | Designed for home or small business wireless networks. WPA2-PSK is a stronger, more recent standard than WPA-PSK. AES is a stronger, more recent standard than TKIP. |
| 802.1X | WEP | Designed for large enterprises. Requires an authentication server. WPA and WPA2 are more recent standards. |
| CCKM (Windows Vista or 7 only) | WEP, TKIP, AES | CCKM allows secured roaming between APs with WDS (wireless domain services) enabled and access to the same RADIUS server. |
| WAPI-PSK (WLAN Authentication and Privacy Infrastructure - Pre-Shared Key) | SMS4 | Designed for home or small business wireless networks. At the time of writing, this standard has not yet been accepted by ISO. |
| WAPI-CA (WLAN Authentication and Privacy Infrastructure - Certification Authority) | SMS4 | Designed for large enterprises. Requires an authentication server. At the time of writing, this standard has not yet been accepted by ISO. |
Click on the following links for descriptions of the screens that follow for each type of security.
- WEP
- WPA-PSK or WPA2-PSK
- WAPI-PSK
- WAPI-CA
- 802.1X, CCKM, WPA or WPA2
-
The WEP Screen
Use this screen to configure WEP security.
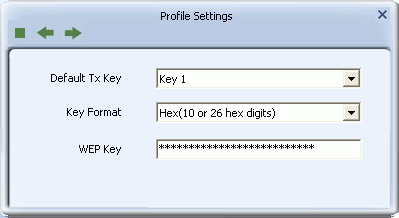
- Default Tx Key: Options are 'Key 1' to 'Key 4'. Select one of these options.
- Key Format: Select a character format for your security passphrase. Options are 'Hex(10 or 26 hex digits)' or 'ASCII(5 or 13 ASCII characters)'.
- WEP Key: Type a security passphrase according to the option you select in the Key Format field.
-
- If you select a key format of 'Hex(10 or 26 hex digits)', in the WEP Key field type a security key 10 or 26 characters long made up of digits '0'-'9' and letters 'A'-'F'.
- If you select a key format of 'ASCII(5 or 13 ASCII characters)' in the WEP Key field, type a security key 5 or 13 characters long made up of digits '0'-'9' and letters 'a'-'z' and 'A'-'Z'.
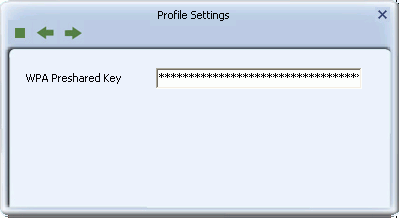
The WPA-PSK or WPA2-PSK Screen
Use this screen to configure WPA-PSK or WPA2-PSK security.
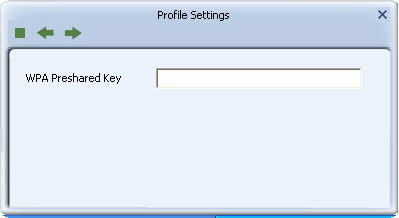
- WPA Preshared Key: Type a passphrase 8-63 characters long made up of characters '0'-'9', 'a'-'z', 'A'-'Z', keyboard symbols and spaces.
The WAPI-PSK Screen
Use this screen to configure WAPI-PSK security.
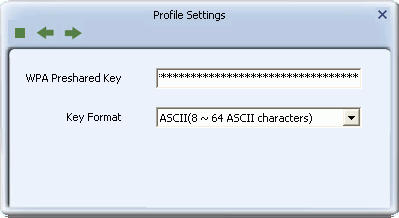
- WPA Preshared Key: Type a security passphrase according to the option you select in the Key Format field.
-
- If you select a Key Format of 'Hex(8~64 hex digits)', in the 'WPA Preshared Key' field type a security key 8-64 characters long made up of digits '0'-'9' and letters 'A'-'F'.
- If you select a Key Format of 'ASCII(8 or 64 ASCII characters)' in the 'WPA Preshared Key' field, type a security key 8-64 characters long made up of digits '0'-'9' and letters 'a'-'z' and 'A'-'Z'.
- Key Format: Options are 'Hex(8~64 hex digits)' or 'ASCII(8 or 64 ASCII characters)'.
The WAPI-CA Screen
Use this screen to configure WAPI-CA security.
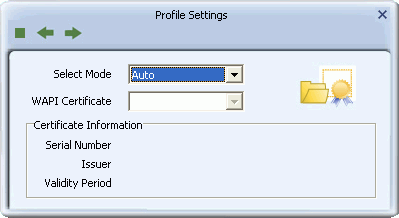
- Select Mode: Options are Auto or Manual. Select 'Auto' to automatically apply WAPI certificates installed on your system. Select 'Manual' to manually select a WAPI certificate installed on your system from the drop-down list in the 'WAPI Certificate' field.
- WAPI Certificate: This option is available if 'Auto' in 'Select Mode' is selected. Select a WAPI certificate from the drop-down list for use in applying WAPI security
-
 - Click this button to browse for WAPI certificates on your system. For information on the screens that follow, see the description of the Certificate Management screens in the Advanced section.
Certificate Information - This information is only available when a WAPI certificate is selected from the 'WAPI Certificate' drop-down list.
- Serial Number: Shows the unique identifier of the WAPI certificate.
- Issuer: Shows the organization that issued the WAPI certificate.
- Valid Period: Shows the validity period of the certificate in month/day/year format.
The 802.1X, CCKM, WPA or WPA2 Screens
Use the following screens to configure authentication and tunnel methods required by 802.1X. CCKM, WPA and WPA2 security.
- The EAP Method Screen
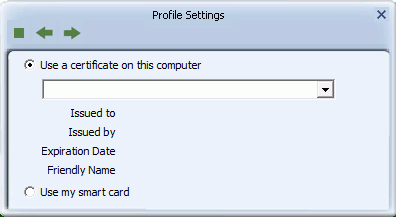
- The User Certification Screen
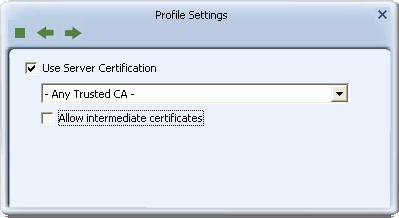
- The Server Certification Screen
- The PAC Screen
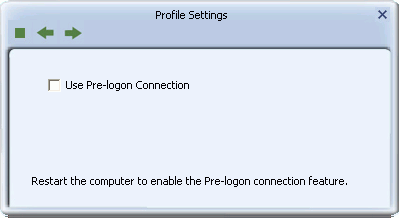
- The Pre-Logon Screen
The EAP Method Screen
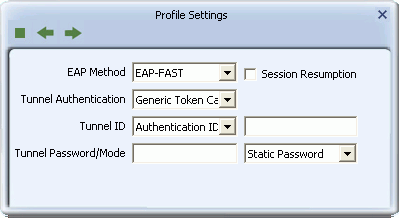
- EAP Method: Select an EAP (Extensible Authentication Protocol) Method. Options are PEAP, TLS/Smart Card, TTLS (XP only), EAP-FAST, MD5-Challenge (available only with 802.1X using Windows XP), and LEAP.
- Session Resumption: Select this option to make use of the previous session's settings for faster re-authentication
- Tunnel Authentication: Select a security method to use when accessing the authentication server. Options depend on the the EAP method selected.
- Tunnel ID: Options are 'Authentication ID' and 'Machine ID'. If 'Authentication ID' is selected, user-based credentials are required. If 'Machine ID' is required, credentials are based on the computer requesting access to the authentication server.
- Tunnel Password/Mode: 'Tunnel Password' refers to the password set for the user or computer accessing the authentication server. 'Tunnel Mode' options may include 'Static Password', 'Soft Token', 'Windows Logon' (Windows Vista/7 only), and 'Prompt User'(Windows Vista/7 only). If tunnel mode is set to 'Static Password', the user authenticates once for the duration of the session. If tunnel mode is set to 'Soft Token', the user must authenticate, based on the time-out period of the soft token. If 'Windows Logon' is selected, user credentials are based on the user's Windows account. If 'Prompt User' is selected, user credentials are requested on connecting to the network.
The following table shows the options for this screen.
Authentication Method Tunnel Authentication Tunnel Mode Tunnel ID User Name/ Password Required PEAP EAP-MS-CHAP v2 n/a n/a Y/Y EAP-TLS/Smart Card n/a Authentication ID Y/N (XP)
N/N (Vista/7)Machine ID N/N Generic Token Card Static Password n/a Y/Y Soft Token N/N Windows Logon (Vista/7) N/N Prompt User (Vista/7) N/N TLS/Smart Card n/a n/a Authentication ID N/N Machine ID N/N TTLS (XP only) CHAP, MS-CHAP, MS-CHAP v2, PAP, EAP-MD5 n/a Authentication ID N/Y Machine ID N/Y EAP-FAST EAP-MSCHAP v2 (XP) n/a Authentication ID N/Y Machine ID N/Y EAP-TLS/Smart Card (XP) n/a Authentication ID N/N Machine ID N/N Generic Token Card (XP) Static Password Authentication ID Y/Y Machine ID N/Y Soft Token Authentication ID N/N Machine ID N/N MD5-Challenge (XP, 802.1X) n/a n/a n/a Y/Y LEAP n/a Static Password (Vista/7) n/a (Vista/7) Y/Y Windows Logon (Vista/7) N/N Prompt User (Vista/7) N/N n/a (XP) Authentication ID N/Y Machine ID N/Y