Home > Connecting to a Wireless Network > Connecting Using WPS
Connecting to a Wireless Network Using WPS
WPS (Wi-Fi Protected Setup) is the simplest and most secure way to connect to a wireless network. WPS is a wireless security method aimed at combining strong WPA or WPA2 security with a simple setup procedure. If the AP or wireless router to which you are connecting shows the WPS logo (shown below), you can set up a wireless connection simply and securely using WPS.

You can apply WPS in two ways.
- The Push-Button (PBC) method: (Recommended) The device to which you are connecting must have a WPS button available on its external casing or as part of its software interface.
- The PIN (personal identification number) method: Use this method if the device to which you are connecting has no WPS button.
Instructions
Follow these instructions to set up a WPS connection using either a push-button or a PIN.
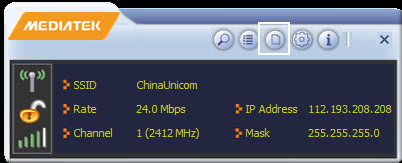
- Click the Profile Settings button
 in the Mediatek Utility.
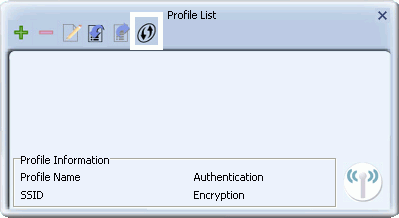
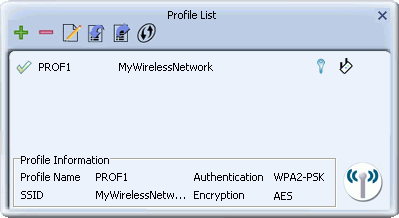
- The Profile List screen displays. In this screen, click the WPS button
 .
.
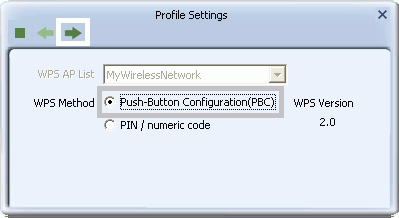
- Select your WPS method.
- If the device to which you are connecting has a WPS push button, either on the casing or in the device's software interface, follow the instructions for the PBC method.
- If the device to which you are connecting has no WPS push button, follow the instructions for the PIN method.
- To use the PBC method, select 'Push-Button Configuration(PBC)'. Click the right arrow to save your settings.
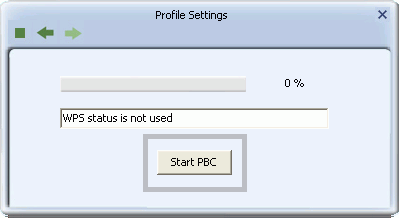
- Click 'Start PBC'. At the same time (within 120 seconds) click the WPS button on the device to which you are connecting.
- Once connected, your WPS profile appears in the Profile List screen.
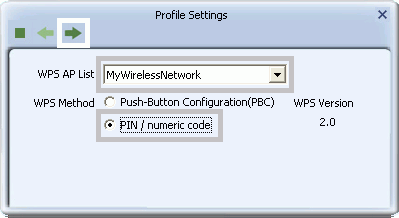
- To use the PIN method, select 'PIN / numeric code' and, in the 'WPS AP List' field, select the name of the network to which you connecting. Click the right arrow to save your settings.
- You can use either the PIN provided by the Mediatek Utility or the PIN provided by the device to which you are connecting.
- PIN provided by the Mediatek Utility.
-
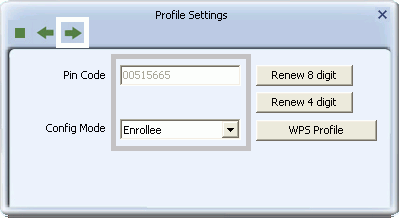
If the device to which you are connecting requires a PIN, in the 'Config Mode' field, from the drop-down list, select 'Enrollee'. Your PIN is displayed in the 'Pin Code' field on your Utility. Then in the corresponding WPS interface on the device to which you are connecting, enter your PIN in its PIN entry field.
- PIN provided by the device to which you connecting.
-
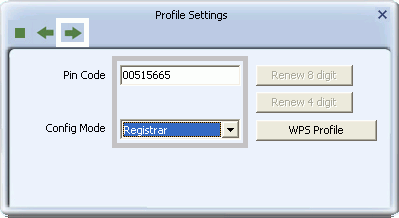
If the device to which you are connecting provides a PIN (e.g. on the device casing), in the 'Config Mode' field, select 'Registrar'. In the 'PIN Code' field, type the PIN provided by the device to which you are connecting.
To optionally configure the connection name and security type on your WPS connection, click the 'WPS Profile' button. Otherwise leave settings at their default and click the right arrow to save your settings.
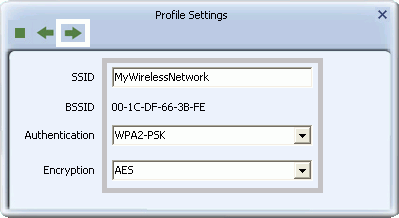
- If you click on the 'WPS Profile' button, the following screen appears, allowing you to configure the name of your network connection and security method. In 'SSID' type a name for your WPS connection, and select an Authentication and Encryption method.
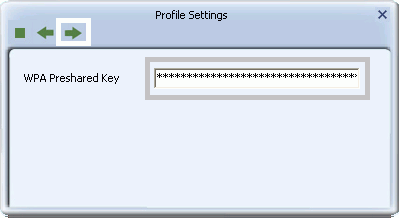
- In the 'WPA Preshared Key' field, type a passphrase 8-63 characters long made up of characters '0'-'9', 'a'-'z', 'A'-'Z', keyboard symbols and spaces. Click the right arrow to save your settings.
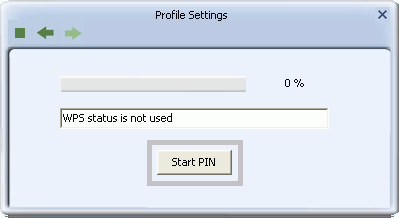
- For both PIN methods, the following screen displays. Click the Start PIN button. At the same time (within 120 seconds) activate the corresponding WPS PIN connection function on the device to which you are connecting.
- Once connected, your WPS profile appears in the Profile List screen.

Troubleshooting
See Troubleshooting for solutions to problems connecting using WPS.
For further information on the screens used in this procedure, see the Profile Settings screens.


