MySQL Server Administration - MariaDB - Databases - Software - Computers
| MySQL Server Administration | ||
|---|---|---|
| Prev | Next | |
MySQL Server Administration
Table of Contents
- The MariaDB Server
- MySQL Server Logs
- General Security Issues
- The MariaDB Access Privilege System
- MySQL User Account Management
- Running Multiple MariaDB Instances on One Machine
- Tracing mysqld Using DTrace
MySQL Server (mysqld) is the main program that does most of the work in a MariaDB installation. This section provides an overview of MariaDB Server and covers topics that deal with administering a MariaDB installation:
- Server configuration
- The server log files
- Security issues and user-account management
- Management of multiple servers on a single machine
The MariaDB Server
- Server Option and Variable Reference
- Server Command Options
- Server System Variables
- Using System Variables
- Server Status Variables
- Server SQL Modes
- Server Plugins
- Server-Side Help
- Server Response to Signals
- The Shutdown Process
- Server Command Options
mysqld is the MariaDB server. The following discussion covers these MariaDB server configuration topics:
- Startup options that the server supports. You can specify these options on the command line, through configuration files, or both.
- Server system variables. These variables reflect the current state and values of the startup options, some of which can be modified while the server is running.
- Server status variables. These variables contain counters and statistics about runtime operation.
- How to set the server SQL mode. This setting modifies certain aspects of SQL syntax and semantics, for example for compatibility with code from other database systems, or to control the error handling for particular situations.
- The server shutdown process. There are performance and reliability considerations depending on the type of table (transactional or non-transactional) and whether you use replication.
Not all storage engines are supported by all MariaDB server binaries and configurations. To find out how to determine which storage engines your MariaDB server installation supports, see , "SHOW ENGINES Syntax".
Server Option and Variable Reference
The following table provides a list of all the command line options, server and status variables applicable within mysqld.
The table lists command-line options (Cmd-line), options valid in configuration files (Option file), server system variables (System Var), and status variables (Status var) in one unified list, with notification of where each option/variable is valid. If a server option set on the command line or in an option file differs from the name of the corresponding server system or status variable, the variable name is noted immediately below the corresponding option. For status variables, the scope of the variable is shown (Scope) as either global, session, or both. Please see the corresponding sections for details on setting and using the options and variables. Where appropriate, a direct link to further information on the item as available.
Table 5.1. Option/Variable Summary
| Name | Cmd-Line | Option file | System Var | Status Var | Var Scope | Dynamic |
|---|---|---|---|---|---|---|
| abort-slave-event-count | Yes | Yes | ||||
| Aborted_clients | Yes | Global | No | |||
| Aborted_connects | Yes | Global | No | |||
| allow-suspicious-udfs | Yes | Yes | ||||
| ansi | Yes | Yes | ||||
| auto_increment_increment | Yes | Yes | Yes | Both | Yes | |
| auto_increment_offset | Yes | Yes | Yes | Both | Yes | |
| autocommit | Yes | Yes | Yes | Both | Yes | |
| automatic_sp_privileges | Yes | Global | Yes | |||
| back_log | Yes | Yes | Yes | Global | No | |
| basedir | Yes | Yes | Yes | Global | No | |
| big-tables | Yes | Yes | Both | Yes | ||
| - Variable: big_tables | Yes | Both | Yes | |||
| bind-address | Yes | Yes | Yes | Global | No | |
| Binlog_cache_disk_use | Yes | Global | No | |||
| binlog_cache_size | Yes | Yes | Yes | Global | Yes | |
| Binlog_cache_use | Yes | Global | No | |||
| binlog-checksum | Yes | Yes | ||||
| binlog_checksum | Yes | Global | Yes | |||
| binlog_direct_non_transactional_updates | Yes | Yes | Yes | Both | Yes | |
| binlog-do-db | Yes | Yes | ||||
| binlog-format | Yes | Yes | Both | Yes | ||
| - Variable: binlog_format | Yes | Both | Yes | |||
| binlog-ignore-db | Yes | Yes | ||||
| binlog-row-event-max-size | Yes | Yes | ||||
| binlog_row_image | Yes | Yes | Both | Yes | ||
| binlog_rows_query_log_events | Yes | Both | Yes | |||
| binlog-rows-query-log-events | Yes | Yes | ||||
| - Variable: binlog_rows_query_log_events | ||||||
| Binlog_stmt_cache_disk_use | Yes | Global | No | |||
| binlog_stmt_cache_size | Yes | Yes | Yes | Global | Yes | |
| Binlog_stmt_cache_use | Yes | Global | No | |||
| bootstrap | Yes | Yes | ||||
| bulk_insert_buffer_size | Yes | Yes | Yes | Both | Yes | |
| Bytes_received | Yes | Both | No | |||
| Bytes_sent | Yes | Both | No | |||
| character_set_client | Yes | Both | Yes | |||
| character-set-client-handshake | Yes | Yes | ||||
| character_set_connection | Yes | Both | Yes | |||
| character_set_database[a] | Yes | Both | Yes | |||
| character-set-filesystem | Yes | Yes | Both | Yes | ||
| - Variable: character_set_filesystem | Yes | Both | Yes | |||
| character_set_results | Yes | Both | Yes | |||
| character-set-server | Yes | Yes | Both | Yes | ||
| - Variable: character_set_server | Yes | Both | Yes | |||
| character_set_system | Yes | Global | No | |||
| character-sets-dir | Yes | Yes | Global | No | ||
| - Variable: character_sets_dir | Yes | Global | No | |||
| chroot | Yes | Yes | ||||
| collation_connection | Yes | Both | Yes | |||
| collation_database[b] | Yes | Both | Yes | |||
| collation-server | Yes | Yes | Both | Yes | ||
| - Variable: collation_server | Yes | Both | Yes | |||
| Com_admin_commands | Yes | Both | No | |||
| Com_alter_db | Yes | Both | No | |||
| Com_alter_db_upgrade | Yes | Both | No | |||
| Com_alter_event | Yes | Both | No | |||
| Com_alter_function | Yes | Both | No | |||
| Com_alter_procedure | Yes | Both | No | |||
| Com_alter_server | Yes | Both | No | |||
| Com_alter_table | Yes | Both | No | |||
| Com_alter_tablespace | Yes | Both | No | |||
| Com_analyze | Yes | Both | No | |||
| Com_assign_to_keycache | Yes | Both | No | |||
| Com_begin | Yes | Both | No | |||
| Com_binlog | Yes | Both | No | |||
| Com_call_procedure | Yes | Both | No | |||
| Com_change_db | Yes | Both | No | |||
| Com_change_master | Yes | Both | No | |||
| Com_check | Yes | Both | No | |||
| Com_checksum | Yes | Both | No | |||
| Com_commit | Yes | Both | No | |||
| Com_create_db | Yes | Both | No | |||
| Com_create_event | Yes | Both | No | |||
| Com_create_function | Yes | Both | No | |||
| Com_create_index | Yes | Both | No | |||
| Com_create_procedure | Yes | Both | No | |||
| Com_create_server | Yes | Both | No | |||
| Com_create_table | Yes | Both | No | |||
| Com_create_trigger | Yes | Both | No | |||
| Com_create_udf | Yes | Both | No | |||
| Com_create_user | Yes | Both | No | |||
| Com_create_view | Yes | Both | No | |||
| Com_dealloc_sql | Yes | Both | No | |||
| Com_delete | Yes | Both | No | |||
| Com_delete_multi | Yes | Both | No | |||
| Com_do | Yes | Both | No | |||
| Com_drop_db | Yes | Both | No | |||
| Com_drop_event | Yes | Both | No | |||
| Com_drop_function | Yes | Both | No | |||
| Com_drop_index | Yes | Both | No | |||
| Com_drop_procedure | Yes | Both | No | |||
| Com_drop_server | Yes | Both | No | |||
| Com_drop_table | Yes | Both | No | |||
| Com_drop_trigger | Yes | Both | No | |||
| Com_drop_user | Yes | Both | No | |||
| Com_drop_view | Yes | Both | No | |||
| Com_empty_query | Yes | Both | No | |||
| Com_execute_sql | Yes | Both | No | |||
| Com_flush | Yes | Both | No | |||
| Com_grant | Yes | Both | No | |||
| Com_ha_close | Yes | Both | No | |||
| Com_ha_open | Yes | Both | No | |||
| Com_ha_read | Yes | Both | No | |||
| Com_help | Yes | Both | No | |||
| Com_insert | Yes | Both | No | |||
| Com_insert_select | Yes | Both | No | |||
| Com_install_plugin | Yes | Both | No | |||
| Com_kill | Yes | Both | No | |||
| Com_load | Yes | Both | No | |||
| Com_lock_tables | Yes | Both | No | |||
| Com_optimize | Yes | Both | No | |||
| Com_preload_keys | Yes | Both | No | |||
| Com_prepare_sql | Yes | Both | No | |||
| Com_purge | Yes | Both | No | |||
| Com_purge_before_date | Yes | Both | No | |||
| Com_release_savepoint | Yes | Both | No | |||
| Com_rename_table | Yes | Both | No | |||
| Com_rename_user | Yes | Both | No | |||
| Com_repair | Yes | Both | No | |||
| Com_replace | Yes | Both | No | |||
| Com_replace_select | Yes | Both | No | |||
| Com_reset | Yes | Both | No | |||
| Com_resignal | Yes | Both | No | |||
| Com_revoke | Yes | Both | No | |||
| Com_revoke_all | Yes | Both | No | |||
| Com_rollback | Yes | Both | No | |||
| Com_rollback_to_savepoint | Yes | Both | No | |||
| Com_savepoint | Yes | Both | No | |||
| Com_select | Yes | Both | No | |||
| Com_set_option | Yes | Both | No | |||
| Com_show_authors | Yes | Both | No | |||
| Com_show_binlog_events | Yes | Both | No | |||
| Com_show_binlogs | Yes | Both | No | |||
| Com_show_charsets | Yes | Both | No | |||
| Com_show_collations | Yes | Both | No | |||
| Com_show_contributors | Yes | Both | No | |||
| Com_show_create_db | Yes | Both | No | |||
| Com_show_create_event | Yes | Both | No | |||
| Com_show_create_func | Yes | Both | No | |||
| Com_show_create_proc | Yes | Both | No | |||
| Com_show_create_table | Yes | Both | No | |||
| Com_show_create_trigger | Yes | Both | No | |||
| Com_show_databases | Yes | Both | No | |||
| Com_show_engine_logs | Yes | Both | No | |||
| Com_show_engine_mutex | Yes | Both | No | |||
| Com_show_engine_status | Yes | Both | No | |||
| Com_show_errors | Yes | Both | No | |||
| Com_show_events | Yes | Both | No | |||
| Com_show_fields | Yes | Both | No | |||
| Com_show_function_code | Yes | Both | No | |||
| Com_show_function_status | Yes | Both | No | |||
| Com_show_grants | Yes | Both | No | |||
| Com_show_keys | Yes | Both | No | |||
| Com_show_logs | Yes | Both | No | |||
| Com_show_master_status | Yes | Both | No | |||
| Com_show_new_master | Yes | Both | No | |||
| Com_show_open_tables | Yes | Both | No | |||
| Com_show_plugins | Yes | Both | No | |||
| Com_show_privileges | Yes | Both | No | |||
| Com_show_procedure_code | Yes | Both | No | |||
| Com_show_procedure_status | Yes | Both | No | |||
| Com_show_processlist | Yes | Both | No | |||
| Com_show_profile | Yes | Both | No | |||
| Com_show_profiles | Yes | Both | No | |||
| Com_show_relaylog_events | Yes | Both | No | |||
| Com_show_slave_hosts | Yes | Both | No | |||
| Com_show_slave_status | Yes | Both | No | |||
| Com_show_status | Yes | Both | No | |||
| Com_show_storage_engines | Yes | Both | No | |||
| Com_show_table_status | Yes | Both | No | |||
| Com_show_tables | Yes | Both | No | |||
| Com_show_triggers | Yes | Both | No | |||
| Com_show_variables | Yes | Both | No | |||
| Com_show_warnings | Yes | Both | No | |||
| Com_signal | Yes | Both | No | |||
| Com_slave_start | Yes | Both | No | |||
| Com_slave_stop | Yes | Both | No | |||
| Com_stmt_close | Yes | Both | No | |||
| Com_stmt_execute | Yes | Both | No | |||
| Com_stmt_fetch | Yes | Both | No | |||
| Com_stmt_prepare | Yes | Both | No | |||
| Com_stmt_reprepare | Yes | Both | No | |||
| Com_stmt_reset | Yes | Both | No | |||
| Com_stmt_send_long_data | Yes | Both | No | |||
| Com_truncate | Yes | Both | No | |||
| Com_uninstall_plugin | Yes | Both | No | |||
| Com_unlock_tables | Yes | Both | No | |||
| Com_update | Yes | Both | No | |||
| Com_update_multi | Yes | Both | No | |||
| Com_xa_commit | Yes | Both | No | |||
| Com_xa_end | Yes | Both | No | |||
| Com_xa_prepare | Yes | Both | No | |||
| Com_xa_recover | Yes | Both | No | |||
| Com_xa_rollback | Yes | Both | No | |||
| Com_xa_start | Yes | Both | No | |||
| completion_type | Yes | Yes | Yes | Both | Yes | |
| Compression | Yes | Session | No | |||
| concurrent_insert | Yes | Yes | Yes | Global | Yes | |
| connect_timeout | Yes | Yes | Yes | Global | Yes | |
| Connection_errors_accept | Yes | Global | No | |||
| Connection_errors_internal | Yes | Global | No | |||
| Connection_errors_max_connections | Yes | Global | No | |||
| Connection_errors_peer_addr | Yes | Global | No | |||
| Connection_errors_select | Yes | Global | No | |||
| Connection_errors_tcpwrap | Yes | Global | No | |||
| Connections | Yes | Global | No | |||
| console | Yes | Yes | ||||
| core-file | Yes | Yes | ||||
| Created_tmp_disk_tables | Yes | Both | No | |||
| Created_tmp_files | Yes | Global | No | |||
| Created_tmp_tables | Yes | Both | No | |||
| datadir | Yes | Yes | Yes | Global | No | |
| date_format | Yes | Global | No | |||
| datetime_format | Yes | Global | No | |||
| debug | Yes | Yes | Yes | Both | Yes | |
| debug_sync | Yes | Session | Yes | |||
| debug-sync-timeout | Yes | Yes | ||||
| default-storage-engine | Yes | Yes | Both | Yes | ||
| - Variable: default_storage_engine | Yes | Both | Yes | |||
| default-time-zone | Yes | Yes | ||||
| default_tmp_storage_engine | Yes | Yes | Yes | Both | Yes | |
| default_week_format | Yes | Yes | Yes | Both | Yes | |
| defaults-extra-file | Yes | |||||
| defaults-file | Yes | |||||
| defaults-group-suffix | Yes | |||||
| delay-key-write | Yes | Yes | Global | Yes | ||
| - Variable: delay_key_write | Yes | Global | Yes | |||
| Delayed_errors | Yes | Global | No | |||
| delayed_insert_limit | Yes | Yes | Yes | Global | Yes | |
| Delayed_insert_threads | Yes | Global | No | |||
| delayed_insert_timeout | Yes | Yes | Yes | Global | Yes | |
| delayed_queue_size | Yes | Yes | Yes | Global | Yes | |
| Delayed_writes | Yes | Global | No | |||
| des-key-file | Yes | Yes | ||||
| disconnect-slave-event-count | Yes | Yes | ||||
| div_precision_increment | Yes | Yes | Yes | Both | Yes | |
| enable-named-pipe | Yes | Yes | ||||
| - Variable: named_pipe | ||||||
| end_markers_in_json | Yes | Both | Yes | |||
| engine-condition-pushdown | Yes | Yes | Both | Yes | ||
| - Variable: engine_condition_pushdown | Yes | Both | Yes | |||
| eq_range_index_dive_limit | Yes | Yes | Yes | Both | Yes | |
| error_count | Yes | Session | No | |||
| event-scheduler | Yes | Yes | Global | Yes | ||
| - Variable: event_scheduler | Yes | Global | Yes | |||
| exit-info | Yes | Yes | ||||
| expire_logs_days | Yes | Yes | Yes | Global | Yes | |
| external-locking | Yes | Yes | ||||
| - Variable: skip_external_locking | ||||||
| external_user | Yes | Session | No | |||
| federated | Yes | Yes | ||||
| flush | Yes | Yes | Yes | Global | Yes | |
| Flush_commands | Yes | Global | No | |||
| flush_time | Yes | Yes | Yes | Global | Yes | |
| foreign_key_checks | Yes | Both | Yes | |||
| ft_boolean_syntax | Yes | Yes | Yes | Global | Yes | |
| ft_max_word_len | Yes | Yes | Yes | Global | No | |
| ft_min_word_len | Yes | Yes | Yes | Global | No | |
| ft_query_expansion_limit | Yes | Yes | Yes | Global | No | |
| ft_stopword_file | Yes | Yes | Yes | Global | No | |
| gdb | Yes | Yes | ||||
| general-log | Yes | Yes | Global | Yes | ||
| - Variable: general_log | Yes | Global | Yes | |||
| general_log_file | Yes | Yes | Yes | Global | Yes | |
| group_concat_max_len | Yes | Yes | Yes | Both | Yes | |
| Handler_commit | Yes | Both | No | |||
| Handler_delete | Yes | Both | No | |||
| Handler_discover | Yes | Both | No | |||
| Handler_external_lock | Yes | Both | No | |||
| Handler_prepare | Yes | Both | No | |||
| Handler_read_first | Yes | Both | No | |||
| Handler_read_key | Yes | Both | No | |||
| Handler_read_last | Yes | Both | No | |||
| Handler_read_next | Yes | Both | No | |||
| Handler_read_prev | Yes | Both | No | |||
| Handler_read_rnd | Yes | Both | No | |||
| Handler_read_rnd_next | Yes | Both | No | |||
| Handler_rollback | Yes | Both | No | |||
| Handler_savepoint | Yes | Both | No | |||
| Handler_savepoint_rollback | Yes | Both | No | |||
| Handler_update | Yes | Both | No | |||
| Handler_write | Yes | Both | No | |||
| have_compress | Yes | Global | No | |||
| have_crypt | Yes | Global | No | |||
| have_csv | Yes | Global | No | |||
| have_dynamic_loading | Yes | Global | No | |||
| have_geometry | Yes | Global | No | |||
| have_innodb | Yes | Global | No | |||
| have_ndbcluster | Yes | Global | No | |||
| have_openssl | Yes | Global | No | |||
| have_partitioning | Yes | Global | No | |||
| have_profiling | Yes | Global | No | |||
| have_query_cache | Yes | Global | No | |||
| have_rtree_keys | Yes | Global | No | |||
| have_ssl | Yes | Global | No | |||
| have_symlink | Yes | Global | No | |||
| help | Yes | Yes | ||||
| host_cache_size | Yes | Yes | Yes | Global | Yes | |
| hostname | Yes | Global | No | |||
| identity | Yes | Session | Yes | |||
| ignore-builtin-innodb | Yes | Yes | Global | No | ||
| - Variable: ignore_builtin_innodb | Yes | Global | No | |||
| ignore-db-dir | Yes | Yes | ||||
| - Variable: ignore_db_dirs | ||||||
| init_connect | Yes | Yes | Yes | Global | Yes | |
| init-file | Yes | Yes | Global | No | ||
| - Variable: init_file | Yes | Global | No | |||
| init_slave | Yes | Yes | Yes | Global | Yes | |
| innodb | Yes | Yes | ||||
| innodb_adaptive_flushing | Yes | Yes | Yes | Global | Yes | |
| innodb_adaptive_hash_index | Yes | Yes | Yes | Global | Yes | |
| innodb_adaptive_max_sleep_delay | Yes | Yes | Yes | Global | Yes | |
| innodb_additional_mem_pool_size | Yes | Yes | Yes | Global | No | |
| innodb_analyze_is_persistent | Yes | Yes | Yes | Global | Yes | |
| innodb_autoextend_increment | Yes | Yes | Yes | Global | Yes | |
| innodb_autoinc_lock_mode | Yes | Yes | Yes | Global | No | |
| innodb_buffer_pool_dump_at_shutdown | Yes | Yes | Yes | Global | Yes | |
| innodb_buffer_pool_dump_now | Yes | Yes | Yes | Global | Yes | |
| Innodb_buffer_pool_dump_status | Yes | Global | No | |||
| innodb_buffer_pool_filename | Yes | Yes | Yes | Global | Yes | |
| innodb_buffer_pool_instances | Yes | Yes | Yes | Global | No | |
| innodb_buffer_pool_load_abort | Yes | Yes | Yes | Global | Yes | |
| innodb_buffer_pool_load_at_startup | Yes | Yes | Yes | Global | Yes | |
| innodb_buffer_pool_load_now | Yes | Yes | Yes | Global | Yes | |
| Innodb_buffer_pool_load_status | Yes | Global | No | |||
| Innodb_buffer_pool_pages_data | Yes | Global | No | |||
| Innodb_buffer_pool_pages_dirty | Yes | Global | No | |||
| Innodb_buffer_pool_pages_flushed | Yes | Global | No | |||
| Innodb_buffer_pool_pages_free | Yes | Global | No | |||
| Innodb_buffer_pool_pages_latched | Yes | Global | No | |||
| Innodb_buffer_pool_pages_misc | Yes | Global | No | |||
| Innodb_buffer_pool_pages_total | Yes | Global | No | |||
| Innodb_buffer_pool_read_ahead | Yes | Global | No | |||
| Innodb_buffer_pool_read_ahead_evicted | Yes | Global | No | |||
| Innodb_buffer_pool_read_requests | Yes | Global | No | |||
| Innodb_buffer_pool_reads | Yes | Global | No | |||
| innodb_buffer_pool_size | Yes | Yes | Yes | Global | No | |
| Innodb_buffer_pool_wait_free | Yes | Global | No | |||
| Innodb_buffer_pool_write_requests | Yes | Global | No | |||
| innodb_change_buffer_max_size | Yes | Yes | Yes | Global | Yes | |
| innodb_change_buffering | Yes | Yes | Yes | Global | Yes | |
| innodb_checksum_algorithm | Yes | Yes | Yes | Global | Yes | |
| innodb_checksums | Yes | Yes | Yes | Global | No | |
| innodb_commit_concurrency | Yes | Yes | Yes | Global | Yes | |
| innodb_concurrency_tickets | Yes | Yes | Yes | Global | Yes | |
| innodb_data_file_path | Yes | Yes | Yes | Global | No | |
| Innodb_data_fsyncs | Yes | Global | No | |||
| innodb_data_home_dir | Yes | Yes | Yes | Global | No | |
| Innodb_data_pending_fsyncs | Yes | Global | No | |||
| Innodb_data_pending_reads | Yes | Global | No | |||
| Innodb_data_pending_writes | Yes | Global | No | |||
| Innodb_data_read | Yes | Global | No | |||
| Innodb_data_reads | Yes | Global | No | |||
| Innodb_data_writes | Yes | Global | No | |||
| Innodb_data_written | Yes | Global | No | |||
| Innodb_dblwr_pages_written | Yes | Global | No | |||
| Innodb_dblwr_writes | Yes | Global | No | |||
| innodb_doublewrite | Yes | Yes | Yes | Global | No | |
| innodb_fast_shutdown | Yes | Yes | Yes | Global | Yes | |
| innodb_file_format | Yes | Yes | Yes | Global | Yes | |
| innodb_file_format_check | Yes | Yes | Yes | Global | No | |
| innodb_file_format_max | Yes | Yes | Yes | Global | Yes | |
| innodb_file_per_table | Yes | Yes | Yes | Global | Yes | |
| innodb_flush_log_at_trx_commit | Yes | Yes | Yes | Global | Yes | |
| innodb_flush_method | Yes | Yes | Yes | Global | No | |
| innodb_flush_neighbors | Yes | Yes | Yes | Global | Yes | |
| innodb_force_load_corrupted | Yes | Yes | Yes | Global | No | |
| innodb_force_recovery | Yes | Yes | Yes | Global | No | |
| innodb_ft_aux_table | Yes | Yes | Yes | Global | Yes | |
| innodb_ft_cache_size | Yes | Yes | Yes | Global | Yes | |
| innodb_ft_enable_stopword | Yes | Yes | Yes | Global | Yes | |
| innodb_ft_max_token_size | Yes | Yes | Yes | Global | Yes | |
| innodb_ft_min_token_size | Yes | Yes | Yes | Global | Yes | |
| innodb_ft_num_word_optimize | Yes | Yes | Yes | Global | Yes | |
| innodb_ft_server_stopword_table | Yes | Yes | Yes | Global | Yes | |
| innodb_ft_sort_pll_degree | Yes | Yes | Yes | Global | Yes | |
| innodb_ft_user_stopword_table | Yes | Yes | Yes | Global | Yes | |
| Innodb_have_atomic_builtins | Yes | Global | No | |||
| innodb_io_capacity | Yes | Yes | Yes | Global | Yes | |
| innodb_large_prefix | Yes | Yes | Yes | Global | Yes | |
| innodb_lock_wait_timeout | Yes | Yes | Yes | Both | Yes | |
| innodb_locks_unsafe_for_binlog | Yes | Yes | Yes | Global | No | |
| innodb_log_buffer_size | Yes | Yes | Yes | Global | No | |
| innodb_log_file_size | Yes | Yes | Yes | Global | No | |
| innodb_log_files_in_group | Yes | Yes | Yes | Global | No | |
| innodb_log_group_home_dir | Yes | Yes | Yes | Global | No | |
| Innodb_log_waits | Yes | Global | No | |||
| Innodb_log_write_requests | Yes | Global | No | |||
| Innodb_log_writes | Yes | Global | No | |||
| innodb_lru_scan_depth | Yes | Yes | Yes | Global | Yes | |
| innodb_max_dirty_pages_pct | Yes | Yes | Yes | Global | Yes | |
| innodb_max_purge_lag | Yes | Yes | Yes | Global | Yes | |
| innodb_mirrored_log_groups | Yes | Yes | Yes | Global | No | |
| innodb_monitor_disable | Yes | Yes | Yes | Global | Yes | |
| innodb_monitor_enable | Yes | Yes | Yes | Global | Yes | |
| innodb_monitor_reset | Yes | Yes | Yes | Global | Yes | |
| innodb_monitor_reset_all | Yes | Yes | Yes | Global | Yes | |
| Innodb_num_open_files | Yes | Global | No | |||
| innodb_old_blocks_pct | Yes | Yes | Yes | Global | Yes | |
| innodb_old_blocks_time | Yes | Yes | Yes | Global | Yes | |
| innodb_open_files | Yes | Yes | Yes | Global | No | |
| innodb_optimize_fulltext_only | Yes | Yes | Yes | Global | Yes | |
| Innodb_os_log_fsyncs | Yes | Global | No | |||
| Innodb_os_log_pending_fsyncs | Yes | Global | No | |||
| Innodb_os_log_pending_writes | Yes | Global | No | |||
| Innodb_os_log_written | Yes | Global | No | |||
| innodb_page_size | Yes | Yes | Yes | Global | No | |
| Innodb_page_size | Yes | Global | No | |||
| Innodb_pages_created | Yes | Global | No | |||
| Innodb_pages_read | Yes | Global | No | |||
| Innodb_pages_written | Yes | Global | No | |||
| innodb_print_all_deadlocks | Yes | Yes | Yes | Global | Yes | |
| innodb_purge_batch_size | Yes | Yes | Yes | Global | No | |
| innodb_purge_threads | Yes | Yes | Yes | Global | No | |
| innodb_random_read_ahead | Yes | Yes | Yes | Global | Yes | |
| innodb_read_ahead_threshold | Yes | Yes | Yes | Global | Yes | |
| innodb_read_io_threads | Yes | Yes | Yes | Global | No | |
| innodb_replication_delay | Yes | Yes | Yes | Global | Yes | |
| innodb_rollback_on_timeout | Yes | Yes | Yes | Global | No | |
| innodb_rollback_segments | Yes | Yes | Yes | Global | Yes | |
| Innodb_row_lock_current_waits | Yes | Global | No | |||
| Innodb_row_lock_time | Yes | Global | No | |||
| Innodb_row_lock_time_avg | Yes | Global | No | |||
| Innodb_row_lock_time_max | Yes | Global | No | |||
| Innodb_row_lock_waits | Yes | Global | No | |||
| Innodb_rows_deleted | Yes | Global | No | |||
| Innodb_rows_inserted | Yes | Global | No | |||
| Innodb_rows_read | Yes | Global | No | |||
| Innodb_rows_updated | Yes | Global | No | |||
| innodb_sort_buffer_size | Yes | Yes | Yes | Global | Yes | |
| innodb_spin_wait_delay | Yes | Yes | Yes | Global | Yes | |
| innodb_stats_method | Yes | Yes | Yes | Both | Yes | |
| innodb_stats_on_metadata | Yes | Yes | Yes | Global | Yes | |
| innodb_stats_persistent_sample_pages | Yes | Yes | Yes | Global | Yes | |
| innodb_stats_sample_pages | Yes | Yes | Yes | Global | Yes | |
| innodb_stats_transient_sample_pages | Yes | Yes | Yes | Global | Yes | |
| innodb-status-file | Yes | Yes | ||||
| innodb_strict_mode | Yes | Yes | Yes | Both | Yes | |
| innodb_support_xa | Yes | Yes | Yes | Both | Yes | |
| innodb_sync_array_size | Yes | Yes | Yes | Global | No | |
| innodb_sync_spin_loops | Yes | Yes | Yes | Global | Yes | |
| innodb_table_locks | Yes | Yes | Yes | Both | Yes | |
| innodb_thread_concurrency | Yes | Yes | Yes | Global | Yes | |
| innodb_thread_sleep_delay | Yes | Yes | Yes | Global | Yes | |
| Innodb_truncated_status_writes | Yes | Global | No | |||
| innodb_undo_directory | Yes | Yes | Yes | Global | Yes | |
| innodb_undo_logs | Yes | Yes | Yes | Global | Yes | |
| innodb_undo_tablespaces | Yes | Yes | Yes | Global | Yes | |
| innodb_use_native_aio | Yes | Yes | Yes | Global | No | |
| innodb_use_sys_malloc | Yes | Yes | Yes | Global | No | |
| innodb_version | Yes | Global | No | |||
| innodb_write_io_threads | Yes | Yes | Yes | Global | No | |
| insert_id | Yes | Session | Yes | |||
| install | Yes | |||||
| install-manual | Yes | |||||
| interactive_timeout | Yes | Yes | Yes | Both | Yes | |
| join_buffer_size | Yes | Yes | Yes | Both | Yes | |
| keep_files_on_create | Yes | Yes | Yes | Both | Yes | |
| Key_blocks_not_flushed | Yes | Global | No | |||
| Key_blocks_unused | Yes | Global | No | |||
| Key_blocks_used | Yes | Global | No | |||
| key_buffer_size | Yes | Yes | Yes | Global | Yes | |
| key_cache_age_threshold | Yes | Yes | Yes | Global | Yes | |
| key_cache_block_size | Yes | Yes | Yes | Global | Yes | |
| key_cache_division_limit | Yes | Yes | Yes | Global | Yes | |
| Key_read_requests | Yes | Global | No | |||
| Key_reads | Yes | Global | No | |||
| Key_write_requests | Yes | Global | No | |||
| Key_writes | Yes | Global | No | |||
| language | Yes | Yes | Yes | Global | No | |
| large_files_support | Yes | Global | No | |||
| large_page_size | Yes | Global | No | |||
| large-pages | Yes | Yes | Global | No | ||
| - Variable: large_pages | Yes | Global | No | |||
| last_insert_id | Yes | Session | Yes | |||
| Last_query_cost | Yes | Session | No | |||
| Last_query_partial_plans | Yes | Session | No | |||
| lc-messages | Yes | Yes | Both | Yes | ||
| - Variable: lc_messages | Yes | Both | Yes | |||
| lc-messages-dir | Yes | Yes | Global | No | ||
| - Variable: lc_messages_dir | Yes | Global | No | |||
| lc_time_names | Yes | Both | Yes | |||
| license | Yes | Global | No | |||
| local_infile | Yes | Global | Yes | |||
| local-infile | Yes | Yes | ||||
| - Variable: local_infile | ||||||
| lock_wait_timeout | Yes | Yes | Yes | Both | Yes | |
| locked_in_memory | Yes | Global | No | |||
| log | Yes | Yes | Yes | Global | Yes | |
| log_bin | Yes | Global | No | |||
| log-bin | Yes | Yes | Yes | Global | No | |
| log_bin_basename | Yes | Global | No | |||
| log-bin-index | Yes | Yes | ||||
| log-error | Yes | Yes | Global | No | ||
| - Variable: log_error | Yes | Global | No | |||
| log-isam | Yes | Yes | ||||
| log-output | Yes | Yes | Global | Yes | ||
| - Variable: log_output | Yes | Global | Yes | |||
| log-queries-not-using-indexes | Yes | Yes | Global | Yes | ||
| - Variable: log_queries_not_using_indexes | Yes | Global | Yes | |||
| log-raw | Yes | Yes | ||||
| log-short-format | Yes | Yes | ||||
| log-slave-updates | Yes | Yes | Global | No | ||
| - Variable: log_slave_updates | Yes | Global | No | |||
| log-slow-admin-statements | Yes | Yes | ||||
| log-slow-queries | Yes | Yes | Global | Yes | ||
| - Variable: log_slow_queries | Yes | Global | Yes | |||
| log-slow-slave-statements | Yes | Yes | ||||
| log-tc | Yes | Yes | ||||
| log-tc-size | Yes | Yes | ||||
| log_throttle_queries_not_using_indexes | Yes | Global | Yes | |||
| log-warnings | Yes | Yes | Global | Yes | ||
| - Variable: log_warnings | Yes | Global | Yes | |||
| long_query_time | Yes | Yes | Yes | Both | Yes | |
| low-priority-updates | Yes | Yes | Both | Yes | ||
| - Variable: low_priority_updates | Yes | Both | Yes | |||
| lower_case_file_system | Yes | Yes | Yes | Global | No | |
| lower_case_table_names | Yes | Yes | Yes | Global | No | |
| master-info-file | Yes | Yes | ||||
| master_info_repository | Yes | Global | No | |||
| master-info-repository | Yes | Yes | ||||
| - Variable: master_info_repository | ||||||
| master-retry-count | Yes | Yes | ||||
| master_verify_checksum | Yes | Global | Yes | |||
| master-verify-checksum | Yes | Yes | ||||
| - Variable: master_verify_checksum | ||||||
| max_allowed_packet | Yes | Yes | Yes | Global | Yes | |
| max_binlog_cache_size | Yes | Yes | Yes | Global | Yes | |
| max-binlog-dump-events | Yes | Yes | ||||
| max_binlog_size | Yes | Yes | Yes | Global | Yes | |
| max_binlog_stmt_cache_size | Yes | Yes | Yes | Global | Yes | |
| max_connect_errors | Yes | Yes | Yes | Global | Yes | |
| max_connections | Yes | Yes | Yes | Global | Yes | |
| max_delayed_threads | Yes | Yes | Yes | Both | Yes | |
| max_error_count | Yes | Yes | Yes | Both | Yes | |
| max_heap_table_size | Yes | Yes | Yes | Both | Yes | |
| max_insert_delayed_threads | Yes | Both | Yes | |||
| max_join_size | Yes | Yes | Yes | Both | Yes | |
| max_length_for_sort_data | Yes | Yes | Yes | Both | Yes | |
| max_prepared_stmt_count | Yes | Yes | Yes | Global | Yes | |
| max_relay_log_size | Yes | Yes | Yes | Global | Yes | |
| max_seeks_for_key | Yes | Yes | Yes | Both | Yes | |
| max_sort_length | Yes | Yes | Yes | Both | Yes | |
| max_sp_recursion_depth | Yes | Yes | Yes | Both | Yes | |
| max_tmp_tables | Yes | Yes | Yes | Both | Yes | |
| Max_used_connections | Yes | Global | No | |||
| max_user_connections | Yes | Yes | Yes | Both | Yes | |
| max_write_lock_count | Yes | Yes | Yes | Global | Yes | |
| memlock | Yes | Yes | Yes | Global | No | |
| metadata_locks_cache_size | Yes | Global | No | |||
| min-examined-row-limit | Yes | Yes | Yes | Both | Yes | |
| myisam-block-size | Yes | Yes | ||||
| myisam_data_pointer_size | Yes | Yes | Yes | Global | Yes | |
| myisam_max_sort_file_size | Yes | Yes | Yes | Global | Yes | |
| myisam_mmap_size | Yes | Yes | Yes | Global | No | |
| myisam-recover-options | Yes | Yes | ||||
| - Variable: myisam_recover_options | ||||||
| myisam_recover_options | Yes | Global | No | |||
| myisam_repair_threads | Yes | Yes | Yes | Both | Yes | |
| myisam_sort_buffer_size | Yes | Yes | Yes | Both | Yes | |
| myisam_stats_method | Yes | Yes | Yes | Both | Yes | |
| myisam_use_mmap | Yes | Yes | Yes | Global | Yes | |
| named_pipe | Yes | Global | No | |||
| Ndb_conflict_fn_max | Yes | Global | No | |||
| Ndb_conflict_fn_old | Yes | Global | No | |||
| Ndb_number_of_data_nodes | Yes | Global | No | |||
| net_buffer_length | Yes | Yes | Yes | Both | Yes | |
| net_read_timeout | Yes | Yes | Yes | Both | Yes | |
| net_retry_count | Yes | Yes | Yes | Both | Yes | |
| net_write_timeout | Yes | Yes | Yes | Both | Yes | |
| new | Yes | Yes | Yes | Both | Yes | |
| no-defaults | Yes | |||||
| Not_flushed_delayed_rows | Yes | Global | No | |||
| old | Yes | Yes | Yes | Global | No | |
| old-alter-table | Yes | Yes | Both | Yes | ||
| - Variable: old_alter_table | Yes | Both | Yes | |||
| old-passwords | Yes | Yes | Both | Yes | ||
| - Variable: old_passwords | Yes | Both | Yes | |||
| old-style-user-limits | Yes | Yes | ||||
| one-thread | Yes | Yes | ||||
| Open_files | Yes | Global | No | |||
| open-files-limit | Yes | Yes | Global | No | ||
| - Variable: open_files_limit | Yes | Global | No | |||
| Open_streams | Yes | Global | No | |||
| Open_table_definitions | Yes | Global | No | |||
| Open_tables | Yes | Both | No | |||
| Opened_files | Yes | Global | No | |||
| Opened_table_definitions | Yes | Both | No | |||
| Opened_tables | Yes | Both | No | |||
| optimizer_join_cache_level | Yes | Yes | Yes | Both | Yes | |
| optimizer_prune_level | Yes | Yes | Yes | Both | Yes | |
| optimizer_search_depth | Yes | Yes | Yes | Both | Yes | |
| optimizer_switch | Yes | Yes | Yes | Both | Yes | |
| optimizer_trace | Yes | Both | Yes | |||
| optimizer_trace_features | Yes | Both | Yes | |||
| optimizer_trace_limit | Yes | Both | Yes | |||
| optimizer_trace_max_mem_size | Yes | Both | Yes | |||
| optimizer_trace_offset | Yes | Both | Yes | |||
| partition | Yes | Yes | Global | No | ||
| - Variable: have_partitioning | Yes | Global | No | |||
| performance_schema | Yes | Yes | Yes | Global | No | |
| Performance_schema_accounts_lost | Yes | Global | No | |||
| performance_schema_accounts_size | Yes | Yes | Yes | Global | No | |
| Performance_schema_cond_classes_lost | Yes | Global | No | |||
| Performance_schema_cond_instances_lost | Yes | Global | No | |||
| performance_schema_consumer_xxx | Yes | Yes | ||||
| performance_schema_events_stages_history_long_size | Yes | Yes | Yes | Global | No | |
| performance_schema_events_stages_history_size | Yes | Yes | Yes | Global | No | |
| performance_schema_events_statements_history_long_size | Yes | Yes | Yes | Global | No | |
| performance_schema_events_statements_history_size | Yes | Yes | Yes | Global | No | |
| performance_schema_events_waits_history_long_size | Yes | Yes | Yes | Global | No | |
| performance_schema_events_waits_history_size | Yes | Yes | Yes | Global | No | |
| Performance_schema_file_classes_lost | Yes | Global | No | |||
| Performance_schema_file_handles_lost | Yes | Global | No | |||
| Performance_schema_file_instances_lost | Yes | Global | No | |||
| Performance_schema_hosts_lost | Yes | Global | No | |||
| performance_schema_hosts_size | Yes | Yes | Yes | Global | No | |
| performance_schema_instrument | Yes | Yes | ||||
| Performance_schema_locker_lost | Yes | Global | No | |||
| performance_schema_max_cond_classes | Yes | Yes | Yes | Global | No | |
| performance_schema_max_cond_instances | Yes | Yes | Yes | Global | No | |
| performance_schema_max_file_classes | Yes | Yes | Yes | Global | No | |
| performance_schema_max_file_handles | Yes | Yes | Yes | Global | No | |
| performance_schema_max_file_instances | Yes | Yes | Yes | Global | No | |
| performance_schema_max_mutex_classes | Yes | Yes | Yes | Global | No | |
| performance_schema_max_mutex_instances | Yes | Yes | Yes | Global | No | |
| performance_schema_max_rwlock_classes | Yes | Yes | Yes | Global | No | |
| performance_schema_max_rwlock_instances | Yes | Yes | Yes | Global | No | |
| performance_schema_max_socket_classes | Yes | Yes | Yes | Global | No | |
| performance_schema_max_socket_instances | Yes | Yes | Yes | Global | No | |
| performance_schema_max_stage_classes | Yes | Yes | Yes | Global | No | |
| performance_schema_max_statement_classes | Yes | Yes | Yes | Global | No | |
| performance_schema_max_table_handles | Yes | Yes | Yes | Global | No | |
| performance_schema_max_table_instances | Yes | Yes | Yes | Global | No | |
| performance_schema_max_thread_classes | Yes | Yes | Yes | Global | No | |
| performance_schema_max_thread_instances | Yes | Yes | Yes | Global | No | |
| Performance_schema_mutex_classes_lost | Yes | Global | No | |||
| Performance_schema_mutex_instances_lost | Yes | Global | No | |||
| Performance_schema_rwlock_classes_lost | Yes | Global | No | |||
| Performance_schema_rwlock_instances_lost | Yes | Global | No | |||
| performance_schema_setup_actors_size | Yes | Yes | Yes | Global | No | |
| performance_schema_setup_objects_size | Yes | Yes | Yes | Global | No | |
| Performance_schema_socket_classes_lost | Yes | Global | No | |||
| Performance_schema_socket_instances_lost | Yes | Global | No | |||
| Performance_schema_stage_classes_lost | Yes | Global | No | |||
| Performance_schema_statement_classes_lost | Yes | Global | No | |||
| Performance_schema_table_handles_lost | Yes | Global | No | |||
| Performance_schema_table_instances_lost | Yes | Global | No | |||
| Performance_schema_thread_classes_lost | Yes | Global | No | |||
| Performance_schema_thread_instances_lost | Yes | Global | No | |||
| Performance_schema_users_lost | Yes | Global | No | |||
| performance_schema_users_size | Yes | Yes | Yes | Global | No | |
| pid-file | Yes | Yes | Global | No | ||
| - Variable: pid_file | Yes | Global | No | |||
| plugin | Yes | Yes | ||||
| plugin_dir | Yes | Yes | Yes | Global | No | |
| plugin-load | Yes | Yes | ||||
| plugin-load-add | Yes | Yes | ||||
| port | Yes | Yes | Yes | Global | No | |
| port-open-timeout | Yes | Yes | ||||
| preload_buffer_size | Yes | Yes | Yes | Both | Yes | |
| Prepared_stmt_count | Yes | Global | No | |||
| print-defaults | Yes | |||||
| profiling | Yes | Both | Yes | |||
| profiling_history_size | Yes | Yes | Yes | Both | Yes | |
| protocol_version | Yes | Global | No | |||
| proxy_user | Yes | Session | No | |||
| pseudo_thread_id | Yes | Session | Yes | |||
| Qcache_free_blocks | Yes | Global | No | |||
| Qcache_free_memory | Yes | Global | No | |||
| Qcache_hits | Yes | Global | No | |||
| Qcache_inserts | Yes | Global | No | |||
| Qcache_lowmem_prunes | Yes | Global | No | |||
| Qcache_not_cached | Yes | Global | No | |||
| Qcache_queries_in_cache | Yes | Global | No | |||
| Qcache_total_blocks | Yes | Global | No | |||
| Queries | Yes | Both | No | |||
| query_alloc_block_size | Yes | Yes | Yes | Both | Yes | |
| query_cache_limit | Yes | Yes | Yes | Global | Yes | |
| query_cache_min_res_unit | Yes | Yes | Yes | Global | Yes | |
| query_cache_size | Yes | Yes | Yes | Global | Yes | |
| query_cache_type | Yes | Yes | Yes | Both | Yes | |
| query_cache_wlock_invalidate | Yes | Yes | Yes | Both | Yes | |
| query_prealloc_size | Yes | Yes | Yes | Both | Yes | |
| Questions | Yes | Both | No | |||
| rand_seed1 | Yes | Session | Yes | |||
| rand_seed2 | Yes | Session | Yes | |||
| range_alloc_block_size | Yes | Yes | Yes | Both | Yes | |
| read_buffer_size | Yes | Yes | Yes | Both | Yes | |
| read_only | Yes | Yes | Yes | Global | Yes | |
| read_rnd_buffer_size | Yes | Yes | Yes | Both | Yes | |
| relay-log | Yes | Yes | ||||
| relay_log_basename | Yes | Global | No | |||
| relay-log-index | Yes | Yes | Both | No | ||
| - Variable: relay_log_index | Yes | Both | No | |||
| relay_log_index | Yes | Yes | Yes | Global | No | |
| relay-log-info-file | Yes | Yes | ||||
| - Variable: relay_log_info_file | ||||||
| relay_log_info_file | Yes | Yes | Yes | Global | No | |
| relay-log-info-repository | Yes | Yes | ||||
| - Variable: relay_log_info_repository | ||||||
| relay_log_info_repository | Yes | Global | No | |||
| relay_log_purge | Yes | Yes | Yes | Global | Yes | |
| relay_log_recovery | Yes | Yes | Yes | Global | Yes | |
| relay_log_space_limit | Yes | Yes | Yes | Global | No | |
| remove | Yes | |||||
| replicate-do-db | Yes | Yes | ||||
| replicate-do-table | Yes | Yes | ||||
| replicate-ignore-db | Yes | Yes | ||||
| replicate-ignore-table | Yes | Yes | ||||
| replicate-rewrite-db | Yes | Yes | ||||
| replicate-same-server-id | Yes | Yes | ||||
| replicate-wild-do-table | Yes | Yes | ||||
| replicate-wild-ignore-table | Yes | Yes | ||||
| report-host | Yes | Yes | Global | No | ||
| - Variable: report_host | Yes | Global | No | |||
| report-password | Yes | Yes | Global | No | ||
| - Variable: report_password | Yes | Global | No | |||
| report-port | Yes | Yes | Global | No | ||
| - Variable: report_port | Yes | Global | No | |||
| report-user | Yes | Yes | Global | No | ||
| - Variable: report_user | Yes | Global | No | |||
| Rpl_semi_sync_master_clients | Yes | Global | No | |||
| rpl_semi_sync_master_enabled | Yes | Global | Yes | |||
| Rpl_semi_sync_master_net_avg_wait_time | Yes | Global | No | |||
| Rpl_semi_sync_master_net_wait_time | Yes | Global | No | |||
| Rpl_semi_sync_master_net_waits | Yes | Global | No | |||
| Rpl_semi_sync_master_no_times | Yes | Global | No | |||
| Rpl_semi_sync_master_no_tx | Yes | Global | No | |||
| Rpl_semi_sync_master_status | Yes | Global | No | |||
| Rpl_semi_sync_master_timefunc_failures | Yes | Global | No | |||
| rpl_semi_sync_master_timeout | Yes | Global | Yes | |||
| rpl_semi_sync_master_trace_level | Yes | Global | Yes | |||
| Rpl_semi_sync_master_tx_avg_wait_time | Yes | Global | No | |||
| Rpl_semi_sync_master_tx_wait_time | Yes | Global | No | |||
| Rpl_semi_sync_master_tx_waits | Yes | Global | No | |||
| rpl_semi_sync_master_wait_no_slave | Yes | Global | Yes | |||
| Rpl_semi_sync_master_wait_pos_backtraverse | Yes | Global | No | |||
| Rpl_semi_sync_master_wait_sessions | Yes | Global | No | |||
| Rpl_semi_sync_master_yes_tx | Yes | Global | No | |||
| rpl_semi_sync_slave_enabled | Yes | Global | Yes | |||
| Rpl_semi_sync_slave_status | Yes | Global | No | |||
| rpl_semi_sync_slave_trace_level | Yes | Global | Yes | |||
| safe-mode | Yes | Yes | ||||
| safe-user-create | Yes | Yes | ||||
| secure-auth | Yes | Yes | Global | Yes | ||
| - Variable: secure_auth | Yes | Global | Yes | |||
| secure-file-priv | Yes | Yes | Global | No | ||
| - Variable: secure_file_priv | Yes | Global | No | |||
| Select_full_join | Yes | Both | No | |||
| Select_full_range_join | Yes | Both | No | |||
| Select_range | Yes | Both | No | |||
| Select_range_check | Yes | Both | No | |||
| Select_scan | Yes | Both | No | |||
| server-id | Yes | Yes | Global | Yes | ||
| - Variable: server_id | Yes | Global | Yes | |||
| server_uuid | Yes | Global | No | |||
| shared_memory | Yes | Global | No | |||
| shared_memory_base_name | Yes | Global | No | |||
| show-slave-auth-info | Yes | Yes | ||||
| skip-character-set-client-handshake | Yes | Yes | ||||
| skip-concurrent-insert | Yes | Yes | ||||
| - Variable: concurrent_insert | ||||||
| skip-event-scheduler | Yes | Yes | ||||
| skip-external-locking | Yes | Yes | Global | No | ||
| - Variable: skip_external_locking | Yes | Global | No | |||
| skip-grant-tables | Yes | Yes | ||||
| skip-host-cache | Yes | Yes | ||||
| skip-log-warnings | Yes | |||||
| skip-name-resolve | Yes | Yes | Global | No | ||
| - Variable: skip_name_resolve | Yes | Global | No | |||
| skip-networking | Yes | Yes | Global | No | ||
| - Variable: skip_networking | Yes | Global | No | |||
| skip-new | Yes | Yes | ||||
| skip-partition | Yes | Yes | ||||
| skip-show-database | Yes | Yes | Global | No | ||
| - Variable: skip_show_database | Yes | Global | No | |||
| skip-slave-start | Yes | Yes | ||||
| skip-ssl | Yes | Yes | ||||
| skip-stack-trace | Yes | Yes | ||||
| skip-symbolic-links | Yes | |||||
| skip-thread-priority | Yes | Yes | ||||
| slave_compressed_protocol | Yes | Yes | Yes | Global | Yes | |
| slave_exec_mode | Yes | Global | Yes | |||
| Slave_heartbeat_period | Yes | Global | No | |||
| Slave_last_heartbeat | Yes | Global | No | |||
| slave-load-tmpdir | Yes | Yes | Global | No | ||
| - Variable: slave_load_tmpdir | Yes | Global | No | |||
| slave-net-timeout | Yes | Yes | Global | Yes | ||
| - Variable: slave_net_timeout | Yes | Global | Yes | |||
| Slave_open_temp_tables | Yes | Global | No | |||
| slave_parallel_workers | Yes | Global | Yes | |||
| slave-parallel-workers | Yes | Yes | ||||
| - Variable: slave_parallel_workers | ||||||
| Slave_received_heartbeats | Yes | Global | No | |||
| Slave_retried_transactions | Yes | Global | No | |||
| Slave_running | Yes | Global | No | |||
| slave-skip-errors | Yes | Yes | Global | No | ||
| - Variable: slave_skip_errors | Yes | Global | No | |||
| slave_sql_verify_checksum | Yes | Global | Yes | |||
| slave-sql-verify-checksum | Yes | Yes | ||||
| slave_transaction_retries | Yes | Yes | Yes | Global | Yes | |
| slave_type_conversions | Yes | Yes | Yes | Global | No | |
| Slow_launch_threads | Yes | Both | No | |||
| slow_launch_time | Yes | Yes | Yes | Global | Yes | |
| Slow_queries | Yes | Both | No | |||
| slow-query-log | Yes | Yes | Global | Yes | ||
| - Variable: slow_query_log | Yes | Global | Yes | |||
| slow_query_log_file | Yes | Yes | Yes | Global | Yes | |
| slow-start-timeout | Yes | Yes | ||||
| socket | Yes | Yes | Yes | Global | No | |
| sort_buffer_size | Yes | Yes | Yes | Both | Yes | |
| Sort_merge_passes | Yes | Both | No | |||
| Sort_range | Yes | Both | No | |||
| Sort_rows | Yes | Both | No | |||
| Sort_scan | Yes | Both | No | |||
| sporadic-binlog-dump-fail | Yes | Yes | ||||
| sql_auto_is_null | Yes | Both | Yes | |||
| sql_big_selects | Yes | Both | Yes | |||
| sql_big_tables | Yes | Both | Yes | |||
| sql_buffer_result | Yes | Both | Yes | |||
| sql_log_bin | Yes | Both | Yes | |||
| sql_log_off | Yes | Both | Yes | |||
| sql_low_priority_updates | Yes | Both | Yes | |||
| sql_max_join_size | Yes | Both | Yes | |||
| sql-mode | Yes | Yes | Both | Yes | ||
| - Variable: sql_mode | Yes | Both | Yes | |||
| sql_notes | Yes | Both | Yes | |||
| sql_quote_show_create | Yes | Both | Yes | |||
| sql_safe_updates | Yes | Both | Yes | |||
| sql_select_limit | Yes | Both | Yes | |||
| sql_slave_skip_counter | Yes | Global | Yes | |||
| sql_warnings | Yes | Both | Yes | |||
| ssl | Yes | Yes | ||||
| Ssl_accept_renegotiates | Yes | Global | No | |||
| Ssl_accepts | Yes | Global | No | |||
| ssl-ca | Yes | Yes | Global | No | ||
| - Variable: ssl_ca | Yes | Global | No | |||
| Ssl_callback_cache_hits | Yes | Global | No | |||
| ssl-capath | Yes | Yes | Global | No | ||
| - Variable: ssl_capath | Yes | Global | No | |||
| ssl-cert | Yes | Yes | Global | No | ||
| - Variable: ssl_cert | Yes | Global | No | |||
| ssl-cipher | Yes | Yes | Global | No | ||
| - Variable: ssl_cipher | Yes | Global | No | |||
| Ssl_cipher | Yes | Both | No | |||
| Ssl_cipher_list | Yes | Both | No | |||
| Ssl_client_connects | Yes | Global | No | |||
| Ssl_connect_renegotiates | Yes | Global | No | |||
| ssl-crl | Yes | Yes | Global | No | ||
| - Variable: ssl_crl | Yes | Global | No | |||
| ssl-crlpath | Yes | Yes | Global | No | ||
| - Variable: ssl_crlpath | Yes | Global | No | |||
| Ssl_ctx_verify_depth | Yes | Global | No | |||
| Ssl_ctx_verify_mode | Yes | Global | No | |||
| Ssl_default_timeout | Yes | Both | No | |||
| Ssl_finished_accepts | Yes | Global | No | |||
| Ssl_finished_connects | Yes | Global | No | |||
| ssl-key | Yes | Yes | Global | No | ||
| - Variable: ssl_key | Yes | Global | No | |||
| Ssl_server_not_after | Yes | Both | No | |||
| Ssl_server_not_before | Yes | Both | No | |||
| Ssl_session_cache_hits | Yes | Global | No | |||
| Ssl_session_cache_misses | Yes | Global | No | |||
| Ssl_session_cache_mode | Yes | Global | No | |||
| Ssl_session_cache_overflows | Yes | Global | No | |||
| Ssl_session_cache_size | Yes | Global | No | |||
| Ssl_session_cache_timeouts | Yes | Global | No | |||
| Ssl_sessions_reused | Yes | Both | No | |||
| Ssl_used_session_cache_entries | Yes | Global | No | |||
| Ssl_verify_depth | Yes | Both | No | |||
| Ssl_verify_mode | Yes | Both | No | |||
| ssl-verify-server-cert | Yes | Yes | ||||
| Ssl_version | Yes | Both | No | |||
| standalone | Yes | Yes | ||||
| storage_engine | Yes | Both | Yes | |||
| symbolic-links | Yes | Yes | ||||
| sync_binlog | Yes | Yes | Yes | Global | Yes | |
| sync_frm | Yes | Yes | Yes | Global | Yes | |
| sync_master_info | Yes | Yes | Yes | Global | Yes | |
| sync_relay_log | Yes | Yes | Yes | Global | Yes | |
| sync_relay_log_info | Yes | Yes | Yes | Global | Yes | |
| sysdate-is-now | Yes | Yes | ||||
| system_time_zone | Yes | Global | No | |||
| table_definition_cache | Yes | Yes | Yes | Global | Yes | |
| Table_locks_immediate | Yes | Global | No | |||
| Table_locks_waited | Yes | Global | No | |||
| table_open_cache | Yes | Yes | Yes | Global | Yes | |
| tc-heuristic-recover | Yes | Yes | ||||
| Tc_log_max_pages_used | Yes | Global | No | |||
| Tc_log_page_size | Yes | Global | No | |||
| Tc_log_page_waits | Yes | Global | No | |||
| temp-pool | Yes | Yes | ||||
| thread_cache_size | Yes | Yes | Yes | Global | Yes | |
| thread_concurrency | Yes | Yes | Yes | Global | No | |
| thread_handling | Yes | Yes | Yes | Global | No | |
| thread_stack | Yes | Yes | Yes | Global | No | |
| Threads_cached | Yes | Global | No | |||
| Threads_connected | Yes | Global | No | |||
| Threads_created | Yes | Global | No | |||
| Threads_running | Yes | Global | No | |||
| time_format | Yes | Global | No | |||
| time_zone | Yes | Yes | Yes | Both | Yes | |
| timed_mutexes | Yes | Yes | Yes | Global | Yes | |
| timestamp | Yes | Session | Yes | |||
| tmp_table_size | Yes | Yes | Yes | Both | Yes | |
| tmpdir | Yes | Yes | Yes | Global | No | |
| transaction_alloc_block_size | Yes | Yes | Yes | Both | Yes | |
| transaction-isolation | Yes | Yes | ||||
| - Variable: tx_isolation | ||||||
| transaction_prealloc_size | Yes | Yes | Yes | Both | Yes | |
| transaction-read-only | Yes | Yes | ||||
| - Variable: tx_read_only | ||||||
| tx_isolation | Yes | Both | Yes | |||
| tx_read_only | Yes | Both | Yes | |||
| unique_checks | Yes | Both | Yes | |||
| updatable_views_with_limit | Yes | Yes | Yes | Both | Yes | |
| Uptime | Yes | Global | No | |||
| Uptime_since_flush_status | Yes | Global | No | |||
| user | Yes | Yes | ||||
| verbose | Yes | Yes | ||||
| version | Yes | Global | No | |||
| version_comment | Yes | Global | No | |||
| version_compile_machine | Yes | Global | No | |||
| version_compile_os | Yes | Global | No | |||
| wait_timeout | Yes | Yes | Yes | Both | Yes | |
| warning_count | Yes | Session | No | |||
|
[a] This option is dynamic, but only the server should set this information. You should not set the value of this variable manually. [b] This option is dynamic, but only the server should set this information. You should not set the value of this variable manually. | ||||||
Server Command Options
When you start the mysqld server, you can specify program options using any of the methods described in , "Specifying Program Options". The most common methods are to provide options in an option file or on the command line. However, in most cases it is desirable to make sure that the server uses the same options each time it runs. The best way to ensure this is to list them in an option file. See , "Using Option Files".
mysqld reads options from the [mysqld] and [server] groups. mysqld_safe reads options from the [mysqld], [server], [mysqld_safe], and [safe_mysqld] groups. mysql.server reads options from the [mysqld] and [mysql.server] groups.
An embedded MariaDB server usually reads options from the [server], [embedded], and [ groups, where xxxxx_SERVER]xxxxx is the name of the application into which the server is embedded.
mysqld accepts many command options. For a brief summary, execute mysqld --help. To see the full list, use mysqld --verbose --help.
The following list shows some of the most common server options. Additional options are described in other sections:
- Options that affect security: See , "Security-Related mysqld Options".
- SSL-related options: See , "SSL Command Options".
- Binary log control options: See , "The Binary Log".
- Replication-related options: See , "Replication and Binary Logging Options and Variables".
- Options for loading plugins such as pluggable storage engines: See , "Installing and Uninstalling Plugins".
- Options specific to particular storage engines: See , "
MyISAMStartup Options", and , "InnoDBStartup Options and System Variables".
You can also set the values of server system variables by using variable names as options, as described at the end of this section.
Some options control the size of buffers or caches. For a given buffer, the server might need to allocate internal data structures. These structures typically are allocated from the total memory allocated to the buffer, and the amount of space required might be platform dependent. This means that when you assign a value to an option that controls a buffer size, the amount of space actually available might differ from the value assigned. In some cases, the amount might be less than the value assigned. It is also possible that the server will adjust a value upward. For example, if you assign a value of 0 to an option for which the minimal value is 1024, the server will set the value to 1024.
Values for buffer sizes, lengths, and stack sizes are given in bytes unless otherwise specified.
Some options take file name values. Unless otherwise specified, the default file location is the data directory if the value is a relative path name. To specify the location explicitly, use an absolute path name. Suppose that the data directory is /var/mysql/data. If a file-valued option is given as a relative path name, it will be located under /var/mysql/data. If the value is an absolute path name, its location is as given by the path name.
--help,-?
Command-Line Format -?--helpOption-File Format helpDisplay a short help message and exit. Use both the
--verboseand--helpoptions to see the full message.--allow-suspicious-udfs
Command-Line Format --allow-suspicious-udfsOption-File Format allow-suspicious-udfsPermitted Values Type booleanDefault FALSEThis option controls whether user-defined functions that have only an
xxxsymbol for the main function can be loaded. By default, the option is off and only UDFs that have at least one auxiliary symbol can be loaded; this prevents attempts at loading functions from shared object files other than those containing legitimate UDFs. See , "User-Defined Function Security Precautions".--ansi
Command-Line Format --ansi-aOption-File Format ansiUse standard (ANSI) SQL syntax instead of MariaDB syntax. For more precise control over the server SQL mode, use the
--sql-modeoption instead. See , "Running MariaDB in ANSI Mode", and , "Server SQL Modes".--basedir=,path-bpath
Command-Line Format --basedir=path-bOption-File Format basedirOption Sets Variable Yes, basedirVariable Name basedirVariable Scope Global Dynamic Variable No Permitted Values Type file nameThe path to the MariaDB installation directory. All paths are usually resolved relative to this directory.
--big-tables
Version Removed 5.6.1 Command-Line Format --big-tablesOption-File Format big-tablesOption Sets Variable Yes, big_tablesVariable Name big-tablesVariable Scope Global, Session Dynamic Variable Yes Permitted Values Type booleanEnable large result sets by saving all temporary sets in files. This option prevents most "table full" errors, but also slows down queries for which in-memory tables would suffice. Since MariaDB 3.23.2, the server is able to handle large result sets automatically by using memory for small temporary tables and switching to disk tables where necessary.
--bind-address=IP
Command-Line Format --bind-address=nameOption-File Format bind-address=nameVariable Name bind-addressVariable Scope Global Dynamic Variable No Permitted Values Type stringDefault 0.0.0.0Range 255.255.255.255The IP address to bind to. Only one address can be selected. If this option is specified multiple times, the last address given is used.
If no address or
0.0.0.0is specified, the server listens on all interfaces.--binlog-format={ROW|STATEMENT|MIXED}
Command-Line Format --binlog-format=formatOption-File Format binlog-format=formatOption Sets Variable Yes, binlog_formatVariable Name binlog_formatVariable Scope Global, Session Dynamic Variable Yes Permitted Values Type enumerationDefault STATEMENTValid Values ROWSTATEMENTMIXEDSpecify whether to use row-based, statement-based, or mixed replication. Statement-based is the default in MariaDB 5.6. See , "Replication Formats".
In MariaDB 5.6, setting the binary logging format without enabling binary logging sets the
binlog_formatglobal system variable and logs a warning.--bootstrap
Command-Line Format --bootstrapOption-File Format bootstrapThis option is used by the mysql_install_db script to create the MariaDB privilege tables without having to start a full MariaDB server.
This option is unavailable if MariaDB was configured with the
DISABLE-GRANT-OPTIONScompiler flag. See , "MySQL Source-Configuration Options".--character-sets-dir=path
Command-Line Format --character-sets-dir=pathOption-File Format character-sets-dir=pathOption Sets Variable Yes, character_sets_dirVariable Name character-sets-dirVariable Scope Global Dynamic Variable No Permitted Values Type directory nameThe directory where character sets are installed. See , "Character Set Configuration".
--character-set-client-handshake
Command-Line Format --character-set-client-handshakeOption-File Format character-set-client-handshakePermitted Values Type booleanDefault TRUEDo not ignore character set information sent by the client. To ignore client information and use the default server character set, use
--skip-character-set-client-handshake; this makes MariaDB behave like MariaDB 4.0.--character-set-filesystem=charset_name
Command-Line Format --character-set-filesystem=nameOption-File Format character-set-filesystemOption Sets Variable Yes, character_set_filesystemVariable Name character_set_filesystemVariable Scope Global, Session Dynamic Variable Yes Permitted Values Type stringThe file system character set. This option sets the
character_set_filesystemsystem variable.--character-set-server=,charset_name-Ccharset_name
Command-Line Format --character-set-serverOption-File Format character-set-serverOption Sets Variable Yes, character_set_serverVariable Name character_set_serverVariable Scope Global, Session Dynamic Variable Yes Permitted Values Type stringUse
charset_nameas the default server character set. See , "Character Set Configuration". If you use this option to specify a nondefault character set, you should also use--collation-serverto specify the collation.--chroot=,path-rpath
Command-Line Format --chroot=name-r nameOption-File Format chrootPermitted Values Type file namePut the mysqld server in a closed environment during startup by using the
chroot()system call. This is a recommended security measure. Note that use of this option somewhat limitsLOAD DATA INFILEandSELECT ... INTO OUTFILE.--collation-server=collation_name
Command-Line Format --collation-serverOption-File Format collation-serverOption Sets Variable Yes, collation_serverVariable Name collation_serverVariable Scope Global, Session Dynamic Variable Yes Permitted Values Type stringUse
collation_nameas the default server collation. See , "Character Set Configuration".--console
Command-Line Format --consoleOption-File Format consolePlatform Specific windows (Windows only.) Write error log messages to
stderrandstdouteven if--log-erroris specified. mysqld does not close the console window if this option is used.--core-file
Command-Line Format --core-fileOption-File Format core-filePermitted Values Type booleanDefault FALSEWrite a core file if mysqld dies. The name and location of the core file is system dependent. On Linux, a core file named
core.is written to the current working directory of the process, which for mysqld is the data directory.pidpidrepresents the process ID of the server process. On Mac OS X, a core file namedcore.is written to thepid/coresdirectory. On Solaris, use the coreadm command to specify where to write the core file and how to name it.For some systems, to get a core file you must also specify the
--core-file-sizeoption to mysqld_safe. See , "mysqld_safe - MariaDB Server Startup Script". On some systems, such as Solaris, you do not get a core file if you are also using the--useroption. There might be additional restrictions or limitations. For example, it might be necessary to execute ulimit -c unlimited before starting the server. Consult your system documentation.--datadir=,path-hpath
Command-Line Format --datadir=path-hOption-File Format datadirOption Sets Variable Yes, datadirVariable Name datadirVariable Scope Global Dynamic Variable No Permitted Values Type file nameThe path to the data directory.
--debug[=,debug_options]-# [debug_options]
Command-Line Format --debug[=debug_options]Option-File Format debugVariable Name debugVariable Scope Global, Session Dynamic Variable Yes Permitted Values Type stringDefault 'd:t:o,/tmp/mysqld.trace'If MariaDB is configured with
-DWITH-DEBUG=1, you can use this option to get a trace file of what mysqld is doing. A typicaldebug_optionsstring is'd:t:o,. The default isfile_name''d:t:i:o,mysqld.trace'. See MySQL Internals: Porting.Using
-DWITH-DEBUG=1to configure MariaDB with debugging support enables you to use the--debug='d,parser_debug'option when you start the server. This causes the Bison parser that is used to process SQL statements to dump a parser trace to the server's standard error output. Typically, this output is written to the error log.This option may be given multiple times. Values that begin with
+or-are added to or subtracted from the previous value. For example,--debug=T--debug=+Psets the value toP:T.--debug-sync-timeout[=N]
Command-Line Format --debug-sync-timeout[=#]Option-File Format debug-sync-timeoutPermitted Values Type numericControls whether the Debug Sync facility for testing and debugging is enabled. Use of Debug Sync requires that MariaDB be configured with the
-DENABLE_DEBUG_SYNC=1option (see , "MySQL Source-Configuration Options"). If Debug Sync is not compiled in, this option is not available. The option value is a timeout in seconds. The default value is 0, which disables Debug Sync. To enable it, specify a value greater than 0; this value also becomes the default timeout for individual synchronization points. If the option is given without a value, the timeout is set to 300 seconds.For a description of the Debug Sync facility and how to use synchronization points, see MySQL Internals: Test Synchronization.
--default-storage-engine=type
Command-Line Format --default-storage-engine=nameOption-File Format default-storage-engineOption Sets Variable Yes, default_storage_engineVariable Name default_storage_engineVariable Scope Global, Session Dynamic Variable Yes Permitted Values Type enumerationDefault InnoDBSet the default storage engine for tables. See , Storage Engines. As of MariaDB 5.6.3, this option sets the storage engine for permanent tables only. To set the storage engine for
TEMPORARYtables, set thedefault_tmp_storage_enginesystem variable.If you disable the default storage engine at server startup, you must set the default engine for both permanent and
TEMPORARYtables to a different engine or the server will not start.--default-time-zone=timezone
Command-Line Format --default-time-zone=nameOption-File Format default-time-zonePermitted Values Type stringSet the default server time zone. This option sets the global
time_zonesystem variable. If this option is not given, the default time zone is the same as the system time zone (given by the value of thesystem_time_zonesystem variable.--delay-key-write[={OFF|ON|ALL}]
Command-Line Format --delay-key-write[=name]Option-File Format delay-key-writeOption Sets Variable Yes, delay_key_writeVariable Name delay-key-writeVariable Scope Global Dynamic Variable Yes Permitted Values Type enumerationDefault ONValid Values ONOFFALLSpecify how to use delayed key writes. Delayed key writing causes key buffers not to be flushed between writes for
MyISAMtables.OFFdisables delayed key writes.ONenables delayed key writes for those tables that were created with theDELAY_KEY_WRITEoption.ALLdelays key writes for allMyISAMtables. See , "Tuning Server Parameters", and , "MyISAMStartup Options".NoteIf you set this variable to
ALL, you should not useMyISAMtables from within another program (such as another MariaDB server or myisamchk) when the tables are in use. Doing so leads to index corruption.--des-key-file=file_name
Command-Line Format --des-key-file=file_nameOption-File Format des-key-file=file_nameRead the default DES keys from this file. These keys are used by the
DES-ENCRYPT()andDES_DECRYPT()functions.--enable-named-pipe
Command-Line Format --enable-named-pipeOption-File Format enable-named-pipeOption Sets Variable Yes, named_pipePlatform Specific windows Enable support for named pipes. This option applies only on Windows.
--engine-condition-pushdown={ON|OFF}
Version Removed 5.6.1 Command-Line Format --engine-condition-pushdownOption-File Format engine-condition-pushdownOption Sets Variable Yes, engine_condition_pushdownVariable Name engine_condition_pushdownVariable Scope Global, Session Dynamic Variable Yes Deprecated 5.5.3, by optimizer_switchPermitted Values Type booleanDefault ONSets the
engine-condition-pushdownsystem variable. For more information, see , "Engine Condition Pushdown Optimization".--event-scheduler[=value]
Command-Line Format --event-scheduler[=value]Option-File Format event-schedulerOption Sets Variable Yes, event_schedulerVariable Name event_schedulerVariable Scope Global Dynamic Variable Yes Permitted Values Type enumerationDefault OFFValid Values ONOFFDISABLEDEnable or disable, and start or stop, the event scheduler.
For detailed information, see The
--event-schedulerOption.--exit-info[=,flags]-T [flags]
Command-Line Format --exit-info[=flags]-T [flags]Option-File Format exit-infoPermitted Values Type numericThis is a bit mask of different flags that you can use for debugging the mysqld server. Do not use this option unless you know exactly what it does!
--external-locking
Command-Line Format --external-lockingOption-File Format external-lockingOption Sets Variable Yes, skip_external_lockingDisabled by skip-external-lockingPermitted Values Type booleanDefault FALSEEnable external locking (system locking), which is disabled by default as of MariaDB 4.0. Note that if you use this option on a system on which
lockddoes not fully work (such as Linux), it is easy for mysqld to deadlock.External locking affects only
MyISAMtable access. For more information, including conditions under which it can and cannot be used, see , "External Locking".--flush
Command-Line Format --flushOption-File Format flushVariable Name flushVariable Scope Global Dynamic Variable Yes Permitted Values Type booleanDefault OFFFlush (synchronize) all changes to disk after each SQL statement. Normally, MariaDB does a write of all changes to disk only after each SQL statement and lets the operating system handle the synchronizing to disk. See "What to Do If MariaDB Keeps Crashing".
--gdb
Command-Line Format --gdbOption-File Format gdbPermitted Values Type booleanDefault FALSEInstall an interrupt handler for
SIGINT(needed to stop mysqld with^Cto set breakpoints) and disable stack tracing and core file handling. See MySQL Internals: Porting.--general-log[={0|1}]
Command-Line Format --general-logOption-File Format general-logOption Sets Variable Yes, general_logVariable Name general_logVariable Scope Global Dynamic Variable Yes Permitted Values Type booleanDefault OFFSpecify the initial general query log state. With no argument or an argument of 1, the
--general-logoption enables the log. If omitted or given with an argument of 0, the option disables the log.--ignore-db-dir=dir_name
Version Introduced 5.6.3 Command-Line Format --ignore-db-dirOption-File Format ignore-db-dirOption Sets Variable Yes, ignore_db_dirsPermitted Values Type directory nameThis option tells the server to ignore the given directory name for purposes of the
SHOW DATABASESstatement orINFORMATION_SCHEMAtables. For example, if a MariaDB configuration locates the data directory at the root of a file system on Unix, the system might create alost+founddirectory there that the server should ignore. Starting the server with--ignore-db-dir=lost+foundcauses that name not to be listed as a database.To specify more than one name, use this option multiple times, once for each name. Specifying the option with an empty value (that is, as
--ignore-db-dir=) resets the directory list to the empty list.Instances of this option given at server startup are used to set the
ignore_db_dirssystem variable.This option was added in MariaDB 5.6.3.
--init-file=file_name
Command-Line Format --init-file=file_nameOption-File Format init-file=file_nameOption Sets Variable Yes, init_fileVariable Name init_fileVariable Scope Global Dynamic Variable No Permitted Values Type file nameRead SQL statements from this file at startup. Each statement must be on a single line and should not include comments.
This option is unavailable if MariaDB was configured with the
DISABLE-GRANT-OPTIONScompiler flag. See , "MySQL Source-Configuration Options".--innodb-xxx
The
InnoDBoptions are listed in , "InnoDBStartup Options and System Variables".--install [service_name]
Command-Line Format --install [service_name](Windows only) Install the server as a Windows service that starts automatically during Windows startup. The default service name is
MariaDBif noservice_namevalue is given. For more information, see , "Starting MariaDB as a Windows Service".--install-manual [service_name]
Command-Line Format --install-manual [service_name](Windows only) Install the server as a Windows service that must be started manually. It does not start automatically during Windows startup. The default service name is
MariaDBif noservice_namevalue is given. For more information, see , "Starting MariaDB as a Windows Service".--language=lang_name, -Llang_name
Version Deprecated 5.6.1 Command-Line Format --language=name-LOption-File Format languageOption Sets Variable Yes, languageVariable Name languageVariable Scope Global Dynamic Variable No Deprecated 5.6.1 Permitted Values Type directory nameDefault /usr/local/mysql/share/mysql/english/The language to use for error messages.
lang_namecan be given as the language name or as the full path name to the directory where the language files are installed. See , "Setting the Error Message Language".In MariaDB 5.6,
--lc-messages-dirand--lc-messagesshould be used rather than--language, which is deprecated as of MariaDB 5.6.1 and handled as an alias for--lc-messages-dir. The--languageoption will be removed in a future MariaDB release.--large-pages
Command-Line Format --large-pagesOption-File Format large-pagesOption Sets Variable Yes, large_pagesVariable Name large_pagesVariable Scope Global Dynamic Variable No Platform Specific linux Permitted Values Type (linux) booleanDefault FALSESome hardware/operating system architectures support memory pages greater than the default (usually 4KB). The actual implementation of this support depends on the underlying hardware and operating system. Applications that perform a lot of memory accesses may obtain performance improvements by using large pages due to reduced Translation Lookaside Buffer (TLB) misses.
MySQL 5.6 supports the Linux implementation of large page support (which is called HugeTLB in Linux). See , "Enabling Large Page Support". For Solaris support of large pages, see the description of the
--super-large-pagesoption.--large-pagesis disabled by default.--lc-messages=locale_name
Command-Line Format --lc-messages=nameOption-File Format lc-messagesOption Sets Variable Yes, lc_messagesVariable Name lc-messagesVariable Scope Global, Session Dynamic Variable Yes Permitted Values Type stringThe locale to use for error messages. The server converts the argument to a language name and combines it with the value of the
--lc-messages-dirto produce the location for the error message file. See , "Setting the Error Message Language".--lc-messages-dir=path
Command-Line Format --lc-messages-dir=pathOption-File Format lc-messages-dirOption Sets Variable Yes, lc_messages_dirVariable Name lc-messages-dirVariable Scope Global Dynamic Variable No Permitted Values Type directory nameThe directory where error messages are located. The value is used together with the value of
--lc-messagesto produce the location for the error message file. See , "Setting the Error Message Language".--log[=,file_name]-l [file_name]
Version Removed 5.6.1 Command-Line Format --log[=name]-lOption-File Format logOption Sets Variable Yes, logVariable Name logVariable Scope Global Dynamic Variable Yes Deprecated 5.1.29, by general-logPermitted Values Type stringDefault OFFThe
--logoption was removed in MariaDB 5.6.1 (along with thelogsystem variable). Instead, use the--general-logoption to enable the general query log and the--general_log_file=option to set the general query log file name.file_name--log-error[=file_name]
Command-Line Format --log-error[=name]Option-File Format log-errorOption Sets Variable Yes, log_errorVariable Name log_errorVariable Scope Global Dynamic Variable No Permitted Values Type file nameLog errors and startup messages to this file. See , "The Error Log". If you omit the file name, MariaDB uses
host_name.err.err.--log-isam[=file_name]
Command-Line Format --log-isam[=name]Option-File Format log-isamPermitted Values Type file nameLog all
MyISAMchanges to this file (used only when debuggingMyISAM).--log-output[=value,...]
Command-Line Format --log-output[=name]Option-File Format log-outputOption Sets Variable Yes, log_outputVariable Name log_outputVariable Scope Global Dynamic Variable Yes Permitted Values Type setDefault FILEValid Values TABLEFILENONEThis option determines the destination for general query log and slow query log output. The option value can be given as one or more of the words
TABLE,FILE, orNONE. If the option is given without a value, the default isFILE.TABLEselect logging to thegeneral_logandslow_logtables in theMariaDBdatabase as a destination.FILEselects logging to log files as a destination.NONEdisables logging. IfNONEis present in the option value, it takes precedence over any other words that are present.TABLEandFILEcan both be given to select to both log output destinations.This option selects log output destinations, but does not enable log output. To do that, use the
--general_logand--slow_query_logoptions. ForFILElogging, the--general_log_fileand-slow_query_log_fileoptions determine the log file location. For more information, see , "Selecting General Query and Slow Query Log Output Destinations".--log-queries-not-using-indexes
Command-Line Format --log-queries-not-using-indexesOption-File Format log-queries-not-using-indexesOption Sets Variable Yes, log_queries_not_using_indexesVariable Name log_queries_not_using_indexesVariable Scope Global Dynamic Variable Yes Permitted Values Type booleanDefault OFFIf you are using this option with the slow query log enabled, queries that are expected to retrieve all rows are logged. See , "The Slow Query Log". This option does not necessarily mean that no index is used. For example, a query that uses a full index scan uses an index but would be logged because the index would not limit the number of rows.
--log-raw
Version Introduced 5.6.3 Command-Line Format --log-raw[=value]Option-File Format log-raw[=value]Permitted Values Type booleanDefault OFFAs of MariaDB 5.6.3, passwords in statements written to the general query log, slow query log, and binary log are rewritten by the server not to occur literally in plain text. Password rewriting can be suppressed for the general query log by starting the server with the
--log-rawoption. This option may be useful for diagnostic purposes, to see the exact text of statements as received by the server, but for security reasons is not recommended for production use.Before MariaDB 5.6.3, passwords in statements are not rewritten and the general query log should be protected. See , "Administrator Guidelines for Password Security".
This option was added in MariaDB 5.6.3.
--log-short-format
Command-Line Format --log-short-formatOption-File Format log-short-formatPermitted Values Type booleanDefault FALSELog less information to the binary log and slow query log, if they have been activated.
--log-slow-admin-statements
Command-Line Format --log-slow-admin-statementsOption-File Format log-slow-admin-statementsPermitted Values Type booleanDefault FALSELog slow administrative statements such as
OPTIMIZE TABLE,ANALYZE TABLE, andALTER TABLEto the slow query log.--log-slow-queries[=file_name]
Version Removed 5.6.1 Command-Line Format --log-slow-queries[=name]Option-File Format log-slow-queriesOption Sets Variable Yes, log_slow_queriesVariable Name log_slow_queriesVariable Scope Global Dynamic Variable Yes Deprecated 5.1.29, by slow-query-logPermitted Values Type booleanThe
--log-slow-queriesoption was removed in MariaDB 5.6.1 (along with thelog_slow_queriessystem variable). Instead, use the--slow_query_logoption to enable the slow query log and the--slow_query_log_file=option to set the slow query log file name.file_name--log-tc=file_name
Command-Line Format --log-tc=nameOption-File Format log-tcPermitted Values Type file nameDefault tc.logThe name of the memory-mapped transaction coordinator log file (for XA transactions that affect multiple storage engines when the binary log is disabled). The default name is
tc.log. The file is created under the data directory if not given as a full path name. Currently, this option is unused.--log-tc-size=size
Command-Line Format --log-tc-size=#Option-File Format log-tc-sizePermitted Values Platform Bit Size 32Type numericDefault 24576Max Value 4294967295Permitted Values Platform Bit Size 64Type numericDefault 24576Max Value 18446744073709547520The size in bytes of the memory-mapped transaction coordinator log. The default size is 24KB.
--log-warnings[=,level]-W [level]
Command-Line Format --log-warnings[=#]-W [#]Option-File Format log-warningsOption Sets Variable Yes, log_warningsVariable Name log_warningsVariable Scope Global Dynamic Variable Yes Disabled by skip-log-warningsPermitted Values Platform Bit Size 64Type numericDefault 1Range 0 .. 18446744073709547520Print out warnings such as
Aborted connection...to the error log. Enabling this option is recommended, for example, if you use replication (you get more information about what is happening, such as messages about network failures and reconnections). This option is enabled (1) by default, and the defaultlevelvalue if omitted is 1. To disable this option, use--log-warnings=0. If the value is greater than 1, aborted connections are written to the error log, and access-denied errors for new connection attempts are written. See "Communication Errors and Aborted Connections".If a slave server was started with
--log-warningsenabled, the slave prints messages to the error log to provide information about its status, such as the binary log and relay log coordinates where it starts its job, when it is switching to another relay log, when it reconnects after a disconnect, and so forth. The server logs messages about statements that are unsafe for statement-based logging only if--log-warningsis enabled.--low-priority-updates
Command-Line Format --low-priority-updatesOption-File Format low-priority-updatesOption Sets Variable Yes, low_priority_updatesVariable Name low_priority_updatesVariable Scope Global, Session Dynamic Variable Yes Permitted Values Type booleanDefault FALSEGive table-modifying operations (
INSERT,REPLACE,DELETE,UPDATE) lower priority than selects. This can also be done using{INSERT | REPLACE | DELETE | UPDATE} LOW_PRIORITY ...to lower the priority of only one query, or bySET LOW_PRIORITY_UPDATES=1to change the priority in one thread. This affects only storage engines that use only table-level locking (MyISAM,MEMORY,MERGE). See , "Table Locking Issues".--min-examined-row-limit=number
Command-Line Format --min-examined-row-limit=#Option-File Format min-examined-row-limitVariable Name min_examined_row_limitVariable Scope Global, Session Dynamic Variable Yes Permitted Values Platform Bit Size 32Type numericDefault 0Range 0 .. 4294967295Permitted Values Platform Bit Size 64Type numericDefault 0Range 0 .. 18446744073709547520When this option is set, queries which examine fewer than
numberrows are not written to the slow query log. The default is 0.--memlock
Command-Line Format --memlockOption-File Format memlockVariable Name locked_in_memoryVariable Scope Global Dynamic Variable No Permitted Values Type booleanDefault FALSELock the mysqld process in memory. This option might help if you have a problem where the operating system is causing mysqld to swap to disk.
--memlockworks on systems that support themlockall()system call; this includes Solaris, most Linux distributions that use a 2.4 or newer kernel, and perhaps other Unix systems. On Linux systems, you can tell whether or notmlockall()(and thus this option) is supported by checking to see whether or not it is defined in the systemmman.hfile, like this:shell>
grep mlockall /usr/include/sys/mman.hIf
mlockall()is supported, you should see in the output of the previous command something like the following:extern int mlockall (int __flags) __THROW;
ImportantUse of this option may require you to run the server as
root, which, for reasons of security, is normally not a good idea. See , "How to Run MariaDB as a Normal User".On Linux and perhaps other systems, you can avoid the need to run the server as
rootby changing thelimits.conffile. See the notes regarding the memlock limit in , "Enabling Large Page Support".You must not try to use this option on a system that does not support the
mlockall()system call; if you do so, mysqld will very likely crash as soon as you try to start it.--myisam-block-size=N
Command-Line Format --myisam-block-size=#Option-File Format myisam-block-sizePermitted Values Type numericDefault 1024Range 16384The block size to be used for
MyISAMindex pages.--myisam-recover-options[=option[,option]...]]
Command-Line Format --myisam-recover-options[=name]Option-File Format myisam-recover-optionsOption Sets Variable Yes, myisam_recover_optionsPermitted Values Type enumerationDefault OFFValid Values OFFDEFAULTBACKUPFORCEQUICKSet the
MyISAMstorage engine recovery mode. The option value is any combination of the values ofDEFAULT,OFF,BACKUP,FORCE, orQUICK. If you specify multiple values, separate them by commas. Specifying the option with no argument is the same as specifyingDEFAULT, and specifying with an explicit value of''disables recovery (same as not giving the option). If recovery is enabled, each time mysqld opens aMyISAMtable, it checks whether the table is marked as crashed or was not closed properly. (The last option works only if you are running with external locking disabled.) If this is the case, mysqld runs a check on the table. If the table was corrupted, mysqld attempts to repair it.The following options affect how the repair works.
Option Description DEFAULTRecovery without backup, forcing, or quick checking. OFFRecovery without backup, forcing, or quick checking. BACKUPIf the data file was changed during recovery, save a backup of the tbl_name.MYDtbl_name-datetime.BAKFORCERun recovery even if we would lose more than one row from the .MYDfile.QUICKDo not check the rows in the table if there are not any delete blocks. Before the server automatically repairs a table, it writes a note about the repair to the error log. If you want to be able to recover from most problems without user intervention, you should use the options
BACKUP,FORCE. This forces a repair of a table even if some rows would be deleted, but it keeps the old data file as a backup so that you can later examine what happened.--old-alter-table
Command-Line Format --old-alter-tableOption-File Format old-alter-tableOption Sets Variable Yes, old_alter_tableVariable Name old_alter_tableVariable Scope Global, Session Dynamic Variable Yes Permitted Values Type booleanDefault OFFWhen this option is given, the server does not use the optimized method of processing an
ALTER TABLEoperation. It reverts to using a temporary table, copying over the data, and then renaming the temporary table to the original, as used by MariaDB 5.0 and earlier. For more information on the operation ofALTER TABLE, see , "ALTER TABLESyntax".--old-passwords
Command-Line Format --old_passwordsOption-File Format old-passwordsOption Sets Variable Yes, old_passwordsVariable Name old_passwordsVariable Scope Global, Session Dynamic Variable Yes Permitted Values Type booleanDefault FALSEForce the server to generate short (pre-4.1) password hashes for new passwords. This is useful for compatibility when the server must support older client programs. See , "Password Hashing in MySQL".
--old-style-user-limits
Command-Line Format --old-style-user-limitsOption-File Format old-style-user-limitsPermitted Values Type booleanDefault FALSEEnable old-style user limits. (Before MariaDB 5.0.3, account resource limits were counted separately for each host from which a user connected rather than per account row in the
usertable.) See , "Setting Account Resource Limits".--one-thread
Version Removed 5.6.1 Command-Line Format --one-threadOption-File Format one-threadThis option was removed in MariaDB 5.6.1. Use
--thread_handling=no-threadsinstead.--open-files-limit=count
Command-Line Format --open-files-limit=#Option-File Format open-files-limitOption Sets Variable Yes, open_files_limitVariable Name open_files_limitVariable Scope Global Dynamic Variable No Permitted Values Type numericDefault 0Range 0 .. 65535Changes the number of file descriptors available to mysqld. You should try increasing the value of this option if mysqld gives you the error
Too many open files. mysqld uses the option value to reserve descriptors withsetrlimit(). If the requested number of file descriptors cannot be allocated, mysqld writes a warning to the error log.mysqld may attempt to allocate more than the requested number of descriptors (if they are available), using the values of
max-connectionsandtable_open_cacheto estimate whether more descriptors will be needed.--partition[=value]
Command-Line Format --partitionOption-File Format partitionOption Sets Variable Yes, have_partitioningVariable Name partitionVariable Scope Global Dynamic Variable No Disabled by skip-partitionPermitted Values Type booleanDefault ONEnables or disables user-defined partitioning support in the MariaDB Server.
--performance_schema_consumer_consumer_name=value
Configure a Performance Schema consumer. For details, see , "Performance Schema Startup Configuration".
--performance_schema_instrument=instrument_name=value
Configure a Performance Schema instrument. For details, see , "Performance Schema Startup Configuration".
--pid-file=path
Command-Line Format --pid-file=file_nameOption-File Format pid-file=file_nameOption Sets Variable Yes, pid_fileVariable Name pid_fileVariable Scope Global Dynamic Variable No Permitted Values Type file nameThe path name of the process ID file. The server creates the file in the data directory unless an absolute path name is given to specify a different directory. This file is used by other programs such as mysqld_safe to determine the server's process ID.
--plugin-xxx
Specifies an option that pertains to a server plugin. For example, many storage engines can be built as plugins, and for such engines, options for them can be specified with a
--pluginprefix. Thus, the--innodb_file_per_tableoption forInnoDBcan be specified as--plugin-innodb_file_per_table.For boolean options that can be enabled or disabled, the
--skipprefix and other alternative formats are supported as well (see , "Program Option Modifiers"). For example,--skip-plugin-innodb_file_per_tabledisablesinnodb_file_per_table.The rationale for the
--pluginprefix is that it enables plugin options to be specified unambiguously if there is a name conflict with a built-in server option. For example, were a plugin writer to name a plugin "sql" and implement a "mode" option, the option name might be--sql-mode, which would conflict with the built-in option of the same name. In such cases, references to the conflicting name are resolved in favor of the built-in option. To avoid the ambiguity, users can specify the plugin option as--plugin-sql-mode. Use of the--pluginprefix for plugin options is recommended to avoid any question of ambiguity.--plugin-load=plugin_list
Command-Line Format --plugin-load=plugin_listOption-File Format plugin-load=plugin_listPermitted Values Type stringThis option tells the server to load the named plugins at startup. The option value is a semicolon-separated list of
name=plugin_librarynameis the name of the plugin, andplugin_libraryis the name of the shared library that contains the plugin code. Each library file must be located in the directory named by theplugin_dirsystem variable. For example, if plugins namedmyplug1andmyplug2have library filesmyplug1.soandmyplug2.so, use this option to load them at startup:shell>
mysqld --plugin-load=myplug1=myplug1.so;myplug2=myplug2.soIf multiple
--plugin-loadoptions are given, only the last one is used. Additional plugins to load may be specified using--plugin-load-addoptions.If a plugin library is named without any preceding plugin name, the server loads all plugins in the library.
Each plugin is loaded for a single invocation of mysqld only. After a restart, the plugin is not loaded unless
--plugin-loadis used again. This is in contrast toINSTALL PLUGIN, which adds an entry to themysql.pluginstable to cause the plugin to be loaded for every normal server startup.Under normal startup, the server determines which plugins to load by reading the
mysql.pluginssystem table. If the server is started with the--skip-grant-tablesoption, it does not consult themysql.pluginstable and does not load plugins listed there.--plugin-loadenables plugins to be loaded even when--skip-grant-tablesis given.--plugin-loadalso enables plugins to be loaded at startup under configurations when plugins cannot be loaded at runtime.For additional information about plugin loading, see , "Installing and Uninstalling Plugins".
--plugin-load-add=plugin_list
Version Introduced 5.6.3 Command-Line Format --plugin-load-add=plugin_listOption-File Format plugin-load-add=plugin_listPermitted Values Type stringThis option complements the
--plugin-loadoption.--plugin-load-addadds a plugin or plugins to the set of plugins to be loaded at startup. The argument format is the same as for--plugin-load.--plugin-load-addcan be used to avoid specifying a large set of plugins as a single long unwieldy--plugin-loadargument. This option was added in MariaDB 5.6.3.--plugin-load-addcan be given in the absence of--plugin-load, but any instance of--plugin-load-addthat appears before--plugin-load. has no effect because--plugin-loadresets the set of plugins to load. In other words, these options:--plugin-load=x --plugin-load-add=y
are equivalent to this option:
--plugin-load=x;y
But these options:
--plugin-load-add=y --plugin-load=x
are equivalent to this option:
--plugin-load=x
For additional information about plugin loading, see , "Installing and Uninstalling Plugins".
--port=,port_num-Pport_num
Command-Line Format --port=#-POption-File Format portOption Sets Variable Yes, portVariable Name portVariable Scope Global Dynamic Variable No Permitted Values Type numericDefault 3306The port number to use when listening for TCP/IP connections. The port number must be 1024 or higher unless the server is started by the
rootsystem user.--port-open-timeout=num
Command-Line Format --port-open-timeout=#Option-File Format port-open-timeoutPermitted Values Type numericDefault 0On some systems, when the server is stopped, the TCP/IP port might not become available immediately. If the server is restarted quickly afterward, its attempt to reopen the port can fail. This option indicates how many seconds the server should wait for the TCP/IP port to become free if it cannot be opened. The default is not to wait.
--remove [service_name]
Command-Line Format --remove [service_name](Windows only) Remove a MariaDB Windows service. The default service name is
MariaDBif noservice_namevalue is given. For more information, see , "Starting MariaDB as a Windows Service".--safe-mode
Command-Line Format --safe-modeOption-File Format safe-modeDeprecated 5.0 Skip some optimization stages.
--safe-user-create
Command-Line Format --safe-user-createOption-File Format safe-user-createPermitted Values Type booleanDefault FALSEIf this option is enabled, a user cannot create new MariaDB users by using the
GRANTstatement unless the user has theINSERTprivilege for themysql.usertable or any column in the table. If you want a user to have the ability to create new users that have those privileges that the user has the right to grant, you should grant the user the following privilege:GRANT INSERT(user) ON mysql.user TO '
user_name'@'host_name';This ensures that the user cannot change any privilege columns directly, but has to use the
GRANTstatement to give privileges to other users.--secure-auth
Command-Line Format --secure-authOption-File Format secure-authOption Sets Variable Yes, secure_authVariable Name secure_authVariable Scope Global Dynamic Variable Yes Permitted Values (<= 5.6.4) Type booleanDefault OFFPermitted Values (>= 5.6.5) Type booleanDefault ONThis option causes the server to block connections by clients that attempt to use accounts that have passwords stored in the old (pre-4.1) format. Use it to prevent all use of passwords employing the old format (and hence insecure communication over the network). Before MariaDB 5.6.5, this option is disabled by default. As of MariaDB 5.6.5, it is enabled by default; to disable it, use
--skip-secure-auth.Server startup fails with an error if this option is enabled and the privilege tables are in pre-4.1 format. See "
Client does not support authentication protocol".--secure-file-priv=path
Command-Line Format --secure-file-priv=pathOption-File Format secure-file-priv=pathOption Sets Variable Yes, secure_file_privVariable Name secure-file-privVariable Scope Global Dynamic Variable No Permitted Values Type stringThis option limits the effect of the
LOAD-FILE()function and theLOAD DATAandSELECT ... INTO OUTFILEstatements to work only with files in the specified directory.--shared-memory
Enable shared-memory connections by local clients. This option is available only on Windows.
--shared-memory-base-name=name
The name of shared memory to use for shared-memory connections. This option is available only on Windows. The default name is
MariaDB. The name is case sensitive.--skip-concurrent-insert
Turn off the ability to select and insert at the same time on
MyISAMtables. (This is to be used only if you think you have found a bug in this feature.) See , "Concurrent Inserts".--skip-external-locking
Do not use external locking (system locking). This affects only
MyISAMtable access. For more information, including conditions under which it can and cannot be used, see , "External Locking".External locking has been disabled by default since MariaDB 4.0.
--skip-event-scheduler
Command-Line Format --skip-event-scheduler--disable-event-schedulerOption-File Format skip-event-schedulerTurns the Event Scheduler
OFF. This is not the same as disabling the Event Scheduler, which requires setting--event-scheduler=DISABLED; see The--event-schedulerOption, for more information.--skip-grant-tables
This option causes the server to start without using the privilege system at all, which gives anyone with access to the server unrestricted access to all databases. You can cause a running server to start using the grant tables again by executing mysqladmin flush-privileges or mysqladmin reload command from a system shell, or by issuing a MariaDB
FLUSH PRIVILEGESstatement after connecting to the server. This option also suppresses loading of plugins that were installed with theINSTALL PLUGINstatement, user-defined functions (UDFs), and scheduled events. To cause plugins to be loaded anyway, use the--plugin-loadoption.--skip-grant-tablesis unavailable if MariaDB was configured with theDISABLE_GRANT_OPTIONScompiler flag. See , "MySQL Source-Configuration Options".--skip-host-cache
Disable use of the internal host cache for faster name-to-IP resolution. In this case, the server performs a DNS lookup every time a client connects. See , "DNS Lookup Optimization and the Host Cache".
Use of
--skip-host-cacheis similar to setting thehost_cache_sizesystem variable to 0, buthost_cache_sizeis more flexible because it can also be used to resize, enable, or disable the host cache at runtime, not just at server startup. If you start the server with--skip-host-cache, the host cache cannot be re-enabled at runtime.--skip-innodb
Disable the
InnoDBstorage engine. In this case, because the default storage engine isInnoDB, the server will not start unless you also use--default-storage-engineand--default-tmp-storage-engineto set the default to some other engine for both permanent andTEMPORARYtables.--skip-name-resolve
Do not resolve host names when checking client connections. Use only IP addresses. If you use this option, all
Hostcolumn values in the grant tables must be IP addresses orlocalhost. See , "DNS Lookup Optimization and the Host Cache".--skip-networking
Do not listen for TCP/IP connections at all. All interaction with mysqld must be made using named pipes or shared memory (on Windows) or Unix socket files (on Unix). This option is highly recommended for systems where only local clients are permitted. See , "DNS Lookup Optimization and the Host Cache".
--skip-partition
Command-Line Format --skip-partition--disable-partitionOption-File Format skip-partitionDisables user-defined partitioning. Existing partitioned tables cannot be accessed when the server has been started with this option.
--ssl*
Options that begin with
--sslspecify whether to permit clients to connect using SSL and indicate where to find SSL keys and certificates. See , "SSL Command Options".--standalone
Command-Line Format --standaloneOption-File Format standalonePlatform Specific windows Available on Windows only; instructs the MariaDB server not to run as a service.
--super-large-pages
Standard use of large pages in MariaDB attempts to use the largest size supported, up to 4MB. Under Solaris, a "super large pages" feature enables uses of pages up to 256MB. This feature is available for recent SPARC platforms. It can be enabled or disabled by using the
--super-large-pagesor--skip-super-large-pagesoption.--symbolic-links,--skip-symbolic-links
Command-Line Format --symbolic-linksOption-File Format symbolic-linksEnable or disable symbolic link support. This option has different effects on Windows and Unix:
- On Windows, enabling symbolic links enables you to establish a symbolic link to a database directory by creating a
db_name.sym - On Unix, enabling symbolic links means that you can link a
MyISAMindex file or data file to another directory with theINDEX DIRECTORYorDATA DIRECTORYoptions of theCREATE TABLEstatement. If you delete or rename the table, the files that its symbolic links point to also are deleted or renamed. See , "Using Symbolic Links for Tables on Unix".
- On Windows, enabling symbolic links enables you to establish a symbolic link to a database directory by creating a
--skip-show-database
Command-Line Format --skip-show-databaseOption-File Format skip-show-databaseOption Sets Variable Yes, skip_show_databaseVariable Name skip_show_databaseVariable Scope Global Dynamic Variable No With this option, the
SHOW DATABASESstatement is permitted only to users who have theSHOW DATABASESprivilege, and the statement displays all database names. Without this option,SHOW DATABASESis permitted to all users, but displays each database name only if the user has theSHOW DATABASESprivilege or some privilege for the database. Note that any global privilege is considered a privilege for the database.--skip-stack-trace
Command-Line Format --skip-stack-traceOption-File Format skip-stack-traceDo not write stack traces. This option is useful when you are running mysqld under a debugger. On some systems, you also must use this option to get a core file. See MySQL Internals: Porting.
--skip-thread-priority
Version Removed 5.6.1 Command-Line Format --skip-thread-priorityOption-File Format skip-thread-priorityDeprecated 5.1.29 Disable using thread priorities for faster response time. This option was unused and was removed in MariaDB 5.6.1.
--slow-query-log[={0|1}]
Command-Line Format --slow-query-logOption-File Format slow-query-logOption Sets Variable Yes, slow_query_logVariable Name slow_query_logVariable Scope Global Dynamic Variable Yes Permitted Values Type booleanDefault OFFSpecify the initial slow query log state. With no argument or an argument of 1, the
--slow-query-logoption enables the log. If omitted or given with an argument of 0, the option disables the log.--slow-start-timeout=timeout
Version Introduced 5.6.5 Command-Line Format --slow-start-timeout=#Option-File Format slow-start-timeout=#Permitted Values Type (windows) numericDefault 15000This option controls the Windows service control manager's service start timeout. The value is the maximum number of milliseconds that the service control manager waits before trying to kill the windows service during startup. The default value is 15000 (15 seconds). If the MariaDB service takes too long to start, you may need to increase this value. A value of 0 means there is no timeout.
--socket=path
Command-Line Format --socket=nameOption-File Format socketOption Sets Variable Yes, socketVariable Name socketVariable Scope Global Dynamic Variable No Permitted Values Type file nameDefault /tmp/mysql.sockOn Unix, this option specifies the Unix socket file to use when listening for local connections. The default value is
/tmp/mysql.sock. If this option is given, the server creates the file in the data directory unless an absolute path name is given to specify a different directory. On Windows, the option specifies the pipe name to use when listening for local connections that use a named pipe. The default value isMariaDB(not case sensitive).--sql-mode=value[,value[,value...]]
Command-Line Format --sql-mode=nameOption-File Format sql-modeOption Sets Variable Yes, sql_modeVariable Name sql_modeVariable Scope Global, Session Dynamic Variable Yes Permitted Values Type setDefault ''Valid Values ALLOW_INVALID_DATESANSI_QUOTESERROR_FOR_DIVISION_BY_ZEROHIGH_NOT_PRECEDENCEIGNORE_SPACENO_AUTO_CREATE_USERNO_AUTO_VALUE_ON_ZERONO_BACKSLASH_ESCAPESNO_DIR_IN_CREATENO_ENGINE_SUBSTITUTIONNO_FIELD_OPTIONSNO_KEY_OPTIONSNO_TABLE_OPTIONSNO_UNSIGNED_SUBTRACTIONNO_ZERO_DATENO_ZERO_IN_DATEONLY_FULL_GROUP_BYPAD_CHAR_TO_FULL_LENGTHPIPES_AS_CONCATREAL_AS_FLOATSTRICT_ALL_TABLESSTRICT_TRANS_TABLESSet the SQL mode. See , "Server SQL Modes".
--sysdate-is-now
Command-Line Format --sysdate-is-nowOption-File Format sysdate-is-nowPermitted Values Type booleanDefault FALSESYSDATE()by default returns the time at which it executes, not the time at which the statement in which it occurs begins executing. This differs from the behavior ofNOW(). This option causesSYSDATE()to be an alias forNOW(). For information about the implications for binary logging and replication, see the description forSYSDATE()in , "Date and Time Functions" and forSET TIMESTAMPin , "Server System Variables".--tc-heuristic-recover={COMMIT|ROLLBACK}
Command-Line Format --tc-heuristic-recover=nameOption-File Format tc-heuristic-recoverPermitted Values Type enumerationValid Values COMMITRECOVERThe type of decision to use in the heuristic recovery process. Currently, this option is unused.
--temp-pool
Command-Line Format --temp-poolOption-File Format temp-poolPermitted Values Type booleanDefault TRUEThis option causes most temporary files created by the server to use a small set of names, rather than a unique name for each new file. This works around a problem in the Linux kernel dealing with creating many new files with different names. With the old behavior, Linux seems to "leak" memory, because it is being allocated to the directory entry cache rather than to the disk cache. This option is ignored except on Linux.
--transaction-isolation=level
Command-Line Format --transaction-isolation=nameOption-File Format transaction-isolationOption Sets Variable Yes, tx_isolationPermitted Values Type enumerationValid Values READ-UNCOMMITTEDREAD-COMMITTEDREPEATABLE-READSERIALIZABLESets the default transaction isolation level. The
levelvalue can beREAD-UNCOMMITTED,READ-COMMITTED,REPEATABLE-READ, orSERIALIZABLE. See , "SET TRANSACTIONSyntax".The default transaction isolation level can also be set at runtime using the
SET TRANSACTIONstatement or by setting thetx_isolationsystem variable.--transaction-read-only=mode
Version Introduced 5.6.5 Command-Line Format --transaction-read-only[=value]Option-File Format transaction-read-only[=value]Option Sets Variable Yes, tx_read_onlyPermitted Values Type booleanSets the default transaction access mode. The value can be
OFF(read/write, the default) orON(read only).To set the default transaction access mode at runtime, use the
SET TRANSACTIONstatement or set thetx_read_onlysystem variable. See , "SET TRANSACTIONSyntax".This option was added in MariaDB 5.6.5.
--tmpdir=,path-tpath
Command-Line Format --tmpdir=path-tOption-File Format tmpdirOption Sets Variable Yes, tmpdirVariable Name tmpdirVariable Scope Global Dynamic Variable No Permitted Values Type file nameThe path of the directory to use for creating temporary files. It might be useful if your default
/tmpdirectory resides on a partition that is too small to hold temporary tables. This option accepts several paths that are used in round-robin fashion. Paths should be separated by colon characters (":") on Unix and semicolon characters (";") on Windows. If the MariaDB server is acting as a replication slave, you should not set--tmpdirto point to a directory on a memory-based file system or to a directory that is cleared when the server host restarts. For more information about the storage location of temporary files, see "Where MariaDB Stores Temporary Files". A replication slave needs some of its temporary files to survive a machine restart so that it can replicate temporary tables orLOAD DATA INFILEoperations. If files in the temporary file directory are lost when the server restarts, replication fails.--user={,user_name|user_id}-u {user_name|user_id}
Command-Line Format --user=name-u nameOption-File Format userPermitted Values Type stringRun the mysqld server as the user having the name
user_nameor the numeric user IDuser_id. ("User" in this context refers to a system login account, not a MariaDB user listed in the grant tables.)This option is mandatory when starting mysqld as
root. The server changes its user ID during its startup sequence, causing it to run as that particular user rather than asroot. See , "General Security Guidelines".To avoid a possible security hole where a user adds a
--user=rootoption to amy.cnffile (thus causing the server to run asroot), mysqld uses only the first--useroption specified and produces a warning if there are multiple--useroptions. Options in/etc/my.cnfand$MYSQL_HOME/my.cnfare processed before command-line options, so it is recommended that you put a--useroption in/etc/my.cnfand specify a value other thanroot. The option in/etc/my.cnfis found before any other--useroptions, which ensures that the server runs as a user other thanroot, and that a warning results if any other--useroption is found.--verbose,-v
Use this option with the
--helpoption for detailed help.--version,-V
Display version information and exit.
You can assign a value to a server system variable by using an option of the form --. For example, var_name=value--key_buffer_size=32M sets the key_buffer_size variable to a value of 32MB.
Note that when you assign a value to a variable, MariaDB might automatically correct the value to stay within a given range, or adjust the value to the closest permissible value if only certain values are permitted.
If you want to restrict the maximum value to which a variable can be set at runtime with SET, you can define this by using the --maximum- command-line option.
var_name=value
You can change the values of most system variables for a running server with the SET statement. See , "SET Syntax".
, "Server System Variables", provides a full description for all variables, and additional information for setting them at server startup and runtime. , "Tuning Server Parameters", includes information on optimizing the server by tuning system variables.
Server System Variables
The MariaDB server maintains many system variables that indicate how it is configured. Each system variable has a default value. System variables can be set at server startup using options on the command line or in an option file. Most of them can be changed dynamically while the server is running by means of the SET statement, which enables you to modify operation of the server without having to stop and restart it. You can refer to system variable values in expressions.
There are several ways to see the names and values of system variables:
- To see the values that a server will use based on its compiled-in defaults and any option files that it reads, use this command:
mysqld --verbose --help
- To see the values that a server will use based on its compiled-in defaults, ignoring the settings in any option files, use this command:
mysqld --no-defaults --verbose --help
- To see the current values used by a running server, use the
SHOW VARIABLESstatement.
This section provides a description of each system variable. Variables with no version indicated are present in all MariaDB 5.6 releases. For historical information concerning their implementation, please see http://dev.mysql.com/doc/refman/5.0/en/, and http://dev.mysql.com/doc/refman/4.1/en/.
The following table lists all available system variables:
Table 5.2. System Variable Summary
| Name | Cmd-Line | Option file | System Var | Var Scope | Dynamic |
|---|---|---|---|---|---|
| auto_increment_increment | Yes | Yes | Yes | Both | Yes |
| auto_increment_offset | Yes | Yes | Yes | Both | Yes |
| autocommit | Yes | Yes | Yes | Both | Yes |
| automatic_sp_privileges | Yes | Global | Yes | ||
| back_log | Yes | Yes | Yes | Global | No |
| basedir | Yes | Yes | Yes | Global | No |
| big-tables | Yes | Yes | Yes | ||
| - Variable: big_tables | Yes | Both | Yes | ||
| bind-address | Yes | Yes | Yes | Global | No |
| binlog_cache_size | Yes | Yes | Yes | Global | Yes |
| binlog_checksum | Yes | Global | Yes | ||
| binlog_direct_non_transactional_updates | Yes | Yes | Yes | Both | Yes |
| binlog-format | Yes | Yes | Yes | ||
| - Variable: binlog_format | Yes | Both | Yes | ||
| binlog_row_image | Yes | Yes | Both | Yes | |
| binlog_stmt_cache_size | Yes | Yes | Yes | Global | Yes |
| bulk_insert_buffer_size | Yes | Yes | Yes | Both | Yes |
| character_set_client | Yes | Both | Yes | ||
| character_set_connection | Yes | Both | Yes | ||
| character_set_database[a] | Yes | Both | Yes | ||
| character-set-filesystem | Yes | Yes | Yes | ||
| - Variable: character_set_filesystem | Yes | Both | Yes | ||
| character_set_results | Yes | Both | Yes | ||
| character-set-server | Yes | Yes | Yes | ||
| - Variable: character_set_server | Yes | Both | Yes | ||
| character_set_system | Yes | Global | No | ||
| character-sets-dir | Yes | Yes | No | ||
| - Variable: character_sets_dir | Yes | Global | No | ||
| collation_connection | Yes | Both | Yes | ||
| collation_database[b] | Yes | Both | Yes | ||
| collation-server | Yes | Yes | Yes | ||
| - Variable: collation_server | Yes | Both | Yes | ||
| completion_type | Yes | Yes | Yes | Both | Yes |
| concurrent_insert | Yes | Yes | Yes | Global | Yes |
| connect_timeout | Yes | Yes | Yes | Global | Yes |
| datadir | Yes | Yes | Yes | Global | No |
| date_format | Yes | Global | No | ||
| datetime_format | Yes | Global | No | ||
| debug | Yes | Yes | Yes | Both | Yes |
| debug_sync | Yes | Session | Yes | ||
| default-storage-engine | Yes | Yes | Yes | ||
| - Variable: default_storage_engine | Yes | Both | Yes | ||
| default_tmp_storage_engine | Yes | Yes | Yes | Both | Yes |
| default_week_format | Yes | Yes | Yes | Both | Yes |
| delay-key-write | Yes | Yes | Yes | ||
| - Variable: delay_key_write | Yes | Global | Yes | ||
| delayed_insert_limit | Yes | Yes | Yes | Global | Yes |
| delayed_insert_timeout | Yes | Yes | Yes | Global | Yes |
| delayed_queue_size | Yes | Yes | Yes | Global | Yes |
| div_precision_increment | Yes | Yes | Yes | Both | Yes |
| end_markers_in_json | Yes | Both | Yes | ||
| engine-condition-pushdown | Yes | Yes | Yes | ||
| - Variable: engine_condition_pushdown | Yes | Both | Yes | ||
| eq_range_index_dive_limit | Yes | Yes | Yes | Both | Yes |
| error_count | Yes | Session | No | ||
| event-scheduler | Yes | Yes | Yes | ||
| - Variable: event_scheduler | Yes | Global | Yes | ||
| expire_logs_days | Yes | Yes | Yes | Global | Yes |
| external_user | Yes | Session | No | ||
| flush | Yes | Yes | Yes | Global | Yes |
| flush_time | Yes | Yes | Yes | Global | Yes |
| foreign_key_checks | Yes | Both | Yes | ||
| ft_boolean_syntax | Yes | Yes | Yes | Global | Yes |
| ft_max_word_len | Yes | Yes | Yes | Global | No |
| ft_min_word_len | Yes | Yes | Yes | Global | No |
| ft_query_expansion_limit | Yes | Yes | Yes | Global | No |
| ft_stopword_file | Yes | Yes | Yes | Global | No |
| general-log | Yes | Yes | Yes | ||
| - Variable: general_log | Yes | Global | Yes | ||
| general_log_file | Yes | Yes | Yes | Global | Yes |
| group_concat_max_len | Yes | Yes | Yes | Both | Yes |
| have_compress | Yes | Global | No | ||
| have_crypt | Yes | Global | No | ||
| have_csv | Yes | Global | No | ||
| have_dynamic_loading | Yes | Global | No | ||
| have_geometry | Yes | Global | No | ||
| have_innodb | Yes | Global | No | ||
| have_ndbcluster | Yes | Global | No | ||
| have_openssl | Yes | Global | No | ||
| have_partitioning | Yes | Global | No | ||
| have_profiling | Yes | Global | No | ||
| have_query_cache | Yes | Global | No | ||
| have_rtree_keys | Yes | Global | No | ||
| have_ssl | Yes | Global | No | ||
| have_symlink | Yes | Global | No | ||
| host_cache_size | Yes | Yes | Yes | Global | Yes |
| hostname | Yes | Global | No | ||
| identity | Yes | Session | Yes | ||
| ignore-builtin-innodb | Yes | Yes | No | ||
| - Variable: ignore_builtin_innodb | Yes | Global | No | ||
| init_connect | Yes | Yes | Yes | Global | Yes |
| init-file | Yes | Yes | No | ||
| - Variable: init_file | Yes | Global | No | ||
| init_slave | Yes | Yes | Yes | Global | Yes |
| innodb_adaptive_flushing | Yes | Yes | Yes | Global | Yes |
| innodb_adaptive_hash_index | Yes | Yes | Yes | Global | Yes |
| innodb_adaptive_max_sleep_delay | Yes | Yes | Yes | Global | Yes |
| innodb_additional_mem_pool_size | Yes | Yes | Yes | Global | No |
| innodb_analyze_is_persistent | Yes | Yes | Yes | Global | Yes |
| innodb_autoextend_increment | Yes | Yes | Yes | Global | Yes |
| innodb_autoinc_lock_mode | Yes | Yes | Yes | Global | No |
| innodb_buffer_pool_dump_at_shutdown | Yes | Yes | Yes | Global | Yes |
| innodb_buffer_pool_dump_now | Yes | Yes | Yes | Global | Yes |
| innodb_buffer_pool_filename | Yes | Yes | Yes | Global | Yes |
| innodb_buffer_pool_instances | Yes | Yes | Yes | Global | No |
| innodb_buffer_pool_load_abort | Yes | Yes | Yes | Global | Yes |
| innodb_buffer_pool_load_at_startup | Yes | Yes | Yes | Global | Yes |
| innodb_buffer_pool_load_now | Yes | Yes | Yes | Global | Yes |
| innodb_buffer_pool_size | Yes | Yes | Yes | Global | No |
| innodb_change_buffer_max_size | Yes | Yes | Yes | Global | Yes |
| innodb_change_buffering | Yes | Yes | Yes | Global | Yes |
| innodb_checksum_algorithm | Yes | Yes | Yes | Global | Yes |
| innodb_checksums | Yes | Yes | Yes | Global | No |
| innodb_commit_concurrency | Yes | Yes | Yes | Global | Yes |
| innodb_concurrency_tickets | Yes | Yes | Yes | Global | Yes |
| innodb_data_file_path | Yes | Yes | Yes | Global | No |
| innodb_data_home_dir | Yes | Yes | Yes | Global | No |
| innodb_doublewrite | Yes | Yes | Yes | Global | No |
| innodb_fast_shutdown | Yes | Yes | Yes | Global | Yes |
| innodb_file_format | Yes | Yes | Yes | Global | Yes |
| innodb_file_format_check | Yes | Yes | Yes | Global | No |
| innodb_file_format_max | Yes | Yes | Yes | Global | Yes |
| innodb_file_per_table | Yes | Yes | Yes | Global | Yes |
| innodb_flush_log_at_trx_commit | Yes | Yes | Yes | Global | Yes |
| innodb_flush_method | Yes | Yes | Yes | Global | No |
| innodb_flush_neighbors | Yes | Yes | Yes | Global | Yes |
| innodb_force_load_corrupted | Yes | Yes | Yes | Global | No |
| innodb_force_recovery | Yes | Yes | Yes | Global | No |
| innodb_ft_aux_table | Yes | Yes | Yes | Global | Yes |
| innodb_ft_cache_size | Yes | Yes | Yes | Global | Yes |
| innodb_ft_enable_stopword | Yes | Yes | Yes | Global | Yes |
| innodb_ft_max_token_size | Yes | Yes | Yes | Global | Yes |
| innodb_ft_min_token_size | Yes | Yes | Yes | Global | Yes |
| innodb_ft_num_word_optimize | Yes | Yes | Yes | Global | Yes |
| innodb_ft_server_stopword_table | Yes | Yes | Yes | Global | Yes |
| innodb_ft_sort_pll_degree | Yes | Yes | Yes | Global | Yes |
| innodb_ft_user_stopword_table | Yes | Yes | Yes | Global | Yes |
| innodb_io_capacity | Yes | Yes | Yes | Global | Yes |
| innodb_large_prefix | Yes | Yes | Yes | Global | Yes |
| innodb_lock_wait_timeout | Yes | Yes | Yes | Both | Yes |
| innodb_locks_unsafe_for_binlog | Yes | Yes | Yes | Global | No |
| innodb_log_buffer_size | Yes | Yes | Yes | Global | No |
| innodb_log_file_size | Yes | Yes | Yes | Global | No |
| innodb_log_files_in_group | Yes | Yes | Yes | Global | No |
| innodb_log_group_home_dir | Yes | Yes | Yes | Global | No |
| innodb_lru_scan_depth | Yes | Yes | Yes | Global | Yes |
| innodb_max_dirty_pages_pct | Yes | Yes | Yes | Global | Yes |
| innodb_max_purge_lag | Yes | Yes | Yes | Global | Yes |
| innodb_mirrored_log_groups | Yes | Yes | Yes | Global | No |
| innodb_monitor_disable | Yes | Yes | Yes | Global | Yes |
| innodb_monitor_enable | Yes | Yes | Yes | Global | Yes |
| innodb_monitor_reset | Yes | Yes | Yes | Global | Yes |
| innodb_monitor_reset_all | Yes | Yes | Yes | Global | Yes |
| innodb_old_blocks_pct | Yes | Yes | Yes | Global | Yes |
| innodb_old_blocks_time | Yes | Yes | Yes | Global | Yes |
| innodb_open_files | Yes | Yes | Yes | Global | No |
| innodb_optimize_fulltext_only | Yes | Yes | Yes | Global | Yes |
| innodb_page_size | Yes | Yes | Yes | Global | No |
| innodb_print_all_deadlocks | Yes | Yes | Yes | Global | Yes |
| innodb_purge_batch_size | Yes | Yes | Yes | Global | No |
| innodb_purge_threads | Yes | Yes | Yes | Global | No |
| innodb_random_read_ahead | Yes | Yes | Yes | Global | Yes |
| innodb_read_ahead_threshold | Yes | Yes | Yes | Global | Yes |
| innodb_read_io_threads | Yes | Yes | Yes | Global | No |
| innodb_replication_delay | Yes | Yes | Yes | Global | Yes |
| innodb_rollback_on_timeout | Yes | Yes | Yes | Global | No |
| innodb_rollback_segments | Yes | Yes | Yes | Global | Yes |
| innodb_sort_buffer_size | Yes | Yes | Yes | Global | Yes |
| innodb_spin_wait_delay | Yes | Yes | Yes | Global | Yes |
| innodb_stats_method | Yes | Yes | Yes | Both | Yes |
| innodb_stats_on_metadata | Yes | Yes | Yes | Global | Yes |
| innodb_stats_persistent_sample_pages | Yes | Yes | Yes | Global | Yes |
| innodb_stats_sample_pages | Yes | Yes | Yes | Global | Yes |
| innodb_stats_transient_sample_pages | Yes | Yes | Yes | Global | Yes |
| innodb_strict_mode | Yes | Yes | Yes | Both | Yes |
| innodb_support_xa | Yes | Yes | Yes | Both | Yes |
| innodb_sync_array_size | Yes | Yes | Yes | Global | No |
| innodb_sync_spin_loops | Yes | Yes | Yes | Global | Yes |
| innodb_table_locks | Yes | Yes | Yes | Both | Yes |
| innodb_thread_concurrency | Yes | Yes | Yes | Global | Yes |
| innodb_thread_sleep_delay | Yes | Yes | Yes | Global | Yes |
| innodb_undo_directory | Yes | Yes | Yes | Global | Yes |
| innodb_undo_logs | Yes | Yes | Yes | Global | Yes |
| innodb_undo_tablespaces | Yes | Yes | Yes | Global | Yes |
| innodb_use_native_aio | Yes | Yes | Yes | Global | No |
| innodb_use_sys_malloc | Yes | Yes | Yes | Global | No |
| innodb_version | Yes | Global | No | ||
| innodb_write_io_threads | Yes | Yes | Yes | Global | No |
| insert_id | Yes | Session | Yes | ||
| interactive_timeout | Yes | Yes | Yes | Both | Yes |
| join_buffer_size | Yes | Yes | Yes | Both | Yes |
| keep_files_on_create | Yes | Yes | Yes | Both | Yes |
| key_buffer_size | Yes | Yes | Yes | Global | Yes |
| key_cache_age_threshold | Yes | Yes | Yes | Global | Yes |
| key_cache_block_size | Yes | Yes | Yes | Global | Yes |
| key_cache_division_limit | Yes | Yes | Yes | Global | Yes |
| language | Yes | Yes | Yes | Global | No |
| large_files_support | Yes | Global | No | ||
| large_page_size | Yes | Global | No | ||
| large-pages | Yes | Yes | No | ||
| - Variable: large_pages | Yes | Global | No | ||
| last_insert_id | Yes | Session | Yes | ||
| lc-messages | Yes | Yes | Yes | ||
| - Variable: lc_messages | Yes | Both | Yes | ||
| lc-messages-dir | Yes | Yes | No | ||
| - Variable: lc_messages_dir | Yes | Global | No | ||
| lc_time_names | Yes | Both | Yes | ||
| license | Yes | Global | No | ||
| local_infile | Yes | Global | Yes | ||
| lock_wait_timeout | Yes | Yes | Yes | Both | Yes |
| locked_in_memory | Yes | Global | No | ||
| log | Yes | Yes | Yes | Global | Yes |
| log_bin | Yes | Global | No | ||
| log-bin | Yes | Yes | Yes | Global | No |
| log_bin_basename | Yes | Global | No | ||
| log-error | Yes | Yes | No | ||
| - Variable: log_error | Yes | Global | No | ||
| log-output | Yes | Yes | Yes | ||
| - Variable: log_output | Yes | Global | Yes | ||
| log-queries-not-using-indexes | Yes | Yes | Yes | ||
| - Variable: log_queries_not_using_indexes | Yes | Global | Yes | ||
| log-slave-updates | Yes | Yes | No | ||
| - Variable: log_slave_updates | Yes | Global | No | ||
| log-slow-queries | Yes | Yes | Yes | ||
| - Variable: log_slow_queries | Yes | Global | Yes | ||
| log_throttle_queries_not_using_indexes | Yes | Global | Yes | ||
| log-warnings | Yes | Yes | Yes | ||
| - Variable: log_warnings | Yes | Global | Yes | ||
| long_query_time | Yes | Yes | Yes | Both | Yes |
| low-priority-updates | Yes | Yes | Yes | ||
| - Variable: low_priority_updates | Yes | Both | Yes | ||
| lower_case_file_system | Yes | Yes | Yes | Global | No |
| lower_case_table_names | Yes | Yes | Yes | Global | No |
| master_info_repository | Yes | Global | No | ||
| master_verify_checksum | Yes | Global | Yes | ||
| max_allowed_packet | Yes | Yes | Yes | Global | Yes |
| max_binlog_cache_size | Yes | Yes | Yes | Global | Yes |
| max_binlog_size | Yes | Yes | Yes | Global | Yes |
| max_binlog_stmt_cache_size | Yes | Yes | Yes | Global | Yes |
| max_connect_errors | Yes | Yes | Yes | Global | Yes |
| max_connections | Yes | Yes | Yes | Global | Yes |
| max_delayed_threads | Yes | Yes | Yes | Both | Yes |
| max_error_count | Yes | Yes | Yes | Both | Yes |
| max_heap_table_size | Yes | Yes | Yes | Both | Yes |
| max_insert_delayed_threads | Yes | Both | Yes | ||
| max_join_size | Yes | Yes | Yes | Both | Yes |
| max_length_for_sort_data | Yes | Yes | Yes | Both | Yes |
| max_prepared_stmt_count | Yes | Yes | Yes | Global | Yes |
| max_relay_log_size | Yes | Yes | Yes | Global | Yes |
| max_seeks_for_key | Yes | Yes | Yes | Both | Yes |
| max_sort_length | Yes | Yes | Yes | Both | Yes |
| max_sp_recursion_depth | Yes | Yes | Yes | Both | Yes |
| max_tmp_tables | Yes | Yes | Yes | Both | Yes |
| max_user_connections | Yes | Yes | Yes | Both | Yes |
| max_write_lock_count | Yes | Yes | Yes | Global | Yes |
| memlock | Yes | Yes | Yes | Global | No |
| metadata_locks_cache_size | Yes | Global | No | ||
| min-examined-row-limit | Yes | Yes | Yes | Both | Yes |
| myisam_data_pointer_size | Yes | Yes | Yes | Global | Yes |
| myisam_max_sort_file_size | Yes | Yes | Yes | Global | Yes |
| myisam_mmap_size | Yes | Yes | Yes | Global | No |
| myisam_recover_options | Yes | Global | No | ||
| myisam_repair_threads | Yes | Yes | Yes | Both | Yes |
| myisam_sort_buffer_size | Yes | Yes | Yes | Both | Yes |
| myisam_stats_method | Yes | Yes | Yes | Both | Yes |
| myisam_use_mmap | Yes | Yes | Yes | Global | Yes |
| named_pipe | Yes | Global | No | ||
| net_buffer_length | Yes | Yes | Yes | Both | Yes |
| net_read_timeout | Yes | Yes | Yes | Both | Yes |
| net_retry_count | Yes | Yes | Yes | Both | Yes |
| net_write_timeout | Yes | Yes | Yes | Both | Yes |
| new | Yes | Yes | Yes | Both | Yes |
| old | Yes | Yes | Yes | Global | No |
| old-alter-table | Yes | Yes | Yes | ||
| - Variable: old_alter_table | Yes | Both | Yes | ||
| old-passwords | Yes | Yes | Yes | ||
| - Variable: old_passwords | Yes | Both | Yes | ||
| open-files-limit | Yes | Yes | No | ||
| - Variable: open_files_limit | Yes | Global | No | ||
| optimizer_join_cache_level | Yes | Yes | Yes | Both | Yes |
| optimizer_prune_level | Yes | Yes | Yes | Both | Yes |
| optimizer_search_depth | Yes | Yes | Yes | Both | Yes |
| optimizer_switch | Yes | Yes | Yes | Both | Yes |
| optimizer_trace | Yes | Both | Yes | ||
| optimizer_trace_features | Yes | Both | Yes | ||
| optimizer_trace_limit | Yes | Both | Yes | ||
| optimizer_trace_max_mem_size | Yes | Both | Yes | ||
| optimizer_trace_offset | Yes | Both | Yes | ||
| partition | Yes | Yes | No | ||
| - Variable: have_partitioning | Yes | Global | No | ||
| performance_schema | Yes | Yes | Yes | Global | No |
| performance_schema_accounts_size | Yes | Yes | Yes | Global | No |
| performance_schema_events_stages_history_long_size | Yes | Yes | Yes | Global | No |
| performance_schema_events_stages_history_size | Yes | Yes | Yes | Global | No |
| performance_schema_events_statements_history_long_size | Yes | Yes | Yes | Global | No |
| performance_schema_events_statements_history_size | Yes | Yes | Yes | Global | No |
| performance_schema_events_waits_history_long_size | Yes | Yes | Yes | Global | No |
| performance_schema_events_waits_history_size | Yes | Yes | Yes | Global | No |
| performance_schema_hosts_size | Yes | Yes | Yes | Global | No |
| performance_schema_max_cond_classes | Yes | Yes | Yes | Global | No |
| performance_schema_max_cond_instances | Yes | Yes | Yes | Global | No |
| performance_schema_max_file_classes | Yes | Yes | Yes | Global | No |
| performance_schema_max_file_handles | Yes | Yes | Yes | Global | No |
| performance_schema_max_file_instances | Yes | Yes | Yes | Global | No |
| performance_schema_max_mutex_classes | Yes | Yes | Yes | Global | No |
| performance_schema_max_mutex_instances | Yes | Yes | Yes | Global | No |
| performance_schema_max_rwlock_classes | Yes | Yes | Yes | Global | No |
| performance_schema_max_rwlock_instances | Yes | Yes | Yes | Global | No |
| performance_schema_max_socket_classes | Yes | Yes | Yes | Global | No |
| performance_schema_max_socket_instances | Yes | Yes | Yes | Global | No |
| performance_schema_max_stage_classes | Yes | Yes | Yes | Global | No |
| performance_schema_max_statement_classes | Yes | Yes | Yes | Global | No |
| performance_schema_max_table_handles | Yes | Yes | Yes | Global | No |
| performance_schema_max_table_instances | Yes | Yes | Yes | Global | No |
| performance_schema_max_thread_classes | Yes | Yes | Yes | Global | No |
| performance_schema_max_thread_instances | Yes | Yes | Yes | Global | No |
| performance_schema_setup_actors_size | Yes | Yes | Yes | Global | No |
| performance_schema_setup_objects_size | Yes | Yes | Yes | Global | No |
| performance_schema_users_size | Yes | Yes | Yes | Global | No |
| pid-file | Yes | Yes | No | ||
| - Variable: pid_file | Yes | Global | No | ||
| plugin_dir | Yes | Yes | Yes | Global | No |
| port | Yes | Yes | Yes | Global | No |
| preload_buffer_size | Yes | Yes | Yes | Both | Yes |
| profiling | Yes | Both | Yes | ||
| profiling_history_size | Yes | Yes | Yes | Both | Yes |
| protocol_version | Yes | Global | No | ||
| proxy_user | Yes | Session | No | ||
| pseudo_thread_id | Yes | Session | Yes | ||
| query_alloc_block_size | Yes | Yes | Yes | Both | Yes |
| query_cache_limit | Yes | Yes | Yes | Global | Yes |
| query_cache_min_res_unit | Yes | Yes | Yes | Global | Yes |
| query_cache_size | Yes | Yes | Yes | Global | Yes |
| query_cache_type | Yes | Yes | Yes | Both | Yes |
| query_cache_wlock_invalidate | Yes | Yes | Yes | Both | Yes |
| query_prealloc_size | Yes | Yes | Yes | Both | Yes |
| rand_seed1 | Yes | Session | Yes | ||
| rand_seed2 | Yes | Session | Yes | ||
| range_alloc_block_size | Yes | Yes | Yes | Both | Yes |
| read_buffer_size | Yes | Yes | Yes | Both | Yes |
| read_only | Yes | Yes | Yes | Global | Yes |
| read_rnd_buffer_size | Yes | Yes | Yes | Both | Yes |
| relay_log_basename | Yes | Global | No | ||
| relay-log-index | Yes | Yes | No | ||
| - Variable: relay_log_index | Yes | Both | No | ||
| relay_log_index | Yes | Yes | Yes | Global | No |
| relay_log_info_file | Yes | Yes | Yes | Global | No |
| relay_log_info_repository | Yes | Global | No | ||
| relay_log_purge | Yes | Yes | Yes | Global | Yes |
| relay_log_recovery | Yes | Yes | Yes | Global | Yes |
| relay_log_space_limit | Yes | Yes | Yes | Global | No |
| report-host | Yes | Yes | No | ||
| - Variable: report_host | Yes | Global | No | ||
| report-password | Yes | Yes | No | ||
| - Variable: report_password | Yes | Global | No | ||
| report-port | Yes | Yes | No | ||
| - Variable: report_port | Yes | Global | No | ||
| report-user | Yes | Yes | No | ||
| - Variable: report_user | Yes | Global | No | ||
| rpl_semi_sync_master_enabled | Yes | Global | Yes | ||
| rpl_semi_sync_master_timeout | Yes | Global | Yes | ||
| rpl_semi_sync_master_trace_level | Yes | Global | Yes | ||
| rpl_semi_sync_master_wait_no_slave | Yes | Global | Yes | ||
| rpl_semi_sync_slave_enabled | Yes | Global | Yes | ||
| rpl_semi_sync_slave_trace_level | Yes | Global | Yes | ||
| secure-auth | Yes | Yes | Yes | ||
| - Variable: secure_auth | Yes | Global | Yes | ||
| secure-file-priv | Yes | Yes | No | ||
| - Variable: secure_file_priv | Yes | Global | No | ||
| server-id | Yes | Yes | Yes | ||
| - Variable: server_id | Yes | Global | Yes | ||
| server_uuid | Yes | Global | No | ||
| shared_memory | Yes | Global | No | ||
| shared_memory_base_name | Yes | Global | No | ||
| skip-external-locking | Yes | Yes | No | ||
| - Variable: skip_external_locking | Yes | Global | No | ||
| skip-name-resolve | Yes | Yes | No | ||
| - Variable: skip_name_resolve | Yes | Global | No | ||
| skip-networking | Yes | Yes | No | ||
| - Variable: skip_networking | Yes | Global | No | ||
| skip-show-database | Yes | Yes | No | ||
| - Variable: skip_show_database | Yes | Global | No | ||
| slave_compressed_protocol | Yes | Yes | Yes | Global | Yes |
| slave_exec_mode | Yes | Global | Yes | ||
| slave-load-tmpdir | Yes | Yes | No | ||
| - Variable: slave_load_tmpdir | Yes | Global | No | ||
| slave-net-timeout | Yes | Yes | Yes | ||
| - Variable: slave_net_timeout | Yes | Global | Yes | ||
| slave_parallel_workers | Yes | Global | Yes | ||
| slave-skip-errors | Yes | Yes | No | ||
| - Variable: slave_skip_errors | Yes | Global | No | ||
| slave_sql_verify_checksum | Yes | Global | Yes | ||
| slave_transaction_retries | Yes | Yes | Yes | Global | Yes |
| slave_type_conversions | Yes | Yes | Yes | Global | No |
| slow_launch_time | Yes | Yes | Yes | Global | Yes |
| slow-query-log | Yes | Yes | Yes | ||
| - Variable: slow_query_log | Yes | Global | Yes | ||
| slow_query_log_file | Yes | Yes | Yes | Global | Yes |
| socket | Yes | Yes | Yes | Global | No |
| sort_buffer_size | Yes | Yes | Yes | Both | Yes |
| sql_auto_is_null | Yes | Both | Yes | ||
| sql_big_selects | Yes | Both | Yes | ||
| sql_big_tables | Yes | Both | Yes | ||
| sql_buffer_result | Yes | Both | Yes | ||
| sql_log_bin | Yes | Both | Yes | ||
| sql_log_off | Yes | Both | Yes | ||
| sql_low_priority_updates | Yes | Both | Yes | ||
| sql_max_join_size | Yes | Both | Yes | ||
| sql-mode | Yes | Yes | Yes | ||
| - Variable: sql_mode | Yes | Both | Yes | ||
| sql_notes | Yes | Both | Yes | ||
| sql_quote_show_create | Yes | Both | Yes | ||
| sql_safe_updates | Yes | Both | Yes | ||
| sql_select_limit | Yes | Both | Yes | ||
| sql_slave_skip_counter | Yes | Global | Yes | ||
| sql_warnings | Yes | Both | Yes | ||
| ssl-ca | Yes | Yes | No | ||
| - Variable: ssl_ca | Yes | Global | No | ||
| ssl-capath | Yes | Yes | No | ||
| - Variable: ssl_capath | Yes | Global | No | ||
| ssl-cert | Yes | Yes | No | ||
| - Variable: ssl_cert | Yes | Global | No | ||
| ssl-cipher | Yes | Yes | No | ||
| - Variable: ssl_cipher | Yes | Global | No | ||
| ssl-crl | Yes | Yes | No | ||
| - Variable: ssl_crl | Yes | Global | No | ||
| ssl-crlpath | Yes | Yes | No | ||
| - Variable: ssl_crlpath | Yes | Global | No | ||
| ssl-key | Yes | Yes | No | ||
| - Variable: ssl_key | Yes | Global | No | ||
| storage_engine | Yes | Both | Yes | ||
| sync_binlog | Yes | Yes | Yes | Global | Yes |
| sync_frm | Yes | Yes | Yes | Global | Yes |
| sync_master_info | Yes | Yes | Yes | Global | Yes |
| sync_relay_log | Yes | Yes | Yes | Global | Yes |
| sync_relay_log_info | Yes | Yes | Yes | Global | Yes |
| system_time_zone | Yes | Global | No | ||
| table_definition_cache | Yes | Yes | Yes | Global | Yes |
| table_open_cache | Yes | Yes | Yes | Global | Yes |
| thread_cache_size | Yes | Yes | Yes | Global | Yes |
| thread_concurrency | Yes | Yes | Yes | Global | No |
| thread_handling | Yes | Yes | Yes | Global | No |
| thread_stack | Yes | Yes | Yes | Global | No |
| time_format | Yes | Global | No | ||
| time_zone | Yes | Yes | Yes | Both | Yes |
| timed_mutexes | Yes | Yes | Yes | Global | Yes |
| timestamp | Yes | Session | Yes | ||
| tmp_table_size | Yes | Yes | Yes | Both | Yes |
| tmpdir | Yes | Yes | Yes | Global | No |
| transaction_alloc_block_size | Yes | Yes | Yes | Both | Yes |
| transaction_prealloc_size | Yes | Yes | Yes | Both | Yes |
| tx_isolation | Yes | Both | Yes | ||
| tx_read_only | Yes | Both | Yes | ||
| unique_checks | Yes | Both | Yes | ||
| updatable_views_with_limit | Yes | Yes | Yes | Both | Yes |
| version | Yes | Global | No | ||
| version_comment | Yes | Global | No | ||
| version_compile_machine | Yes | Global | No | ||
| version_compile_os | Yes | Global | No | ||
| wait_timeout | Yes | Yes | Yes | Both | Yes |
| warning_count | Yes | Session | No | ||
|
[a] This option is dynamic, but only the server should set this information. You should not set the value of this variable manually. [b] This option is dynamic, but only the server should set this information. You should not set the value of this variable manually. | |||||
For additional system variable information, see these sections:
- , "Using System Variables", discusses the syntax for setting and displaying system variable values.
- , "Dynamic System Variables", lists the variables that can be set at runtime.
- Information on tuning system variables can be found in , "Tuning Server Parameters".
- , "
InnoDBStartup Options and System Variables", listsInnoDBsystem variables. - MySQL Cluster System Variables, lists system variables which are specific to MariaDB Cluster.
- For information on server system variables specific to replication, see , "Replication and Binary Logging Options and Variables".
Some of the following variable descriptions refer to "enabling" or "disabling" a variable. These variables can be enabled with the SET statement by setting them to ON or 1, or disabled by setting them to OFF or 0. However, before MariaDB 5.6.2, to set such a variable on the command line or in an option file, you must set it to 1 or 0; setting it to ON or OFF will not work. For example, on the command line, --delay_key_write=1 works but --delay_key_write=ON does not. As of MariaDB 5.6.2, boolean variables can be set at startup to the values ON, TRUE, OFF, and FALSE (not case sensitive). See , "Program Option Modifiers".
Some system variables control the size of buffers or caches. For a given buffer, the server might need to allocate internal data structures. These structures typically are allocated from the total memory allocated to the buffer, and the amount of space required might be platform dependent. This means that when you assign a value to a system variable that controls a buffer size, the amount of space actually available might differ from the value assigned. In some cases, the amount might be less than the value assigned. It is also possible that the server will adjust a value upward. For example, if you assign a value of 0 to a variable for which the minimal value is 1024, the server will set the value to 1024.
Values for buffer sizes, lengths, and stack sizes are given in bytes unless otherwise specified.
Some system variables take file name values. Unless otherwise specified, the default file location is the data directory if the value is a relative path name. To specify the location explicitly, use an absolute path name. Suppose that the data directory is /var/mysql/data. If a file-valued variable is given as a relative path name, it will be located under /var/mysql/data. If the value is an absolute path name, its location is as given by the path name.
autocommit
Command-Line Format --autocommit[=#]Option-File Format autocommitOption Sets Variable Yes, autocommitVariable Name autocommitVariable Scope Global, Session Dynamic Variable Yes Permitted Values Type booleanThe autocommit mode. If set to 1, all changes to a table take effect immediately. If set to 0, you must use
COMMITto accept a transaction orROLLBACKto cancel it. Ifautocommitis 0 and you change it to 1, MariaDB performs an automaticCOMMITof any open transaction. Another way to begin a transaction is to use aSTART TRANSACTIONorBEGINstatement. See , "START TRANSACTION,COMMIT, andROLLBACKSyntax".By default, client connections begin with
autocommitset to 1. To cause clients to begin with a default of 0, set the globalautocommitvalue by starting the server with the--autocommit=0option. To set the variable using an option file, include these lines:[mysqld] autocommit=0
automatic_sp_privileges
Variable Name automatic_sp_privilegesVariable Scope Global Dynamic Variable Yes Permitted Values Type booleanDefault TRUEWhen this variable has a value of 1 (the default), the server automatically grants the
EXECUTEandALTER ROUTINEprivileges to the creator of a stored routine, if the user cannot already execute and alter or drop the routine. (TheALTER ROUTINEprivilege is required to drop the routine.) The server also automatically drops those privileges from the creator when the routine is dropped. Ifautomatic_sp_privilegesis 0, the server does not automatically add or drop these privileges.The creator of a routine is the account used to execute the
CREATEstatement for it. This might not be the same as the account named as theDEFINERin the routine definition.back_log
Command-Line Format --back_log=#Option-File Format back_logOption Sets Variable Yes, back_logVariable Name back_logVariable Scope Global Dynamic Variable No Permitted Values Type numericDefault 50Range 1 .. 65535The number of outstanding connection requests MariaDB can have. This comes into play when the main MariaDB thread gets very many connection requests in a very short time. It then takes some time (although very little) for the main thread to check the connection and start a new thread. The
back_logvalue indicates how many requests can be stacked during this short time before MariaDB momentarily stops answering new requests. You need to increase this only if you expect a large number of connections in a short period of time.In other words, this value is the size of the listen queue for incoming TCP/IP connections. Your operating system has its own limit on the size of this queue. The manual page for the Unix
listen()system call should have more details. Check your OS documentation for the maximum value for this variable.back_logcannot be set higher than your operating system limit.basedir
Command-Line Format --basedir=path-bOption-File Format basedirOption Sets Variable Yes, basedirVariable Name basedirVariable Scope Global Dynamic Variable No Permitted Values Type file nameThe MariaDB installation base directory. This variable can be set with the
--basediroption. Relative path names for other variables usually are resolved relative to the base directory.big_tables
If set to 1, all temporary tables are stored on disk rather than in memory. This is a little slower, but the error
The tabledoes not occur fortbl_nameis fullSELECToperations that require a large temporary table. The default value for a new connection is 0 (use in-memory temporary tables). Normally, you should never need to set this variable, because in-memory tables are automatically converted to disk-based tables as required.bind_address
Command-Line Format --bind-address=nameOption-File Format bind-address=nameVariable Name bind-addressVariable Scope Global Dynamic Variable No Permitted Values Type stringDefault 0.0.0.0Range 255.255.255.255The value of the
--bind-addressoption. This variable was added in MariaDB 5.6.1.bulk_insert_buffer_size
Command-Line Format --bulk_insert_buffer_size=#Option-File Format bulk_insert_buffer_sizeOption Sets Variable Yes, bulk_insert_buffer_sizeVariable Name bulk_insert_buffer_sizeVariable Scope Global, Session Dynamic Variable Yes Permitted Values Platform Bit Size 32Type numericDefault 8388608Range 0 .. 4294967295Permitted Values Platform Bit Size 64Type numericDefault 8388608Range 0 .. 18446744073709547520MyISAMuses a special tree-like cache to make bulk inserts faster forINSERT ... SELECT,INSERT ... VALUES (...), (...), ..., andLOAD DATA INFILEwhen adding data to nonempty tables. This variable limits the size of the cache tree in bytes per thread. Setting it to 0 disables this optimization. The default value is 8MB.character_set_client
Variable Name character_set_clientVariable Scope Global, Session Dynamic Variable Yes Permitted Values Type stringThe character set for statements that arrive from the client. The session value of this variable is set using the character set requested by the client when the client connects to the server. (Many clients support a
--default-character-setoption to enable this character set to be specified explicitly. See also , "Connection Character Sets and Collations".) The global value of the variable is used to set the session value in cases when the client-requested value is unknown or not available, or the server is configured to ignore client requests:- The client is from a version of MariaDB older than MySQL, and thus does not request a character set.
- The client requests a character set not known to the server. For example, a Japanese-enabled client requests
sjiswhen connecting to a server not configured withsjissupport. - mysqld was started with the
--skip-character-set-client-handshakeoption, which causes it to ignore client character set configuration. This reproduces MariaDB behavior and is useful should you wish to upgrade the server without upgrading all the clients.
ucs2,utf16,utf16le, andutf32cannot be used as a client character set, which means that they also do not work forSET NAMESorSET CHARACTER SET.character_set_connection
Variable Name character_set_connectionVariable Scope Global, Session Dynamic Variable Yes Permitted Values Type stringThe character set used for literals that do not have a character set introducer and for number-to-string conversion.
character_set_database
Variable Name character_set_databaseVariable Scope Global, Session Dynamic Variable Yes Footnote This option is dynamic, but only the server should set this information. You should not set the value of this variable manually. Permitted Values Type stringThe character set used by the default database. The server sets this variable whenever the default database changes. If there is no default database, the variable has the same value as
character_set_server.character_set_filesystem
Command-Line Format --character-set-filesystem=nameOption-File Format character-set-filesystemOption Sets Variable Yes, character_set_filesystemVariable Name character_set_filesystemVariable Scope Global, Session Dynamic Variable Yes Permitted Values Type stringThe file system character set. This variable is used to interpret string literals that refer to file names, such as in the
LOAD DATA INFILEandSELECT ... INTO OUTFILEstatements and theLOAD_FILE()function. Such file names are converted fromcharacter_set_clienttocharacter_set_filesystembefore the file opening attempt occurs. The default value isbinary, which means that no conversion occurs. For systems on which multi-byte file names are permitted, a different value may be more appropriate. For example, if the system represents file names using UTF-8, setcharacter_set_filesystemto'utf8'.character_set_results
Variable Name character_set_resultsVariable Scope Global, Session Dynamic Variable Yes Permitted Values Type stringThe character set used for returning query results such as result sets or error messages to the client.
character_set_server
Command-Line Format --character-set-serverOption-File Format character-set-serverOption Sets Variable Yes, character_set_serverVariable Name character_set_serverVariable Scope Global, Session Dynamic Variable Yes Permitted Values Type stringThe server's default character set.
character_set_system
Variable Name character_set_systemVariable Scope Global Dynamic Variable No Permitted Values Type stringThe character set used by the server for storing identifiers. The value is always
utf8.character_sets_dir
Command-Line Format --character-sets-dir=pathOption-File Format character-sets-dir=pathOption Sets Variable Yes, character_sets_dirVariable Name character-sets-dirVariable Scope Global Dynamic Variable No Permitted Values Type directory nameThe directory where character sets are installed.
collation_connection
Variable Name collation_connectionVariable Scope Global, Session Dynamic Variable Yes Permitted Values Type stringThe collation of the connection character set.
collation_database
Variable Name collation_databaseVariable Scope Global, Session Dynamic Variable Yes Footnote This option is dynamic, but only the server should set this information. You should not set the value of this variable manually. Permitted Values Type stringThe collation used by the default database. The server sets this variable whenever the default database changes. If there is no default database, the variable has the same value as
collation_server.collation_server
Command-Line Format --collation-serverOption-File Format collation-serverOption Sets Variable Yes, collation_serverVariable Name collation_serverVariable Scope Global, Session Dynamic Variable Yes Permitted Values Type stringThe server's default collation.
completion_type
Command-Line Format --completion_type=#Option-File Format completion_typeOption Sets Variable Yes, completion_typeVariable Name completion_typeVariable Scope Global, Session Dynamic Variable Yes Permitted Values Type enumerationDefault NO_CHAINValid Values NO_CHAINCHAINRELEASE012The transaction completion type. This variable can take the values shown in the following table. The variable can be assigned using either the name values or corresponding integer values.
Value Description NO_CHAIN(or 0)COMMITandROLLBACKare unaffected. This is the default value.CHAIN(or 1)COMMITandROLLBACKare equivalent toCOMMIT AND CHAINandROLLBACK AND CHAIN, respectively. (A new transaction starts immediately with the same isolation level as the just-terminated transaction.)RELEASE(or 2)COMMITandROLLBACKare equivalent toCOMMIT RELEASEandROLLBACK RELEASE, respectively. (The server disconnects after terminating the transaction.)completion-typeaffects transactions that begin withSTART TRANSACTIONorBEGINand end withCOMMITorROLLBACK. It does not apply to implicit commits resulting from execution of the statements listed in , "Statements That Cause an Implicit Commit". It also does not apply forXA COMMIT,XA ROLLBACK, or whenautocommit=1.concurrent_insert
Command-Line Format --concurrent_insert[=#]Option-File Format concurrent_insertOption Sets Variable Yes, concurrent_insertVariable Name concurrent_insertVariable Scope Global Dynamic Variable Yes Permitted Values Type enumerationDefault AUTOValid Values NEVERAUTOALWAYS012If
AUTO(the default), MariaDB permitsINSERTandSELECTstatements to run concurrently forMyISAMtables that have no free blocks in the middle of the data file. If you start mysqld with--skip-new, this variable is set toNEVER.This variable can take the values shown in the following table. The variable can be assigned using either the name values or corresponding integer values.
Value Description NEVER(or 0)Disables concurrent inserts AUTO(or 1)(Default) Enables concurrent insert for MyISAMtables that do not have holesALWAYS(or 2)Enables concurrent inserts for all MyISAMtables, even those that have holes. For a table with a hole, new rows are inserted at the end of the table if it is in use by another thread. Otherwise, MariaDB acquires a normal write lock and inserts the row into the hole.See also , "Concurrent Inserts".
connect_timeout
Command-Line Format --connect_timeout=#Option-File Format connect_timeoutOption Sets Variable Yes, connect_timeoutVariable Name connect_timeoutVariable Scope Global Dynamic Variable Yes Permitted Values Type numericDefault 10The number of seconds that the mysqld server waits for a connect packet before responding with
Bad handshake. The default value is 10 seconds.Increasing the
connect_timeoutvalue might help if clients frequently encounter errors of the formLost connection to MariaDB server at '.XXX', system error:errnodatadir
Command-Line Format --datadir=path-hOption-File Format datadirOption Sets Variable Yes, datadirVariable Name datadirVariable Scope Global Dynamic Variable No Permitted Values Type file nameThe MariaDB data directory. This variable can be set with the
--datadiroption.date_format
This variable is unused.
datetime_format
This variable is unused.
debug
Command-Line Format --debug[=debug_options]Option-File Format debugVariable Name debugVariable Scope Global, Session Dynamic Variable Yes Permitted Values Type stringDefault 'd:t:o,/tmp/mysqld.trace'This variable indicates the current debugging settings. It is available only for servers built with debugging support. The initial value comes from the value of instances of the
--debugoption given at server startup. The global and session values may be set at runtime; theSUPERprivilege is required, even for the session value.Assigning a value that begins with
+or-cause the value to added to or subtracted from the current value:mysql>
SET debug = 'T';mysql>SELECT @@debug;+---------+ | @@debug | +---------+ | T | +---------+ mysql>SET debug = '+P';mysql>SELECT @@debug;+---------+ | @@debug | +---------+ | P:T | +---------+ mysql>SET debug = '-P';mysql>SELECT @@debug;+---------+ | @@debug | +---------+ | T | +---------+debug_sync
Variable Name debug_syncVariable Scope Session Dynamic Variable Yes Permitted Values Type stringThis variable is the user interface to the Debug Sync facility. Use of Debug Sync requires that MariaDB be configured with the
-DENABLE_DEBUG_SYNC=1option (see , "MySQL Source-Configuration Options"). If Debug Sync is not compiled in, this system variable is not available.The global variable value is read only and indicates whether the facility is enabled. By default, Debug Sync is disabled and the value of
debug_syncisOFF. If the server is started with--debug-sync-timeout=, whereNNis a timeout value greater than 0, Debug Sync is enabled and the value ofdebug_syncisON - current signalfollowed by the signal name. Also,Nbecomes the default timeout for individual synchronization points.The session value can be read by any user and will have the same value as the global variable. The session value can be set by users that have the
SUPERprivilege to control synchronization points.For a description of the Debug Sync facility and how to use synchronization points, see MySQL Internals: Test Synchronization.
default_storage_engine
Command-Line Format --default-storage-engine=nameOption-File Format default-storage-engineOption Sets Variable Yes, default_storage_engineVariable Name default_storage_engineVariable Scope Global, Session Dynamic Variable Yes Permitted Values Type enumerationDefault InnoDBThe default storage engine. As of MariaDB 5.6.3, this variable sets the storage engine for permanent tables only. To set the storage engine for
TEMPORARYtables, set thedefault_tmp_storage_enginesystem variable.default-storage-engineshould be used in preference tostorage_engine, which is deprecated.If you disable the default storage engine at server startup, you must set the default engine for both permanent and
TEMPORARYtables to a different engine or the server will not start.default_tmp_storage_engine
The default storage engine for
TEMPORARYtables (created withCREATE TEMPORARY TABLE). To set the storage engine for permanent tables, set thedefault_storage_enginesystem variable.If you disable the default storage engine at server startup, you must set the default engine for both permanent and
TEMPORARYtables to a different engine or the server will not start.default_tmp_storage_enginewas added in MariaDB 5.6.3.default_week_format
Command-Line Format --default_week_format=#Option-File Format default_week_formatOption Sets Variable Yes, default_week_formatVariable Name default_week_formatVariable Scope Global, Session Dynamic Variable Yes Permitted Values Type numericDefault 0Range 0 .. 7The default mode value to use for the
WEEK()function. See , "Date and Time Functions".delay_key_write
Command-Line Format --delay-key-write[=name]Option-File Format delay-key-writeOption Sets Variable Yes, delay_key_writeVariable Name delay-key-writeVariable Scope Global Dynamic Variable Yes Permitted Values Type enumerationDefault ONValid Values ONOFFALLThis option applies only to
MyISAMtables. It can have one of the following values to affect handling of theDELAY_KEY_WRITEtable option that can be used inCREATE TABLEstatements.Option Description OFFDELAY_KEY_WRITEis ignored.ONMySQL honors any DELAY_KEY_WRITEoption specified inCREATE TABLEstatements. This is the default value.ALLAll new opened tables are treated as if they were created with the DELAY_KEY_WRITEoption enabled.If
DELAY_KEY_WRITEis enabled for a table, the key buffer is not flushed for the table on every index update, but only when the table is closed. This speeds up writes on keys a lot, but if you use this feature, you should add automatic checking of allMyISAMtables by starting the server with the--myisam-recover-optionsoption (for example,--myisam-recover-options=BACKUP,FORCE). See , "Server Command Options", and , "MyISAMStartup Options".WarningIf you enable external locking with
--external-locking, there is no protection against index corruption for tables that use delayed key writes.delayed_insert_limit
Command-Line Format --delayed_insert_limit=#Option-File Format delayed_insert_limitOption Sets Variable Yes, delayed_insert_limitVariable Name delayed_insert_limitVariable Scope Global Dynamic Variable Yes Permitted Values Platform Bit Size 32Type numericDefault 100Range 1 .. 4294967295Permitted Values Platform Bit Size 64Type numericDefault 100Range 1 .. 18446744073709547520After inserting
delayed-insert-limitdelayed rows into a nontransactional table, theINSERT DELAYEDhandler thread checks whether there are anySELECTstatements pending. If so, it permits them to execute before continuing to insert delayed rows.delayed_insert_timeout
Command-Line Format --delayed_insert_timeout=#Option-File Format delayed_insert_timeoutOption Sets Variable Yes, delayed_insert_timeoutVariable Name delayed_insert_timeoutVariable Scope Global Dynamic Variable Yes Permitted Values Type numericDefault 300How many seconds an
INSERT DELAYEDhandler thread should wait forINSERTstatements before terminating.delayed_queue_size
Command-Line Format --delayed_queue_size=#Option-File Format delayed_queue_sizeOption Sets Variable Yes, delayed_queue_sizeVariable Name delayed_queue_sizeVariable Scope Global Dynamic Variable Yes Permitted Values Platform Bit Size 32Type numericDefault 1000Range 1 .. 4294967295Permitted Values Platform Bit Size 64Type numericDefault 1000Range 1 .. 18446744073709547520This is a per-table limit on the number of rows to queue when handling
INSERT DELAYEDstatements for nontransactional tables. If the queue becomes full, any client that issues anINSERT DELAYEDstatement waits until there is room in the queue again.div_precision_increment
Command-Line Format --div_precision_increment=#Option-File Format div_precision_incrementOption Sets Variable Yes, div_precision_incrementVariable Name div_precision_incrementVariable Scope Global, Session Dynamic Variable Yes Permitted Values Type numericDefault 4Range 0 .. 30This variable indicates the number of digits by which to increase the scale of the result of division operations performed with the
/operator. The default value is 4. The minimum and maximum values are 0 and 30, respectively. The following example illustrates the effect of increasing the default value.mysql>
SELECT 1/7;+--------+ | 1/7 | +--------+ | 0.1429 | +--------+ mysql>SET div_precision_increment = 12;mysql>SELECT 1/7;+----------------+ | 1/7 | +----------------+ | 0.142857142857 | +----------------+engine_condition_pushdown
Version Removed 5.6.1 Command-Line Format --engine-condition-pushdownOption-File Format engine-condition-pushdownOption Sets Variable Yes, engine_condition_pushdownVariable Name engine_condition_pushdownVariable Scope Global, Session Dynamic Variable Yes Deprecated 5.5.3, by optimizer_switchPermitted Values Type booleanDefault ONThis variable was removed in MariaDB 5.6.1. Use the
engine_condition_pushdownflag of theoptimizer_switchvariable instead. See , "Controlling Switchable Optimizations".end_markers_in_json
Version Introduced 5.6.5 Variable Name end_markers_in_jsonVariable Scope Global, Session Dynamic Variable Yes Permitted Values Type booleanDefault OFFWhether optimizer JSON output should add end markers.
eq_range_index_dive_limit
Version Introduced 5.6.5 Command-Line Format --eq_range_index_dive_limit=#Option-File Format eq_range_index_dive_limitOption Sets Variable Yes, eq_range_index_dive_limitVariable Name eq_range_index_dive_limitVariable Scope Global, Session Dynamic Variable Yes Permitted Values Type numericDefault 10Range 0 .. 4294967295This variable indicates the number of equality ranges in an equality comparison condition when the optimizer should switch from using index dives to index statistics in estimating the number of qualifying rows. It applies to evaluation of expressions that have either of these equivalent forms, where the optimizer uses a non-unique index to look up
col_namevalues:col_nameIN(val1, ...,valN)col_name=val1OR ... ORcol_name=valNIn both cases, the expression contains
Nequality ranges. The optimizer can make row estimates using index dives or index statistics. Ifeq_range_index_dive_limitis greater than 0, the optimizer uses existing index statistics instead of index dives if there areeq_range_index_dive_limitor more equality ranges. Thus, to permit use of index dives for up toNequality ranges, seteq_range_index_dive_limittoN+ 1. Seteq_range_index_dive_limitto 0 to disable use of index statistics and always use index dives regardless ofN.For more information, see , "Equality Range Optimization of Many-Valued Comparisons".
This variable was added in MariaDB 5.6.5. Before 5.6.5, the optimizer makes row estimates using index dives in all cases.
To update table index statistics for best estimates, use
ANALYZE TABLE.error_count
The number of errors that resulted from the last statement that generated messages. This variable is read only. See , "
SHOW ERRORSSyntax".event_scheduler
Command-Line Format --event-scheduler[=value]Option-File Format event-schedulerOption Sets Variable Yes, event_schedulerVariable Name event_schedulerVariable Scope Global Dynamic Variable Yes Permitted Values Type enumerationDefault OFFValid Values ONOFFDISABLEDThis variable indicates the status of the Event Scheduler; possible values are
ON,OFF, andDISABLED, with the default beingOFF. This variable and its effects on the Event Scheduler's operation are discussed in greater detail in the Overview section of the Events chapter.expire_logs_days
Command-Line Format --expire_logs_days=#Option-File Format expire_logs_daysOption Sets Variable Yes, expire_logs_daysVariable Name expire_logs_daysVariable Scope Global Dynamic Variable Yes Permitted Values Type numericDefault 0Range 0 .. 99The number of days for automatic binary log file removal. The default is 0, which means "no automatic removal." Possible removals happen at startup and when the binary log is flushed. Log flushing occurs as indicated in , "MySQL Server Logs".
To remove binary log files manually, use the
PURGE BINARY LOGSstatement. See , "PURGE BINARY LOGSSyntax".external_user
Variable Name external_userVariable Scope Session Dynamic Variable No Permitted Values Type stringThe external user name used during the authentication process, as set by the plugin used to authenticate the client. With native (built-in) MariaDB authentication, or if the plugin does not set the value, this variable is
NULL. See , "Proxy Users".flush
Command-Line Format --flushOption-File Format flushVariable Name flushVariable Scope Global Dynamic Variable Yes Permitted Values Type booleanDefault OFFIf
ON, the server flushes (synchronizes) all changes to disk after each SQL statement. Normally, MariaDB does a write of all changes to disk only after each SQL statement and lets the operating system handle the synchronizing to disk. See "What to Do If MariaDB Keeps Crashing". This variable is set toONif you start mysqld with the--flushoption.flush_time
Command-Line Format --flush_time=#Option-File Format flush_timeOption Sets Variable Yes, flush_timeVariable Name flush_timeVariable Scope Global Dynamic Variable Yes Permitted Values Type numericDefault 0Min Value 0Permitted Values Type (windows) numericDefault 1800Min Value 0If this is set to a nonzero value, all tables are closed every
flush_timeseconds to free up resources and synchronize unflushed data to disk. This option is best used only on Windows 9x or Me, or on systems with minimal resources.foreign_key_checks
If set to 1 (the default), foreign key constraints for
InnoDBtables are checked. If set to 0, they are ignored. Typically you leave this setting enabled during normal operation, to enforce referential integrity. Disabling foreign key checking can be useful for reloadingInnoDBtables in an order different from that required by their parent/child relationships. See , "FOREIGN KEYConstraints".Setting
foreign_key_checksto 0 also affects data definition statements:DROP SCHEMAdrops a schema even if it contains tables that have foreign keys that are referred to by tables outside the schema, andDROP TABLEdrops tables that have foreign keys that are referred to by other tables.NoteSetting
foreign_key_checksto 1 does not trigger a scan of the existing table data. Therefore, rows added to the table whileforeign_key_checks = 0will not be verified for consistency.ft_boolean_syntax
Command-Line Format --ft_boolean_syntax=nameOption-File Format ft_boolean_syntaxVariable Name ft_boolean_syntaxVariable Scope Global Dynamic Variable Yes Permitted Values Type stringDefault +-><()~*:''&The list of operators supported by boolean full-text searches performed using
IN BOOLEAN MODE. See , "Boolean Full-Text Searches".The default variable value is
'+ -><()~*:''&|'. The rules for changing the value are as follows:- Operator function is determined by position within the string.
- The replacement value must be 14 characters.
- Each character must be an ASCII nonalphanumeric character.
- Either the first or second character must be a space.
- No duplicates are permitted except the phrase quoting operators in positions 11 and 12. These two characters are not required to be the same, but they are the only two that may be.
- Positions 10, 13, and 14 (which by default are set to "
:", "&", and "|") are reserved for future extensions.
ft_max_word_len
Command-Line Format --ft_max_word_len=#Option-File Format ft_max_word_lenOption Sets Variable Yes, ft_max_word_lenVariable Name ft_max_word_lenVariable Scope Global Dynamic Variable No Permitted Values Type numericMin Value 10The maximum length of the word to be included in a
MyISAMFULLTEXTindex.NoteFULLTEXTindexes onMyISAMtables must be rebuilt after changing this variable. UseREPAIR TABLE.tbl_nameQUICKft_min_word_len
Command-Line Format --ft_min_word_len=#Option-File Format ft_min_word_lenOption Sets Variable Yes, ft_min_word_lenVariable Name ft_min_word_lenVariable Scope Global Dynamic Variable No Permitted Values Type numericDefault 4Min Value 1The minimum length of the word to be included in a
MyISAMFULLTEXTindex.NoteFULLTEXTindexes onMyISAMtables must be rebuilt after changing this variable. UseREPAIR TABLE.tbl_nameQUICKft_query_expansion_limit
Command-Line Format --ft_query_expansion_limit=#Option-File Format ft_query_expansion_limitOption Sets Variable Yes, ft_query_expansion_limitVariable Name ft_query_expansion_limitVariable Scope Global Dynamic Variable No Permitted Values Type numericDefault 20Range 0 .. 1000The number of top matches to use for full-text searches performed using
WITH QUERY EXPANSION.ft_stopword_file
Command-Line Format --ft_stopword_file=file_nameOption-File Format ft_stopword_file=file_nameOption Sets Variable Yes, ft_stopword_fileVariable Name ft_stopword_fileVariable Scope Global Dynamic Variable No Permitted Values Type file nameThe file from which to read the list of stopwords for full-text searches on
MyISAMtables. The server looks for the file in the data directory unless an absolute path name is given to specify a different directory. All the words from the file are used; comments are not honored. By default, a built-in list of stopwords is used (as defined in thestorage/myisam/ft_static.cfile). Setting this variable to the empty string ('') disables stopword filtering. See also , "Full-Text Stopwords".NoteFULLTEXTindexes onMyISAMtables must be rebuilt after changing this variable or the contents of the stopword file. UseREPAIR TABLE.tbl_nameQUICKgeneral_log
Command-Line Format --general-logOption-File Format general-logOption Sets Variable Yes, general_logVariable Name general_logVariable Scope Global Dynamic Variable Yes Permitted Values Type booleanDefault OFFWhether the general query log is enabled. The value can be 0 (or
OFF) to disable the log or 1 (orON) to enable the log. The default value depends on whether the--general_logoption is given. The destination for log output is controlled by thelog_outputsystem variable; if that value isNONE, no log entries are written even if the log is enabled.general_log_file
Command-Line Format --general-log-file=file_nameOption-File Format general_log_fileOption Sets Variable Yes, general_log_fileVariable Name general_log_fileVariable Scope Global Dynamic Variable Yes Permitted Values Type file nameDefault host_name.logThe name of the general query log file. The default value is
host_name.log--general_log_fileoption.group_concat_max_len
Command-Line Format --group_concat_max_len=#Option-File Format group_concat_max_lenOption Sets Variable Yes, group_concat_max_lenVariable Name group_concat_max_lenVariable Scope Global, Session Dynamic Variable Yes Permitted Values Platform Bit Size 32Type numericDefault 1024Range 4 .. 4294967295Permitted Values Platform Bit Size 64Type numericDefault 1024Range 4 .. 18446744073709547520The maximum permitted result length in bytes for the
GROUP_CONCAT()function. The default is 1024.have_compress
YESif thezlibcompression library is available to the server,NOif not. If not, theCOMPRESS()andUNCOMPRESS()functions cannot be used.have_crypt
YESif thecrypt()system call is available to the server,NOif not. If not, theENCRYPT()function cannot be used.have_csv
YESif mysqld supportsCSVtables,NOif not.This variable was removed in MariaDB 5.6.1. Use
SHOW ENGINESinstead.have_dynamic_loading
YESif mysqld supports dynamic loading of plugins,NOif not.have_geometry
YESif the server supports spatial data types,NOif not.have_innodb
YESif mysqld supportsInnoDBtables.DISABLEDif--skip-innodbis used.This variable was removed in MariaDB 5.6.1. Use
SHOW ENGINESinstead.have_openssl
This variable is an alias for
have_ssl.have_partitioning
YESif mysqld supports partitioning.This variable was removed in MariaDB 5.6.1. Use
SHOW ENGINESinstead.have_profiling
YESif statement profiling is enabled,NOif not. See , "SHOW PROFILESyntax".have_query_cache
YESif mysqld supports the query cache,NOif not.have_rtree_keys
YESifRTREEindexes are available,NOif not. (These are used for spatial indexes inMyISAMtables.)have_ssl
YESif mysqld supports SSL connections,NOif not.DISABLEDindicates that the server was compiled with SSL support, but but was not started with the appropriate--ssl-options. See , "Using SSL Connections", for more information.xxxhave_symlink
YESif symbolic link support is enabled,NOif not. This is required on Unix for support of theDATA DIRECTORYandINDEX DIRECTORYtable options, and on Windows for support of data directory symlinks.host_cache_size
Version Introduced 5.6.5 Command-Line Format --host_cache_size=#Option-File Format host_cache_sizeOption Sets Variable Yes, host_cache_sizeVariable Name host_cache_sizeVariable Scope Global Dynamic Variable Yes Permitted Values Type numericDefault 128Range 0 .. 65536The size of the internal host cache (see , "DNS Lookup Optimization and the Host Cache"). Setting the size to 0 disables the host cache. Changing the cache size at runtime implicitly causes a
FLUSH HOSTSoperation to clear the host cache and truncate thehost_cachetable.Use of
--skip-host-cacheis similar to setting thehost_cache_sizesystem variable to 0, buthost_cache_sizeis more flexible because it can also be used to resize, enable, or disable the host cache at runtime, not just at server startup. If you start the server with--skip-host-cache, the host cache cannot be re-enabled at runtime.This variable was added in MariaDB 5.6.5.
hostname
Variable Name hostnameVariable Scope Global Dynamic Variable No Permitted Values Type stringThe server sets this variable to the server host name at startup.
identity
This variable is a synonym for the
last_insert_idvariable. It exists for compatibility with other database systems. You can read its value withSELECT @@identity, and set it usingSET identity.ignore_db_dirs
Version Introduced 5.6.3 Variable Name ignore_db_dirsVariable Scope Global Dynamic Variable No Permitted Values Type stringA comma-separated list of names that are not considered as database directories in the data directory. The value is set from any instances of
--ignore-db-dirgiven at server startup.This variable was added in MariaDB 5.6.3.
init_connect
Command-Line Format --init-connect=nameOption-File Format init_connectOption Sets Variable Yes, init_connectVariable Name init_connectVariable Scope Global Dynamic Variable Yes Permitted Values Type stringA string to be executed by the server for each client that connects. The string consists of one or more SQL statements, separated by semicolon characters. For example, each client session begins by default with autocommit mode enabled. For older servers (before MariaDB 5.5.8), there is no global
autocommitsystem variable to specify that autocommit should be disabled by default, but as a workaroundinit_connectcan be used to achieve the same effect:SET GLOBAL init_connect='SET autocommit=0';
The
init_connectvariable can also be set on the command line or in an option file. To set the variable as just shown using an option file, include these lines:[mysqld] init_connect='SET autocommit=0'
The content of
init-connectis not executed for users that have theSUPERprivilege. This is done so that an erroneous value forinit_connectdoes not prevent all clients from connecting. For example, the value might contain a statement that has a syntax error, thus causing client connections to fail. Not executinginit_connectfor users that have theSUPERprivilege enables them to open a connection and fix theinit_connectvalue.init_file
Command-Line Format --init-file=file_nameOption-File Format init-file=file_nameOption Sets Variable Yes, init_fileVariable Name init_fileVariable Scope Global Dynamic Variable No Permitted Values Type file nameThe name of the file specified with the
--init-fileoption when you start the server. This should be a file containing SQL statements that you want the server to execute when it starts. Each statement must be on a single line and should not include comments. No statement terminator such as;,\g, or\Gshould be given at the end of each statement.Note that the
--init-fileoption is unavailable if MariaDB was configured with theDISABLE_GRANT_OPTIONScompiler flag. See , "MySQL Source-Configuration Options".innodb_xxx
InnoDBsystem variables are listed in , "InnoDBStartup Options and System Variables".insert_id
The value to be used by the following
INSERTorALTER TABLEstatement when inserting anAUTO_INCREMENTvalue. This is mainly used with the binary log.interactive_timeout
Command-Line Format --interactive_timeout=#Option-File Format interactive_timeoutOption Sets Variable Yes, interactive_timeoutVariable Name interactive_timeoutVariable Scope Global, Session Dynamic Variable Yes Permitted Values Type numericDefault 28800Min Value 1The number of seconds the server waits for activity on an interactive connection before closing it. An interactive client is defined as a client that uses the
CLIENT_INTERACTIVEoption tomysql_real_connect(). See alsowait_timeout.join_buffer_size
Command-Line Format --join_buffer_size=#Option-File Format join_buffer_sizeOption Sets Variable Yes, join_buffer_sizeVariable Name join_buffer_sizeVariable Scope Global, Session Dynamic Variable Yes The minimum size of the buffer that is used for plain index scans, range index scans, and joins that do not use indexes and thus perform full table scans. Normally, the best way to get fast joins is to add indexes. Increase the value of
join_buffer_sizeto get a faster full join when adding indexes is not possible. One join buffer is allocated for each full join between two tables. For a complex join between several tables for which indexes are not used, multiple join buffers might be necessary. There is no gain from setting the buffer larger than required to hold each matching row, and all joins allocate at least the minimum size, so use caution in setting this variable to a large value globally. It is better to keep the global setting small and change to a larger setting only in sessions that are doing large joins. Memory allocation time can cause substantial performance drops if the global size is larger than needed by most queries that use it.The maximum permissible setting for
join_buffer_sizeis 4GB. Values larger than 4GB are permitted for 64-bit platforms (except 64-bit Windows, for which large values are truncated to 4GB with a warning).keep_files_on_create
Command-Line Format --keep_files_on_create=#Option-File Format keep_files_on_createOption Sets Variable Yes, keep_files_on_createVariable Name keep_files_on_createVariable Scope Global, Session Dynamic Variable Yes Permitted Values Type booleanDefault OFFIf a
MyISAMtable is created with noDATA DIRECTORYoption, the.MYDfile is created in the database directory. By default, ifMyISAMfinds an existing.MYDfile in this case, it overwrites it. The same applies to.MYIfiles for tables created with noINDEX DIRECTORYoption. To suppress this behavior, set thekeep_files_on_createvariable toON(1), in which caseMyISAMwill not overwrite existing files and returns an error instead. The default value isOFF(0).If a
MyISAMtable is created with aDATA DIRECTORYorINDEX DIRECTORYoption and an existing.MYDor.MYIfile is found, MyISAM always returns an error. It will not overwrite a file in the specified directory.key_buffer_size
Command-Line Format --key_buffer_size=#Option-File Format key_buffer_sizeOption Sets Variable Yes, key_buffer_sizeVariable Name key_buffer_sizeVariable Scope Global Dynamic Variable Yes Permitted Values Platform Bit Size 32Type numericDefault 8388608Range 8 .. 4294967295Index blocks for
MyISAMtables are buffered and are shared by all threads.key_buffer_sizeis the size of the buffer used for index blocks. The key buffer is also known as the key cache.The maximum permissible setting for
key_buffer_sizeis 4GB on 32-bit platforms. Values larger than 4GB are permitted for 64-bit platforms. The effective maximum size might be less, depending on your available physical RAM and per-process RAM limits imposed by your operating system or hardware platform. The value of this variable indicates the amount of memory requested. Internally, the server allocates as much memory as possible up to this amount, but the actual allocation might be less.You can increase the value to get better index handling for all reads and multiple writes; on a system whose primary function is to run MariaDB using the
MyISAMstorage engine, 25% of the machine's total memory is an acceptable value for this variable. However, you should be aware that, if you make the value too large (for example, more than 50% of the machine's total memory), your system might start to page and become extremely slow. This is because MariaDB relies on the operating system to perform file system caching for data reads, so you must leave some room for the file system cache. You should also consider the memory requirements of any other storage engines that you may be using in addition toMyISAM.For even more speed when writing many rows at the same time, use
LOCK TABLES. See , "Speed ofINSERTStatements".You can check the performance of the key buffer by issuing a
SHOW STATUSstatement and examining theKey_read_requests,Key_reads,Key_write_requests, andKey_writesstatus variables. (See , "SHOWSyntax".) TheKey_reads/Key_read_requestsratio should normally be less than 0.01. TheKey_writes/Key_write_requestsratio is usually near 1 if you are using mostly updates and deletes, but might be much smaller if you tend to do updates that affect many rows at the same time or if you are using theDELAY_KEY_WRITEtable option.The fraction of the key buffer in use can be determined using
key_buffer_sizein conjunction with theKey_blocks_unusedstatus variable and the buffer block size, which is available from thekey_cache_block_sizesystem variable:1 - ((Key_blocks_unused * key_cache_block_size) / key_buffer_size)
This value is an approximation because some space in the key buffer is allocated internally for administrative structures. Factors that influence the amount of overhead for these structures include block size and pointer size. As block size increases, the percentage of the key buffer lost to overhead tends to decrease. Larger blocks results in a smaller number of read operations (because more keys are obtained per read), but conversely an increase in reads of keys that are not examined (if not all keys in a block are relevant to a query).
It is possible to create multiple
MyISAMkey caches. The size limit of 4GB applies to each cache individually, not as a group. See , "TheMyISAMKey Cache".key_cache_age_threshold
Command-Line Format --key_cache_age_threshold=#Option-File Format key_cache_age_thresholdOption Sets Variable Yes, key_cache_age_thresholdVariable Name key_cache_age_thresholdVariable Scope Global Dynamic Variable Yes Permitted Values Platform Bit Size 32Type numericDefault 300Range 4294967295Permitted Values Platform Bit Size 64Type numericDefault 300Range 18446744073709547520This value controls the demotion of buffers from the hot sublist of a key cache to the warm sublist. Lower values cause demotion to happen more quickly. The minimum value is 100. The default value is 300. See , "The
MyISAMKey Cache".key_cache_block_size
Command-Line Format --key_cache_block_size=#Option-File Format key_cache_block_sizeOption Sets Variable Yes, key_cache_block_sizeVariable Name key_cache_block_sizeVariable Scope Global Dynamic Variable Yes Permitted Values Type numericDefault 1024Range 16384The size in bytes of blocks in the key cache. The default value is 1024. See , "The
MyISAMKey Cache".key_cache_division_limit
Command-Line Format --key_cache_division_limit=#Option-File Format key_cache_division_limitOption Sets Variable Yes, key_cache_division_limitVariable Name key_cache_division_limitVariable Scope Global Dynamic Variable Yes Permitted Values Type numericDefault 100Range 1 .. 100The division point between the hot and warm sublists of the key cache buffer list. The value is the percentage of the buffer list to use for the warm sublist. Permissible values range from 1 to 100. The default value is 100. See , "The
MyISAMKey Cache".large_files_support
Variable Name large_files_supportVariable Scope Global Dynamic Variable No Whether mysqld was compiled with options for large file support.
large_pages
Command-Line Format --large-pagesOption-File Format large-pagesOption Sets Variable Yes, large_pagesVariable Name large_pagesVariable Scope Global Dynamic Variable No Platform Specific linux Permitted Values Type (linux) booleanDefault FALSEWhether large page support is enabled (via the
--large-pagesoption). See , "Enabling Large Page Support".large_page_size
Variable Name large_page_sizeVariable Scope Global Dynamic Variable No Permitted Values Type (linux) numericDefault 0If large page support is enabled, this shows the size of memory pages. Currently, large memory pages are supported only on Linux; on other platforms, the value of this variable is always 0. See , "Enabling Large Page Support".
last_insert_id
The value to be returned from
LAST-INSERT-ID(). This is stored in the binary log when you useLAST_INSERT_ID()in a statement that updates a table. Setting this variable does not update the value returned by themysql_insert_id()C API function.lc_messages
Command-Line Format --lc-messages=nameOption-File Format lc-messagesOption Sets Variable Yes, lc_messagesVariable Name lc-messagesVariable Scope Global, Session Dynamic Variable Yes Permitted Values Type stringThe locale to use for error messages. The server converts the value to a language name and combines it with the value of the
lc_messages_dirto produce the location for the error message file. See , "Setting the Error Message Language".lc_messages_dir
Command-Line Format --lc-messages-dir=pathOption-File Format lc-messages-dirOption Sets Variable Yes, lc_messages_dirVariable Name lc-messages-dirVariable Scope Global Dynamic Variable No Permitted Values Type directory nameThe directory where error messages are located. The value is used together with the value of
lc_messagesto produce the location for the error message file. See , "Setting the Error Message Language".lc_time_names
Variable Name lc_time_namesVariable Scope Global, Session Dynamic Variable Yes Permitted Values Type stringThis variable specifies the locale that controls the language used to display day and month names and abbreviations. This variable affects the output from the
DATE_FORMAT(),DAYNAME()andMONTHNAME()functions. Locale names are POSIX-style values such as'ja_JP'or'pt_BR'. The default value is'en_US'regardless of your system's locale setting. For further information, see , "MySQL Server Locale Support".license
Variable Name licenseVariable Scope Global Dynamic Variable No Permitted Values Type stringDefault GPLThe type of license the server has.
local_infile
Variable Name local_infileVariable Scope Global Dynamic Variable Yes Permitted Values Type booleanWhether
LOCALis supported forLOAD DATA INFILEstatements. See , "Security Issues withLOAD DATA LOCAL".lock_wait_timeout
Command-Line Format --lock_wait_timeout=#Option-File Format lock_wait_timeoutOption Sets Variable Yes, lock_wait_timeoutVariable Name lock_wait_timeoutVariable Scope Global, Session Dynamic Variable Yes Permitted Values Type numericDefault 31536000Range 1 .. 31536000This variable specifies the timeout in seconds for attempts to acquire metadata locks. The permissible values range from 1 to 31536000 (1 year). The default is 31536000.
This timeout applies to all statements that use metadata locks. These include DML and DDL operations on tables, views, stored procedures, and stored functions, as well as
LOCK TABLES,FLUSH TABLES WITH READ LOCK, andHANDLERstatements.The timeout value applies separately for each metadata lock attempt. A given statement can require more than one lock, so it is possible for the statement to block for longer than the
lock_wait_timeoutvalue before reporting a timeout error. When lock timeout occurs,ER_LOCK_WAIT_TIMEOUTis reported.lock_wait_timeoutdoes not apply to delayed inserts, which always execute with a timeout of 1 year. This is done to avoid unnecessary timeouts because a session that issues a delayed insert receives no notification of delayed insert timeouts.locked_in_memory
Variable Name locked_in_memoryVariable Scope Global Dynamic Variable No log
This variable removed in MariaDB 5.6.1. Use
general_loginstead.log_bin
Variable Name log_binVariable Scope Global Dynamic Variable No Whether the binary log is enabled. If the
--log-binoption is used, then the value of this variable isON; otherwise it isOFF. This variable reports only on the status of binary logging (enabled or disabled); it does not actually report the value to which--log-binis set.See , "The Binary Log".
log_bin_trust_function_creators
Command-Line Format --log-bin-trust-function-creatorsOption-File Format log-bin-trust-function-creatorsOption Sets Variable Yes, log_bin_trust_function_creatorsVariable Name log_bin_trust_function_creatorsVariable Scope Global Dynamic Variable Yes Permitted Values Type booleanDefault FALSEThis variable applies when binary logging is enabled. It controls whether stored function creators can be trusted not to create stored functions that will cause unsafe events to be written to the binary log. If set to 0 (the default), users are not permitted to create or alter stored functions unless they have the
SUPERprivilege in addition to theCREATE ROUTINEorALTER ROUTINEprivilege. A setting of 0 also enforces the restriction that a function must be declared with theDETERMINISTICcharacteristic, or with theREADS SQL DATAorNO SQLcharacteristic. If the variable is set to 1, MariaDB does not enforce these restrictions on stored function creation. This variable also applies to trigger creation. See , "Binary Logging of Stored Programs".log_error
Command-Line Format --log-error[=name]Option-File Format log-errorOption Sets Variable Yes, log_errorVariable Name log_errorVariable Scope Global Dynamic Variable No Permitted Values Type file nameThe location of the error log.
log_output
Command-Line Format --log-output[=name]Option-File Format log-outputOption Sets Variable Yes, log_outputVariable Name log_outputVariable Scope Global Dynamic Variable Yes Permitted Values Type setDefault FILEValid Values TABLEFILENONEThe destination for general query log and slow query log output. The value can be a comma-separated list of one or more of the words
TABLE(log to tables),FILE(log to files), orNONE(do not log to tables or files). The default value isTABLE.NONE, if present, takes precedence over any other specifiers. If the value isNONElog entries are not written even if the logs are enabled. If the logs are not enabled, no logging occurs even if the value oflog_outputis notNONE. For more information, see , "Selecting General Query and Slow Query Log Output Destinations".log_queries_not_using_indexes
Command-Line Format --log-queries-not-using-indexesOption-File Format log-queries-not-using-indexesOption Sets Variable Yes, log_queries_not_using_indexesVariable Name log_queries_not_using_indexesVariable Scope Global Dynamic Variable Yes Permitted Values Type booleanDefault OFFWhether queries that do not use indexes are logged to the slow query log. See , "The Slow Query Log".
log_slave_updates
Whether updates received by a slave server from a master server should be logged to the slave's own binary log. Binary logging must be enabled on the slave for this variable to have any effect. See , "Replication and Binary Logging Options and Variables".
log_slow_admin_statements
Command-Line Format --log-slow-admin-statementsOption-File Format log-slow-admin-statementsPermitted Values Type booleanDefault FALSEWhen the slow query log is enabled, whether to log slow administrative statements such as
OPTIMIZE TABLE,ANALYZE TABLE, andALTER TABLEto the slow query log.log_slow_slave_statements
Command-Line Format --log-slow-slave-statementsOption-File Format log-slow-slave-statementsPermitted Values Type booleanDefault offWhen the slow query log is enabled, whether to log queries that have taken more than
long_query_timeseconds to execute on the slave.log_slow_queries
Version Removed 5.6.1 Command-Line Format --log-slow-queries[=name]Option-File Format log-slow-queriesOption Sets Variable Yes, log_slow_queriesVariable Name log_slow_queriesVariable Scope Global Dynamic Variable Yes Deprecated 5.1.29, by slow-query-logPermitted Values Type booleanThis variable was removed in MariaDB 5.6.1. Use
slow_query_loginstead.log_throttle_queries_not_using_indexes
Version Introduced 5.6.5 Variable Name log_throttle_queries_not_using_indexesVariable Scope Global Dynamic Variable Yes Permitted Values Type numericDefault 0If
log-queries-not-using-indexesis enabled, thelog_throttle_queries_not_using_indexesvariable limits the number of such queries per minute that can be written to the slow query log. A value of 0 (the default) means "no limit". For more information, see , "The Slow Query Log".This variable was added in MariaDB 5.6.5.
log_warnings
Command-Line Format --log-warnings[=#]-W [#]Option-File Format log-warningsOption Sets Variable Yes, log_warningsVariable Name log_warningsVariable Scope Global Dynamic Variable Yes Disabled by skip-log-warningsPermitted Values Platform Bit Size 64Type numericDefault 1Range 0 .. 18446744073709547520Whether to produce additional warning messages to the error log. It is enabled (1) by default and can be disabled by setting it to 0. Aborted connections and access-denied errors for new connection attempts are logged if the value is greater than 1. The server logs messages about statements that are unsafe for statement-based logging only if the value is greater than 0.
long_query_time
Command-Line Format --long_query_time=#Option-File Format long_query_timeOption Sets Variable Yes, long_query_timeVariable Name long_query_timeVariable Scope Global, Session Dynamic Variable Yes Permitted Values Type numericDefault 10Min Value 0If a query takes longer than this many seconds, the server increments the
Slow_queriesstatus variable. If the slow query log is enabled, the query is logged to the slow query log file. This value is measured in real time, not CPU time, so a query that is under the threshold on a lightly loaded system might be above the threshold on a heavily loaded one. The minimum and default values oflong_query_timeare 0 and 10, respectively. The value can be specified to a resolution of microseconds. For logging to a file, times are written including the microseconds part. For logging to tables, only integer times are written; the microseconds part is ignored. See , "The Slow Query Log".low_priority_updates
Command-Line Format --low-priority-updatesOption-File Format low-priority-updatesOption Sets Variable Yes, low_priority_updatesVariable Name low_priority_updatesVariable Scope Global, Session Dynamic Variable Yes Permitted Values Type booleanDefault FALSEIf set to
1, allINSERT,UPDATE,DELETE, andLOCK TABLE WRITEstatements wait until there is no pendingSELECTorLOCK TABLE READon the affected table. This affects only storage engines that use only table-level locking (such asMyISAM,MEMORY, andMERGE).lower_case_file_system
Command-Line Format --lower_case_file_system[=#]Option-File Format lower_case_file_systemOption Sets Variable Yes, lower_case_file_systemVariable Name lower_case_file_systemVariable Scope Global Dynamic Variable No Permitted Values Type booleanThis variable describes the case sensitivity of file names on the file system where the data directory is located.
OFFmeans file names are case sensitive,ONmeans they are not case sensitive. This variable is read only because it reflects a file system attribute and setting it would have no effect on the file system.lower_case_table_names
Command-Line Format --lower_case_table_names[=#]Option-File Format lower_case_table_namesOption Sets Variable Yes, lower_case_table_namesVariable Name lower_case_table_namesVariable Scope Global Dynamic Variable No Permitted Values Type numericDefault 0Range 0 .. 2If set to 0, table names are stored as specified and comparisons are case sensitive. If set to 1, table names are stored in lowercase on disk and comparisons are not case sensitive. If set to 2, table names are stored as given but compared in lowercase. This option also applies to database names and table aliases. For additional information, see , "Identifier Case Sensitivity".
You should not set this variable to 0 if you are running MariaDB on a system that has case-insensitive file names (such as Windows or Mac OS X). If you set this variable to 0 on such a system and access
MyISAMtablenames using different lettercases, index corruption may result. On Windows the default value is 1. On Mac OS X, the default value is 2.If you are using
InnoDBtables, you should set this variable to 1 on all platforms to force names to be converted to lowercase.The setting of this variable in MariaDB 5.6 effects the behavior of replication filtering options with regard to case sensitivity. This is a change from previous versions of MySQL. (Bug #51639) See , "How Servers Evaluate Replication Filtering Rules", for more information.
In previous versions of MySQL, using different settings for
lower_case_table_nameson replication masters and slaves could cause replication to fail when the slave used a case-sensitive file system. This issue is resolved in MariaDB 5.6.1. For more information, see , "Replication and Variables".max_allowed_packet
Command-Line Format --max_allowed_packet=#Option-File Format max_allowed_packetOption Sets Variable Yes, max_allowed_packetVariable Name max_allowed_packetVariable Scope Global Dynamic Variable Yes Permitted Values Type numericDefault 1048576Range 1073741824The maximum size of one packet or any generated/intermediate string, or any parameter sent by the
mysql_stmt_send_long_data()C API function.The packet message buffer is initialized to
net_buffer_lengthbytes, but can grow up tomax_allowed_packetbytes when needed. This value by default is small, to catch large (possibly incorrect) packets.You must increase this value if you are using large
BLOBcolumns or long strings. It should be as big as the largestBLOByou want to use. The protocol limit formax_allowed_packetis 1GB. The value should be a multiple of 1024; nonmultiples are rounded down to the nearest multiple.When you change the message buffer size by changing the value of the
max_allowed_packetvariable, you should also change the buffer size on the client side if your client program permits it. On the client side,max-allowed-packethas a default of 1GB. Some programs such as mysql and mysqldump enable you to change the client-side value by settingmax_allowed_packeton the command line or in an option file.The session value of this variable is read only.
max_connect_errors
Command-Line Format --max_connect_errors=#Option-File Format max_connect_errorsOption Sets Variable Yes, max_connect_errorsVariable Name max_connect_errorsVariable Scope Global Dynamic Variable Yes Permitted Values Platform Bit Size 32Type numericDefault 10Range 1 .. 4294967295Permitted Values Platform Bit Size 64Type numericDefault 10Range 1 .. 18446744073709547520If more than this many successive connection requests from a host are interrupted without a successful connection, the server blocks that host from further connections. You can unblock blocked hosts by flushing the host cache. To do so, issue a
FLUSH HOSTSstatement or execute a mysqladmin flush-hosts command. If a connection is established successfully within fewer thanmax_connect_errorsattempts after a previous connection was interrupted, the error count for the host is cleared to zero. However, once a host is blocked, flushing the host cache is the only way to unblock it.max_connections
Command-Line Format --max_connections=#Option-File Format max_connectionsOption Sets Variable Yes, max_connectionsVariable Name max_connectionsVariable Scope Global Dynamic Variable Yes Permitted Values Type numericDefault 151Range 1 .. 100000The maximum permitted number of simultaneous client connections. By default, this is 151. See "
Too many connections", for more information.Increasing this value increases the number of file descriptors that mysqld requires. See , "How MariaDB Opens and Closes Tables", for comments on file descriptor limits.
Connections refused because the
max_connectionslimit is reached increment theConnection_errors_max_connectionsstatus variable.max_delayed_threads
Command-Line Format --max_delayed_threads=#Option-File Format max_delayed_threadsOption Sets Variable Yes, max_delayed_threadsVariable Name max_delayed_threadsVariable Scope Global, Session Dynamic Variable Yes Permitted Values Type numericDefault 20Range 0 .. 16384Do not start more than this number of threads to handle
INSERT DELAYEDstatements for nontransactional tables. If you try to insert data into a new table after allINSERT DELAYEDthreads are in use, the row is inserted as if theDELAYEDattribute was not specified. If you set this to 0, MariaDB never creates a thread to handleDELAYEDrows; in effect, this disablesDELAYEDentirely.For the
SESSIONvalue of this variable, the only valid values are 0 or theGLOBALvalue.max_error_count
Command-Line Format --max_error_count=#Option-File Format max_error_countOption Sets Variable Yes, max_error_countVariable Name max_error_countVariable Scope Global, Session Dynamic Variable Yes Permitted Values Type numericDefault 64Range 0 .. 65535The maximum number of error, warning, and note messages to be stored for display by the
SHOW ERRORSandSHOW WARNINGSstatements. This is the same as the number of condition areas in the diagnostics area, and thus the number of conditions that can be inspected byGET DIAGNOSTICS.max_heap_table_size
Command-Line Format --max_heap_table_size=#Option-File Format max_heap_table_sizeOption Sets Variable Yes, max_heap_table_sizeVariable Name max_heap_table_sizeVariable Scope Global, Session Dynamic Variable Yes Permitted Values Platform Bit Size 32Type numericDefault 16777216Range 4294967295Permitted Values Platform Bit Size 64Type numericDefault 16777216Range 1844674407370954752This variable sets the maximum size to which user-created
MEMORYtables are permitted to grow. The value of the variable is used to calculateMEMORYtableMAX_ROWSvalues. Setting this variable has no effect on any existingMEMORYtable, unless the table is re-created with a statement such asCREATE TABLEor altered withALTER TABLEorTRUNCATE TABLE. A server restart also sets the maximum size of existingMEMORYtables to the globalmax_heap_table_sizevalue.This variable is also used in conjunction with
tmp_table_sizeto limit the size of internal in-memory tables. See , "How MariaDB Uses Internal Temporary Tables".max_heap_table_sizeis not replicated. See , "Replication andMEMORYTables", and , "Replication and Variables", for more information.max_insert_delayed_threads
Variable Name max_insert_delayed_threadsVariable Scope Global, Session Dynamic Variable Yes Permitted Values Type numericThis variable is a synonym for
max_delayed_threads.max_join_size
Command-Line Format --max_join_size=#Option-File Format max_join_sizeOption Sets Variable Yes, max_join_sizeVariable Name max_join_sizeVariable Scope Global, Session Dynamic Variable Yes Permitted Values Type numericDefault 18446744073709551615Range 1 .. 18446744073709551615Do not permit
SELECTstatements that probably need to examine more thanmax_join_sizerows (for single-table statements) or row combinations (for multiple-table statements) or that are likely to do more thanmax_join_sizedisk seeks. By setting this value, you can catchSELECTstatements where keys are not used properly and that would probably take a long time. Set it if your users tend to perform joins that lack aWHEREclause, that take a long time, or that return millions of rows.Setting this variable to a value other than
DEFAULTresets the value ofsql_big_selectsto0. If you set thesql-big-selectsvalue again, themax_join_sizevariable is ignored.If a query result is in the query cache, no result size check is performed, because the result has previously been computed and it does not burden the server to send it to the client.
max_length_for_sort_data
Command-Line Format --max_length_for_sort_data=#Option-File Format max_length_for_sort_dataOption Sets Variable Yes, max_length_for_sort_dataVariable Name max_length_for_sort_dataVariable Scope Global, Session Dynamic Variable Yes Permitted Values Type numericDefault 1024Range 4 .. 8388608The cutoff on the size of index values that determines which
filesortalgorithm to use. See , "ORDER BYOptimization".max_prepared_stmt_count
Command-Line Format --max_prepared_stmt_count=#Option-File Format max_prepared_stmt_countOption Sets Variable Yes, max_prepared_stmt_countVariable Name max_prepared_stmt_countVariable Scope Global Dynamic Variable Yes Permitted Values Type numericDefault 16382Range 0 .. 1048576This variable limits the total number of prepared statements in the server. It can be used in environments where there is the potential for denial-of-service attacks based on running the server out of memory by preparing huge numbers of statements. If the value is set lower than the current number of prepared statements, existing statements are not affected and can be used, but no new statements can be prepared until the current number drops below the limit. The default value is 16,382. The permissible range of values is from 0 to 1 million. Setting the value to 0 disables prepared statements.
max_relay_log_size
Command-Line Format --max_relay_log_size=#Option-File Format max_relay_log_sizeOption Sets Variable Yes, max_relay_log_sizeVariable Name max_relay_log_sizeVariable Scope Global Dynamic Variable Yes Permitted Values Type numericDefault 0Range 0 .. 1073741824If a write by a replication slave to its relay log causes the current log file size to exceed the value of this variable, the slave rotates the relay logs (closes the current file and opens the next one). If
max_relay_log_sizeis 0, the server usesmax_binlog_sizefor both the binary log and the relay log. Ifmax_relay_log_sizeis greater than 0, it constrains the size of the relay log, which enables you to have different sizes for the two logs. You must setmax_relay_log_sizeto between 4096 bytes and 1GB (inclusive), or to 0. The default value is 0. See , "Replication Implementation Details".max_seeks_for_key
Command-Line Format --max_seeks_for_key=#Option-File Format max_seeks_for_keyOption Sets Variable Yes, max_seeks_for_keyVariable Name max_seeks_for_keyVariable Scope Global, Session Dynamic Variable Yes Permitted Values Platform Bit Size 32Type numericDefault 4294967295Range 1 .. 4294967295Permitted Values Platform Bit Size 64Type numericDefault 18446744073709547520Range 1 .. 18446744073709547520Limit the assumed maximum number of seeks when looking up rows based on a key. The MariaDB optimizer assumes that no more than this number of key seeks are required when searching for matching rows in a table by scanning an index, regardless of the actual cardinality of the index (see , "
SHOW INDEXSyntax"). By setting this to a low value (say, 100), you can force MariaDB to prefer indexes instead of table scans.max_sort_length
Command-Line Format --max_sort_length=#Option-File Format max_sort_lengthOption Sets Variable Yes, max_sort_lengthVariable Name max_sort_lengthVariable Scope Global, Session Dynamic Variable Yes Permitted Values Type numericDefault 1024Range 4 .. 8388608The number of bytes to use when sorting
BLOBorTEXTvalues. Only the firstmax_sort_lengthbytes of each value are used; the rest are ignored.max_sp_recursion_depth
Command-Line Format --max_sp_recursion_depth[=#]Option-File Format max_sp_recursion_depthOption Sets Variable Yes, max_sp_recursion_depthVariable Name max_sp_recursion_depthVariable Scope Global, Session Dynamic Variable Yes Permitted Values Type numericDefault 0Max Value 255The number of times that any given stored procedure may be called recursively. The default value for this option is 0, which completely disables recursion in stored procedures. The maximum value is 255.
Stored procedure recursion increases the demand on thread stack space. If you increase the value of
max_sp_recursion_depth, it may be necessary to increase thread stack size by increasing the value ofthread_stackat server startup.max_tmp_tables
Command-Line Format --max_tmp_tables=#Option-File Format max_tmp_tablesOption Sets Variable Yes, max_tmp_tablesVariable Name max_tmp_tablesVariable Scope Global, Session Dynamic Variable Yes Permitted Values Platform Bit Size 32Type numericDefault 32Range 1 .. 4294967295Permitted Values Platform Bit Size 64Type numericDefault 32Range 1 .. 18446744073709547520The maximum number of temporary tables a client can keep open at the same time. (This variable does not yet do anything.)
max_user_connections
Command-Line Format --max_user_connections=#Option-File Format max_user_connectionsOption Sets Variable Yes, max_user_connectionsVariable Name max_user_connectionsVariable Scope Global, Session Dynamic Variable Yes Permitted Values Type numericDefault 0Range 0 .. 4294967295The maximum number of simultaneous connections permitted to any given MariaDB user account. A value of 0 (the default) means "no limit."
This variable has a global value that can be set at server startup or runtime. It also has a read-only session value that indicates the effective simultaneous-connection limit that applies to the account associated with the current session. The session value is initialized as follows:
- If the user account has a nonzero
MAX_USER_CONNECTIONSresource limit, the sessionmax_user_connectionsvalue is set to that limit. - Otherwise, the session
max_user_connectionsvalue is set to the global value.
Account resource limits are specified using the
GRANTstatement. See , "Setting Account Resource Limits", and , "GRANTSyntax".- If the user account has a nonzero
max_write_lock_count
Command-Line Format --max_write_lock_count=#Option-File Format max_write_lock_countOption Sets Variable Yes, max_write_lock_countVariable Name max_write_lock_countVariable Scope Global Dynamic Variable Yes Permitted Values Platform Bit Size 32Type numericDefault 4294967295Range 1 .. 4294967295Permitted Values Platform Bit Size 64Type numericDefault 18446744073709547520Range 1 .. 18446744073709547520After this many write locks, permit some pending read lock requests to be processed in between.
metadata_locks_cache_size
Version Introduced 5.6.4 Variable Name metadata_locks_cache_sizeVariable Scope Global Dynamic Variable No Permitted Values Type numericDefault 1024Range 1 .. 1048576The size of the metadata locks cache. The server uses this cache to avoid creation and destruction of synchronization objects. This is particularly helpful on systems where such operations are expensive, such as Windows XP. This variable was added in MariaDB 5.6.4.
min_examined_row_limit
Command-Line Format --min-examined-row-limit=#Option-File Format min-examined-row-limitVariable Name min_examined_row_limitVariable Scope Global, Session Dynamic Variable Yes Permitted Values Platform Bit Size 32Type numericDefault 0Range 0 .. 4294967295Permitted Values Platform Bit Size 64Type numericDefault 0Range 0 .. 18446744073709547520Queries that examine fewer than this number of rows are not logged to the slow query log.
myisam_data_pointer_size
Command-Line Format --myisam_data_pointer_size=#Option-File Format myisam_data_pointer_sizeOption Sets Variable Yes, myisam_data_pointer_sizeVariable Name myisam_data_pointer_sizeVariable Scope Global Dynamic Variable Yes Permitted Values Type numericDefault 6Range 2 .. 7The default pointer size in bytes, to be used by
CREATE TABLEforMyISAMtables when noMAX_ROWSoption is specified. This variable cannot be less than 2 or larger than 7. The default value is 6. See "The table is full".myisam_max_sort_file_size
Command-Line Format --myisam_max_sort_file_size=#Option-File Format myisam_max_sort_file_sizeOption Sets Variable Yes, myisam_max_sort_file_sizeVariable Name myisam_max_sort_file_sizeVariable Scope Global Dynamic Variable Yes Permitted Values Type numericDefault 2147483648The maximum size of the temporary file that MariaDB is permitted to use while re-creating a
MyISAMindex (duringREPAIR TABLE,ALTER TABLE, orLOAD DATA INFILE). If the file size would be larger than this value, the index is created using the key cache instead, which is slower. The value is given in bytes.The default value is 2GB. If
MyISAMindex files exceed this size and disk space is available, increasing the value may help performance. The space must be available in the file system containing the directory where the original index file is located.myisam_mmap_size
Command-Line Format --myisam_mmap_size=#Option-File Format myisam_mmap_sizeOption Sets Variable Yes, myisam_mmap_sizeVariable Name myisam_mmap_sizeVariable Scope Global Dynamic Variable No Permitted Values Platform Bit Size 32Type numericDefault 4294967295Range 7 .. 4294967295Permitted Values Platform Bit Size 64Type numericDefault 18446744073709547520Range 7 .. 18446744073709547520The maximum amount of memory to use for memory mapping compressed
MyISAMfiles. If many compressedMyISAMtables are used, the value can be decreased to reduce the likelihood of memory-swapping problems.myisam_recover_options
Variable Name myisam_recover_optionsVariable Scope Global Dynamic Variable No The value of the
--myisam-recover-optionsoption. See , "Server Command Options".myisam_repair_threads
Command-Line Format --myisam_repair_threads=#Option-File Format myisam_repair_threadsOption Sets Variable Yes, myisam_repair_threadsVariable Name myisam_repair_threadsVariable Scope Global, Session Dynamic Variable Yes Permitted Values Platform Bit Size 32Type numericDefault 1Range 1 .. 4294967295Permitted Values Platform Bit Size 64Type numericDefault 1Range 1 .. 18446744073709547520If this value is greater than 1,
MyISAMtable indexes are created in parallel (each index in its own thread) during theRepair by sortingprocess. The default value is 1.NoteMulti-threaded repair is still beta-quality code.
myisam_sort_buffer_size
Command-Line Format --myisam_sort_buffer_size=#Option-File Format myisam_sort_buffer_sizeOption Sets Variable Yes, myisam_sort_buffer_sizeVariable Name myisam_sort_buffer_sizeVariable Scope Global, Session Dynamic Variable Yes Permitted Values Platform Bit Size 32Type numericDefault 8388608Range 4 .. 4294967295Permitted Values Platform Bit Size 64Type numericDefault 8388608Range 4 .. 18446744073709547520The size of the buffer that is allocated when sorting
MyISAMindexes during aREPAIR TABLEor when creating indexes withCREATE INDEXorALTER TABLE.The maximum permissible setting for
myisam_sort_buffer_sizeis 4GB. Values larger than 4GB are permitted for 64-bit platforms (except 64-bit Windows, for which large values are truncated to 4GB with a warning).myisam_stats_method
Command-Line Format --myisam_stats_method=nameOption-File Format myisam_stats_methodOption Sets Variable Yes, myisam_stats_methodVariable Name myisam_stats_methodVariable Scope Global, Session Dynamic Variable Yes Permitted Values Type enumerationValid Values nulls_equalnulls_unequalnulls_ignoredHow the server treats
NULLvalues when collecting statistics about the distribution of index values forMyISAMtables. This variable has three possible values,nulls_equal,nulls_unequal, andnulls_ignored. Fornulls_equal, allNULLindex values are considered equal and form a single value group that has a size equal to the number ofNULLvalues. Fornulls_unequal,NULLvalues are considered unequal, and eachNULLforms a distinct value group of size 1. Fornulls_ignored,NULLvalues are ignored.The method that is used for generating table statistics influences how the optimizer chooses indexes for query execution, as described in , "
InnoDBandMyISAMIndex Statistics Collection".myisam_use_mmap
Command-Line Format --myisam_use_mmapOption-File Format myisam_use_mmapOption Sets Variable Yes, myisam_use_mmapVariable Name myisam_use_mmapVariable Scope Global Dynamic Variable Yes Permitted Values Type booleanDefault OFFUse memory mapping for reading and writing
MyISAMtables.named_pipe
Variable Name named_pipeVariable Scope Global Dynamic Variable No Platform Specific windows Permitted Values Type (windows) booleanDefault OFF(Windows only.) Indicates whether the server supports connections over named pipes.
net_buffer_length
Command-Line Format --net_buffer_length=#Option-File Format net_buffer_lengthOption Sets Variable Yes, net_buffer_lengthVariable Name net_buffer_lengthVariable Scope Global, Session Dynamic Variable Yes Permitted Values Type numericDefault 16384Range 1048576Each client thread is associated with a connection buffer and result buffer. Both begin with a size given by
net_buffer_lengthbut are dynamically enlarged up tomax-allowed-packetbytes as needed. The result buffer shrinks tonet_buffer_lengthafter each SQL statement.This variable should not normally be changed, but if you have very little memory, you can set it to the expected length of statements sent by clients. If statements exceed this length, the connection buffer is automatically enlarged. The maximum value to which
net_buffer_lengthcan be set is 1MB.The session value of this variable is read only.
net_read_timeout
Command-Line Format --net_read_timeout=#Option-File Format net_read_timeoutOption Sets Variable Yes, net_read_timeoutVariable Name net_read_timeoutVariable Scope Global, Session Dynamic Variable Yes Permitted Values Type numericDefault 30Min Value 1The number of seconds to wait for more data from a connection before aborting the read. When the server is reading from the client,
net_read_timeoutis the timeout value controlling when to abort. When the server is writing to the client,net_write_timeoutis the timeout value controlling when to abort. See alsoslave_net_timeout.net_retry_count
Command-Line Format --net_retry_count=#Option-File Format net_retry_countOption Sets Variable Yes, net_retry_countVariable Name net_retry_countVariable Scope Global, Session Dynamic Variable Yes Permitted Values Platform Bit Size 32Type numericDefault 10Range 1 .. 4294967295Permitted Values Platform Bit Size 64Type numericDefault 10Range 1 .. 18446744073709547520If a read or write on a communication port is interrupted, retry this many times before giving up. This value should be set quite high on FreeBSD because internal interrupts are sent to all threads.
net_write_timeout
Command-Line Format --net_write_timeout=#Option-File Format net_write_timeoutOption Sets Variable Yes, net_write_timeoutVariable Name net_write_timeoutVariable Scope Global, Session Dynamic Variable Yes Permitted Values Type numericDefault 60Min Value 1The number of seconds to wait for a block to be written to a connection before aborting the write. See also
net_read_timeout.new
Command-Line Format --new-nOption-File Format newOption Sets Variable Yes, newVariable Name newVariable Scope Global, Session Dynamic Variable Yes Disabled by skip-newPermitted Values Type booleanDefault FALSEThis variable was used in MariaDB to turn on some 4.1 behaviors, and is retained for backward compatibility. In MariaDB 5.6, its value is always
OFF.old
Command-Line Format --oldOption-File Format oldVariable Name oldVariable Scope Global Dynamic Variable No oldis a compatibility variable. It is disabled by default, but can be enabled at startup to revert the server to behaviors present in older versions.Currently, when
oldis enabled, it changes the default scope of index hints to that used prior to MariaDB 5.1.17. That is, index hints with noFORclause apply only to how indexes are used for row retrieval and not to resolution ofORDER BYorGROUP BYclauses. (See , "Index Hint Syntax".) Take care about enabling this in a replication setup. With statement-based binary logging, having different modes for the master and slaves might lead to replication errors.old_alter_table
Command-Line Format --old-alter-tableOption-File Format old-alter-tableOption Sets Variable Yes, old_alter_tableVariable Name old_alter_tableVariable Scope Global, Session Dynamic Variable Yes Permitted Values Type booleanDefault OFFWhen this variable is enabled, the server does not use the optimized method of processing an
ALTER TABLEoperation. It reverts to using a temporary table, copying over the data, and then renaming the temporary table to the original, as used by MariaDB 5.0 and earlier. For more information on the operation ofALTER TABLE, see , "ALTER TABLESyntax".old_passwords
Command-Line Format --old_passwordsOption-File Format old-passwordsOption Sets Variable Yes, old_passwordsVariable Name old_passwordsVariable Scope Global, Session Dynamic Variable Yes Permitted Values Type booleanDefault FALSEWhether the server should use pre-4.1-style passwords for MariaDB user accounts. See "
Client does not support authentication protocol".open_files_limit
Command-Line Format --open-files-limit=#Option-File Format open-files-limitOption Sets Variable Yes, open_files_limitVariable Name open_files_limitVariable Scope Global Dynamic Variable No Permitted Values Type numericDefault 0Range 0 .. 65535The number of files that the operating system permits mysqld to open. This is the real value permitted by the system and might be different from the value you gave using the
--open-files-limitoption to mysqld or mysqld_safe. The value is 0 on systems where MariaDB cannot change the number of open files.optimizer_join_cache_level
Version Introduced 5.6.1 Version Removed 5.6.3 Command-Line Format --optimizer_join_cache_level=#Option-File Format optimizer_join_cache_levelOption Sets Variable Yes, optimizer_join_cache_levelVariable Name optimizer_join_cache_levelVariable Scope Global, Session Dynamic Variable Yes Permitted Values Type numericDefault 4Range 0 .. 4Before MariaDB 5.6.3, this variable is used for join buffer management. It controls how join buffers are used for join operations. As of MariaDB 5.6.3, it is removed and the
optimizer_switchvariable is used instead. See , "Block Nested-Loop and Batched Key Access Joins".The following table shows the permissible
optimizer_join_cache_levelvalues.Option Description 0No join buffer is used for any join operation. This setting can be useful for assessing baseline join performance in comparison to performance with nonzero values that enable use of join buffering. 1This is the default value. Join buffers are employed only for inner joins that are executed by the original Block Nested-Loop (BNL) join algorithm. When this algorithm is applied, rows of the inner table are accessed through a table scan, a plain index scan, or a range index scan. 2The server employs an incremental join buffer for a join operation if its first operand is produced by a join operation that uses a join buffer itself. 3The BNL algorithm is used for outer join operations with one inner table and for inner joins. 4The BNL algorithm uses incremental buffers for inner tables. In this case, the BNL algorithm can be used for nested outer joins (outer joins with several inner tables). Such an operation can be executed only if incremental join buffers are used to join all inner tables but the first one. optimizer_prune_level
Command-Line Format --optimizer_prune_level[=#]Option-File Format optimizer_prune_levelOption Sets Variable Yes, optimizer_prune_levelVariable Name optimizer_prune_levelVariable Scope Global, Session Dynamic Variable Yes Permitted Values Type booleanDefault 1Controls the heuristics applied during query optimization to prune less-promising partial plans from the optimizer search space. A value of 0 disables heuristics so that the optimizer performs an exhaustive search. A value of 1 causes the optimizer to prune plans based on the number of rows retrieved by intermediate plans.
optimizer_search_depth
Command-Line Format --optimizer_search_depth[=#]Option-File Format optimizer_search_depthOption Sets Variable Yes, optimizer_search_depthVariable Name optimizer_search_depthVariable Scope Global, Session Dynamic Variable Yes Permitted Values (>= 5.6) Type numericDefault 62Range 0 .. 62The maximum depth of search performed by the query optimizer. Values larger than the number of relations in a query result in better query plans, but take longer to generate an execution plan for a query. Values smaller than the number of relations in a query return an execution plan quicker, but the resulting plan may be far from being optimal. If set to 0, the system automatically picks a reasonable value.
optimizer_switch
Command-Line Format --optimizer_switch=valueOption-File Format optimizer_switchoptimizer_switchoptimizer_switchOption Sets Variable Yes, optimizer_switchVariable Name optimizer_switchVariable Scope Global, Session Dynamic Variable Yes Permitted Values (>= 5.6.1, <= 5.6.2) Type setValid Values engine_condition_pushdown={on|off}index_merge={on|off}index_merge_intersection={on|off}index_merge_sort_union={on|off}index_merge_union={on|off}engine_condition_pushdown={on|off}index_condition_pushdown={on|off}mrr={on|off}mrr_cost_based={on|off}Permitted Values (>= 5.6.3) Type setValid Values engine_condition_pushdown={on|off}index_merge={on|off}index_merge_intersection={on|off}index_merge_sort_union={on|off}index_merge_union={on|off}engine_condition_pushdown={on|off}index_condition_pushdown={on|off}mrr={on|off}mrr_cost_based={on|off}block_nested_loop={on|off}batched_key_access={on|off}The
optimizer_switchsystem variable enables control over optimizer behavior. The value of this variable is a set of flags, each of which has a value ofonoroffto indicate whether the corresponding optimizer behavior is enabled or disabled. This variable has global and session values and can be changed at runtime. The global default can be set at server startup.To see the current set of optimizer flags, select the variable value:
mysql>
SELECT @@optimizer_switch\G*************************** 1. row *************************** @@optimizer_switch: index_merge=on,index_merge_union=on, index_merge_sort_union=on, index_merge_intersection=on, engine_condition_pushdown=on, index_condition_pushdown=on, mrr=on,mrr_cost_based=on, block_nested_loop=on,batched_key_access=offFor more information about the syntax of this variable and the optimizer behaviors that it controls, see , "Controlling Switchable Optimizations".
optimizer_trace
Version Introduced 5.6.3 Variable Name optimizer_traceVariable Scope Global, Session Dynamic Variable Yes Permitted Values Type stringThis variable controls optimizer tracing. For details, see MySQL Internals: Optimizer tracing. This variable was added in MariaDB 5.6.3.
optimizer_trace_features
Version Introduced 5.6.3 Variable Name optimizer_trace_featuresVariable Scope Global, Session Dynamic Variable Yes Permitted Values Type stringThis variable enables or disables selected optimizer tracing features. For details, see MySQL Internals: Optimizer tracing. This variable was added in MariaDB 5.6.3.
optimizer_trace_limit
Version Introduced 5.6.3 Variable Name optimizer_trace_limitVariable Scope Global, Session Dynamic Variable Yes Permitted Values Type numericDefault 1The maximum number of optimizer traces to display. For details, see MySQL Internals: Optimizer tracing. This variable was added in MariaDB 5.6.3.
optimizer_trace_max_mem_size
Version Introduced 5.6.3 Variable Name optimizer_trace_max_mem_sizeVariable Scope Global, Session Dynamic Variable Yes Permitted Values Type numericDefault 16384The maximum cumulative size of stored optimizer traces. For details, see MySQL Internals: Optimizer tracing. This variable was added in MariaDB 5.6.3.
optimizer_trace_offset
Version Introduced 5.6.3 Variable Name optimizer_trace_offsetVariable Scope Global, Session Dynamic Variable Yes Permitted Values Type numericDefault -1The offset of optimizer traces to display. For details, see MySQL Internals: Optimizer tracing. This variable was added in MariaDB 5.6.3.
performance_schema_xxx
Performance Schema system variables are listed in , "Performance Schema System Variables".
pid_file
Command-Line Format --pid-file=file_nameOption-File Format pid-file=file_nameOption Sets Variable Yes, pid_fileVariable Name pid_fileVariable Scope Global Dynamic Variable No Permitted Values Type file nameThe path name of the process ID (PID) file. This variable can be set with the
--pid-fileoption.plugin_dir
Command-Line Format --plugin_dir=pathOption-File Format plugin_dirOption Sets Variable Yes, plugin_dirVariable Name plugin_dirVariable Scope Global Dynamic Variable No Permitted Values Type directory nameDefault BASEDIR/lib/pluginThe path name of the plugin directory.
If the plugin directory is writable by the server, it may be possible for a user to write executable code to a file in the directory using
SELECT ... INTO DUMPFILE. This can be prevented by makingplugin_dirread only to the server or by setting--secure-file-privto a directory whereSELECTwrites can be made safely.port
Command-Line Format --port=#-POption-File Format portOption Sets Variable Yes, portVariable Name portVariable Scope Global Dynamic Variable No Permitted Values Type numericDefault 3306The number of the port on which the server listens for TCP/IP connections. This variable can be set with the
--portoption.preload_buffer_size
Command-Line Format --preload_buffer_size=#Option-File Format preload_buffer_sizeOption Sets Variable Yes, preload_buffer_sizeVariable Name preload_buffer_sizeVariable Scope Global, Session Dynamic Variable Yes Permitted Values Type numericDefault 32768Range 1073741824The size of the buffer that is allocated when preloading indexes.
profiling
If set to 0 (the default), statement profiling is disabled. If set to 1, statement profiling is enabled and the
SHOW PROFILESandSHOW PROFILEstatements provide access to profiling information. See , "SHOW PROFILESSyntax".profiling_history_size
The number of statements for which to maintain profiling information if
profilingis enabled. The default value is 15. The maximum value is 100. Setting the value to 0 effectively disables profiling. See , "SHOW PROFILESSyntax".protocol_version
Variable Name protocol_versionVariable Scope Global Dynamic Variable No Permitted Values Type numericThe version of the client/server protocol used by the MariaDB server.
proxy_user
Variable Name proxy_userVariable Scope Session Dynamic Variable No Permitted Values Type stringIf the current client is a proxy for another user, this variable is the proxy user account name. Otherwise, this variable is
NULL. See , "Proxy Users".pseudo_thread_id
Variable Name pseudo_thread_idVariable Scope Session Dynamic Variable Yes Permitted Values Type numericThis variable is for internal server use.
query_alloc_block_size
Command-Line Format --query_alloc_block_size=#Option-File Format query_alloc_block_sizeOption Sets Variable Yes, query_alloc_block_sizeVariable Name query_alloc_block_sizeVariable Scope Global, Session Dynamic Variable Yes Permitted Values Platform Bit Size 32Type numericDefault 8192Range 4294967295Block Size 1024Permitted Values Platform Bit Size 64Type numericDefault 8192Range 18446744073709547520Block Size 1024The allocation size of memory blocks that are allocated for objects created during statement parsing and execution. If you have problems with memory fragmentation, it might help to increase this parameter.
query_cache_limit
Command-Line Format --query_cache_limit=#Option-File Format query_cache_limitOption Sets Variable Yes, query_cache_limitVariable Name query_cache_limitVariable Scope Global Dynamic Variable Yes Permitted Values Platform Bit Size 32Type numericDefault 1048576Range 0 .. 4294967295Permitted Values Platform Bit Size 64Type numericDefault 1048576Range 0 .. 18446744073709547520Do not cache results that are larger than this number of bytes. The default value is 1MB.
query_cache_min_res_unit
Command-Line Format --query_cache_min_res_unit=#Option-File Format query_cache_min_res_unitOption Sets Variable Yes, query_cache_min_res_unitVariable Name query_cache_min_res_unitVariable Scope Global Dynamic Variable Yes Permitted Values Platform Bit Size 32Type numericDefault 4096Range 4294967295Permitted Values Platform Bit Size 64Type numericDefault 4096Range 18446744073709547520The minimum size (in bytes) for blocks allocated by the query cache. The default value is 4096 (4KB). Tuning information for this variable is given in , "Query Cache Configuration".
query_cache_size
Command-Line Format --query_cache_size=#Option-File Format query_cache_sizeOption Sets Variable Yes, query_cache_sizeVariable Name query_cache_sizeVariable Scope Global Dynamic Variable Yes Permitted Values Platform Bit Size 32Type numericDefault 0Range 0 .. 4294967295Permitted Values Platform Bit Size 64Type numericDefault 0Range 0 .. 18446744073709547520The amount of memory allocated for caching query results. The default value is 0, which disables the query cache. To reduce overhead significantly, you should also start the server with
query_cache_type=0if you will not be using the query cache. The permissible values are multiples of 1024; other values are rounded down to the nearest multiple. Note thatquery-cache-sizebytes of memory are allocated even ifquery_cache_typeis set to 0. See , "Query Cache Configuration", for more information.The query cache needs a minimum size of about 40KB to allocate its structures. (The exact size depends on system architecture.) If you set the value of
query_cache_sizetoo small, a warning will occur, as described in , "Query Cache Configuration".query_cache_type
Command-Line Format --query_cache_type=#Option-File Format query_cache_typeOption Sets Variable Yes, query_cache_typeVariable Name query_cache_typeVariable Scope Global, Session Dynamic Variable Yes Permitted Values Type enumerationDefault 1Valid Values 012Set the query cache type. Setting the
GLOBALvalue sets the type for all clients that connect thereafter. Individual clients can set theSESSIONvalue to affect their own use of the query cache. Possible values are shown in the following table.Option Description 0orOFFDo not cache results in or retrieve results from the query cache. Note that this does not deallocate the query cache buffer. To do that, you should set query_cache_sizeto 0.1orONCache all cacheable query results except for those that begin with SELECT SQL_NO_CACHE.2orDEMANDCache results only for cacheable queries that begin with SELECT SQL_CACHE.This variable defaults to
ON.If the server is started with
query_cache_typeset to 0, it does not acquire the query cache mutex at all, which means that the query cache cannot be enabled at runtime and there is reduced overhead in query execution.query_cache_wlock_invalidate
Command-Line Format --query_cache_wlock_invalidateOption-File Format query_cache_wlock_invalidateOption Sets Variable Yes, query_cache_wlock_invalidateVariable Name query_cache_wlock_invalidateVariable Scope Global, Session Dynamic Variable Yes Permitted Values Type booleanDefault FALSENormally, when one client acquires a
WRITElock on aMyISAMtable, other clients are not blocked from issuing statements that read from the table if the query results are present in the query cache. Setting this variable to 1 causes acquisition of aWRITElock for a table to invalidate any queries in the query cache that refer to the table. This forces other clients that attempt to access the table to wait while the lock is in effect.query_prealloc_size
Command-Line Format --query_prealloc_size=#Option-File Format query_prealloc_sizeOption Sets Variable Yes, query_prealloc_sizeVariable Name query_prealloc_sizeVariable Scope Global, Session Dynamic Variable Yes Permitted Values Platform Bit Size 32Type numericDefault 8192Range 4294967295Block Size 1024Permitted Values Platform Bit Size 64Type numericDefault 8192Range 18446744073709547520Block Size 1024The size of the persistent buffer used for statement parsing and execution. This buffer is not freed between statements. If you are running complex queries, a larger
query_prealloc_sizevalue might be helpful in improving performance, because it can reduce the need for the server to perform memory allocation during query execution operations.rand_seed1
The
rand-seed1andrand_seed2variables exist as session variables only, and can be set but not read. The variables-but not their values-are shown in the output ofSHOW VARIABLES.The purpose of these variables is to support replication of the
RAND()function. For statements that invokeRAND(), the master passes two values to the slave, where they are used to seed the random number generator. The slave uses these values to set the session variablesrand_seed1andrand-seed2so thatRAND()on the slave generates the same value as on the master.rand_seed2
See the description for
rand_seed1.range_alloc_block_size
Command-Line Format --range_alloc_block_size=#Option-File Format range_alloc_block_sizeOption Sets Variable Yes, range_alloc_block_sizeVariable Name range_alloc_block_sizeVariable Scope Global, Session Dynamic Variable Yes Permitted Values Platform Bit Size 32Type numericDefault 4096Range 4294967295Block Size 1024The size of blocks that are allocated when doing range optimization.
read_buffer_size
Command-Line Format --read_buffer_size=#Option-File Format read_buffer_sizeOption Sets Variable Yes, read_buffer_sizeVariable Name read_buffer_sizeVariable Scope Global, Session Dynamic Variable Yes Permitted Values Type numericDefault 131072Range 2147479552Each thread that does a sequential scan for a
MyISAMtable allocates a buffer of this size (in bytes) for each table it scans. If you do many sequential scans, you might want to increase this value, which defaults to 131072. The value of this variable should be a multiple of 4KB. If it is set to a value that is not a multiple of 4KB, its value will be rounded down to the nearest multiple of 4KB.The maximum permissible setting for
read_buffer_sizeis 2GB.For more information about memory use during different operations, see , "How MariaDB Uses Memory".
read_only
Command-Line Format --read-onlyOption-File Format read_onlyOption Sets Variable Yes, read_onlyVariable Name read_onlyVariable Scope Global Dynamic Variable Yes Permitted Values Type numericDefault 0This variable is off by default. When it is enabled, the server permits no updates except from users that have the
SUPERprivilege or (on a slave server) from updates performed by slave threads. In replication setups, it can be useful to enableread_onlyon slave servers to ensure that slaves accept updates only from the master server and not from clients.read_onlydoes not apply toTEMPORARYtables, nor does it prevent the server from inserting rows into the log tables (see , "Selecting General Query and Slow Query Log Output Destinations"). This variable does not prevent the use ofANALYZE TABLEorOPTIMIZE TABLEstatements because its purpose is to prevent changes to table structure or contents. Analysis and optimization do not qualify as such changes. This means, for example, that consistency checks on read-only slaves can be performed with mysqlcheck --all-databases --analyze.read_onlyexists only as aGLOBALvariable, so changes to its value require theSUPERprivilege. Changes toread_onlyon a master server are not replicated to slave servers. The value can be set on a slave server independent of the setting on the master.ImportantIn MariaDB 5.6, enabling
read_onlyprevents the use of theSET PASSWORDstatement by any user not having theSUPERprivilege. This is not necessarily the case for all MariaDB release series. When replicating from one MariaDB release series to another (for example, from a MariaDB 5.0 master to a MariaDB 5.1 or later slave), you should check the documentation for the versions running on both master and slave to determine whether the behavior ofread_onlyin this regard is or is not the same, and, if it is different, whether this has an impact on your applications.The following conditions apply:
- If you attempt to enable
read-onlywhile you have any explicit locks (acquired withLOCK TABLES) or have a pending transaction, an error occurs. - If you attempt to enable
read_onlywhile other clients hold explicit table locks or have pending transactions, the attempt blocks until the locks are released and the transactions end. While the attempt to enableread_onlyis pending, requests by other clients for table locks or to begin transactions also block untilread_onlyhas been set. read-onlycan be enabled while you hold a global read lock (acquired withFLUSH TABLES WITH READ LOCK) because that does not involve table locks.
In MariaDB 5.6, attempts to set
read_onlyblock for active transactions that hold metadata locks until those transactions end.- If you attempt to enable
read_rnd_buffer_size
Command-Line Format --read_rnd_buffer_size=#Option-File Format read_rnd_buffer_sizeOption Sets Variable Yes, read_rnd_buffer_sizeVariable Name read_rnd_buffer_sizeVariable Scope Global, Session Dynamic Variable Yes Permitted Values Type numericDefault 262144Range 4294967295When reading rows from a
MyISAMtable in sorted order following a key-sorting operation, the rows are read through this buffer to avoid disk seeks. See , "ORDER BYOptimization". Setting the variable to a large value can improveORDER BYperformance by a lot. However, this is a buffer allocated for each client, so you should not set the global variable to a large value. Instead, change the session variable only from within those clients that need to run large queries.The maximum permissible setting for
read_rnd_buffer_sizeis 2GB.For more information about memory use during different operations, see , "How MariaDB Uses Memory".
relay_log_purge
Command-Line Format --relay_log_purgeOption-File Format relay_log_purgeOption Sets Variable Yes, relay_log_purgeVariable Name relay_log_purgeVariable Scope Global Dynamic Variable Yes Permitted Values Type booleanDefault TRUEDisables or enables automatic purging of relay log files as soon as they are not needed any more. The default value is 1 (
ON).relay_log_space_limit
Command-Line Format --relay_log_space_limit=#Option-File Format relay_log_space_limitOption Sets Variable Yes, relay_log_space_limitVariable Name relay_log_space_limitVariable Scope Global Dynamic Variable No Permitted Values Platform Bit Size 32Type numericDefault 0Range 0 .. 4294967295Permitted Values Platform Bit Size 64Type numericDefault 0Range 0 .. 18446744073709547520The maximum amount of space to use for all relay logs.
report_host
Command-Line Format --report-host=host_nameOption-File Format report-hostOption Sets Variable Yes, report_hostVariable Name report-hostVariable Scope Global Dynamic Variable No Permitted Values Type stringThe value of the
--report-hostoption.report_password
Command-Line Format --report-password=nameOption-File Format report-passwordOption Sets Variable Yes, report_passwordVariable Name report-passwordVariable Scope Global Dynamic Variable No Permitted Values Type stringThe value of the
--report-passwordoption. Not the same as the password used for the MariaDB replication user account.report_port
Command-Line Format --report-port=#Option-File Format report-portOption Sets Variable Yes, report_portVariable Name report-portVariable Scope Global Dynamic Variable No Permitted Values (>= 5.6.5) Type numericDefault 0The value of the
--report-portoption.report_user
Command-Line Format --report-user=nameOption-File Format report-userOption Sets Variable Yes, report_userVariable Name report-userVariable Scope Global Dynamic Variable No Permitted Values Type stringThe value of the
--report-useroption. Not the same as the name for the MariaDB replication user account.rpl_semi_sync_master_enabled
Variable Name rpl_semi_sync_master_enabledVariable Scope Global Dynamic Variable Yes Permitted Values Type booleanDefault OFFControls whether semisynchronous replication is enabled on the master. To enable or disable the plugin, set this variable to
ONorOFF(or 1 or 0), respectively. The default isOFF.This variable is available only if the master-side semisynchronous replication plugin is installed.
rpl_semi_sync_master_timeout
Variable Name rpl_semi_sync_master_timeoutVariable Scope Global Dynamic Variable Yes Permitted Values Type numericDefault 10000A value in milliseconds that controls how long the master waits on a commit for acknowledgment from a slave before timing out and reverting to asynchronous replication. The default value is 10000 (10 seconds).
This variable is available only if the master-side semisynchronous replication plugin is installed.
rpl_semi_sync_master_trace_level
Variable Name rpl_semi_sync_master_trace_levelVariable Scope Global Dynamic Variable Yes Permitted Values Type numericDefault 32The semisynchronous replication debug trace level on the master. Currently, four levels are defined:
- 1 = general level (for example, time function failures)
- = detail level (more verbose information)
- = net wait level (more information about network waits)
- = function level (information about function entry and exit)
This variable is available only if the master-side semisynchronous replication plugin is installed.
rpl_semi_sync_master_wait_no_slave
Variable Name rpl_semi_sync_master_wait_no_slaveVariable Scope Global Dynamic Variable Yes Permitted Values Type booleanDefault ONWith semisynchronous replication, for each transaction, the master waits until timeout for acknowledgment of receipt from some semisynchronous slave. If no response occurs during this period, the master reverts to normal replication. This variable controls whether the master waits for the timeout to expire before reverting to normal replication even if the slave count drops to zero during the timeout period.
If the value is
ON(the default), it is permissible for the slave count to drop to zero during the timeout period (for example, if slaves disconnect). The master still waits for the timeout, so as long as some slave reconnects and acknowledges the transaction within the timeout interval, semisynchronous replication continues.If the value is
OFF, the master reverts to normal replication if the slave count drops to zero during the timeout period.This variable is available only if the master-side semisynchronous replication plugin is installed.
rpl_semi_sync_slave_enabled
Variable Name rpl_semi_sync_slave_enabledVariable Scope Global Dynamic Variable Yes Permitted Values Type booleanDefault OFFControls whether semisynchronous replication is enabled on the slave. To enable or disable the plugin, set this variable to
ONorOFF(or 1 or 0), respectively. The default isOFF.This variable is available only if the slave-side semisynchronous replication plugin is installed.
rpl_semi_sync_slave_trace_level
Variable Name rpl_semi_sync_slave_trace_levelVariable Scope Global Dynamic Variable Yes Permitted Values Type numericDefault 32The semisynchronous replication debug trace level on the slave. See
rpl_semi_sync_master_trace_levelfor the permissible values.This variable is available only if the slave-side semisynchronous replication plugin is installed.
secure_auth
Command-Line Format --secure-authOption-File Format secure-authOption Sets Variable Yes, secure_authVariable Name secure_authVariable Scope Global Dynamic Variable Yes Permitted Values (<= 5.6.4) Type booleanDefault OFFPermitted Values (>= 5.6.5) Type booleanDefault ONIf this variable is enabled, the server blocks connections by clients that attempt to use accounts that have passwords stored in the old (pre-4.1) format.
Enable this variable to prevent all use of passwords employing the old format (and hence insecure communication over the network). Before MariaDB 5.6.5, this variable is disabled by default. As of MariaDB 5.6.5, it is enabled by default.
Server startup fails with an error if this variable is enabled and the privilege tables are in pre-4.1 format. See "
Client does not support authentication protocol".secure_file_priv
Command-Line Format --secure-file-priv=pathOption-File Format secure-file-priv=pathOption Sets Variable Yes, secure_file_privVariable Name secure-file-privVariable Scope Global Dynamic Variable No Permitted Values Type stringBy default, this variable is empty. If set to the name of a directory, it limits the effect of the
LOAD-FILE()function and theLOAD DATAandSELECT ... INTO OUTFILEstatements to work only with files in that directory.server_id
Command-Line Format --server-id=#Option-File Format server-idOption Sets Variable Yes, server_idVariable Name server_idVariable Scope Global Dynamic Variable Yes Permitted Values Type numericDefault 0Range 0 .. 4294967295The server ID, used in replication to give each master and slave a unique identity. This variable is set by the
--server-idoption. For each server participating in replication, you should pick a positive integer in the range from 1 to 232 - 1 to act as that server's ID.shared_memory
Variable Name shared_memoryVariable Scope Global Dynamic Variable No Platform Specific windows (Windows only.) Whether the server permits shared-memory connections.
shared_memory_base_name
Variable Name shared_memory_base_nameVariable Scope Global Dynamic Variable No Platform Specific windows (Windows only.) The name of shared memory to use for shared-memory connections. This is useful when running multiple MariaDB instances on a single physical machine. The default name is
MariaDB. The name is case sensitive.skip_external_locking
This is
OFFif mysqld uses external locking,ONif external locking is disabled. This affects onlyMyISAMtable access.skip_name_resolve
This variable is set from the value of the
--skip-name-resolveoption. If it isON, mysqld resolves host names when checking client connections. IfOFF, mysqld uses only IP numbers and allHostcolumn values in the grant tables must be IP addresses orlocalhost. See , "DNS Lookup Optimization and the Host Cache".skip_networking
This is
ONif the server permits only local (non-TCP/IP) connections. On Unix, local connections use a Unix socket file. On Windows, local connections use a named pipe or shared memory. This variable can be set toONwith the--skip-networkingoption.skip_show_database
This prevents people from using the
SHOW DATABASESstatement if they do not have theSHOW DATABASESprivilege. This can improve security if you have concerns about users being able to see databases belonging to other users. Its effect depends on theSHOW DATABASESprivilege: If the variable value isON, theSHOW DATABASESstatement is permitted only to users who have theSHOW DATABASESprivilege, and the statement displays all database names. If the value isOFF,SHOW DATABASESis permitted to all users, but displays the names of only those databases for which the user has theSHOW DATABASESor other privilege.slow_launch_time
Command-Line Format --slow_launch_time=#Option-File Format slow_launch_timeOption Sets Variable Yes, slow_launch_timeVariable Name slow_launch_timeVariable Scope Global Dynamic Variable Yes Permitted Values Type numericDefault 2If creating a thread takes longer than this many seconds, the server increments the
Slow_launch_threadsstatus variable.slow_query_log
Command-Line Format --slow-query-logOption-File Format slow-query-logOption Sets Variable Yes, slow_query_logVariable Name slow_query_logVariable Scope Global Dynamic Variable Yes Permitted Values Type booleanDefault OFFWhether the slow query log is enabled. The value can be 0 (or
OFF) to disable the log or 1 (orON) to enable the log. The default value depends on whether the--slow_query_logoption is given. The destination for log output is controlled by thelog_outputsystem variable; if that value isNONE, no log entries are written even if the log is enabled."Slow" is determined by the value of the
long-query-timevariable. See , "The Slow Query Log".slow_query_log_file
Command-Line Format --slow-query-log-file=file_nameOption-File Format slow_query_log_fileOption Sets Variable Yes, slow_query_log_fileVariable Name slow_query_log_fileVariable Scope Global Dynamic Variable Yes Permitted Values Type file nameThe name of the slow query log file. The default value is
host_name-slow.log--slow_query_log_fileoption.socket
Command-Line Format --socket=nameOption-File Format socketOption Sets Variable Yes, socketVariable Name socketVariable Scope Global Dynamic Variable No Permitted Values Type file nameDefault /tmp/mysql.sockOn Unix platforms, this variable is the name of the socket file that is used for local client connections. The default is
/tmp/mysql.sock. (For some distribution formats, the directory might be different, such as/var/lib/mysqlfor RPMs.)On Windows, this variable is the name of the named pipe that is used for local client connections. The default value is
MariaDB(not case sensitive).sort_buffer_size
Command-Line Format --sort_buffer_size=#Option-File Format sort_buffer_sizeOption Sets Variable Yes, sort_buffer_sizeVariable Name sort_buffer_sizeVariable Scope Global, Session Dynamic Variable Yes Permitted Values Platform Bit Size 32Type numericDefault 2097144Max Value 4294967295Permitted Values Platform Bit Size 64Type numericDefault 2097144Max Value 18446744073709547520Each session that needs to do a sort allocates a buffer of this size.
sort_buffer_sizeis not specific to any storage engine and applies in a general manner for optimization. See , "ORDER BYOptimization", for example.If you see many
Sort-merge-passesper second inSHOW GLOBAL STATUSoutput, you can consider increasing thesort_buffer_sizevalue to speed upORDER BYorGROUP BYoperations that cannot be improved with query optimization or improved indexing. The entire buffer is allocated even if it is not all needed, so setting it larger than required globally will slow down most queries that sort. It is best to increase it as a session setting, and only for the sessions that need a larger size. On Linux, there are thresholds of 256KB and 2MB where larger values may significantly slow down memory allocation, so you should consider staying below one of those values. Experiment to find the best value for your workload. See "Where MariaDB Stores Temporary Files".The maximum permissible setting for
sort_buffer_sizeis 4GB. Values larger than 4GB are permitted for 64-bit platforms (except 64-bit Windows, for which large values are truncated to 4GB with a warning).sql_auto_is_null
Variable Name sql_auto_is_nullVariable Scope Global, Session Dynamic Variable Yes Permitted Values Type booleanDefault 0If this variable is set to 1, then after a statement that successfully inserts an automatically generated
AUTO_INCREMENTvalue, you can find that value by issuing a statement of the following form:SELECT * FROM
tbl_nameWHEREauto_colIS NULLIf the statement returns a row, the value returned is the same as if you invoked the
LAST_INSERT_ID()function. For details, including the return value after a multiple-row insert, see , "Information Functions". If noAUTO_INCREMENTvalue was successfully inserted, theSELECTstatement returns no row.The behavior of retrieving an
AUTO_INCREMENTvalue by using anIS NULLcomparison is used by some ODBC programs, such as Access. See , "Obtaining Auto-Increment Values". This behavior can be disabled by settingsql_auto_is_nullto 0.The default value of
sql_auto_is_nullis 0 in MariaDB 5.6.sql_big_selects
Variable Name sql_big_selectsVariable Scope Global, Session Dynamic Variable Yes Permitted Values Type booleanDefault 1If set to 0, MariaDB aborts
SELECTstatements that are likely to take a very long time to execute (that is, statements for which the optimizer estimates that the number of examined rows exceeds the value ofmax_join_size). This is useful when an inadvisableWHEREstatement has been issued. The default value for a new connection is 1, which permits allSELECTstatements.If you set the
max_join_sizesystem variable to a value other thanDEFAULT,sql_big_selectsis set to 0.sql_buffer_result
Variable Name sql_buffer_resultVariable Scope Global, Session Dynamic Variable Yes Permitted Values Type booleanDefault 0If set to 1,
sql-buffer-resultforces results fromSELECTstatements to be put into temporary tables. This helps MariaDB free the table locks early and can be beneficial in cases where it takes a long time to send results to the client. The default value is 0.sql_log_bin
Variable Name sql_log_binVariable Scope Global, Session Dynamic Variable Yes Permitted Values Type booleanThis variable controls whether logging to the binary log is done. The default value is 1 (do logging). To change logging for the current session, change the session value of this variable. The session user must have the
SUPERprivilege to set this variable.In MariaDB 5.6, it is not possible to set
@@session.sql_log_binwithin a transaction or subquery. (Bug #53437)sql_log_off
Variable Name sql_log_offVariable Scope Global, Session Dynamic Variable Yes Permitted Values Type booleanDefault 0This variable controls whether logging to the general query log is done. The default value is 0 (do logging). To change logging for the current session, change the session value of this variable. The session user must have the
SUPERprivilege to set this option. The default value is 0.sql_mode
Variable Name sql_log_updateVariable Scope Session Dynamic Variable Yes Deprecated 5.0, by sql_log_binPermitted Values Type booleanCommand-Line Format --sql-mode=nameOption-File Format sql-modeOption Sets Variable Yes, sql_modeVariable Name sql_modeVariable Scope Global, Session Dynamic Variable Yes Permitted Values Type setDefault ''Valid Values ALLOW_INVALID_DATESANSI_QUOTESERROR_FOR_DIVISION_BY_ZEROHIGH_NOT_PRECEDENCEIGNORE_SPACENO_AUTO_CREATE_USERNO_AUTO_VALUE_ON_ZERONO_BACKSLASH_ESCAPESNO_DIR_IN_CREATENO_ENGINE_SUBSTITUTIONNO_FIELD_OPTIONSNO_KEY_OPTIONSNO_TABLE_OPTIONSNO_UNSIGNED_SUBTRACTIONNO_ZERO_DATENO_ZERO_IN_DATEONLY_FULL_GROUP_BYPAD_CHAR_TO_FULL_LENGTHPIPES_AS_CONCATREAL_AS_FLOATSTRICT_ALL_TABLESSTRICT_TRANS_TABLESThe current server SQL mode, which can be set dynamically. See , "Server SQL Modes".
sql_notes
If set to 1 (the default), warnings of
Notelevel incrementwarning_countand the server records them. If set to 0,Notewarnings do not incrementwarning_countand the server does not record them. mysqldump includes output to set this variable to 0 so that reloading the dump file does not produce warnings for events that do not affect the integrity of the reload operation.sql_quote_show_create
If set to 1 (the default), the server quotes identifiers for
SHOW CREATE TABLEandSHOW CREATE DATABASEstatements. If set to 0, quoting is disabled. This option is enabled by default so that replication works for identifiers that require quoting. See , "SHOW CREATE TABLESyntax", and , "SHOW CREATE DATABASESyntax".sql_safe_updates
If set to 1, MariaDB aborts
UPDATEorDELETEstatements that do not use a key in theWHEREclause or aLIMITclause. This makes it possible to catchUPDATEorDELETEstatements where keys are not used properly and that would probably change or delete a large number of rows. The default value is 0.sql_select_limit
Variable Name sql_select_limitVariable Scope Global, Session Dynamic Variable Yes Permitted Values Type numericThe maximum number of rows to return from
SELECTstatements. The default value for a new connection is the maximum number of rows that the server permits per table. Typical default values are (232)-1 or (264)-1. If you have changed the limit, the default value can be restored by assigning a value ofDEFAULT.If a
SELECThas aLIMITclause, theLIMITtakes precedence over the value ofsql_select_limit.sql-select-limitdoes not apply toSELECTstatements executed within stored routines. It also does not apply toSELECTstatements that do not produce a result set to be returned to the client. These includeSELECTstatements in subqueries,CREATE TABLE ... SELECT, andINSERT INTO ... SELECT.sql_warnings
This variable controls whether single-row
INSERTstatements produce an information string if warnings occur. The default is 0. Set the value to 1 to produce an information string.ssl_ca
Command-Line Format --ssl-ca=nameOption-File Format ssl-caOption Sets Variable Yes, ssl_caVariable Name ssl-caVariable Scope Global Dynamic Variable No Permitted Values Type file nameThe path to a file with a list of trusted SSL CAs.
ssl_capath
Command-Line Format --ssl-capath=nameOption-File Format ssl-capathOption Sets Variable Yes, ssl_capathVariable Name ssl-capathVariable Scope Global Dynamic Variable No Permitted Values Type directory nameThe path to a directory that contains trusted SSL CA certificates in PEM format.
ssl_cert
Command-Line Format --ssl-cert=nameOption-File Format ssl-certOption Sets Variable Yes, ssl_certVariable Name ssl-certVariable Scope Global Dynamic Variable No Permitted Values Type file nameThe name of the SSL certificate file to use for establishing a secure connection.
ssl_cipher
Command-Line Format --ssl-cipher=nameOption-File Format ssl-cipherOption Sets Variable Yes, ssl_cipherVariable Name ssl-cipherVariable Scope Global Dynamic Variable No Permitted Values Type file nameA list of permissible ciphers to use for SSL encryption.
ssl_crl
Version Introduced 5.6.3 Command-Line Format --ssl-crl=nameOption-File Format ssl-crlOption Sets Variable Yes, ssl_crlVariable Name ssl-crlVariable Scope Global Dynamic Variable No Permitted Values Type file nameThe path to a file containing certificate revocation lists in PEM format. Revocation lists work for MariaDB distributions compiled against OpenSSL (but not yaSSL).
This variable was added in MariaDB 5.6.3.
ssl_crlpath
Version Introduced 5.6.3 Command-Line Format --ssl-crlpath=nameOption-File Format ssl-crlpathOption Sets Variable Yes, ssl_crlpathVariable Name ssl-crlpathVariable Scope Global Dynamic Variable No Permitted Values Type directory nameThe path to a directory that contains files containing certificate revocation lists in PEM format. Revocation lists work for MariaDB distributions compiled against OpenSSL (but not yaSSL).
This variable was added in MariaDB 5.6.3.
ssl_key
Command-Line Format --ssl-key=nameOption-File Format ssl-keyOption Sets Variable Yes, ssl_keyVariable Name ssl-keyVariable Scope Global Dynamic Variable No Permitted Values Type stringThe name of the SSL key file to use for establishing a secure connection.
storage_engine
Variable Name storage_engineVariable Scope Global, Session Dynamic Variable Yes Permitted Values Type enumerationDefault InnoDBThe default storage engine (table type). To set the storage engine at server startup, use the
--default-storage-engineoption. See , "Server Command Options".This variable is deprecated. Use
default_storage_engineinstead.sync_frm
Command-Line Format --sync-frmOption-File Format sync_frmOption Sets Variable Yes, sync_frmVariable Name sync_frmVariable Scope Global Dynamic Variable Yes Permitted Values Type booleanDefault TRUEIf this variable is set to 1, when any nontemporary table is created its
.frmfile is synchronized to disk (usingfdatasync()). This is slower but safer in case of a crash. The default is 1.system_time_zone
Variable Name system_time_zoneVariable Scope Global Dynamic Variable No Permitted Values Type stringThe server system time zone. When the server begins executing, it inherits a time zone setting from the machine defaults, possibly modified by the environment of the account used for running the server or the startup script. The value is used to set
system_time_zone. Typically the time zone is specified by theTZenvironment variable. It also can be specified using the--timezoneoption of the mysqld_safe script.The
system-time-zonevariable differs fromtime_zone. Although they might have the same value, the latter variable is used to initialize the time zone for each client that connects. See , "MySQL Server Time Zone Support".table_definition_cache
Command-Line Format --table_definition_cache=#Option-File Format table_definition_cacheOption Sets Variable Yes, table_definition_cacheVariable Name table_definition_cacheVariable Scope Global Dynamic Variable Yes Permitted Values Type numericDefault 400Range 524288The number of table definitions that can be stored in the definition cache. If you use a large number of tables, you can create a large table definition cache to speed up opening of tables. The table definition cache takes less space and does not use file descriptors, unlike the normal table cache. The minimum and default values are both 400.
table_open_cache
Command-Line Format --table-open-cache=#Option-File Format table_open_cacheVariable Name table_open_cacheVariable Scope Global Dynamic Variable Yes Permitted Values Type numericDefault 400Range 524288The number of open tables for all threads. Increasing this value increases the number of file descriptors that mysqld requires. You can check whether you need to increase the table cache by checking the
Opened_tablesstatus variable. See , "Server Status Variables". If the value ofOpened_tablesis large and you do not useFLUSH TABLESoften (which just forces all tables to be closed and reopened), then you should increase the value of thetable-open-cachevariable. For more information about the table cache, see , "How MariaDB Opens and Closes Tables".thread_cache_size
Command-Line Format --thread_cache_size=#Option-File Format thread_cache_sizeOption Sets Variable Yes, thread_cache_sizeVariable Name thread_cache_sizeVariable Scope Global Dynamic Variable Yes Permitted Values Type numericDefault 0Range 0 .. 16384How many threads the server should cache for reuse. When a client disconnects, the client's threads are put in the cache if there are fewer than
thread_cache_sizethreads there. Requests for threads are satisfied by reusing threads taken from the cache if possible, and only when the cache is empty is a new thread created. This variable can be increased to improve performance if you have a lot of new connections. Normally, this does not provide a notable performance improvement if you have a good thread implementation. However, if your server sees hundreds of connections per second you should normally setthread_cache_sizehigh enough so that most new connections use cached threads. By examining the difference between theConnectionsandThreads_createdstatus variables, you can see how efficient the thread cache is. For details, see , "Server Status Variables".thread_concurrency
Version Deprecated 5.6.1 Command-Line Format --thread_concurrency=#Option-File Format thread_concurrencyOption Sets Variable Yes, thread_concurrencyVariable Name thread_concurrencyVariable Scope Global Dynamic Variable No Deprecated 5.6.1 Permitted Values Type numericDefault 10Range 1 .. 512This variable is specific to Solaris systems, for which mysqld invokes the
thr_setconcurrency()with the variable value. This function enables applications to give the threads system a hint about the desired number of threads that should be run at the same time.This variable is deprecated as of MariaDB 5.6.1 and will be removed in a future MariaDB release.
thread_handling
Command-Line Format --thread_handling=nameOption-File Format thread_handling=nameOption Sets Variable Yes, thread_handlingVariable Name thread_handlingVariable Scope Global Dynamic Variable No Permitted Values Type enumerationValid Values no-threadsone-thread-per-connectiondynamically-loadedThe thread-handling model used by the server for connection threads. The permissible values are
no-threads(the server uses a single thread) andone-thread-per-connection(the server uses one thread to handle each client connection).no-threadsis useful for debugging under Linux; see MySQL Internals: Porting.thread_stack
Command-Line Format --thread_stack=#Option-File Format thread_stackOption Sets Variable Yes, thread_stackVariable Name thread_stackVariable Scope Global Dynamic Variable No Permitted Values Platform Bit Size 32Type numericDefault 196608Range 4294967295Block Size 1024Permitted Values Platform Bit Size 64Type numericDefault 262144Range 18446744073709547520Block Size 1024The stack size for each thread. Many of the limits detected by the
crash-metest are dependent on this value. See , "The MariaDB Benchmark Suite". The default of 192KB (256KB for 64-bit systems) is large enough for normal operation. If the thread stack size is too small, it limits the complexity of the SQL statements that the server can handle, the recursion depth of stored procedures, and other memory-consuming actions.time_format
This variable is unused.
time_zone
Command-Line Format --default_time_zone=stringOption-File Format default_time_zoneVariable Name time_zoneVariable Scope Global, Session Dynamic Variable Yes Permitted Values Type stringThe current time zone. This variable is used to initialize the time zone for each client that connects. By default, the initial value of this is
'SYSTEM'(which means, "use the value ofsystem_time_zone"). The value can be specified explicitly at server startup with the--default-time-zoneoption. See , "MySQL Server Time Zone Support".timed_mutexes
Command-Line Format --timed_mutexesOption-File Format timed_mutexesOption Sets Variable Yes, timed_mutexesVariable Name timed_mutexesVariable Scope Global Dynamic Variable Yes Permitted Values Type booleanDefault OFFThis variable controls whether
InnoDBmutexes are timed. If this variable is set to 0 orOFF(the default), mutex timing is disabled. If the variable is set to 1 orON, mutex timing is enabled. With timing enabled, theos_wait_timesvalue in the output fromSHOW ENGINE INNODB MUTEXindicates the amount of time (in ms) spent in operating system waits. Otherwise, the value is 0.timestamp = {timestamp_value| DEFAULT}
Set the time for this client. This is used to get the original timestamp if you use the binary log to restore rows.
timestamp_valueshould be a Unix epoch timestamp, not a MariaDB timestamp.As of MariaDB 5.6.4,
timestampis aDOUBLErather thanBIGINTbecause its value includes a microseconds part.SET timestampaffects the value returned byNOW()but not bySYSDATE(). This means that timestamp settings in the binary log have no effect on invocations ofSYSDATE(). The server can be started with the--sysdate-is-nowoption to causeSYSDATE()to be an alias forNOW(), in which caseSET timestampaffects both functions.tmp_table_size
Command-Line Format --tmp_table_size=#Option-File Format tmp_table_sizeOption Sets Variable Yes, tmp_table_sizeVariable Name tmp_table_sizeVariable Scope Global, Session Dynamic Variable Yes Permitted Values Type numericDefault system dependentRange 4294967295The maximum size of internal in-memory temporary tables. (The actual limit is determined as the minimum of
tmp_table_sizeandmax_heap_table_size.) If an in-memory temporary table exceeds the limit, MariaDB automatically converts it to an on-diskMyISAMtable. Increase the value oftmp-table-size(andmax_heap_table_sizeif necessary) if you do many advancedGROUP BYqueries and you have lots of memory. This variable does not apply to user-createdMEMORYtables.You can compare the number of internal on-disk temporary tables created to the total number of internal temporary tables created by comparing the values of the
Created_tmp_disk_tablesandCreated_tmp_tablesvariables.tmpdir
Command-Line Format --tmpdir=path-tOption-File Format tmpdirOption Sets Variable Yes, tmpdirVariable Name tmpdirVariable Scope Global Dynamic Variable No Permitted Values Type file nameThe directory used for temporary files and temporary tables. This variable can be set to a list of several paths that are used in round-robin fashion. Paths should be separated by colon characters ("
:") on Unix and semicolon characters (";") on Windows.The multiple-directory feature can be used to spread the load between several physical disks. If the MariaDB server is acting as a replication slave, you should not set
tmpdirto point to a directory on a memory-based file system or to a directory that is cleared when the server host restarts. A replication slave needs some of its temporary files to survive a machine restart so that it can replicate temporary tables orLOAD DATA INFILEoperations. If files in the temporary file directory are lost when the server restarts, replication fails. You can set the slave's temporary directory using theslave_load_tmpdirvariable. In that case, the slave will not use the generaltmpdirvalue and you can settmpdirto a nonpermanent location.transaction_alloc_block_size
Command-Line Format --transaction_alloc_block_size=#Option-File Format transaction_alloc_block_sizeOption Sets Variable Yes, transaction_alloc_block_sizeVariable Name transaction_alloc_block_sizeVariable Scope Global, Session Dynamic Variable Yes Permitted Values Platform Bit Size 32Type numericDefault 8192Range 4294967295Block Size 1024Permitted Values Platform Bit Size 64Type numericDefault 8192Range 18446744073709547520Block Size 1024The amount in bytes by which to increase a per-transaction memory pool which needs memory. See the description of
transaction_prealloc_size.transaction_prealloc_size
Command-Line Format --transaction_prealloc_size=#Option-File Format transaction_prealloc_sizeOption Sets Variable Yes, transaction_prealloc_sizeVariable Name transaction_prealloc_sizeVariable Scope Global, Session Dynamic Variable Yes Permitted Values Platform Bit Size 32Type numericDefault 4096Range 4294967295Block Size 1024Permitted Values Platform Bit Size 64Type numericDefault 4096Range 18446744073709547520Block Size 1024There is a per-transaction memory pool from which various transaction-related allocations take memory. The initial size of the pool in bytes is
transaction_prealloc_size. For every allocation that cannot be satisfied from the pool because it has insufficient memory available, the pool is increased bytransaction_alloc_block_sizebytes. When the transaction ends, the pool is truncated totransaction_prealloc_sizebytes.By making
transaction_prealloc_sizesufficiently large to contain all statements within a single transaction, you can avoid manymalloc()calls.tx_isolation
Variable Name tx_isolationVariable Scope Global, Session Dynamic Variable Yes Permitted Values Type enumerationDefault REPEATABLE-READValid Values READ-UNCOMMITTEDREAD-COMMITTEDREPEATABLE-READSERIALIZABLEThe default transaction isolation level. Defaults to
REPEATABLE-READ.This variable can be set directly, or indirectly using the
SET TRANSACTIONstatement. See , "SET TRANSACTIONSyntax". If you settx_isolationdirectly to an isolation level name that contains a space, the name should be enclosed within quotation marks, with the space replaced by a dash. For example:SET tx_isolation = 'READ-COMMITTED';
Any unique prefix of a valid value may be used to set the value of this variable.
The default transaction isolation level can also be set at startup using the
--transaction-isolationserver option.tx_read_only
Version Introduced 5.6.5 Variable Name tx_read_onlyVariable Scope Global, Session Dynamic Variable Yes Permitted Values Type booleanThe default transaction access mode. The value can be
OFF(read/write, the default) orON(read only).This variable can be set directly, or indirectly using the
SET TRANSACTIONstatement. See , "SET TRANSACTIONSyntax".To set the default transaction access mode at startup, use the
--transaction-read-onlyserver option.This variable was added in MariaDB 5.6.5.
unique_checks
Variable Name unique_checksVariable Scope Global, Session Dynamic Variable Yes Permitted Values Type booleanDefault 1If set to 1 (the default), uniqueness checks for secondary indexes in
InnoDBtables are performed. If set to 0, storage engines are permitted to assume that duplicate keys are not present in input data. If you know for certain that your data does not contain uniqueness violations, you can set this to 0 to speed up large table imports toInnoDB.Note that setting this variable to 0 does not require storage engines to ignore duplicate keys. An engine is still permitted to check for them and issue duplicate-key errors if it detects them.
updatable_views_with_limit
Command-Line Format --updatable_views_with_limit=#Option-File Format updatable_views_with_limitOption Sets Variable Yes, updatable_views_with_limitVariable Name updatable_views_with_limitVariable Scope Global, Session Dynamic Variable Yes Permitted Values Type booleanDefault 1This variable controls whether updates to a view can be made when the view does not contain all columns of the primary key defined in the underlying table, if the update statement contains a
LIMITclause. (Such updates often are generated by GUI tools.) An update is anUPDATEorDELETEstatement. Primary key here means aPRIMARY KEY, or aUNIQUEindex in which no column can containNULL.The variable can have two values:
1orYES: Issue a warning only (not an error message). This is the default value.0orNO: Prohibit the update.
version
The version number for the server. The value might also include a suffix indicating server build or configuration information.
-logindicates that one or more of the general log, slow query log, or binary log are enabled.-debugindicates that the server was built with debugging support enabled.version_comment
Variable Name version_commentVariable Scope Global Dynamic Variable No Permitted Values Type stringThe CMake configuration program has a
WITH_COMMENToption that permits a comment to be specified when building MySQL. This variable contains the value of that comment. See , "MySQL Source-Configuration Options".version_compile_machine
Variable Name version_compile_machineVariable Scope Global Dynamic Variable No Permitted Values Type stringThe type of machine or architecture on which MariaDB was built.
version_compile_os
Variable Name version_compile_osVariable Scope Global Dynamic Variable No Permitted Values Type stringThe type of operating system on which MariaDB was built.
wait_timeout
Command-Line Format --wait_timeout=#Option-File Format wait_timeoutOption Sets Variable Yes, wait_timeoutVariable Name wait_timeoutVariable Scope Global, Session Dynamic Variable Yes Permitted Values Type numericDefault 28800Range 1 .. 31536000Permitted Values Type (windows) numericDefault 28800Range 1 .. 2147483The number of seconds the server waits for activity on a noninteractive connection before closing it.
On thread startup, the session
wait-timeoutvalue is initialized from the globalwait_timeoutvalue or from the globalinteractive_timeoutvalue, depending on the type of client (as defined by theCLIENT_INTERACTIVEconnect option tomysql_real_connect()). See alsointeractive_timeout.warning_count
The number of errors, warnings, and notes that resulted from the last statement that generated messages. This variable is read only. See , "
SHOW WARNINGSSyntax".
Using System Variables
The MariaDB server maintains many system variables that indicate how it is configured. , "Server System Variables", describes the meaning of these variables. Each system variable has a default value. System variables can be set at server startup using options on the command line or in an option file. Most of them can be changed dynamically while the server is running by means of the SET statement, which enables you to modify operation of the server without having to stop and restart it. You can refer to system variable values in expressions.
The server maintains two kinds of system variables. Global variables affect the overall operation of the server. Session variables affect its operation for individual client connections. A given system variable can have both a global and a session value. Global and session system variables are related as follows:
- When the server starts, it initializes all global variables to their default values. These defaults can be changed by options specified on the command line or in an option file. (See , "Specifying Program Options".)
- The server also maintains a set of session variables for each client that connects. The client's session variables are initialized at connect time using the current values of the corresponding global variables. For example, the client's SQL mode is controlled by the session
sql_modevalue, which is initialized when the client connects to the value of the globalsql_modevalue.
System variable values can be set globally at server startup by using options on the command line or in an option file. When you use a startup option to set a variable that takes a numeric value, the value can be given with a suffix of K, M, or G (either uppercase or lowercase) to indicate a multiplier of 1024, 10242 or 10243; that is, units of kilobytes, megabytes, or gigabytes, respectively. Thus, the following command starts the server with a query cache size of 16 megabytes and a maximum packet size of one gigabyte:
mysqld --query_cache_size=16M --max_allowed_packet=1G
Within an option file, those variables are set like this:
[mysqld]
query_cache_size=16M max_allowed_packet=1G
The lettercase of suffix letters does not matter; 16M and 16m are equivalent, as are 1G and 1g.
If you want to restrict the maximum value to which a system variable can be set at runtime with the SET statement, you can specify this maximum by using an option of the form --maximum- at server startup. For example, to prevent the value of var_name=valuequery_cache_size from being increased to more than 32MB at runtime, use the option --maximum-query_cache_size=32M.
Many system variables are dynamic and can be changed while the server runs by using the SET statement. For a list, see , "Dynamic System Variables". To change a system variable with SET, refer to it as var_name, optionally preceded by a modifier:
- To indicate explicitly that a variable is a global variable, precede its name by
GLOBALor@@global.. TheSUPERprivilege is required to set global variables. - To indicate explicitly that a variable is a session variable, precede its name by
SESSION,@@session., or@@. Setting a session variable requires no special privilege, but a client can change only its own session variables, not those of any other client. LOCALand@@local.are synonyms forSESSIONand@@session..- If no modifier is present,
SETchanges the session variable.
A SET statement can contain multiple variable assignments, separated by commas. If you set several system variables, the most recent GLOBAL or SESSION modifier in the statement is used for following variables that have no modifier specified.
Examples:
SET sort_buffer_size=10000;
SET @@local.sort_buffer_size=10000;
SET GLOBAL sort_buffer_size=1000000, SESSION sort_buffer_size=1000000;
SET @@sort_buffer_size=1000000;
SET @@global.sort_buffer_size=1000000, @@local.sort_buffer_size=1000000;
The @@ syntax for system variables is supported for compatibility with some other database systems.
var_name
If you change a session system variable, the value remains in effect until your session ends or until you change the variable to a different value. The change is not visible to other clients.
If you change a global system variable, the value is remembered and used for new connections until the server restarts. (To make a global system variable setting permanent, you should set it in an option file.) The change is visible to any client that accesses that global variable. However, the change affects the corresponding session variable only for clients that connect after the change. The global variable change does not affect the session variable for any client that is currently connected (not even that of the client that issues the SET GLOBAL statement).
To prevent incorrect usage, MariaDB produces an error if you use SET GLOBAL with a variable that can only be used with SET SESSION or if you do not specify GLOBAL (or @@global.) when setting a global variable.
To set a SESSION variable to the GLOBAL value or a GLOBAL value to the compiled-in MariaDB default value, use the DEFAULT keyword. For example, the following two statements are identical in setting the session value of max_join_size to the global value:
SET max_join_size=DEFAULT;
SET @@session.max_join_size=@@global.max_join_size;
Not all system variables can be set to DEFAULT. In such cases, use of DEFAULT results in an error.
You can refer to the values of specific global or session system variables in expressions by using one of the @@-modifiers. For example, you can retrieve values in a SELECT statement like this:
SELECT @@global.sql_mode, @@session.sql_mode, @@sql_mode;
When you refer to a system variable in an expression as @@ (that is, when you do not specify var_name@@global. or @@session.), MariaDB returns the session value if it exists and the global value otherwise. (This differs from SET @@, which always refers to the session value.)Note
var_name = value
Some variables displayed by SHOW VARIABLES may not be available using SELECT @@ syntax; an var_nameUnknown system variable occurs. As a workaround in such cases, you can use SHOW VARIABLES LIKE '.
var_name'
Suffixes for specifying a value multiplier can be used when setting a variable at server startup, but not to set the value with SET at runtime. On the other hand, with SET you can assign a variable's value using an expression, which is not true when you set a variable at server startup. For example, the first of the following lines is legal at server startup, but the second is not:
shell>mysql --max_allowed_packet=16Mshell>mysql --max_allowed_packet=16*1024*1024
Conversely, the second of the following lines is legal at runtime, but the first is not:
mysql>NoteSET GLOBAL max_allowed_packet=16M;mysql>SET GLOBAL max_allowed_packet=16*1024*1024;
Some system variables can be enabled with the SET statement by setting them to ON or 1, or disabled by setting them to OFF or 0. However, to set such a variable on the command line or in an option file, you must set it to 1 or 0; setting it to ON or OFF will not work. For example, on the command line, --delay_key_write=1 works but --delay_key_write=ON does not.
To display system variable names and values, use the SHOW VARIABLES statement:
mysql> SHOW VARIABLES;
+---------------------------------+-----------------------------------+
| Variable_name | Value |
+---------------------------------+-----------------------------------+
| auto_increment_increment | 1 |
| auto_increment_offset | 1 |
| automatic_sp_privileges | ON |
| back_log | 50 |
| basedir | /home/mysql/ |
| binlog_cache_size | 32768 |
| bulk_insert_buffer_size | 8388608 |
| character_set_client | latin1 |
| character_set_connection | latin1 |
| character_set_database | latin1 |
| character_set_results | latin1 |
| character_set_server | latin1 |
| character_set_system | utf8 |
| character_sets_dir | /home/mysql/share/mysql/charsets/ |
| collation_connection | latin1_swedish_ci |
| collation_database | latin1_swedish_ci |
| collation_server | latin1_swedish_ci |
...
| innodb_additional_mem_pool_size | 1048576 |
| innodb_autoextend_increment | 8 |
| innodb_buffer_pool_size | 8388608 |
| innodb_checksums | ON |
| innodb_commit_concurrency | 0 |
| innodb_concurrency_tickets | 500 |
| innodb_data_file_path | ibdata1:10M:autoextend |
| innodb_data_home_dir | |
...
| version | 5.1.6-alpha-log |
| version_comment | Source distribution |
| version_compile_machine | i686 |
| version_compile_os | suse-linux |
| wait_timeout | 28800 |
+---------------------------------+-----------------------------------+
With a LIKE clause, the statement displays only those variables that match the pattern. To obtain a specific variable name, use a LIKE clause as shown:
SHOW VARIABLES LIKE 'max_join_size';
SHOW SESSION VARIABLES LIKE 'max_join_size';
To get a list of variables whose name match a pattern, use the "%" wildcard character in a LIKE clause:
SHOW VARIABLES LIKE '%size%';
SHOW GLOBAL VARIABLES LIKE '%size%';
Wildcard characters can be used in any position within the pattern to be matched. Strictly speaking, because "_" is a wildcard that matches any single character, you should escape it as "\_" to match it literally. In practice, this is rarely necessary.
For SHOW VARIABLES, if you specify neither GLOBAL nor SESSION, MariaDB returns SESSION values.
The reason for requiring the GLOBAL keyword when setting GLOBAL-only variables but not when retrieving them is to prevent problems in the future. If we were to remove a SESSION variable that has the same name as a GLOBAL variable, a client with the SUPER privilege might accidentally change the GLOBAL variable rather than just the SESSION variable for its own connection. If we add a SESSION variable with the same name as a GLOBAL variable, a client that intends to change the GLOBAL variable might find only its own SESSION variable changed.
Structured System Variables
A structured variable differs from a regular system variable in two respects:
- Its value is a structure with components that specify server parameters considered to be closely related.
- There might be several instances of a given type of structured variable. Each one has a different name and refers to a different resource maintained by the server.
MySQL 5.6 supports one structured variable type, which specifies parameters governing the operation of key caches. A key cache structured variable has these components:
This section describes the syntax for referring to structured variables. Key cache variables are used for syntax examples, but specific details about how key caches operate are found elsewhere, in , "The MyISAM Key Cache".
To refer to a component of a structured variable instance, you can use a compound name in instance_name.component_name format. Examples:
hot_cache.key_buffer_size hot_cache.key_cache_block_size cold_cache.key_cache_block_size
For each structured system variable, an instance with the name of default is always predefined. If you refer to a component of a structured variable without any instance name, the default instance is used. Thus, default.key_buffer_size and key_buffer_size both refer to the same system variable.
Structured variable instances and components follow these naming rules:
- For a given type of structured variable, each instance must have a name that is unique within variables of that type. However, instance names need not be unique across structured variable types. For example, each structured variable has an instance named
default, sodefaultis not unique across variable types. - The names of the components of each structured variable type must be unique across all system variable names. If this were not true (that is, if two different types of structured variables could share component member names), it would not be clear which default structured variable to use for references to member names that are not qualified by an instance name.
- If a structured variable instance name is not legal as an unquoted identifier, refer to it as a quoted identifier using backticks. For example,
hot-cacheis not legal, but`hot-cache`is. global,session, andlocalare not legal instance names. This avoids a conflict with notation such as@@global.for referring to nonstructured system variables.var_name
Currently, the first two rules have no possibility of being violated because the only structured variable type is the one for key caches. These rules will assume greater significance if some other type of structured variable is created in the future.
With one exception, you can refer to structured variable components using compound names in any context where simple variable names can occur. For example, you can assign a value to a structured variable using a command-line option:
shell> mysqld --hot_cache.key_buffer_size=64K
In an option file, use this syntax:
[mysqld]
hot_cache.key_buffer_size=64K
If you start the server with this option, it creates a key cache named hot_cache with a size of 64KB in addition to the default key cache that has a default size of 8MB.
Suppose that you start the server as follows:
shell>mysqld --key_buffer_size=256K \--extra_cache.key_buffer_size=128K \--extra_cache.key_cache_block_size=2048
In this case, the server sets the size of the default key cache to 256KB. (You could also have written --default.key_buffer_size=256K.) In addition, the server creates a second key cache named extra_cache that has a size of 128KB, with the size of block buffers for caching table index blocks set to 2048 bytes.
The following example starts the server with three different key caches having sizes in a 3:1:1 ratio:
shell>mysqld --key_buffer_size=6M \--hot_cache.key_buffer_size=2M \--cold_cache.key_buffer_size=2M
Structured variable values may be set and retrieved at runtime as well. For example, to set a key cache named hot_cache to a size of 10MB, use either of these statements:
mysql>SET GLOBAL hot_cache.key_buffer_size = 10*1024*1024;mysql>SET @@global.hot_cache.key_buffer_size = 10*1024*1024;
To retrieve the cache size, do this:
mysql> SELECT @@global.hot_cache.key_buffer_size;
However, the following statement does not work. The variable is not interpreted as a compound name, but as a simple string for a LIKE pattern-matching operation:
mysql> SHOW GLOBAL VARIABLES LIKE 'hot_cache.key_buffer_size';
This is the exception to being able to use structured variable names anywhere a simple variable name may occur.
Dynamic System Variables
Many server system variables are dynamic and can be set at runtime using SET GLOBAL or SET SESSION. You can also obtain their values using SELECT. See , "Using System Variables".
The following table shows the full list of all dynamic system variables. The last column indicates for each variable whether GLOBAL or SESSION (or both) apply. The table also lists session options that can be set with the SET statement. , "Server System Variables", discusses these options.
Variables that have a type of "string" take a string value. Variables that have a type of "numeric" take a numeric value. Variables that have a type of "boolean" can be set to 0, 1, ON or OFF. (If you set them on the command line or in an option file, use the numeric values.) Variables that are marked as "enumeration" normally should be set to one of the available values for the variable, but can also be set to the number that corresponds to the desired enumeration value. For enumerated system variables, the first enumeration value corresponds to 0. This differs from ENUM columns, for which the first enumeration value corresponds to 1.
Table 5.3. Dynamic Variable Summary
| Variable Name | Variable Type | Variable Scope |
|---|---|---|
auto_increment_increment
| numeric | GLOBAL | SESSION
|
auto_increment_offset
| numeric | GLOBAL | SESSION
|
autocommit
| boolean | GLOBAL | SESSION
|
automatic_sp_privileges
| boolean | GLOBAL
|
big_tables
| boolean | GLOBAL | SESSION
|
binlog_cache_size
| numeric | GLOBAL
|
binlog_checksum
| string | GLOBAL
|
binlog_direct_non_transactional_updates
| boolean | GLOBAL | SESSION
|
binlog_format
| enumeration | GLOBAL | SESSION
|
binlog_row_image=image_type
| enumeration | GLOBAL | SESSION
|
binlog_rows_query_log_events
| boolean | GLOBAL | SESSION
|
binlog_stmt_cache_size
| numeric | GLOBAL
|
bulk_insert_buffer_size
| numeric | GLOBAL | SESSION
|
character_set_client
| string | GLOBAL | SESSION
|
character_set_connection
| string | GLOBAL | SESSION
|
character_set_database
| string | GLOBAL | SESSION
|
character_set_filesystem
| string | GLOBAL | SESSION
|
character_set_results
| string | GLOBAL | SESSION
|
character_set_server
| string | GLOBAL | SESSION
|
collation_connection
| string | GLOBAL | SESSION
|
collation_database
| string | GLOBAL | SESSION
|
collation_server
| string | GLOBAL | SESSION
|
completion_type
| numeric | GLOBAL | SESSION
|
concurrent_insert
| boolean | GLOBAL
|
connect_timeout
| numeric | GLOBAL
|
debug
| string | GLOBAL | SESSION
|
debug_sync
| string | SESSION
|
default_storage_engine
| enumeration | GLOBAL | SESSION
|
default_tmp_storage_engine
| enumeration | GLOBAL | SESSION
|
default_week_format
| numeric | GLOBAL | SESSION
|
delay_key_write
| enumeration | GLOBAL
|
delayed_insert_limit
| numeric | GLOBAL
|
delayed_insert_timeout
| numeric | GLOBAL
|
delayed_queue_size
| numeric | GLOBAL
|
div_precision_increment
| numeric | GLOBAL | SESSION
|
end_markers_in_json
| boolean | GLOBAL | SESSION
|
engine_condition_pushdown
| boolean | GLOBAL | SESSION
|
eq_range_index_dive_limit
| numeric | GLOBAL | SESSION
|
event_scheduler
| enumeration | GLOBAL
|
expire_logs_days
| numeric | GLOBAL
|
flush
| boolean | GLOBAL
|
flush_time
| numeric | GLOBAL
|
foreign_key_checks
| boolean | GLOBAL | SESSION
|
ft_boolean_syntax
| string | GLOBAL
|
general_log
| boolean | GLOBAL
|
general_log_file
| filename | GLOBAL
|
group_concat_max_len
| numeric | GLOBAL | SESSION
|
host_cache_size
| numeric | GLOBAL
|
identity
| numeric | SESSION
|
init_connect
| string | GLOBAL
|
init_slave
| string | GLOBAL
|
innodb_adaptive_flushing
| boolean | GLOBAL
|
innodb_adaptive_hash_index
| boolean | GLOBAL
|
innodb_adaptive_max_sleep_delay
| numeric | GLOBAL
|
innodb_analyze_is_persistent
| boolean | GLOBAL
|
innodb_autoextend_increment
| numeric | GLOBAL
|
innodb_buffer_pool_dump_at_shutdown
| boolean | GLOBAL
|
innodb_buffer_pool_dump_now
| boolean | GLOBAL
|
innodb_buffer_pool_filename
| boolean | GLOBAL
|
innodb_buffer_pool_load_abort
| boolean | GLOBAL
|
innodb_buffer_pool_load_at_startup
| boolean | GLOBAL
|
innodb_buffer_pool_load_now
| boolean | GLOBAL
|
innodb_change_buffer_max_size
| numeric | GLOBAL
|
innodb_change_buffering
| enumeration | GLOBAL
|
innodb_checksum_algorithm
| enumeration | GLOBAL
|
innodb_commit_concurrency
| numeric | GLOBAL
|
innodb_concurrency_tickets
| numeric | GLOBAL
|
innodb_fast_shutdown
| numeric | GLOBAL
|
innodb_file_format
| string | GLOBAL
|
innodb_file_format_max
| string | GLOBAL
|
innodb_file_per_table
| boolean | GLOBAL
|
innodb_flush_log_at_trx_commit
| enumeration | GLOBAL
|
innodb_flush_neighbors
| boolean | GLOBAL
|
innodb_ft_aux_table
| string | GLOBAL
|
innodb_ft_cache_size
| numeric | GLOBAL
|
innodb_ft_enable_stopword
| boolean | GLOBAL
|
innodb_ft_max_token_size
| numeric | GLOBAL
|
innodb_ft_min_token_size
| numeric | GLOBAL
|
innodb_ft_num_word_optimize
| numeric | GLOBAL
|
innodb_ft_server_stopword_table
| string | GLOBAL
|
innodb_ft_sort_pll_degree
| boolean | GLOBAL
|
innodb_ft_user_stopword_table
| string | GLOBAL
|
innodb_io_capacity
| numeric | GLOBAL
|
innodb_large_prefix
| boolean | GLOBAL
|
innodb_lock_wait_timeout
| numeric | GLOBAL | SESSION
|
innodb_lru_scan_depth
| numeric | GLOBAL
|
innodb_max_dirty_pages_pct
| numeric | GLOBAL
|
innodb_max_purge_lag
| numeric | GLOBAL
|
innodb_monitor_disable
| string | GLOBAL
|
innodb_monitor_enable
| string | GLOBAL
|
innodb_monitor_reset
| string | GLOBAL
|
innodb_monitor_reset_all
| string | GLOBAL
|
innodb_old_blocks_pct
| numeric | GLOBAL
|
innodb_old_blocks_time
| numeric | GLOBAL
|
innodb_optimize_fulltext_only
| boolean | GLOBAL
|
innodb_print_all_deadlocks
| boolean | GLOBAL
|
innodb_random_read_ahead
| boolean | GLOBAL
|
innodb_read_ahead_threshold
| numeric | GLOBAL
|
innodb_replication_delay
| numeric | GLOBAL
|
innodb_rollback_segments
| numeric | GLOBAL
|
innodb_sort_buffer_size
| numeric | GLOBAL
|
innodb_spin_wait_delay
| numeric | GLOBAL
|
innodb_stats_method
| enumeration | GLOBAL | SESSION
|
innodb_stats_on_metadata
| boolean | GLOBAL
|
innodb_stats_persistent_sample_pages
| numeric | GLOBAL
|
innodb_stats_sample_pages
| numeric | GLOBAL
|
innodb_stats_transient_sample_pages
| numeric | GLOBAL
|
innodb_strict_mode
| boolean | GLOBAL | SESSION
|
innodb_support_xa
| boolean | GLOBAL | SESSION
|
innodb_sync_spin_loops
| numeric | GLOBAL
|
innodb_table_locks
| boolean | GLOBAL | SESSION
|
innodb_thread_concurrency
| numeric | GLOBAL
|
innodb_thread_sleep_delay
| numeric | GLOBAL
|
innodb_undo_directory
| string | GLOBAL
|
innodb_undo_logs
| numeric | GLOBAL
|
innodb_undo_tablespaces
| numeric | GLOBAL
|
insert_id
| numeric | SESSION
|
interactive_timeout
| numeric | GLOBAL | SESSION
|
join_buffer_size
| numeric | GLOBAL | SESSION
|
keep_files_on_create
| boolean | GLOBAL | SESSION
|
key_buffer_size
| numeric | GLOBAL
|
key_cache_age_threshold
| numeric | GLOBAL
|
key_cache_block_size
| numeric | GLOBAL
|
key_cache_division_limit
| numeric | GLOBAL
|
last_insert_id
| numeric | SESSION
|
lc_messages
| string | GLOBAL | SESSION
|
lc_time_names
| string | GLOBAL | SESSION
|
local_infile
| boolean | GLOBAL
|
lock_wait_timeout
| numeric | GLOBAL | SESSION
|
log
| string | GLOBAL
|
log_output
| set | GLOBAL
|
log_queries_not_using_indexes
| boolean | GLOBAL
|
log_slow_queries
| boolean | GLOBAL
|
log_throttle_queries_not_using_indexes
| numeric | GLOBAL
|
log_warnings
| numeric | GLOBAL
|
long_query_time
| numeric | GLOBAL | SESSION
|
low_priority_updates
| boolean | GLOBAL | SESSION
|
master_verify_checksum
| boolean | GLOBAL
|
max_allowed_packet
| numeric | GLOBAL
|
max_binlog_cache_size
| numeric | GLOBAL
|
max_binlog_size
| numeric | GLOBAL
|
max_binlog_stmt_cache_size
| numeric | GLOBAL
|
max_connect_errors
| numeric | GLOBAL
|
max_connections
| numeric | GLOBAL
|
max_delayed_threads
| numeric | GLOBAL | SESSION
|
max_error_count
| numeric | GLOBAL | SESSION
|
max_heap_table_size
| numeric | GLOBAL | SESSION
|
max_insert_delayed_threads
| numeric | GLOBAL | SESSION
|
max_join_size
| numeric | GLOBAL | SESSION
|
max_length_for_sort_data
| numeric | GLOBAL | SESSION
|
max_prepared_stmt_count
| numeric | GLOBAL
|
max_relay_log_size
| numeric | GLOBAL
|
max_seeks_for_key
| numeric | GLOBAL | SESSION
|
max_sort_length
| numeric | GLOBAL | SESSION
|
max_sp_recursion_depth
| numeric | GLOBAL | SESSION
|
max_tmp_tables
| numeric | GLOBAL | SESSION
|
max_user_connections
| numeric | GLOBAL | SESSION
|
max_write_lock_count
| numeric | GLOBAL
|
min_examined_row_limit
| numeric | GLOBAL | SESSION
|
myisam_data_pointer_size
| numeric | GLOBAL
|
myisam_max_sort_file_size
| numeric | GLOBAL
|
myisam_repair_threads
| numeric | GLOBAL | SESSION
|
myisam_sort_buffer_size
| numeric | GLOBAL | SESSION
|
myisam_stats_method
| enumeration | GLOBAL | SESSION
|
myisam_use_mmap
| boolean | GLOBAL
|
net_buffer_length
| numeric | GLOBAL | SESSION
|
net_read_timeout
| numeric | GLOBAL | SESSION
|
net_retry_count
| numeric | GLOBAL | SESSION
|
net_write_timeout
| numeric | GLOBAL | SESSION
|
new
| boolean | GLOBAL | SESSION
|
old_alter_table
| boolean | GLOBAL | SESSION
|
old_passwords
| boolean | GLOBAL | SESSION
|
optimizer_join_cache_level
| numeric | GLOBAL | SESSION
|
optimizer_prune_level
| boolean | GLOBAL | SESSION
|
optimizer_search_depth
| numeric | GLOBAL | SESSION
|
optimizer_switch
| set | GLOBAL | SESSION
|
optimizer_trace
| string | GLOBAL | SESSION
|
optimizer_trace_features
| string | GLOBAL | SESSION
|
optimizer_trace_limit
| numeric | GLOBAL | SESSION
|
optimizer_trace_max_mem_size
| numeric | GLOBAL | SESSION
|
optimizer_trace_offset
| numeric | GLOBAL | SESSION
|
preload_buffer_size
| numeric | GLOBAL | SESSION
|
profiling
| boolean | GLOBAL | SESSION
|
profiling_history_size
| numeric | GLOBAL | SESSION
|
pseudo_thread_id
| numeric | SESSION
|
query_alloc_block_size
| numeric | GLOBAL | SESSION
|
query_cache_limit
| numeric | GLOBAL
|
query_cache_min_res_unit
| numeric | GLOBAL
|
query_cache_size
| numeric | GLOBAL
|
query_cache_type
| enumeration | GLOBAL | SESSION
|
query_cache_wlock_invalidate
| boolean | GLOBAL | SESSION
|
query_prealloc_size
| numeric | GLOBAL | SESSION
|
rand_seed1
| numeric | SESSION
|
rand_seed2
| numeric | SESSION
|
range_alloc_block_size
| numeric | GLOBAL | SESSION
|
read_buffer_size
| numeric | GLOBAL | SESSION
|
read_only
| numeric | GLOBAL
|
read_rnd_buffer_size
| numeric | GLOBAL | SESSION
|
relay_log_purge
| boolean | GLOBAL
|
relay_log_recovery
| boolean | GLOBAL
|
rpl_semi_sync_master_enabled
| boolean | GLOBAL
|
rpl_semi_sync_master_timeout
| numeric | GLOBAL
|
rpl_semi_sync_master_trace_level
| numeric | GLOBAL
|
rpl_semi_sync_master_wait_no_slave
| boolean | GLOBAL
|
rpl_semi_sync_slave_enabled
| boolean | GLOBAL
|
rpl_semi_sync_slave_trace_level
| numeric | GLOBAL
|
secure_auth
| boolean | GLOBAL
|
server_id
| numeric | GLOBAL
|
slave_compressed_protocol
| boolean | GLOBAL
|
slave_exec_mode
| enumeration | GLOBAL
|
slave_net_timeout
| numeric | GLOBAL
|
slave_parallel_workers
| numeric | GLOBAL
|
slave_sql_verify_checksum
| boolean | GLOBAL
|
slave_transaction_retries
| numeric | GLOBAL
|
slow_launch_time
| numeric | GLOBAL
|
slow_query_log
| boolean | GLOBAL
|
slow_query_log_file
| filename | GLOBAL
|
sort_buffer_size
| numeric | GLOBAL | SESSION
|
sql_auto_is_null
| boolean | GLOBAL | SESSION
|
sql_big_selects
| boolean | GLOBAL | SESSION
|
sql_big_tables
| boolean | GLOBAL | SESSION
|
sql_buffer_result
| boolean | GLOBAL | SESSION
|
sql_log_bin
| boolean | GLOBAL | SESSION
|
sql_log_off
| boolean | GLOBAL | SESSION
|
sql_low_priority_updates
| boolean | GLOBAL | SESSION
|
sql_max_join_size
| numeric | GLOBAL | SESSION
|
sql_mode
| set | GLOBAL | SESSION
|
sql_notes
| boolean | GLOBAL | SESSION
|
sql_quote_show_create
| boolean | GLOBAL | SESSION
|
sql_safe_updates
| boolean | GLOBAL | SESSION
|
sql_select_limit
| numeric | GLOBAL | SESSION
|
sql_slave_skip_counter
| numeric | GLOBAL
|
sql_warnings
| boolean | GLOBAL | SESSION
|
storage_engine
| enumeration | GLOBAL | SESSION
|
sync_binlog
| numeric | GLOBAL
|
sync_frm
| boolean | GLOBAL
|
sync_master_info
| numeric | GLOBAL
|
sync_relay_log
| numeric | GLOBAL
|
sync_relay_log_info
| numeric | GLOBAL
|
table_definition_cache
| numeric | GLOBAL
|
table_open_cache
| numeric | GLOBAL
|
thread_cache_size
| numeric | GLOBAL
|
time_zone
| string | GLOBAL | SESSION
|
timed_mutexes
| boolean | GLOBAL
|
timestamp
| numeric | SESSION
|
tmp_table_size
| numeric | GLOBAL | SESSION
|
transaction_alloc_block_size
| numeric | GLOBAL | SESSION
|
transaction_prealloc_size
| numeric | GLOBAL | SESSION
|
tx_isolation
| enumeration | GLOBAL | SESSION
|
tx_read_only
| boolean | GLOBAL | SESSION
|
unique_checks
| boolean | GLOBAL | SESSION
|
updatable_views_with_limit
| boolean | GLOBAL | SESSION
|
wait_timeout
| numeric | GLOBAL | SESSION |
Server Status Variables
The server maintains many status variables that provide information about its operation. You can view these variables and their values by using the SHOW [GLOBAL | SESSION] STATUS statement (see , "SHOW STATUS Syntax"). The optional GLOBAL keyword aggregates the values over all connections, and SESSION shows the values for the current connection.
mysql> SHOW GLOBAL STATUS;
+-----------------------------------+------------+
| Variable_name | Value |
+-----------------------------------+------------+
| Aborted_clients | 0 |
| Aborted_connects | 0 |
| Bytes_received | 155372598 |
| Bytes_sent | 1176560426 |
...
| Connections | 30023 |
| Created_tmp_disk_tables | 0 |
| Created_tmp_files | 3 |
| Created_tmp_tables | 2 |
...
| Threads_created | 217 |
| Threads_running | 88 |
| Uptime | 1389872 |
+-----------------------------------+------------+
Many status variables are reset to 0 by the FLUSH STATUS statement.
The following table lists all available server status variables:
Table 5.4. Status Variable Summary
| Variable Name | Variable Type | Variable Scope |
|---|---|---|
Aborted_clients
| numeric | GLOBAL
|
Aborted_connects
| numeric | GLOBAL
|
Binlog_cache_disk_use
| numeric | GLOBAL
|
Binlog_cache_use
| numeric | GLOBAL
|
binlog_rows_query_log_events
| boolean | GLOBAL | SESSION
|
Binlog_stmt_cache_disk_use
| numeric | GLOBAL
|
Binlog_stmt_cache_use
| numeric | GLOBAL
|
Bytes_received
| numeric | GLOBAL | SESSION
|
Bytes_sent
| numeric | GLOBAL | SESSION
|
Com_admin_commands
| numeric | GLOBAL | SESSION
|
Com_alter_db
| numeric | GLOBAL | SESSION
|
Com_alter_db_upgrade
| numeric | GLOBAL | SESSION
|
Com_alter_event
| numeric | GLOBAL | SESSION
|
Com_alter_function
| numeric | GLOBAL | SESSION
|
Com_alter_procedure
| numeric | GLOBAL | SESSION
|
Com_alter_server
| numeric | GLOBAL | SESSION
|
Com_alter_table
| numeric | GLOBAL | SESSION
|
Com_alter_tablespace
| numeric | GLOBAL | SESSION
|
Com_analyze
| numeric | GLOBAL | SESSION
|
Com_assign_to_keycache
| numeric | GLOBAL | SESSION
|
Com_begin
| numeric | GLOBAL | SESSION
|
Com_binlog
| numeric | GLOBAL | SESSION
|
Com_call_procedure
| numeric | GLOBAL | SESSION
|
Com_change_db
| numeric | GLOBAL | SESSION
|
Com_change_master
| numeric | GLOBAL | SESSION
|
Com_check
| numeric | GLOBAL | SESSION
|
Com_checksum
| numeric | GLOBAL | SESSION
|
Com_commit
| numeric | GLOBAL | SESSION
|
Com_create_db
| numeric | GLOBAL | SESSION
|
Com_create_event
| numeric | GLOBAL | SESSION
|
Com_create_function
| numeric | GLOBAL | SESSION
|
Com_create_index
| numeric | GLOBAL | SESSION
|
Com_create_procedure
| numeric | GLOBAL | SESSION
|
Com_create_server
| numeric | GLOBAL | SESSION
|
Com_create_table
| numeric | GLOBAL | SESSION
|
Com_create_trigger
| numeric | GLOBAL | SESSION
|
Com_create_udf
| numeric | GLOBAL | SESSION
|
Com_create_user
| numeric | GLOBAL | SESSION
|
Com_create_view
| numeric | GLOBAL | SESSION
|
Com_dealloc_sql
| numeric | GLOBAL | SESSION
|
Com_delete
| numeric | GLOBAL | SESSION
|
Com_delete_multi
| numeric | GLOBAL | SESSION
|
Com_do
| numeric | GLOBAL | SESSION
|
Com_drop_db
| numeric | GLOBAL | SESSION
|
Com_drop_event
| numeric | GLOBAL | SESSION
|
Com_drop_function
| numeric | GLOBAL | SESSION
|
Com_drop_index
| numeric | GLOBAL | SESSION
|
Com_drop_procedure
| numeric | GLOBAL | SESSION
|
Com_drop_server
| numeric | GLOBAL | SESSION
|
Com_drop_table
| numeric | GLOBAL | SESSION
|
Com_drop_trigger
| numeric | GLOBAL | SESSION
|
Com_drop_user
| numeric | GLOBAL | SESSION
|
Com_drop_view
| numeric | GLOBAL | SESSION
|
Com_empty_query
| numeric | GLOBAL | SESSION
|
Com_execute_sql
| numeric | GLOBAL | SESSION
|
Com_flush
| numeric | GLOBAL | SESSION
|
Com_grant
| numeric | GLOBAL | SESSION
|
Com_ha_close
| numeric | GLOBAL | SESSION
|
Com_ha_open
| numeric | GLOBAL | SESSION
|
Com_ha_read
| numeric | GLOBAL | SESSION
|
Com_help
| numeric | GLOBAL | SESSION
|
Com_insert
| numeric | GLOBAL | SESSION
|
Com_insert_select
| numeric | GLOBAL | SESSION
|
Com_install_plugin
| numeric | GLOBAL | SESSION
|
Com_kill
| numeric | GLOBAL | SESSION
|
Com_load
| numeric | GLOBAL | SESSION
|
Com_lock_tables
| numeric | GLOBAL | SESSION
|
Com_optimize
| numeric | GLOBAL | SESSION
|
Com_preload_keys
| numeric | GLOBAL | SESSION
|
Com_prepare_sql
| numeric | GLOBAL | SESSION
|
Com_purge
| numeric | GLOBAL | SESSION
|
Com_purge_before_date
| numeric | GLOBAL | SESSION
|
Com_release_savepoint
| numeric | GLOBAL | SESSION
|
Com_rename_table
| numeric | GLOBAL | SESSION
|
Com_rename_user
| numeric | GLOBAL | SESSION
|
Com_repair
| numeric | GLOBAL | SESSION
|
Com_replace
| numeric | GLOBAL | SESSION
|
Com_replace_select
| numeric | GLOBAL | SESSION
|
Com_reset
| numeric | GLOBAL | SESSION
|
Com_resignal
| numeric | GLOBAL | SESSION
|
Com_revoke
| numeric | GLOBAL | SESSION
|
Com_revoke_all
| numeric | GLOBAL | SESSION
|
Com_rollback
| numeric | GLOBAL | SESSION
|
Com_rollback_to_savepoint
| numeric | GLOBAL | SESSION
|
Com_savepoint
| numeric | GLOBAL | SESSION
|
Com_select
| numeric | GLOBAL | SESSION
|
Com_set_option
| numeric | GLOBAL | SESSION
|
Com_show_authors
| numeric | GLOBAL | SESSION
|
Com_show_binlog_events
| numeric | GLOBAL | SESSION
|
Com_show_binlogs
| numeric | GLOBAL | SESSION
|
Com_show_charsets
| numeric | GLOBAL | SESSION
|
Com_show_collations
| numeric | GLOBAL | SESSION
|
Com_show_contributors
| numeric | GLOBAL | SESSION
|
Com_show_create_db
| numeric | GLOBAL | SESSION
|
Com_show_create_event
| numeric | GLOBAL | SESSION
|
Com_show_create_func
| numeric | GLOBAL | SESSION
|
Com_show_create_proc
| numeric | GLOBAL | SESSION
|
Com_show_create_table
| numeric | GLOBAL | SESSION
|
Com_show_create_trigger
| numeric | GLOBAL | SESSION
|
Com_show_databases
| numeric | GLOBAL | SESSION
|
Com_show_engine_logs
| numeric | GLOBAL | SESSION
|
Com_show_engine_mutex
| numeric | GLOBAL | SESSION
|
Com_show_engine_status
| numeric | GLOBAL | SESSION
|
Com_show_errors
| numeric | GLOBAL | SESSION
|
Com_show_events
| numeric | GLOBAL | SESSION
|
Com_show_fields
| numeric | GLOBAL | SESSION
|
Com_show_function_code
| numeric | GLOBAL | SESSION
|
Com_show_function_status
| numeric | GLOBAL | SESSION
|
Com_show_grants
| numeric | GLOBAL | SESSION
|
Com_show_keys
| numeric | GLOBAL | SESSION
|
Com_show_logs
| numeric | GLOBAL | SESSION
|
Com_show_master_status
| numeric | GLOBAL | SESSION
|
Com_show_new_master
| numeric | GLOBAL | SESSION
|
Com_show_open_tables
| numeric | GLOBAL | SESSION
|
Com_show_plugins
| numeric | GLOBAL | SESSION
|
Com_show_privileges
| numeric | GLOBAL | SESSION
|
Com_show_procedure_code
| numeric | GLOBAL | SESSION
|
Com_show_procedure_status
| numeric | GLOBAL | SESSION
|
Com_show_processlist
| numeric | GLOBAL | SESSION
|
Com_show_profile
| numeric | GLOBAL | SESSION
|
Com_show_profiles
| numeric | GLOBAL | SESSION
|
Com_show_relaylog_events
| numeric | GLOBAL | SESSION
|
Com_show_slave_hosts
| numeric | GLOBAL | SESSION
|
Com_show_slave_status
| numeric | GLOBAL | SESSION
|
Com_show_status
| numeric | GLOBAL | SESSION
|
Com_show_storage_engines
| numeric | GLOBAL | SESSION
|
Com_show_table_status
| numeric | GLOBAL | SESSION
|
Com_show_tables
| numeric | GLOBAL | SESSION
|
Com_show_triggers
| numeric | GLOBAL | SESSION
|
Com_show_variables
| numeric | GLOBAL | SESSION
|
Com_show_warnings
| numeric | GLOBAL | SESSION
|
Com_signal
| numeric | GLOBAL | SESSION
|
Com_slave_start
| numeric | GLOBAL | SESSION
|
Com_slave_stop
| numeric | GLOBAL | SESSION
|
Com_stmt_close
| numeric | GLOBAL | SESSION
|
Com_stmt_execute
| numeric | GLOBAL | SESSION
|
Com_stmt_fetch
| numeric | GLOBAL | SESSION
|
Com_stmt_prepare
| numeric | GLOBAL | SESSION
|
Com_stmt_reprepare
| numeric | GLOBAL | SESSION
|
Com_stmt_reset
| numeric | GLOBAL | SESSION
|
Com_stmt_send_long_data
| numeric | GLOBAL | SESSION
|
Com_truncate
| numeric | GLOBAL | SESSION
|
Com_uninstall_plugin
| numeric | GLOBAL | SESSION
|
Com_unlock_tables
| numeric | GLOBAL | SESSION
|
Com_update
| numeric | GLOBAL | SESSION
|
Com_update_multi
| numeric | GLOBAL | SESSION
|
Com_xa_commit
| numeric | GLOBAL | SESSION
|
Com_xa_end
| numeric | GLOBAL | SESSION
|
Com_xa_prepare
| numeric | GLOBAL | SESSION
|
Com_xa_recover
| numeric | GLOBAL | SESSION
|
Com_xa_rollback
| numeric | GLOBAL | SESSION
|
Com_xa_start
| numeric | GLOBAL | SESSION
|
Compression
| numeric | SESSION
|
Connection_errors_accept
| numeric | GLOBAL
|
Connection_errors_internal
| numeric | GLOBAL
|
Connection_errors_max_connections
| numeric | GLOBAL
|
Connection_errors_peer_addr
| numeric | GLOBAL
|
Connection_errors_select
| numeric | GLOBAL
|
Connection_errors_tcpwrap
| numeric | GLOBAL
|
Connections
| numeric | GLOBAL
|
Created_tmp_disk_tables
| numeric | GLOBAL | SESSION
|
Created_tmp_files
| numeric | GLOBAL
|
Created_tmp_tables
| numeric | GLOBAL | SESSION
|
Delayed_errors
| numeric | GLOBAL
|
Delayed_insert_threads
| numeric | GLOBAL
|
Delayed_writes
| numeric | GLOBAL
|
Flush_commands
| numeric | GLOBAL
|
Handler_commit
| numeric | GLOBAL | SESSION
|
Handler_delete
| numeric | GLOBAL | SESSION
|
Handler_discover
| numeric | GLOBAL | SESSION
|
Handler_external_lock
| numeric | GLOBAL | SESSION
|
Handler_prepare
| numeric | GLOBAL | SESSION
|
Handler_read_first
| numeric | GLOBAL | SESSION
|
Handler_read_key
| numeric | GLOBAL | SESSION
|
Handler_read_last
| numeric | GLOBAL | SESSION
|
Handler_read_next
| numeric | GLOBAL | SESSION
|
Handler_read_prev
| numeric | GLOBAL | SESSION
|
Handler_read_rnd
| numeric | GLOBAL | SESSION
|
Handler_read_rnd_next
| numeric | GLOBAL | SESSION
|
Handler_rollback
| numeric | GLOBAL | SESSION
|
Handler_savepoint
| numeric | GLOBAL | SESSION
|
Handler_savepoint_rollback
| numeric | GLOBAL | SESSION
|
Handler_update
| numeric | GLOBAL | SESSION
|
Handler_write
| numeric | GLOBAL | SESSION
|
Innodb_buffer_pool_dump_status
| numeric | GLOBAL
|
Innodb_buffer_pool_load_status
| numeric | GLOBAL
|
Innodb_buffer_pool_pages_data
| numeric | GLOBAL
|
Innodb_buffer_pool_pages_dirty
| numeric | GLOBAL
|
Innodb_buffer_pool_pages_flushed
| numeric | GLOBAL
|
Innodb_buffer_pool_pages_free
| numeric | GLOBAL
|
Innodb_buffer_pool_pages_latched
| numeric | GLOBAL
|
Innodb_buffer_pool_pages_misc
| numeric | GLOBAL
|
Innodb_buffer_pool_pages_total
| numeric | GLOBAL
|
Innodb_buffer_pool_read_ahead
| numeric | GLOBAL
|
Innodb_buffer_pool_read_ahead_evicted
| numeric | GLOBAL
|
Innodb_buffer_pool_read_requests
| numeric | GLOBAL
|
Innodb_buffer_pool_reads
| numeric | GLOBAL
|
Innodb_buffer_pool_wait_free
| numeric | GLOBAL
|
Innodb_buffer_pool_write_requests
| numeric | GLOBAL
|
Innodb_data_fsyncs
| numeric | GLOBAL
|
Innodb_data_pending_fsyncs
| numeric | GLOBAL
|
Innodb_data_pending_reads
| numeric | GLOBAL
|
Innodb_data_pending_writes
| numeric | GLOBAL
|
Innodb_data_read
| numeric | GLOBAL
|
Innodb_data_reads
| numeric | GLOBAL
|
Innodb_data_writes
| numeric | GLOBAL
|
Innodb_data_written
| numeric | GLOBAL
|
Innodb_dblwr_pages_written
| numeric | GLOBAL
|
Innodb_dblwr_writes
| numeric | GLOBAL
|
Innodb_have_atomic_builtins
| numeric | GLOBAL
|
Innodb_log_waits
| numeric | GLOBAL
|
Innodb_log_write_requests
| numeric | GLOBAL
|
Innodb_log_writes
| numeric | GLOBAL
|
Innodb_num_open_files
| numeric | GLOBAL
|
Innodb_os_log_fsyncs
| numeric | GLOBAL
|
Innodb_os_log_pending_fsyncs
| numeric | GLOBAL
|
Innodb_os_log_pending_writes
| numeric | GLOBAL
|
Innodb_os_log_written
| numeric | GLOBAL
|
Innodb_page_size
| numeric | GLOBAL
|
Innodb_pages_created
| numeric | GLOBAL
|
Innodb_pages_read
| numeric | GLOBAL
|
Innodb_pages_written
| numeric | GLOBAL
|
Innodb_row_lock_current_waits
| numeric | GLOBAL
|
Innodb_row_lock_time
| numeric | GLOBAL
|
Innodb_row_lock_time_avg
| numeric | GLOBAL
|
Innodb_row_lock_time_max
| numeric | GLOBAL
|
Innodb_row_lock_waits
| numeric | GLOBAL
|
Innodb_rows_deleted
| numeric | GLOBAL
|
Innodb_rows_inserted
| numeric | GLOBAL
|
Innodb_rows_read
| numeric | GLOBAL
|
Innodb_rows_updated
| numeric | GLOBAL
|
Innodb_truncated_status_writes
| numeric | GLOBAL
|
Key_blocks_not_flushed
| numeric | GLOBAL
|
Key_blocks_unused
| numeric | GLOBAL
|
Key_blocks_used
| numeric | GLOBAL
|
Key_read_requests
| numeric | GLOBAL
|
Key_reads
| numeric | GLOBAL
|
Key_write_requests
| numeric | GLOBAL
|
Key_writes
| numeric | GLOBAL
|
Last_query_cost
| numeric | SESSION
|
Last_query_partial_plans
| numeric | SESSION
|
Max_used_connections
| numeric | GLOBAL
|
Ndb_conflict_fn_max
| numeric | GLOBAL
|
Ndb_conflict_fn_old
| numeric | GLOBAL
|
Ndb_number_of_data_nodes
| numeric | GLOBAL
|
Not_flushed_delayed_rows
| numeric | GLOBAL
|
Open_files
| numeric | GLOBAL
|
Open_streams
| numeric | GLOBAL
|
Open_table_definitions
| numeric | GLOBAL
|
Open_tables
| numeric | GLOBAL | SESSION
|
Opened_files
| numeric | GLOBAL
|
Opened_table_definitions
| numeric | GLOBAL | SESSION
|
Opened_tables
| numeric | GLOBAL | SESSION
|
Performance_schema_accounts_lost
| numeric | GLOBAL
|
Performance_schema_cond_classes_lost
| numeric | GLOBAL
|
Performance_schema_cond_instances_lost
| numeric | GLOBAL
|
Performance_schema_file_classes_lost
| numeric | GLOBAL
|
Performance_schema_file_handles_lost
| numeric | GLOBAL
|
Performance_schema_file_instances_lost
| numeric | GLOBAL
|
Performance_schema_hosts_lost
| numeric | GLOBAL
|
Performance_schema_locker_lost
| numeric | GLOBAL
|
Performance_schema_mutex_classes_lost
| numeric | GLOBAL
|
Performance_schema_mutex_instances_lost
| numeric | GLOBAL
|
Performance_schema_rwlock_classes_lost
| numeric | GLOBAL
|
Performance_schema_rwlock_instances_lost
| numeric | GLOBAL
|
Performance_schema_socket_classes_lost
| numeric | GLOBAL
|
Performance_schema_socket_instances_lost
| numeric | GLOBAL
|
Performance_schema_stage_classes_lost
| numeric | GLOBAL
|
Performance_schema_statement_classes_lost
| numeric | GLOBAL
|
Performance_schema_table_handles_lost
| numeric | GLOBAL
|
Performance_schema_table_instances_lost
| numeric | GLOBAL
|
Performance_schema_thread_classes_lost
| numeric | GLOBAL
|
Performance_schema_thread_instances_lost
| numeric | GLOBAL
|
Performance_schema_users_lost
| numeric | GLOBAL
|
Prepared_stmt_count
| numeric | GLOBAL
|
Qcache_free_blocks
| numeric | GLOBAL
|
Qcache_free_memory
| numeric | GLOBAL
|
Qcache_hits
| numeric | GLOBAL
|
Qcache_inserts
| numeric | GLOBAL
|
Qcache_lowmem_prunes
| numeric | GLOBAL
|
Qcache_not_cached
| numeric | GLOBAL
|
Qcache_queries_in_cache
| numeric | GLOBAL
|
Qcache_total_blocks
| numeric | GLOBAL
|
Queries
| numeric | GLOBAL | SESSION
|
Questions
| numeric | GLOBAL | SESSION
|
Rpl_semi_sync_master_clients
| numeric | GLOBAL
|
Rpl_semi_sync_master_net_avg_wait_time
| numeric | GLOBAL
|
Rpl_semi_sync_master_net_wait_time
| numeric | GLOBAL
|
Rpl_semi_sync_master_net_waits
| numeric | GLOBAL
|
Rpl_semi_sync_master_no_times
| numeric | GLOBAL
|
Rpl_semi_sync_master_no_tx
| numeric | GLOBAL
|
Rpl_semi_sync_master_status
| boolean | GLOBAL
|
Rpl_semi_sync_master_timefunc_failures
| numeric | GLOBAL
|
Rpl_semi_sync_master_tx_avg_wait_time
| numeric | GLOBAL
|
Rpl_semi_sync_master_tx_wait_time
| numeric | GLOBAL
|
Rpl_semi_sync_master_tx_waits
| numeric | GLOBAL
|
Rpl_semi_sync_master_wait_pos_backtraverse
| numeric | GLOBAL
|
Rpl_semi_sync_master_wait_sessions
| numeric | GLOBAL
|
Rpl_semi_sync_master_yes_tx
| numeric | GLOBAL
|
Rpl_semi_sync_slave_status
| boolean | GLOBAL
|
Select_full_join
| numeric | GLOBAL | SESSION
|
Select_full_range_join
| numeric | GLOBAL | SESSION
|
Select_range
| numeric | GLOBAL | SESSION
|
Select_range_check
| numeric | GLOBAL | SESSION
|
Select_scan
| numeric | GLOBAL | SESSION
|
Slave_heartbeat_period
| GLOBAL
| |
Slave_last_heartbeat
| GLOBAL
| |
Slave_open_temp_tables
| numeric | GLOBAL
|
Slave_received_heartbeats
| GLOBAL
| |
Slave_retried_transactions
| numeric | GLOBAL
|
Slave_running
| boolean | GLOBAL
|
Slow_launch_threads
| numeric | GLOBAL | SESSION
|
Slow_queries
| numeric | GLOBAL | SESSION
|
Sort_merge_passes
| numeric | GLOBAL | SESSION
|
Sort_range
| numeric | GLOBAL | SESSION
|
Sort_rows
| numeric | GLOBAL | SESSION
|
Sort_scan
| numeric | GLOBAL | SESSION
|
Ssl_accept_renegotiates
| numeric | GLOBAL
|
Ssl_accepts
| numeric | GLOBAL
|
Ssl_callback_cache_hits
| numeric | GLOBAL
|
Ssl_cipher
| string | GLOBAL | SESSION
|
Ssl_cipher_list
| string | GLOBAL | SESSION
|
Ssl_client_connects
| numeric | GLOBAL
|
Ssl_connect_renegotiates
| numeric | GLOBAL
|
Ssl_ctx_verify_depth
| numeric | GLOBAL
|
Ssl_ctx_verify_mode
| numeric | GLOBAL
|
Ssl_default_timeout
| numeric | GLOBAL | SESSION
|
Ssl_finished_accepts
| numeric | GLOBAL
|
Ssl_finished_connects
| numeric | GLOBAL
|
Ssl_server_not_after
| numeric | GLOBAL | SESSION
|
Ssl_server_not_before
| numeric | GLOBAL | SESSION
|
Ssl_session_cache_hits
| numeric | GLOBAL
|
Ssl_session_cache_misses
| numeric | GLOBAL
|
Ssl_session_cache_mode
| string | GLOBAL
|
Ssl_session_cache_overflows
| numeric | GLOBAL
|
Ssl_session_cache_size
| numeric | GLOBAL
|
Ssl_session_cache_timeouts
| numeric | GLOBAL
|
Ssl_sessions_reused
| numeric | GLOBAL | SESSION
|
Ssl_used_session_cache_entries
| numeric | GLOBAL
|
Ssl_verify_depth
| numeric | GLOBAL | SESSION
|
Ssl_verify_mode
| numeric | GLOBAL | SESSION
|
Ssl_version
| string | GLOBAL | SESSION
|
Table_locks_immediate
| numeric | GLOBAL
|
Table_locks_waited
| numeric | GLOBAL
|
Tc_log_max_pages_used
| numeric | GLOBAL
|
Tc_log_page_size
| numeric | GLOBAL
|
Tc_log_page_waits
| numeric | GLOBAL
|
Threads_cached
| numeric | GLOBAL
|
Threads_connected
| numeric | GLOBAL
|
Threads_created
| numeric | GLOBAL
|
Threads_running
| numeric | GLOBAL
|
Uptime
| numeric | GLOBAL
|
Uptime_since_flush_status
| numeric | GLOBAL |
The status variables have the following meanings.
Aborted_clients
The number of connections that were aborted because the client died without closing the connection properly. See "Communication Errors and Aborted Connections".
Aborted_connects
The number of failed attempts to connect to the MariaDB server. See "Communication Errors and Aborted Connections".
For additional connection-related information, check the
Connection_errors_status variables and thexxxhost_cachetable.Binlog_cache_disk_use
The number of transactions that used the temporary binary log cache but that exceeded the value of
binlog_cache_sizeand used a temporary file to store statements from the transaction.The number of nontransactional statements that caused the binary log transaction cache to be written to disk is tracked separately in the
Binlog_stmt_cache_disk_usestatus variable.Binlog_cache_use
The number of transactions that used the binary log cache.
Binlog_stmt_cache_disk_use
The number of nontransaction statements that used the binary log statement cache but that exceeded the value of
binlog_stmt_cache_sizeand used a temporary file to store those statements.Binlog_stmt_cache_use
The number of nontransactional statements that used the binary log statement cache.
Bytes_received
The number of bytes received from all clients.
Bytes_sent
The number of bytes sent to all clients.
Com_xxx
The
Com_statement counter variables indicate the number of times eachxxxxxxstatement has been executed. There is one status variable for each type of statement. For example,Com_deleteandCom_insertcountDELETEandINSERTstatements, respectively. However, if a query result is returned from query cache, the server increments theQcache_hitsstatus variable, notCom_select. See , "Query Cache Status and Maintenance".All of the
Com_stmt_variables are increased even if a prepared statement argument is unknown or an error occurred during execution. In other words, their values correspond to the number of requests issued, not to the number of requests successfully completed.xxxThe
Com_stmt_status variables are as follows:xxxCom_stmt_prepareCom_stmt_executeCom_stmt_fetchCom_stmt_send_long_dataCom_stmt_resetCom_stmt_close
Those variables stand for prepared statement commands. Their names refer to the
COM_command set used in the network layer. In other words, their values increase whenever prepared statement API calls such as mysql_stmt_prepare(), mysql_stmt_execute(), and so forth are executed. However,xxxCom_stmt_prepare,Com_stmt_executeandCom_stmt_closealso increase forPREPARE,EXECUTE, orDEALLOCATE PREPARE, respectively. Additionally, the values of the older statement counter variablesCom_prepare_sql,Com_execute_sql, andCom_dealloc_sqlincrease for thePREPARE,EXECUTE, andDEALLOCATE PREPAREstatements.Com_stmt_fetchstands for the total number of network round-trips issued when fetching from cursors.Com_stmt_reprepareindicated the number of times statements were automatically reprepared by the server after metadata changes to tables or views referred to by the statement. A reprepare operation incrementsCom_stmt_reprepare, and alsoCom_stmt_prepare.Compression
Whether the client connection uses compression in the client/server protocol.
Connection_errors_xxx
These variables provide information about errors that occur during the client connection process. They are global only and represent error counts aggregated across connections from all hosts. These variables track errors not accounted for by the host cache (see , "DNS Lookup Optimization and the Host Cache"), such as errors that are not associated with TCP connections, occur very early in the connection process (even before an IP address is known), or are not specific to any particular IP address (such as out-of-memory conditions). These variables were added in MariaDB 5.6.5.
Connection_errors_accept
The number of errors that occurred during calls to
accept()on the listening port.Connection_errors_internal
The number of connections refused due to internal errors in the server, such as failure to start a new thread or an out-of-memory condition.
Connection_errors_max_connections
The number of connections refused because the server
max_connectionslimit was reached.Connection_errors_peer_addr
The number of errors that occurred while searching for connecting client IP addresses.
Connection_errors_select
The number of errors that occurred during calls to
select()orpoll()on the listening port. (Failure of this operation does not necessarily means a client connection was rejected.)Connection_errors_tcpwrap
The number of connections refused by the
libwraplibrary.
Connections
The number of connection attempts (successful or not) to the MariaDB server.
Created_tmp_disk_tables
The number of internal on-disk temporary tables created by the server while executing statements.
If an internal temporary table is created initially as an in-memory table but becomes too large, MariaDB automatically converts it to an on-disk table. The maximum size for in-memory temporary tables is the minimum of the
tmp_table_sizeandmax_heap_table_sizevalues. IfCreated_tmp_disk_tablesis large, you may want to increase thetmp_table_sizeormax_heap_table_sizevalues. value to lessen the likelihood that internal temporary tables in memory will be converted to on-disk tables.You can compare the number of internal on-disk temporary tables created to the total number of internal temporary tables created by comparing the values of the
Created_tmp_disk_tablesandCreated_tmp_tablesvariables.Created_tmp_files
How many temporary files mysqld has created.
Created_tmp_tables
The number of internal temporary tables created by the server while executing statements.
You can compare the number of internal on-disk temporary tables created to the total number of internal temporary tables created by comparing the values of the
Created_tmp_disk_tablesandCreated_tmp_tablesvariables.See also , "How MariaDB Uses Internal Temporary Tables".
Each invocation of the
SHOW STATUSstatement uses an internal temporary table and increments the globalCreated_tmp_tablesvalue.Delayed_errors
The number of rows written with
INSERT DELAYEDfor which some error occurred (probablyduplicate key).Delayed_insert_threads
The number of
INSERT DELAYEDhandler threads in use for nontransactional tables.Delayed_writes
The number of
INSERT DELAYEDrows written to nontransactional tables.Flush_commands
The number of times the server flushes tables, whether because a user executed a
FLUSH TABLESstatement or due to internal server operation. It is also incremented by receipt of aCOM_REFRESHpacket. This is in contrast toCom_flush, which indicates how manyFLUSHstatements have been executed, whetherFLUSH TABLES,FLUSH LOGS, and so forth.Handler_commit
The number of internal
COMMITstatements.Handler_delete
The number of times that rows have been deleted from tables.
Handler_external_lock
The number of locks started while a statement executed.
Handler_prepare
A counter for the prepare phase of two-phase commit operations.
Handler_read_first
The number of times the first entry in an index was read. If this value is high, it suggests that the server is doing a lot of full index scans; for example,
SELECT col1 FROM foo, assuming thatcol1is indexed.Handler_read_key
The number of requests to read a row based on a key. If this value is high, it is a good indication that your tables are properly indexed for your queries.
Handler_read_last
The number of requests to read the last key in an index. With
ORDER BY, the server will issue a first-key request followed by several next-key requests, whereas with WithORDER BY DESC, the server will issue a last-key request followed by several previous-key requests. This variable was added in MariaDB 5.6.1.Handler_read_next
The number of requests to read the next row in key order. This value is incremented if you are querying an index column with a range constraint or if you are doing an index scan.
Handler_read_prev
The number of requests to read the previous row in key order. This read method is mainly used to optimize
ORDER BY ... DESC.Handler_read_rnd
The number of requests to read a row based on a fixed position. This value is high if you are doing a lot of queries that require sorting of the result. You probably have a lot of queries that require MariaDB to scan entire tables or you have joins that do not use keys properly.
Handler_read_rnd_next
The number of requests to read the next row in the data file. This value is high if you are doing a lot of table scans. Generally this suggests that your tables are not properly indexed or that your queries are not written to take advantage of the indexes you have.
Handler_rollback
The number of requests for a storage engine to perform a rollback operation.
Handler_savepoint
The number of requests for a storage engine to place a savepoint.
Handler_savepoint_rollback
The number of requests for a storage engine to roll back to a savepoint.
Handler_update
The number of requests to update a row in a table.
Handler_write
The number of requests to insert a row in a table.
Innodb_buffer_pool_dump_status
The progress of an operation to record the pages held in the InnoDB buffer pool, triggered by the setting of
innodb_buffer_pool_dump_at_shutdownorinnodb_buffer_pool_dump_now.Innodb_buffer_pool_load_status
The progress of an operation to 'warm up' the InnoDB buffer pool by reading in a set of pages corresponding to an earlier point in time, triggered by the setting of
innodb_buffer_pool_load_at_startuporinnodb_buffer_pool_load_now. If the operation introduces too much overhead, you can cancel it by settinginnodb_buffer_pool_load_abort.Innodb_buffer_pool_pages_data
The number of pages containing data (dirty or clean).
Innodb_buffer_pool_pages_dirty
The number of pages currently dirty.
Innodb_buffer_pool_pages_flushed
The number of buffer pool page-flush requests.
Innodb_buffer_pool_pages_free
The number of free pages.
Innodb_buffer_pool_pages_latched
The number of latched pages in
InnoDBbuffer pool. These are pages currently being read or written or that cannot be flushed or removed for some other reason. Calculation of this variable is expensive, so it is available only when theUNIV_DEBUGsystem is defined at server build time.Innodb_buffer_pool_pages_misc
The number of pages that are busy because they have been allocated for administrative overhead such as row locks or the adaptive hash index. This value can also be calculated as
Innodb_buffer_pool_pages_total-Innodb_buffer_pool_pages_free-Innodb_buffer_pool_pages_data.Innodb_buffer_pool_pages_total
The total size of the buffer pool, in pages.
Innodb_buffer_pool_read_ahead
The number of pages read into the
InnoDBbuffer pool by the read-ahead background thread.Innodb_buffer_pool_read_ahead_evicted
The number of pages read into the
InnoDBbuffer pool by the read-ahead background thread that were subsequently evicted without having been accessed by queries.Innodb_buffer_pool_read_requests
The number of logical read requests
InnoDBhas done.Innodb_buffer_pool_reads
The number of logical reads that
InnoDBcould not satisfy from the buffer pool, and had to read directly from the disk.Innodb_buffer_pool_wait_free
Normally, writes to the
InnoDBbuffer pool happen in the background. However, if it is necessary to read or create a page and no clean pages are available, it is also necessary to wait for pages to be flushed first. This counter counts instances of these waits. If the buffer pool size has been set properly, this value should be small.Innodb_buffer_pool_write_requests
The number writes done to the
InnoDBbuffer pool.Innodb_data_fsyncs
The number of
fsync()operations so far.Innodb_data_pending_fsyncs
The current number of pending
fsync()operations.Innodb_data_pending_reads
The current number of pending reads.
Innodb_data_pending_writes
The current number of pending writes.
Innodb_data_read
The amount of data read since the server was started.
Innodb_data_reads
The total number of data reads.
Innodb_data_writes
The total number of data writes.
Innodb_data_written
The amount of data written so far, in bytes.
Innodb_dblwr_pages_written
The number of pages that have been written for doublewrite operations. See , "
InnoDBDisk I/O".Innodb_dblwr_writes
The number of doublewrite operations that have been performed. See , "
InnoDBDisk I/O".Innodb_have_atomic_builtins
Indicates whether the server was built with atomic instructions.
Innodb_log_waits
The number of times that the log buffer was too small and a wait was required for it to be flushed before continuing.
Innodb_log_write_requests
The number of log write requests.
Innodb_log_writes
The number of physical writes to the log file.
Innodb_num_open_files
The number of files
InnoDBcurrently holds open.Innodb_os_log_fsyncs
The number of
fsync()writes done to the log file.Innodb_os_log_pending_fsyncs
The number of pending log file
fsync()operations.Innodb_os_log_pending_writes
The number of pending log file writes.
Innodb_os_log_written
The number of bytes written to the log file.
Innodb_page_size
The compiled-in
InnoDBpage size (default 16KB). Many values are counted in pages; the page size enables them to be easily converted to bytes.Innodb_pages_created
The number of pages created.
Innodb_pages_read
The number of pages read.
Innodb_pages_written
The number of pages written.
Innodb_row_lock_current_waits
The number of row locks currently being waited for.
Innodb_row_lock_time
The total time spent in acquiring row locks, in milliseconds.
Innodb_row_lock_time_avg
The average time to acquire a row lock, in milliseconds.
Innodb_row_lock_time_max
The maximum time to acquire a row lock, in milliseconds.
Innodb_row_lock_waits
The number of times a row lock had to be waited for.
Innodb_rows_deleted
The number of rows deleted from
InnoDBtables.Innodb_rows_inserted
The number of rows inserted into
InnoDBtables.Innodb_rows_read
The number of rows read from
InnoDBtables.Innodb_rows_updated
The number of rows updated in
InnoDBtables.Innodb_truncated_status_writes
The number of times output from the
SHOW ENGINE INNODB STATUSstatement has been truncated.Key_blocks_not_flushed
The number of key blocks in the key cache that have changed but have not yet been flushed to disk.
Key_blocks_unused
The number of unused blocks in the key cache. You can use this value to determine how much of the key cache is in use; see the discussion of
key_buffer_sizein , "Server System Variables".Key_blocks_used
The number of used blocks in the key cache. This value is a high-water mark that indicates the maximum number of blocks that have ever been in use at one time.
Key_read_requests
The number of requests to read a key block from the cache.
Key_reads
The number of physical reads of a key block from disk. If
Key-readsis large, then yourkey_buffer_sizevalue is probably too small. The cache miss rate can be calculated asKey_reads/Key_read_requests.Key_write_requests
The number of requests to write a key block to the cache.
Key_writes
The number of physical writes of a key block to disk.
Last_query_cost
The total cost of the last compiled query as computed by the query optimizer. This is useful for comparing the cost of different query plans for the same query. The default value of 0 means that no query has been compiled yet. The default value is 0.
Last_query_costhas session scope.The
Last_query_costvalue can be computed accurately only for simple "flat" queries, not complex queries such as those with subqueries orUNION. For the latter, the value is set to 0.Last_query_partial_plans
The number of iterations the query optimizer made in execution plan construction for the previous query.
Last_query_costhas session scope. This variable was added in MariaDB 5.6.5.Max_used_connections
The maximum number of connections that have been in use simultaneously since the server started.
Not_flushed_delayed_rows
The number of rows waiting to be written to nontransactional tables in
INSERT DELAYEDqueues.Open_files
The number of files that are open. This count includes regular files opened by the server. It does not include other types of files such as sockets or pipes. Also, the count does not include files that storage engines open using their own internal functions rather than asking the server level to do so.
Open_streams
The number of streams that are open (used mainly for logging).
Open_table_definitions
The number of cached
.frmfiles.Open_tables
The number of tables that are open.
Opened_files
The number of files that have been opened with
my_open()(amysyslibrary function). Parts of the server that open files without using this function do not increment the count.Opened_table_definitions
The number of
.frmfiles that have been cached.Opened_tables
The number of tables that have been opened. If
Opened-tablesis big, yourtable_open_cachevalue is probably too small.Performance_schema_xxx
Performance Schema status variables are listed in , "Performance Schema Status Variables".
Prepared_stmt_count
The current number of prepared statements. (The maximum number of statements is given by the
max_prepared_stmt_countsystem variable.)Qcache_free_blocks
The number of free memory blocks in the query cache.
Qcache_free_memory
The amount of free memory for the query cache.
Qcache_hits
The number of query cache hits.
Qcache_inserts
The number of queries added to the query cache.
Qcache_lowmem_prunes
The number of queries that were deleted from the query cache because of low memory.
Qcache_not_cached
The number of noncached queries (not cacheable, or not cached due to the
query_cache_typesetting).Qcache_queries_in_cache
The number of queries registered in the query cache.
Qcache_total_blocks
The total number of blocks in the query cache.
Queries
The number of statements executed by the server. This variable includes statements executed within stored programs, unlike the
Questionsvariable. It does not countCOM_PINGorCOM_STATISTICScommands.Questions
The number of statements executed by the server. This includes only statements sent to the server by clients and not statements executed within stored programs, unlike the
Queriesvariable. This variable does not countCOM_PING,COM_STATISTICS,COM_STMT_PREPARE,COM_STMT_CLOSE, orCOM_STMT_RESETcommands.Rpl_semi_sync_master_clients
The number of semisynchronous slaves.
This variable is available only if the master-side semisynchronous replication plugin is installed.
Rpl_semi_sync_master_net_avg_wait_time
The average time in microseconds the master waited for a slave reply.
This variable is available only if the master-side semisynchronous replication plugin is installed.
Rpl_semi_sync_master_net_wait_time
The total time in microseconds the master waited for slave replies.
This variable is available only if the master-side semisynchronous replication plugin is installed.
Rpl_semi_sync_master_net_waits
The total number of times the master waited for slave replies.
This variable is available only if the master-side semisynchronous replication plugin is installed.
Rpl_semi_sync_master_no_times
The number of times the master turned off semisynchronous replication.
This variable is available only if the master-side semisynchronous replication plugin is installed.
Rpl_semi_sync_master_no_tx
The number of commits that were not acknowledged successfully by a slave.
This variable is available only if the master-side semisynchronous replication plugin is installed.
Rpl_semi_sync_master_status
Whether semisynchronous replication currently is operational on the master. The value is
ONif the plugin has been enabled and a commit acknowledgment has occurred. It isOFFif the plugin is not enabled or the master has fallen back to asynchronous replication due to commit acknowledgment timeout.This variable is available only if the master-side semisynchronous replication plugin is installed.
Rpl_semi_sync_master_timefunc_failures
The number of times the master failed when calling time functions such as
gettimeofday().This variable is available only if the master-side semisynchronous replication plugin is installed.
Rpl_semi_sync_master_tx_avg_wait_time
The average time in microseconds the master waited for each transaction.
This variable is available only if the master-side semisynchronous replication plugin is installed.
Rpl_semi_sync_master_tx_wait_time
The total time in microseconds the master waited for transactions.
This variable is available only if the master-side semisynchronous replication plugin is installed.
Rpl_semi_sync_master_tx_waits
The total number of times the master waited for transactions.
This variable is available only if the master-side semisynchronous replication plugin is installed.
Rpl_semi_sync_master_wait_pos_backtraverse
The total number of times the master waited for an event with binary coordinates lower than events waited for previously. This can occur when the order in which transactions start waiting for a reply is different from the order in which their binary log events are written.
This variable is available only if the master-side semisynchronous replication plugin is installed.
Rpl_semi_sync_master_wait_sessions
The number of sessions currently waiting for slave replies.
This variable is available only if the master-side semisynchronous replication plugin is installed.
Rpl_semi_sync_master_yes_tx
The number of commits that were acknowledged successfully by a slave.
This variable is available only if the master-side semisynchronous replication plugin is installed.
Rpl_semi_sync_slave_status
Whether semisynchronous replication currently is operational on the slave. This is
ONif the plugin has been enabled and the slave I/O thread is running,OFFotherwise.This variable is available only if the slave-side semisynchronous replication plugin is installed.
Select_full_join
The number of joins that perform table scans because they do not use indexes. If this value is not 0, you should carefully check the indexes of your tables.
Select_full_range_join
The number of joins that used a range search on a reference table.
Select_range
The number of joins that used ranges on the first table. This is normally not a critical issue even if the value is quite large.
Select_range_check
The number of joins without keys that check for key usage after each row. If this is not 0, you should carefully check the indexes of your tables.
Select_scan
The number of joins that did a full scan of the first table.
Slave_heartbeat_period
Shows the replication heartbeat interval (in seconds) on a replication slave.
Slave_last_heartbeat
Shows when the most recent heartbeat signal was received by a replication slave, as a
TIMESTAMPvalue.Slave_open_temp_tables
The number of temporary tables that the slave SQL thread currently has open. If the value is greater than zero, it is not safe to shut down the slave; see , "Replication and Temporary Tables".
Slave_received_heartbeats
This counter increments with each replication heartbeat received by a replication slave since the last time that the slave was restarted or reset, or a
CHANGE MASTER TOstatement was issued.Slave_retried_transactions
The total number of times since startup that the replication slave SQL thread has retried transactions.
Slave_running
This is
ONif this server is a replication slave that is connected to a replication master, and both the I/O and SQL threads are running; otherwise, it isOFF.Slow_launch_threads
The number of threads that have taken more than
slow_launch_timeseconds to create.Slow_queries
The number of queries that have taken more than
long-query-timeseconds. See , "The Slow Query Log".Sort_merge_passes
The number of merge passes that the sort algorithm has had to do. If this value is large, you should consider increasing the value of the
sort_buffer_sizesystem variable.Sort_range
The number of sorts that were done using ranges.
Sort_rows
The number of sorted rows.
Sort_scan
The number of sorts that were done by scanning the table.
Ssl_accept_renegotiates
The number of negotiates needed to establish the connection.
Ssl_accepts
The number of accepted SSL connections.
Ssl_callback_cache_hits
The number of callback cache hits.
Ssl_cipher
The current SSL cipher (empty for non-SSL connections).
Ssl_cipher_list
The list of possible SSL ciphers.
Ssl_client_connects
The number of SSL connection attempts to an SSL-enabled master.
Ssl_connect_renegotiates
The number of negotiates needed to establish the connection to an SSL-enabled master.
Ssl_ctx_verify_depth
The SSL context verification depth (how many certificates in the chain are tested).
Ssl_ctx_verify_mode
The SSL context verification mode.
Ssl_default_timeout
The default SSL timeout.
Ssl_finished_accepts
The number of successful SSL connections to the server.
Ssl_finished_connects
The number of successful slave connections to an SSL-enabled master.
Ssl_server_not_after
The last date for which the SSL certificate is valid. This variable was added in MariaDB 5.6.3.
Ssl_server_not_before
The first date for which the SSL certificate is valid. This variable was added in MariaDB 5.6.3.
Ssl_session_cache_hits
The number of SSL session cache hits.
Ssl_session_cache_misses
The number of SSL session cache misses.
Ssl_session_cache_mode
The SSL session cache mode.
Ssl_session_cache_overflows
The number of SSL session cache overflows.
Ssl_session_cache_size
The SSL session cache size.
Ssl_session_cache_timeouts
The number of SSL session cache timeouts.
Ssl_sessions_reused
How many SSL connections were reused from the cache.
Ssl_used_session_cache_entries
How many SSL session cache entries were used.
Ssl_verify_depth
The verification depth for replication SSL connections.
Ssl_verify_mode
The verification mode for replication SSL connections.
Ssl_version
The SSL protocol version of the connection.
Table_locks_immediate
The number of times that a request for a table lock could be granted immediately.
Table_locks_waited
The number of times that a request for a table lock could not be granted immediately and a wait was needed. If this is high and you have performance problems, you should first optimize your queries, and then either split your table or tables or use replication.
Tc_log_max_pages_used
For the memory-mapped implementation of the log that is used by mysqld when it acts as the transaction coordinator for recovery of internal XA transactions, this variable indicates the largest number of pages used for the log since the server started. If the product of
Tc_log_max_pages_usedandTc_log_page_sizeis always significantly less than the log size, the size is larger than necessary and can be reduced. (The size is set by the--log-tc-sizeoption. Currently, this variable is unused: It is unneeded for binary log-based recovery, and the memory-mapped recovery log method is not used unless the number of storage engines capable of two-phase commit is greater than one. (InnoDBis the only applicable engine.)Tc_log_page_size
The page size used for the memory-mapped implementation of the XA recovery log. The default value is determined using
getpagesize(). Currently, this variable is unused for the same reasons as described forTc_log_max_pages_used.Tc_log_page_waits
For the memory-mapped implementation of the recovery log, this variable increments each time the server was not able to commit a transaction and had to wait for a free page in the log. If this value is large, you might want to increase the log size (with the
--log-tc-sizeoption). For binary log-based recovery, this variable increments each time the binary log cannot be closed because there are two-phase commits in progress. (The close operation waits until all such transactions are finished.)Threads_cached
The number of threads in the thread cache.
Threads_connected
The number of currently open connections.
Threads_created
The number of threads created to handle connections. If
Threads_createdis big, you may want to increase thethread_cache_sizevalue. The cache miss rate can be calculated asThreads_created/Connections.Threads_running
The number of threads that are not sleeping.
Uptime
The number of seconds that the server has been up.
Uptime_since_flush_status
The number of seconds since the most recent
FLUSH STATUSstatement.
Server SQL Modes
The MariaDB server can operate in different SQL modes, and can apply these modes differently for different clients. This capability enables each application to tailor the server's operating mode to its own requirements.
For answers to some questions that are often asked about server SQL modes in MySQL, see "MySQL 5.6 FAQ: Server SQL Mode".
Modes define what SQL syntax MariaDB should support and what kind of data validation checks it should perform. This makes it easier to use MariaDB in different environments and to use MariaDB together with other database servers.
When working with InnoDB tables, consider also the innodb_strict_mode configuration option. It enables additional error checks for InnoDB tables, as listed in , "InnoDB Strict Mode".
Setting the SQL Mode
You can set the default SQL mode by starting mysqld with the --sql-mode=' option, or by using modes'sql-mode=' in modes'my.cnf (Unix operating systems) or my.ini (Windows). modes is a list of different modes separated by comma (",") characters. The default value is empty (no modes set). The modes value also can be empty (--sql-mode='' on the command line, or sql-mode='' in my.cnf on Unix systems or in my.ini on Windows) if you want to clear it explicitly.
You can change the SQL mode at runtime by using a SET [GLOBAL|SESSION] sql_mode=' statement to set the modes'sql_mode system value. Setting the GLOBAL variable requires the SUPER privilege and affects the operation of all clients that connect from that time on. Setting the SESSION variable affects only the current client. Any client can change its own session sql_mode value at any time.Important
SQL mode and user-defined partitioning. Changing the server SQL mode after creating and inserting data into partitioned tables can cause major changes in the behavior of such tables, and could lead to loss or corruption of data. It is strongly recommended that you never change the SQL mode once you have created tables employing user-defined partitioning.
When replicating partitioned tables, differing SQL modes on master and slave can also lead to problems. For best results, you should always use the same server SQL mode on the master and on the slave.
See , "Restrictions and Limitations on Partitioning", for more information.
You can retrieve the current global or session sql_mode value with the following statements:
SELECT @@GLOBAL.sql_mode;
SELECT @@SESSION.sql_mode;
Most Important SQL Modes
The most important sql_mode values are probably these:
ANSI
This mode changes syntax and behavior to conform more closely to standard SQL. It is one of the special combination modes listed at the end of this section.
STRICT_TRANS_TABLES
If a value could not be inserted as given into a transactional table, abort the statement. For a nontransactional table, abort the statement if the value occurs in a single-row statement or the first row of a multiple-row statement. More detail is given later in this section.
TRADITIONAL
Make MariaDB behave like a "traditional" SQL database system. A simple description of this mode is "give an error instead of a warning" when inserting an incorrect value into a column. It is one of the special combination modes listed at the end of this section.Note
The
INSERT/UPDATEaborts as soon as the error is noticed. This may not be what you want if you are using a nontransactional storage engine, because data changes made prior to the error may not be rolled back, resulting in a "partially done" update.
When this manual refers to "strict mode," it means a mode where at least one of STRICT_TRANS_TABLES or STRICT_ALL_TABLES is enabled.
Full List of SQL Modes
The following list describes all supported modes:
ALLOW_INVALID_DATES
Do not perform full checking of dates. Check only that the month is in the range from 1 to 12 and the day is in the range from 1 to 31. This is very convenient for Web applications where you obtain year, month, and day in three different fields and you want to store exactly what the user inserted (without date validation). This mode applies to
DATEandDATETIMEcolumns. It does not applyTIMESTAMPcolumns, which always require a valid date.The server requires that month and day values be legal, and not merely in the range 1 to 12 and 1 to 31, respectively. With strict mode disabled, invalid dates such as
'2004-04-31'are converted to'0000-00-00'and a warning is generated. With strict mode enabled, invalid dates generate an error. To permit such dates, enableALLOW_INVALID_DATES.ANSI_QUOTES
Treat "
'" as an identifier quote character (like the "`" quote character) and not as a string quote character. You can still use "`" to quote identifiers with this mode enabled. WithANSI_QUOTESenabled, you cannot use double quotation marks to quote literal strings, because it is interpreted as an identifier.ERROR_FOR_DIVISION_BY_ZERO
Produce an error in strict mode (otherwise a warning) when a division by zero (or
MOD(X,0)) occurs during anINSERTorUPDATE. If this mode is not enabled, MariaDB instead returnsNULLfor divisions by zero. ForINSERT IGNOREorUPDATE IGNORE, MariaDB generates a warning for divisions by zero, but the result of the operation isNULL.HIGH_NOT_PRECEDENCE
The precedence of the
NOToperator is such that expressions such asNOT a BETWEEN b AND care parsed asNOT (a BETWEEN b AND c). In some older versions of MySQL, the expression was parsed as(NOT a) BETWEEN b AND c. The old higher-precedence behavior can be obtained by enabling theHIGH_NOT_PRECEDENCESQL mode.mysql>
SET sql_mode = '';mysql>SELECT NOT 1 BETWEEN -5 AND 5;-> 0 mysql>SET sql_mode = 'HIGH_NOT_PRECEDENCE';mysql>SELECT NOT 1 BETWEEN -5 AND 5;-> 1IGNORE_SPACE
Permit spaces between a function name and the "
(" character. This causes built-in function names to be treated as reserved words. As a result, identifiers that are the same as function names must be quoted as described in , "Schema Object Names". For example, because there is aCOUNT()function, the use ofcountas a table name in the following statement causes an error:mysql>
CREATE TABLE count (i INT);ERROR 1064 (42000): You have an error in your SQL syntaxThe table name should be quoted:
mysql>
CREATE TABLE `count` (i INT);Query OK, 0 rows affected (0.00 sec)The
IGNORE_SPACESQL mode applies to built-in functions, not to user-defined functions or stored functions. It is always permissible to have spaces after a UDF or stored function name, regardless of whetherIGNORE_SPACEis enabled.For further discussion of
IGNORE-SPACE, see , "Function Name Parsing and Resolution".NO_AUTO_CREATE_USER
Prevent the
GRANTstatement from automatically creating new users if it would otherwise do so, unless a nonempty password also is specified.This mode has no effect for
GRANTstatements that include anIDENTIFIED WITHclause. That is,GRANT ... IDENTIFIED WITHcreates nonexistent users regardless of the mode setting.NO_AUTO_VALUE_ON_ZERO
NO_AUTO_VALUE_ON_ZEROaffects handling ofAUTO_INCREMENTcolumns. Normally, you generate the next sequence number for the column by inserting eitherNULLor0into it.NO_AUTO_VALUE_ON_ZEROsuppresses this behavior for0so that onlyNULLgenerates the next sequence number.This mode can be useful if
0has been stored in a table'sAUTO_INCREMENTcolumn. (Storing0is not a recommended practice, by the way.) For example, if you dump the table with mysqldump and then reload it, MariaDB normally generates new sequence numbers when it encounters the0values, resulting in a table with contents different from the one that was dumped. EnablingNO_AUTO_VALUE_ON_ZERObefore reloading the dump file solves this problem. mysqldump now automatically includes in its output a statement that enablesNO_AUTO_VALUE_ON_ZERO, to avoid this problem.NO_BACKSLASH_ESCAPES
Disable the use of the backslash character ("
\") as an escape character within strings. With this mode enabled, backslash becomes an ordinary character like any other.NO_DIR_IN_CREATE
When creating a table, ignore all
INDEX DIRECTORYandDATA DIRECTORYdirectives. This option is useful on slave replication servers.NO_ENGINE_SUBSTITUTION
Control automatic substitution of the default storage engine when a statement such as
CREATE TABLEorALTER TABLEspecifies a storage engine that is disabled or not compiled in.Because storage engines can be pluggable at runtime, unavailable engines are treated the same way:
With
NO-ENGINE-SUBSTITUTIONdisabled, forCREATE TABLEthe default engine is used and a warning occurs if the desired engine is unavailable. ForALTER TABLE, a warning occurs and the table is not altered.With
NO_ENGINE_SUBSTITUTIONenabled, an error occurs and the table is not created or altered if the desired engine is unavailable.NO_FIELD_OPTIONS
Do not print MySQL-specific column options in the output of
SHOW CREATE TABLE. This mode is used by mysqldump in portability mode.NO_KEY_OPTIONS
Do not print MySQL-specific index options in the output of
SHOW CREATE TABLE. This mode is used by mysqldump in portability mode.NO_TABLE_OPTIONS
Do not print MySQL-specific table options (such as
ENGINE) in the output ofSHOW CREATE TABLE. This mode is used by mysqldump in portability mode.NO_UNSIGNED_SUBTRACTION
By default, subtraction between integer operands produces an
UNSIGNEDresult if any operand isUNSIGNED. WhenNO_UNSIGNED_SUBTRACTIONis enabled, the subtraction result is signed, even if any operand is unsigned. For example, compare the type of columnc2in tablet1with that of columnc2in tablet2:mysql>
SET sql_mode='';mysql>CREATE TABLE test (c1 BIGINT UNSIGNED NOT NULL);mysql>CREATE TABLE t1 SELECT c1 - 1 AS c2 FROM test;mysql>DESCRIBE t1;+-------+---------------------+------+-----+---------+-------+ | Field | Type | Null | Key | Default | Extra | +-------+---------------------+------+-----+---------+-------+ | c2 | bigint(21) unsigned | | | 0 | | +-------+---------------------+------+-----+---------+-------+ mysql>SET sql_mode='NO_UNSIGNED_SUBTRACTION';mysql>CREATE TABLE t2 SELECT c1 - 1 AS c2 FROM test;mysql>DESCRIBE t2;+-------+------------+------+-----+---------+-------+ | Field | Type | Null | Key | Default | Extra | +-------+------------+------+-----+---------+-------+ | c2 | bigint(21) | | | 0 | | +-------+------------+------+-----+---------+-------+Note that this means that
BIGINT UNSIGNEDis not 100% usable in all contexts. See , "Cast Functions and Operators".mysql>
SET sql_mode = '';mysql>SELECT CAST(0 AS UNSIGNED) - 1;+-------------------------+ | CAST(0 AS UNSIGNED) - 1 | +-------------------------+ | 18446744073709551615 | +-------------------------+ mysql>SET sql_mode = 'NO_UNSIGNED_SUBTRACTION';mysql>SELECT CAST(0 AS UNSIGNED) - 1;+-------------------------+ | CAST(0 AS UNSIGNED) - 1 | +-------------------------+ | -1 | +-------------------------+NO_ZERO_DATE
In strict mode, do not permit
'0000-00-00'as a valid date. You can still insert zero dates with theIGNOREoption. When not in strict mode, the date is accepted but a warning is generated.NO_ZERO_IN_DATE
In strict mode, do not accept dates where the year part is nonzero but the month or day part is 0 (for example,
'0000-00-00'is legal but'2010-00-01'and'2010-01-00'are not). If used with theIGNOREoption, MariaDB inserts a'0000-00-00'date for any such date. When not in strict mode, the date is accepted but a warning is generated.ONLY_FULL_GROUP_BY
Do not permit queries for which the select list refers to nonaggregated columns that are not named in the
GROUP BYclause. The following query is invalid with this mode enabled becauseaddressis not named in theGROUP BYclause:SELECT name, address, MAX(age) FROM t GROUP BY name;
This mode also restricts references to nonaggregated columns in the
HAVINGclause that are not named in theGROUP BYclause.PAD_CHAR_TO_FULL_LENGTH
By default, trailing spaces are trimmed from
CHARcolumn values on retrieval. IfPAD_CHAR_TO_FULL_LENGTHis enabled, trimming does not occur and retrievedCHARvalues are padded to their full length. This mode does not apply toVARCHARcolumns, for which trailing spaces are retained on retrieval.mysql>
CREATE TABLE t1 (c1 CHAR(10));Query OK, 0 rows affected (0.37 sec) mysql>INSERT INTO t1 (c1) VALUES('xy');Query OK, 1 row affected (0.01 sec) mysql>SET sql_mode = '';Query OK, 0 rows affected (0.00 sec) mysql>SELECT c1, CHAR_LENGTH(c1) FROM t1;+------+-----------------+ | c1 | CHAR_LENGTH(c1) | +------+-----------------+ | xy | 2 | +------+-----------------+ 1 row in set (0.00 sec) mysql>SET sql_mode = 'PAD_CHAR_TO_FULL_LENGTH';Query OK, 0 rows affected (0.00 sec) mysql>SELECT c1, CHAR_LENGTH(c1) FROM t1;+------------+-----------------+ | c1 | CHAR_LENGTH(c1) | +------------+-----------------+ | xy | 10 | +------------+-----------------+ 1 row in set (0.00 sec)PIPES_AS_CONCAT
Treat
||as a string concatenation operator (same asCONCAT()) rather than as a synonym forOR.REAL_AS_FLOAT
Treat
REALas a synonym forFLOAT. By default, MariaDB treatsREALas a synonym forDOUBLE.STRICT_ALL_TABLES
Enable strict mode for all storage engines. Invalid data values are rejected. Additional detail follows.
STRICT_TRANS_TABLES
Enable strict mode for transactional storage engines, and when possible for nontransactional storage engines. Additional details follow.
Strict mode controls how MariaDB handles input values that are invalid or missing. A value can be invalid for several reasons. For example, it might have the wrong data type for the column, or it might be out of range. A value is missing when a new row to be inserted does not contain a value for a non-NULL column that has no explicit DEFAULT clause in its definition. (For a NULL column, NULL is inserted if the value is missing.)
For transactional tables, an error occurs for invalid or missing values in a statement when either of the STRICT_ALL_TABLES or STRICT_TRANS_TABLES modes are enabled. The statement is aborted and rolled back.
For nontransactional tables, the behavior is the same for either mode, if the bad value occurs in the first row to be inserted or updated. The statement is aborted and the table remains unchanged. If the statement inserts or modifies multiple rows and the bad value occurs in the second or later row, the result depends on which strict option is enabled:
- For
STRICT_ALL_TABLES, MariaDB returns an error and ignores the rest of the rows. However, in this case, the earlier rows still have been inserted or updated. This means that you might get a partial update, which might not be what you want. To avoid this, it is best to use single-row statements because these can be aborted without changing the table. - For
STRICT_TRANS_TABLES, MariaDB converts an invalid value to the closest valid value for the column and insert the adjusted value. If a value is missing, MariaDB inserts the implicit default value for the column data type. In either case, MariaDB generates a warning rather than an error and continues processing the statement. Implicit defaults are described in , "Data Type Default Values".
Strict mode disallows invalid date values such as '2004-04-31'. It does not disallow dates with zero month or day parts such as '2004-04-00' or "zero" dates. To disallow these as well, enable the NO-ZERO-IN-DATE and NO_ZERO_DATE SQL modes in addition to strict mode.
If you are not using strict mode (that is, neither STRICT-TRANS-TABLES nor STRICT_ALL_TABLES is enabled), MariaDB inserts adjusted values for invalid or missing values and produces warnings. In strict mode, you can produce this behavior by using INSERT IGNORE or UPDATE IGNORE. See , "SHOW WARNINGS Syntax".
Strict mode does not affect whether foreign key constraints are checked. foreign_key_checks can be used for that. (See , "Server System Variables".)
Combination Modes
The following special modes are provided as shorthand for combinations of mode values from the preceding list.
The descriptions include all mode values that are available in the most recent version of MySQL. For older versions, a combination mode does not include individual mode values that are not available except in newer versions.
ANSI
Equivalent to
REAL-AS-FLOAT,PIPES_AS_CONCAT,ANSI_QUOTES,IGNORE_SPACE.ANSImode also causes the server to return an error for queries where a set functionSwith an outer referenceS(outer_ref)SELECT * FROM t1 WHERE t1.a IN (SELECT MAX(t1.b) FROM t2 WHERE ...);
Here,
MAX(t1.b)cannot aggregated in the outer query because it appears in theWHEREclause of that query. Standard SQL requires an error in this situation. IfANSImode is not enabled, the server treatsS(outer_ref)S(const)DB2
Equivalent to
PIPES-AS-CONCAT,ANSI_QUOTES,IGNORE_SPACE,NO_KEY_OPTIONS,NO_TABLE_OPTIONS,NO_FIELD_OPTIONS.MAXDB
Equivalent to
PIPES-AS-CONCAT,ANSI_QUOTES,IGNORE_SPACE,NO_KEY_OPTIONS,NO_TABLE_OPTIONS,NO_FIELD_OPTIONS,NO_AUTO_CREATE_USER.MSSQL
Equivalent to
PIPES-AS-CONCAT,ANSI_QUOTES,IGNORE_SPACE,NO_KEY_OPTIONS,NO_TABLE_OPTIONS,NO_FIELD_OPTIONS.MYSQL323
Equivalent to
NO-FIELD-OPTIONS,HIGH_NOT_PRECEDENCE.MYSQL40
Equivalent to
NO-FIELD-OPTIONS,HIGH_NOT_PRECEDENCE.ORACLE
Equivalent to
PIPES-AS-CONCAT,ANSI_QUOTES,IGNORE_SPACE,NO_KEY_OPTIONS,NO_TABLE_OPTIONS,NO_FIELD_OPTIONS,NO_AUTO_CREATE_USER.POSTGRESQL
Equivalent to
PIPES-AS-CONCAT,ANSI_QUOTES,IGNORE_SPACE,NO_KEY_OPTIONS,NO_TABLE_OPTIONS,NO_FIELD_OPTIONS.TRADITIONAL
Equivalent to
STRICT-TRANS-TABLES,STRICT_ALL_TABLES,NO-ZERO-IN-DATE,NO_ZERO_DATE,ERROR_FOR_DIVISION_BY_ZERO,NO_AUTO_CREATE_USER, andNO_ENGINE_SUBSTITUTION.
Server Plugins
MySQL supports a plugin API that enables creation of server components. Plugins can be loaded at server startup, or loaded and unloaded at runtime without restarting the server. The components supported by this interface include, but are not limited to, storage engines, full-text parser plugins, partitioning support, and server extensions.
Installing and Uninstalling Plugins
Server plugins must be loaded in to the server before they can be used. MariaDB enables you to load a plugin at server startup or at runtime. It is also possible to control the activation of loaded plugins at startup, and to unload them at runtime.
Installing Plugins
Server plugins must be known to the server before they can be used. A plugin can be made known several ways, as described here. In the following descriptions, plugin_name stands for a plugin name such as innodb or csv.
Built-in plugins:
A plugin that is built in to the server is known by the server automatically. Normally, the server enables the plugin at startup, although this can be changed with the -- option.
plugin_name
Plugins registered in the mysql.plugin table:
The mysql.plugin table serves as a registry of plugins. The server normally enables each plugin listed in the table at startup, although whether a given plugin is enabled can be changed with the -- option. If the server is started with the plugin_name--skip-grant-tables option, it does not consult this table and does not load the plugins listed there.
Plugins named with command-line options:
A plugin that is located in a plugin library file can be loaded at server startup with the --plugin-load option. Normally, the server enables the plugin at startup, although this can be changed with the -- option.
plugin_name
The option value is a semicolon-separated list of name=plugin_libraryname is the name of the plugin, and plugin_library is the name of the shared library that contains the plugin code. If a plugin library is named without any preceding plugin name, the server loads all plugins in the library. Each library file must be located in the directory named by the plugin_dir system variable.
This option does not register any plugin in the mysql.plugin table. For subsequent restarts, the server loads the plugin again only if --plugin-load is given again. That is, this option effects a one-time installation that persists only for one server invocation.
--plugin-load enables plugins to be loaded even when --skip-grant-tables is given (which causes the server to ignore the mysql.plugin table). --plugin-load also enables plugins to be loaded at startup under configurations when plugins cannot be loaded at runtime.
The --plugin-load-add option complements the --plugin-load option. --plugin-load-add adds a plugin or plugins to the set of plugins to be loaded at startup. The argument format is the same as for --plugin-load. --plugin-load-add can be used to avoid specifying a large set of plugins as a single long unwieldy --plugin-load. argument. --plugin-load-add can be given in the absence of --plugin-load, but any instance of --plugin-load-add that appears before --plugin-load. has no effect because --plugin-load resets the set of plugins to load. In other words, these options:
--plugin-load=x --plugin-load-add=y
are equivalent to this option:
--plugin-load=x;y
But these options:
--plugin-load-add=y --plugin-load=x
are equivalent to this option:
--plugin-load=x
Plugins installed with the INSTALL PLUGIN statement:
A plugin that is located in a plugin library file can be loaded at runtime with the INSTALL PLUGIN statement. The statement also registers the plugin in the mysql.plugin table to cause the server to load it on subsequent restarts. For this reason, INSTALL PLUGIN requires the INSERT privilege for the mysql.plugin table.
If a plugin is named both using a --plugin-load option and in the mysql.plugin table, the server starts but writes these messages to the error log:
100310 19:15:44 [ERROR] Function 'plugin_name' already exists
100310 19:15:44 [Warning] Couldn't load plugin named 'plugin_name'
with soname 'plugin_object_file'.
Example: The --plugin-load option installs a plugin at server startup. To install a plugin named myplugin in a plugin library file named somepluglib.so, use these lines in a my.cnf file:
[mysqld]
plugin-load=myplugin=somepluglib.so
In this case, the plugin is not registered in mysql.plugin. Restarting the server without the --plugin-load option causes the plugin not to be loaded at startup.
Alternatively, the INSTALL PLUGIN statement causes the server to load the plugin code from the library file at runtime:
mysql> INSTALL PLUGIN myplugin SONAME 'somepluglib.so';
INSTALL PLUGIN also causes "permanent" plugin registration: The server lists the plugin in the mysql.plugin table to ensure that it is loaded on subsequent server restarts.
Many plugins can be loaded either at server startup or at runtime. However, if a plugin is designed such that it must be loaded and initialized during server startup, use --plugin-load rather than INSTALL PLUGIN.
While a plugin is loaded, information about it is available at runtime from several sources, such as the INFORMATION_SCHEMA.PLUGINS table and the SHOW PLUGINS statement. For more information, see , "Obtaining Server Plugin Information".
Controlling Plugin Activation
If the server knows about a plugin when it starts (for example, because the plugin is named using a --plugin-load option or registered in the mysql.plugin table), the server loads and enables the plugin by default. It is possible to control activation for such a plugin using a -- startup option named after the plugin. In the following descriptions, plugin_name[=value]plugin_name stands for a plugin name such as innodb or csv. As with other options, dashes and underscores are interchangeable in option names. For example, --my_plugin=ON and --my-plugin=ON are equivalent.
--plugin_name=OFF
Tells the server to disable the plugin.
--plugin_name[=ON]
Tells the server to enable the plugin. (Specifying the option as
--without a value has the same effect.) If the plugin fails to initialize, the server runs with the plugin disabled.plugin_name--plugin_name=FORCE
Tells the server to enable the plugin, but if plugin initialization fails, the server does not start. In other words, this option forces the server to run with the plugin enabled or not at all.
--plugin_name=FORCE_PLUS_PERMANENT
Like
FORCE, but in addition prevents the plugin from being unloaded at runtime. If a user attempts to do so withUNINSTALL PLUGIN, an error occurs.
The values OFF, ON, FORCE, and FORCE_PLUS_PERMANENT are not case sensitive.
The activation state for plugins is visible in the LOAD_OPTION column of the INFORMATION_SCHEMA.PLUGINS table.
Suppose that CSV, BLACKHOLE, and ARCHIVE are built-in pluggable storage engines and that you want the server to load them at startup, subject to these conditions: The server is permitted to run if CSV initialization fails, but must require that BLACKHOLE initialization succeeds, and ARCHIVE should be disabled. To accomplish that, use these lines in an option file:
[mysqld]
csv=ON blackhole=FORCE archive=OFF
The --enable- option format is supported as a synonym for plugin_name--. The plugin_name=ON--disable- and plugin_name--skip- option formats are supported as synonyms for plugin_name--.
plugin_name=OFF
If a plugin is disabled, either explicitly with OFF or implicitly because it was enabled with ON but failed to initialize, aspects of server operation that require the plugin will change. For example, if the plugin implements a storage engine, existing tables for the storage engine become inaccessible, and attempts to create new tables for the storage engine result in tables that use the default storage engine unless the NO_ENGINE_SUBSTITUTION SQL mode has been enabled to cause an error to occur instead.
Disabling a plugin may require adjustment to other options. For example, if you start the server using --skip-innodb to disable InnoDB, other innodb_ options likely will need to be omitted from the startup command. In addition, because xxxInnoDB is the default storage engine, it will not start unless you specify another available storage engine with --default_storage_engine. As of MariaDB 5.6.3, you will also need to set --default_tmp_storage_engine.
Uninstalling Plugins
A plugin known to the server can be uninstalled to disable it at runtime with the UNINSTALL PLUGIN statement. The statement unloads the plugin and removes it from the mysql.plugin table if it is registered there. For this reason, UNINSTALL PLUGIN statement requires the DELETE privilege for the mysql.plugin table. With the plugin no longer registered in the table, the server will not load the plugin automatically for subsequent restarts.
UNINSTALL PLUGIN can unload plugins regardless of whether they were loaded with INSTALL PLUGIN or --plugin-load.
UNINSTALL PLUGIN is subject to these exceptions:
- It cannot unload plugins that are built in to the server. These can be identified as those that have a library name of
NULLin the output fromINFORMATION_SCHEMA.PLUGINSorSHOW PLUGINS. - It cannot unload plugins for which the server was started with
--, which prevents plugin unloading at runtime. These can be identified from theplugin_name=FORCE_PLUS_PERMANENTLOAD_OPTIONcolumn of theINFORMATION_SCHEMA.PLUGINStable.
Obtaining Server Plugin Information
There are several ways to determine which plugins are installed in the server:
- The
INFORMATION_SCHEMA.PLUGINStable contains a row for each loaded plugin. Any that have aPLUGIN_LIBRARYvalue ofNULLare built in and cannot be unloaded.
mysql>
SELECT * FROM information_schema.PLUGINS\G*************************** 1. row *************************** PLUGIN_NAME: binlog PLUGIN_VERSION: 1.0 PLUGIN_STATUS: ACTIVE PLUGIN_TYPE: STORAGE ENGINE PLUGIN_TYPE_VERSION: 50158.0 PLUGIN_LIBRARY: NULL PLUGIN_LIBRARY_VERSION: NULL PLUGIN_AUTHOR: MariaDB Foundation PLUGIN_DESCRIPTION: This is a pseudo storage engine to represent the binlog in a transaction PLUGIN_LICENSE: GPL LOAD_OPTION: FORCE ... *************************** 10. row *************************** PLUGIN_NAME: InnoDB PLUGIN_VERSION: 1.0 PLUGIN_STATUS: ACTIVE PLUGIN_TYPE: STORAGE ENGINE PLUGIN_TYPE_VERSION: 50158.0 PLUGIN_LIBRARY: ha_innodb_plugin.so PLUGIN_LIBRARY_VERSION: 1.0 PLUGIN_AUTHOR: Innobase Oy PLUGIN_DESCRIPTION: Supports transactions, row-level locking, and foreign keys PLUGIN_LICENSE: GPL LOAD_OPTION: ON ... - The
SHOW PLUGINSstatement displays a row for each loaded plugin. Any that have aLibraryvalue ofNULLare built in and cannot be unloaded.
mysql>
SHOW PLUGINS\G*************************** 1. row *************************** Name: binlog Status: ACTIVE Type: STORAGE ENGINE Library: NULL License: GPL ... *************************** 10. row *************************** Name: InnoDB Status: ACTIVE Type: STORAGE ENGINE Library: ha_innodb_plugin.so License: GPL ... - The
mysql.plugintable shows which plugins have been registered withINSTALL PLUGIN. The table contains only plugin names and library file names, so it does not provide as much information as thePLUGINStable or theSHOW PLUGINSstatement.
Server-Side Help
MySQL Server supports a HELP statement that returns online information from the MariaDB Reference manual (see , "HELP Syntax"). The proper operation of this statement requires that the help tables in the MariaDB database be initialized with help topic information, which is done by processing the contents of the fill_help_tables.sql script.
If you install MariaDB using a binary or source distribution on Unix, help table setup occurs when you run mysql_install_db. For an RPM distribution on Linux or binary distribution on Windows, help table setup occurs as part of the MariaDB installation process.
If you upgrade MariaDB using a binary distribution, the help tables are not upgraded automatically, but you can upgrade them manually. Locate the fill_help_tables.sql file in the share or share/mysql directory. Change location into that directory and process the file with the mysql client as follows:
shell> mysql -u root mysql < fill_help_tables.sql
You can also obtain the latest fill_help_tables.sql at any time to upgrade your help tables. Download the proper file for your version of MariaDB from http://dev.mysql.com/doc/index-other.html. After downloading and uncompressing the file, process it with mysql as described previously.
If you are working with Bazaar and a MariaDB development source tree, you will need to download the fill_help_tables.sql file because the tree contains only a "stub" version.
Server Response to Signals
On Unix, signals can be sent to processes. mysqld responds to signals sent to it as follows:
SIGTERMcauses the server to shut down.SIGHUPcauses the server to reload the grant tables and flush the logs (likeFLUSH PRIVILEGESandFLUSH LOGS). It also writes a status report to the error log that has this format:
Status information:
Current dir: /var/mysql/data/
Running threads: 0 Stack size: 196608
Current locks:
Key caches:
default Buffer_size: 8388600
Block_size: 1024
Division_limit: 100
Age_limit: 300
blocks used: 0
not flushed: 0
w_requests: 0
writes: 0
r_requests: 0
reads: 0
handler status:
read_key: 0
read_next: 0
read_rnd 0
read_first: 1
write: 0
delete 0
update: 0
Table status:
Opened tables: 5
Open tables: 0
Open files: 7
Open streams: 0
Alarm status:
Active alarms: 1
Max used alarms: 2
Next alarm time: 67
On some Mac OS X 10.3 versions, mysqld ignores SIGHUP and SIGQUIT.
The Shutdown Process
The server shutdown process takes place as follows:
- The shutdown process is initiated.
This can occur initiated several ways. For example, a user with the
SHUTDOWNprivilege can execute a mysqladmin shutdown command. mysqladmin can be used on any platform supported by MySQL. Other operating system-specific shutdown initiation methods are possible as well: The server shuts down on Unix when it receives aSIGTERMsignal. A server running as a service on Windows shuts down when the services manager tells it to. - The server creates a shutdown thread if necessary.
Depending on how shutdown was initiated, the server might create a thread to handle the shutdown process. If shutdown was requested by a client, a shutdown thread is created. If shutdown is the result of receiving a
SIGTERMsignal, the signal thread might handle shutdown itself, or it might create a separate thread to do so. If the server tries to create a shutdown thread and cannot (for example, if memory is exhausted), it issues a diagnostic message that appears in the error log:Error: Can't create thread to kill server
- The server stops accepting new connections.
To prevent new activity from being initiated during shutdown, the server stops accepting new client connections by closing the handlers for the network interfaces to which it normally listens for connections: the TCP/IP port, the Unix socket file, the Windows named pipe, and shared memory on Windows.
- The server terminates current activity.
For each thread associated with a client connection, the server breaks the connection to the client and marks the thread as killed. Threads die when they notice that they are so marked. Threads for idle connections die quickly. Threads that currently are processing statements check their state periodically and take longer to die. For additional information about thread termination, see , "
KILLSyntax", in particular for the instructions about killedREPAIR TABLEorOPTIMIZE TABLEoperations onMyISAMtables.For threads that have an open transaction, the transaction is rolled back. Note that if a thread is updating a nontransactional table, an operation such as a multiple-row
UPDATEorINSERTmay leave the table partially updated because the operation can terminate before completion.If the server is a master replication server, it treats threads associated with currently connected slaves like other client threads. That is, each one is marked as killed and exits when it next checks its state.
If the server is a slave replication server, it stops the I/O and SQL threads, if they are active, before marking client threads as killed. The SQL thread is permitted to finish its current statement (to avoid causing replication problems), and then stops. If the SQL thread was in the middle of a transaction at this point, the transaction is rolled back. Since non-transactional statements cannot be rolled back, in order to guarantee crash-safe replication, only transactional tables should be used.
See also , "Replication Relay and Status Logs").
- The server shuts down or closes storage engines.
At this stage, the server flushes the table cache and closes all open tables.
Each storage engine performs any actions necessary for tables that it manages.
InnoDBflushes its buffer pool to disk (unlessinnodb_fast_shutdownis 2), writes the current LSN to the tablespace, and terminates its own internal threads.MyISAMflushes any pending index writes for a table. - The server exits.
MySQL Server Logs
- Selecting General Query and Slow Query Log Output Destinations
- The Error Log
- The General Query Log
- The Binary Log
- The Slow Query Log
- Server Log Maintenance
- The Error Log
MySQL Server has several logs that can help you find out what activity is taking place.
| Log Type | Information Written to Log |
|---|---|
| Error log | Problems encountered starting, running, or stopping mysqld |
| General query log | Established client connections and statements received from clients |
| Binary log | Statements that change data (also used for replication) |
| Relay log | Data changes received from a replication master server |
| Slow query log | Queries that took more than long_query_time seconds to execute |
By default, no logs are enabled. The following log-specific sections provide information about the server options that enable logging.
By default, the server writes files for all enabled logs in the data directory. You can force the server to close and reopen the log files (or in some cases switch to a new log file) by flushing the logs. Log flushing occurs when you issue a FLUSH LOGS statement; execute mysqladmin with a flush-logs or refresh argument; or execute mysqldump with a --flush-logs or --master-data option. See , "FLUSH Syntax", , "mysqladmin - Client for Administering a MariaDB Server", and , "mysqldump - A Database Backup Program". In addition, the binary log is flushed when its size reaches the value of the max_binlog_size system variable.
You can control the general query and slow query logs during runtime. You can enable or disable logging, or change the log file name. You can tell the server to write general query and slow query entries to log tables, log files, or both. For details, see , "Selecting General Query and Slow Query Log Output Destinations", , "The General Query Log", and , "The Slow Query Log".
The relay log is used only on slave replication servers, to hold data changes from the master server that must also be made on the slave. For discussion of relay log contents and configuration, see , "The Slave Relay Log".
For information about log maintenance operations such as expiration of old log files, see , "Server Log Maintenance".
For information about keeping logs secure, see , "Administrator Guidelines for Password Security".
Selecting General Query and Slow Query Log Output Destinations
MySQL Server provides flexible control over the destination of output to the general query log and the slow query log, if those logs are enabled. Possible destinations for log entries are log files or the general_log and slow_log tables in the MariaDB database. Either or both destinations can be selected.
Currently, logging to tables incurs significantly more server overhead than logging to files. If you enable the general log or slow query log and require highest performance, you should use file logging, not table logging.
Log control at server startup. The --log-output option specifies the destination for log output. This option does not in itself enable the logs. Its syntax is --log-output[=:
value,...]
- If
--log-outputis given with a value, the value should be a comma-separated list of one or more of the wordsTABLE(log to tables),FILE(log to files), orNONE(do not log to tables or files).NONE, if present, takes precedence over any other specifiers. - If
--log-outputis omitted or given without a value, the default logging destination isFILE.
The general_log system variable controls logging to the general query log for the selected log destinations. If specified at server startup, general_log takes an optional argument of 1 or 0 to enable or disable the log. To specify a file name other than the default for file logging, set the general_log_file variable. Similarly, the slow_query_log variable controls logging to the slow query log for the selected destinations and setting slow_query_log_file specifies a file name for file logging. If either log is enabled, the server opens the corresponding log file and writes startup messages to it. However, further logging of queries to the file does not occur unless the FILE log destination is selected.
Examples:
- To write general query log entries to the log table and the log file, use
--log-output=TABLE,FILEto select both log destinations and--general_logto enable the general query log. - To write general and slow query log entries only to the log tables, use
--log-output=TABLEto select tables as the log destination and--general_logand--slow_query_logto enable both logs. - To write slow query log entries only to the log file, use
--log-output=FILEto select files as the log destination and--slow_query_logto enable the slow query log. (In this case, because the default log destination isFILE, you could omit the--log-outputoption.)
Log control at runtime. The system variables associated with log tables and files enable runtime control over logging:
- The global
log_outputsystem variable indicates the current logging destination. It can be modified at runtime to change the destination. - The global
general-logandslow_query_logvariables indicate whether the general query log and slow query log are enabled (ON) or disabled (OFF). You can set these variables at runtime to control whether the logs are enabled. - The global
general-log-fileandslow_query_log_filevariables indicate the names of the general query log and slow query log files. You can set these variables at server startup or at runtime to change the names of the log files. - To disable or enable general query logging for the current connection, set the session
sql_log_offvariable toONorOFF.
The use of tables for log output offers the following benefits:
- Log entries have a standard format. To display the current structure of the log tables, use these statements:
SHOW CREATE TABLE mysql.general_log;
SHOW CREATE TABLE mysql.slow_log;
- Log contents are accessible through SQL statements. This enables the use of queries that select only those log entries that satisfy specific criteria. For example, to select log contents associated with a particular client (which can be useful for identifying problematic queries from that client), it is easier to do this using a log table than a log file.
- Logs are accessible remotely through any client that can connect to the server and issue queries (if the client has the appropriate log table privileges). It is not necessary to log in to the server host and directly access the file system.
The log table implementation has the following characteristics:
- In general, the primary purpose of log tables is to provide an interface for users to observe the runtime execution of the server, not to interfere with its runtime execution.
CREATE TABLE,ALTER TABLE, andDROP TABLEare valid operations on a log table. ForALTER TABLEandDROP TABLE, the log table cannot be in use and must be disabled, as described later.- By default, the log tables use the
CSVstorage engine that writes data in comma-separated values format. For users who have access to the.CSVfiles that contain log table data, the files are easy to import into other programs such as spreadsheets that can process CSV input.
The log tables can be altered to use the
MyISAMstorage engine. You cannot useALTER TABLEto alter a log table that is in use. The log must be disabled first. No engines other thanCSVorMyISAMare legal for the log tables. - To disable logging so that you can alter (or drop) a log table, you can use the following strategy. The example uses the general query log; the procedure for the slow query log is similar but uses the
slow_logtable andslow_query_logsystem variable.
SET @old_log_state = @@global.general_log;
SET GLOBAL general_log = 'OFF';
ALTER TABLE mysql.general_log ENGINE = MyISAM;
SET GLOBAL general_log = @old_log_state;
TRUNCATE TABLEis a valid operation on a log table. It can be used to expire log entries.RENAME TABLEis a valid operation on a log table. You can atomically rename a log table (to perform log rotation, for example) using the following strategy:
USE mysql;
DROP TABLE IF EXISTS general_log2;
CREATE TABLE general_log2 LIKE general_log;
RENAME TABLE general_log TO general_log_backup, general_log2 TO general_log;
CHECK TABLEis a valid operation on a log table.LOCK TABLEScannot be used on a log table.INSERT,DELETE, andUPDATEcannot be used on a log table. These operations are permitted only internally to the server itself.FLUSH TABLES WITH READ LOCKand the state of the globalread_onlysystem variable have no effect on log tables. The server can always write to the log tables.- Entries written to the log tables are not written to the binary log and thus are not replicated to slave servers.
- To flush the log tables or log files, use
FLUSH TABLESorFLUSH LOGS, respectively. - Partitioning of log tables is not permitted.
The Error Log
The error log contains information indicating when mysqld was started and stopped and also any critical errors that occur while the server is running. If mysqld notices a table that needs to be automatically checked or repaired, it writes a message to the error log.
On some operating systems, the error log contains a stack trace if mysqld dies. The trace can be used to determine where mysqld died. See MySQL Internals: Porting.
You can specify where mysqld writes the error log with the --log-error[= option. If the option is given with no file_name]file_name value, mysqld uses the name host_name.err
If you do not specify --log-error, or (on Windows) if you use the --console option, errors are written to stderr, the standard error output. Usually this is your terminal.
On Windows, error output is always written to the error log if --console is not given.
In addition, on Windows, events and error messages are written to the Windows Event Log within the Application log. Entries marked as Warning and Note are written to the Event Log, but informational messages (such as information statements from individual storage engines) are not copied to the Event Log. The log entries have a source of MySQL. You cannot disable writing information to the Windows Event Log.
If you flush the logs using FLUSH LOGS or mysqladmin flush-logs and mysqld is writing the error log to a file (for example, if it was started with the --log-error option), the server closes and reopens the log file. To rename the file, you can do so manually before flushing. Then flushing the logs reopens a new file with the original file name. For example, you can rename the file and create a new one using the following commands:
shell>mvshell>host_name.errhost_name.err-oldmysqladmin flush-logsshell>mvhost_name.err-oldbackup-directory
On Windows, use rename rather than mv.
No error log renaming occurs when the logs are flushed if the server is not writing to a named file.
If you use mysqld-safe to start mysqld, mysqld_safe arranges for mysqld to write error messages to a log file or to syslog mysqld_safe has three error-logging options, --syslog, --skip-syslog, and --log-error. The default with no logging options or with --skip-syslog is to use the default log file. To explicitly specify use of an error log file, specify --log-error= to mysqld_safe, and mysqld_safe will arrange for mysqld to write messages to a log file. To use file_namesyslog instead, specify the --syslog option.
If you specify --log-error in an option file in a [mysqld], [server], or [mysqld_safe] section, mysqld_safe will find and use the option.
If mysqld-safe is used to start mysqld and mysqld dies unexpectedly, mysqld_safe notices that it needs to restart mysqld and writes a restarted mysqld message to the error log.
The --log-warnings option or log_warnings system variable can be used to control warning logging to the error log. The default value is enabled (1). Warning logging can be disabled using a value of 0. If the value is greater than 1, aborted connections are written to the error log, and access-denied errors for new connection attempts are written. See "Communication Errors and Aborted Connections".
The General Query Log
The general query log is a general record of what mysqld is doing. The server writes information to this log when clients connect or disconnect, and it logs each SQL statement received from clients. The general query log can be very useful when you suspect an error in a client and want to know exactly what the client sent to mysqld.
mysqld writes statements to the query log in the order that it receives them, which might differ from the order in which they are executed. This logging order contrasts to the binary log, for which statements are written after they are executed but before any locks are released. (Also, the query log contains all statements, whereas the binary log does not contain statements that only select data.)
By default, the general query log is disabled. To specify the initial general query log state explicitly, use --general_log[={0|1}]. With no argument or an argument of 1, --general_log enables the log. With an argument of 0, this option disables the log. To specify a log file name, use --general_log_file=. To specify the log destination, use file_name--log-output (as described in , "Selecting General Query and Slow Query Log Output Destinations").
If you specify no name for the general query log file, the default name is host_name.log
To disable or enable the general query log or change the log file name at runtime, use the global general_log and general_log_file system variables. Set general_log to 0 (or OFF) to disable the log or to 1 (or ON) to enable it. Set general_log_file to specify the name of the log file. If a log file already is open, it is closed and the new file is opened.
When the general query log is enabled, the server writes output to any destinations specified by the --log-output option or log_output system variable. If you enable the log, the server opens the log file and writes startup messages to it. However, further logging of queries to the file does not occur unless the FILE log destination is selected. If the destination is NONE, the server writes no queries even if the general log is enabled. Setting the log file name has no effect on logging if the log destination value does not contain FILE.
Server restarts and log flushing do not cause a new general query log file to be generated (although flushing closes and reopens it). You can rename the file and create a new one by using the following commands:
shell>mvshell>host_name.loghost_name-old.logmysqladmin flush-logsshell>mvhost_name-old.logbackup-directory
On Windows, use rename rather than mv.
You can also rename the general query log file at runtime by disabling the log:
SET GLOBAL general_log = 'OFF';
With the log disabled, rename the log file externally; for example, from the command line. Then enable the log again:
SET GLOBAL general_log = 'ON';
This method works on any platform and does not require a server restart.
The session sql_log_off variable can be set to ON or OFF to disable or enable general query logging for the current connection.
As of MariaDB 5.6.3, passwords in statements written to the general query log are rewritten by the server not to occur literally in plain text. Password rewriting can be suppressed for the general query log by starting the server with the --log-raw option. This option may be useful for diagnostic purposes, to see the exact text of statements as received by the server, but for security reasons is not recommended for production use.
Before MariaDB 5.6.3, passwords in statements are not rewritten and the general query log should be protected. See , "Administrator Guidelines for Password Security".
The Binary Log
- Binary Logging Formats
- Setting The Binary Log Format
- Mixed Binary Logging Format
- Logging Format for Changes to
MariaDBDatabase Tables - Setting The Binary Log Format
The binary log contains "events" that describe database changes such as table creation operations or changes to table data. It also contains events for statements that potentially could have made changes (for example, a DELETE which matched no rows), unless row-based logging is used. The binary log also contains information about how long each statement took that updated data. The binary log has two important purposes:
- For replication, the binary log is used on master replication servers as a record of the statements to be sent to slave servers. The master server sends the events contained in its binary log to its slaves, which execute those events to make the same data changes that were made on the master. See , "Replication Implementation".
- Certain data recovery operations require use of the binary log. After a backup has been restored, the events in the binary log that were recorded after the backup was made are re-executed. These events bring databases up to date from the point of the backup. See , "Point-in-Time (Incremental) Recovery Using the Binary Log".
Running a server with binary logging enabled makes performance slightly slower. However, the benefits of the binary log in enabling you to set up replication and for restore operations generally outweigh this minor performance decrement.
Beginning with MariaDB 5.6.2, the binary log is crash-safe. Only complete events or transactions are logged or read back.
By default, the server logs the length of the event as well as the event itself and uses this to verify that the event was written correctly. You can also cause the server to write checksums for the events by setting the binlog_checksum system variable. When reading back from the binary log, the master uses the event length by default, but can be made to use checksums if available by enabling the master_verify_checksum system variable. The slave I/O thread also verifies events received from the master. You can cause the slave SQL thread to use checksums if available when reading from the relay log by enabling the slave_sql_verify_checksum system variable.
For information about server options and variables affecting the operation of binary logging, see , "Binary Log Options and Variables".
The binary log is not used for statements such as SELECT or SHOW that do not modify data. If you want to log all statements (for example, to identify a problem query), use the general query log. See , "The General Query Log".
As of MariaDB 5.6.3, passwords in statements written to the binary log are rewritten by the server not to occur literally in plain text. Before MariaDB 5.6.3, passwords in statements are not rewritten and the binary log should be protected. See , "Administrator Guidelines for Password Security".
The format of the events recorded in the binary log is dependent on the binary logging format. Three format types are supported, row-based logging, statement-based logging and mixed-base logging. The binary logging format used depends on the MariaDB version. For more information on logging formats, see , "Binary Logging Formats".
For information about the format of the binary log itself, see http://forge.mysql.com/wiki/MySQL_Internals_Binary_Log.
To enable the binary log, start the server with the --log-bin[= option. If no base_name]base_name value is given, the default name is the value of the pid-file option (which by default is the name of host machine) followed by -bin. If the basename is given, the server writes the file in the data directory unless the basename is given with a leading absolute path name to specify a different directory. It is recommended that you specify a basename; see "Known Issues in MySQL", for the reason.
If you supply an extension in the log name (for example, --log-bin=), the extension is silently removed and ignored.
base_name.extension
mysqld appends a numeric extension to the binary log basename to generate binary log file names. The number increases each time the server creates a new log file, thus creating an ordered series of files. The server creates a new file in the series each time it starts or flushes the logs. The server also creates a new binary log file automatically after the current log's size reaches max-binlog-size. A binary log file may become larger than max_binlog_size if you are using large transactions because a transaction is written to the file in one piece, never split between files.
To keep track of which binary log files have been used, mysqld also creates a binary log index file that contains the names of all used binary log files. By default, this has the same basename as the binary log file, with the extension '.index'. You can change the name of the binary log index file with the --log-bin-index[= option. You should not manually edit this file while mysqld is running; doing so would confuse mysqld.
file_name]
The term "binary log file" generally denotes an individual numbered file containing database events. The term "binary log" collectively denotes the set of numbered binary log files plus the index file.
The server evaluates the --binlog-do-db and --binlog-ignore-db options in the same way as it does the --replicate-do-db and --replicate-ignore-db options. For information about how this is done, see , "Evaluation of Database-Level Replication and Binary Logging Options".
A replication slave server by default does not write to its own binary log any data modifications that are received from the replication master. To log these modifications, start the slave with the --log-slave-updates option in addition to the --log-bin option (see , "Replication Slave Options and Variables"). This is done when a slave is also to act as a master to other slaves in chained replication.
You can delete all binary log files with the RESET MASTER statement, or a subset of them with PURGE BINARY LOGS. See , "RESET Syntax", and , "PURGE BINARY LOGS Syntax".
If you are using replication, you should not delete old binary log files on the master until you are sure that no slave still needs to use them. For example, if your slaves never run more than three days behind, once a day you can execute mysqladmin flush-logs on the master and then remove any logs that are more than three days old. You can remove the files manually, but it is preferable to use PURGE BINARY LOGS, which also safely updates the binary log index file for you (and which can take a date argument). See , "PURGE BINARY LOGS Syntax".
A client that has the SUPER privilege can disable binary logging of its own statements by using a SET sql_log_bin=0 statement. See , "Server System Variables".
You can display the contents of binary log files with the mysqlbinlog utility. This can be useful when you want to reprocess statements in the log for a recovery operation. For example, you can update a MariaDB server from the binary log as follows:
shell> mysqlbinlog log_file | mysql -h server_name
mysqlbinlog also can be used to display replication slave relay log file contents because they are written using the same format as binary log files. For more information on the mysqlbinlog utility and how to use it, see , "mysqlbinlog - Utility for Processing Binary Log Files". For more information about the binary log and recovery operations, see , "Point-in-Time (Incremental) Recovery Using the Binary Log".
Binary logging is done immediately after a statement completes but before any locks are released or any commit is done. This ensures that the log is logged in execution order.
Updates to nontransactional tables are stored in the binary log immediately after execution.
Within an uncommitted transaction, all updates (UPDATE, DELETE, or INSERT) that change transactional tables such as InnoDB tables are cached until a COMMIT statement is received by the server. At that point, mysqld writes the entire transaction to the binary log before the COMMIT is executed.
Modifications to nontransactional tables cannot be rolled back. If a transaction that is rolled back includes modifications to nontransactional tables, the entire transaction is logged with a ROLLBACK statement at the end to ensure that the modifications to those tables are replicated.
When a thread that handles the transaction starts, it allocates a buffer of binlog_cache_size to buffer statements. If a statement is bigger than this, the thread opens a temporary file to store the transaction. The temporary file is deleted when the thread ends.
The Binlog_cache_use status variable shows the number of transactions that used this buffer (and possibly a temporary file) for storing statements. The Binlog_cache_disk_use status variable shows how many of those transactions actually had to use a temporary file. These two variables can be used for tuning binlog_cache_size to a large enough value that avoids the use of temporary files.
The max_binlog_cache_size system variable (default 4GB, which is also the maximum) can be used to restrict the total size used to cache a multiple-statement transaction. If a transaction is larger than this many bytes, it fails and rolls back. The minimum value is 4096.
If you are using the binary log and row based logging, concurrent inserts are converted to normal inserts for CREATE ... SELECT or INSERT ... SELECT statements. This is done to ensure that you can re-create an exact copy of your tables by applying the log during a backup operation. If you are using statement-based logging, the original statement is written to the log.
The binary log format has some known limitations that can affect recovery from backups. See , "Replication Features and Issues".
Binary logging for stored programs is done as described in , "Binary Logging of Stored Programs".
Note that the binary log format differs in MariaDB 5.6 from previous versions of MySQL, due to enhancements in replication. See , "Replication Compatibility Between MariaDB Versions".
Writes to the binary log file and binary log index file are handled in the same way as writes to MyISAM tables. See "How MariaDB Handles a Full Disk".
By default, the binary log is not synchronized to disk at each write. So if the operating system or machine (not only the MariaDB server) crashes, there is a chance that the last statements of the binary log are lost. To prevent this, you can make the binary log be synchronized to disk after every N writes to the binary log, with the sync_binlog system variable. See , "Server System Variables". 1 is the safest value for sync_binlog, but also the slowest. Even with sync_binlog set to 1, there is still the chance of an inconsistency between the table content and binary log content in case of a crash. For example, if you are using InnoDB tables and the MariaDB server processes a COMMIT statement, it writes the whole transaction to the binary log and then commits this transaction into InnoDB. If the server crashes between those two operations, the transaction is rolled back by InnoDB at restart but still exists in the binary log. To resolve this, you should set --innodb_support_xa to 1. Although this option is related to the support of XA transactions in InnoDB, it also ensures that the binary log and InnoDB data files are synchronized.
For this option to provide a greater degree of safety, the MariaDB server should also be configured to synchronize the binary log and the InnoDB logs to disk at every transaction. The InnoDB logs are synchronized by default, and sync_binlog=1 can be used to synchronize the binary log. The effect of this option is that at restart after a crash, after doing a rollback of transactions, the MariaDB server cuts rolled back InnoDB transactions from the binary log. This ensures that the binary log reflects the exact data of InnoDB tables, and so, that the slave remains in synchrony with the master (not receiving a statement which has been rolled back).
If the MariaDB server discovers at crash recovery that the binary log is shorter than it should have been, it lacks at least one successfully committed InnoDB transaction. This should not happen if sync_binlog=1 and the disk/file system do an actual sync when they are requested to (some do not), so the server prints an error message The binary log . In this case, this binary log is not correct and replication should be restarted from a fresh snapshot of the master's data.
file_name is shorter than its expected size
The session values of the following system variables are written to the binary log and honored by the replication slave when parsing the binary log:
sql-mode(except that theNO_DIR_IN_CREATEmode is not replicated; see , "Replication and Variables")foreign_key_checksunique_checkscharacter_set_clientcollation_connectioncollation_databasecollation_serversql_auto_is_null
Binary Logging Formats
The server uses several logging formats to record information in the binary log. The exact format employed depends on the version of MariaDB being used. There are three logging formats:
- Replication capabilities in MariaDB originally were based on propagation of SQL statements from master to slave. This is called statement-based logging. You can cause this format to be used by starting the server with
--binlog-format=STATEMENT. - In row-based logging, the master writes events to the binary log that indicate how individual table rows are affected. You can cause the server to use row-based logging by starting it with
--binlog-format=ROW. - A third option is also available: mixed logging. With mixed logging, statement-based logging is used by default, but the logging mode switches automatically to row-based in certain cases as described below. You can cause MariaDB to use mixed logging explicitly by starting mysqld with the option
--binlog-format=MIXED.
In MariaDB 5.6, the default binary logging format is STATEMENT.
The logging format can also be set or limited by the storage engine being used. This helps to eliminate issues when replicating certain statements between a master and slave which are using different storage engines.
With statement-based replication, there may be issues with replicating nondeterministic statements. In deciding whether or not a given statement is safe for statement-based replication, MariaDB determines whether it can guarantee that the statement can be replicated using statement-based logging. If MariaDB cannot make this guarantee, it marks the statement as potentially unreliable and issues the warning, Statement may not be safe to log in statement format.
You can avoid these issues by using MySQL's row-based replication instead.
Setting The Binary Log Format
You can select the binary logging format explicitly by starting the MariaDB server with --binlog-format=. The supported values for typetype are:
STATEMENTcauses logging to be statement based.ROWcauses logging to be row based.MIXEDcauses logging to use mixed format.
In MariaDB 5.6, the default binary logging format is STATEMENT.
The logging format also can be switched at runtime. To specify the format globally for all clients, set the global value of the binlog_format system variable:
mysql>SET GLOBAL binlog_format = 'STATEMENT';mysql>SET GLOBAL binlog_format = 'ROW';mysql>SET GLOBAL binlog_format = 'MIXED';
An individual client can control the logging format for its own statements by setting the session value of binlog_format:
mysql>NoteSET SESSION binlog_format = 'STATEMENT';mysql>SET SESSION binlog_format = 'ROW';mysql>SET SESSION binlog_format = 'MIXED';
Each MariaDB Server can set its own and only its own binary logging format (true whether binlog_format is set with global or session scope). This means that changing the logging format on a replication master does not cause a slave to change its logging format to match. (When using STATEMENT mode, the binlog_format system variable is not replicated; when using MIXED or ROW logging mode, it is replicated but is ignored by the slave.) Changing the binary logging format on the master while replication is ongoing, or without also changing it on the slave can thus cause unexpected results, or even cause replication to fail altogether.
To change the global or session binlog-format value, you must have the SUPER privilege.
In addition to switching the logging format manually, a slave server may switch the format automatically. This happens when the server is running in either STATEMENT or MIXED format and encounters an event in the binary log that is written in ROW logging format. In that case, the slave switches to row-based replication temporarily for that event, and switches back to the previous format afterward.
There are several reasons why a client might want to set binary logging on a per-session basis:
- A session that makes many small changes to the database might want to use row-based logging.
- A session that performs updates that match many rows in the
WHEREclause might want to use statement-based logging because it will be more efficient to log a few statements than many rows. - Some statements require a lot of execution time on the master, but result in just a few rows being modified. It might therefore be beneficial to replicate them using row-based logging.
There are exceptions when you cannot switch the replication format at runtime:
- From within a stored function or a trigger
- If the
NDBCLUSTERstorage engine is enabled - If the session is currently in row-based replication mode and has open temporary tables
Trying to switch the format in any of these cases results in an error.
Switching the replication format at runtime is not recommended when any temporary tables exist, because temporary tables are logged only when using statement-based replication, whereas with row-based replication they are not logged. With mixed replication, temporary tables are usually logged; exceptions happen with user-defined functions (UDFs) and with the UUID() function.
With the binary log format set to ROW, many changes are written to the binary log using the row-based format. Some changes, however, still use the statement-based format. Examples include all DDL (data definition language) statements such as CREATE TABLE, ALTER TABLE, or DROP TABLE.
The --binlog-row-event-max-size option is available for servers that are capable of row-based replication. Rows are stored into the binary log in chunks having a size in bytes not exceeding the value of this option. The value must be a multiple of 256. The default value is 1024.Warning
When using statement-based logging for replication, it is possible for the data on the master and slave to become different if a statement is designed in such a way that the data modification is nondeterministic; that is, it is left to the will of the query optimizer. In general, this is not a good practice even outside of replication. For a detailed explanation of this issue, see "Known Issues in MySQL".
For information about logs kept by replication slaves, see , "Replication Relay and Status Logs".
Mixed Binary Logging Format
When running in MIXED logging format, the server automatically switches from statement-based to row-based logging under the following conditions:
- When a function contains
UUID(). - When one or more tables with
AUTO_INCREMENTcolumns are updated and a trigger or stored function is invoked. Like all other unsafe statements, this generates a warning ifbinlog_format = STATEMENT.
For more information, see , "Replication and
AUTO_INCREMENT". - When the body of a view requires row-based replication, the statement creating the view also uses it. For example, this occurs when the statement creating a view uses the
UUID()function. - When a call to a UDF is involved.
- When any
INSERT DELAYEDis executed for a nontransactional table. - If a statement is logged by row and the session that executed the statement has any temporary tables, logging by row is used for all subsequent statements (except for those accessing temporary tables) until all temporary tables in use by that session are dropped.
This is true whether or not any temporary tables are actually logged.
Temporary tables cannot be logged using row-based format; thus, once row-based logging is used, all subsequent statements using that table are unsafe. The server approximates this condition by treating all statements executed during the session as unsafe until the session no longer holds any temporary tables.
- When
FOUND-ROWS()orROW_COUNT()is used. (Bug #12092, Bug #30244) - When
USER(),CURRENT-USER(), orCURRENT_USERis used. (Bug #28086) - When a statement refers to one or more system variables. (Bug #31168)
Exception. The following system variables, when used with session scope (only), do not cause the logging format to switch:
auto_increment_incrementauto_increment_offsetcharacter_set_clientcharacter_set_connectioncharacter_set_databasecharacter_set_servercollation_connectioncollation_databasecollation_serverforeign_key_checksidentitylast_insert_idlc_time_namespseudo_thread_idsql_auto_is_nulltime_zonetimestampunique_checks
For information about determining system variable scope, see , "Using System Variables".
For information about how replication treats
sql-mode, see , "Replication and Variables". - When one of the tables involved is a log table in the
MariaDBdatabase. - When the
LOAD_FILE()function is used. (Bug #39701)
A warning is generated if you try to execute a statement using statement-based logging that should be written using row-based logging. The warning is shown both in the client (in the output of SHOW WARNINGS) and through the mysqld error log. A warning is added to the SHOW WARNINGS table each time such a statement is executed. However, only the first statement that generated the warning for each client session is written to the error log to prevent flooding the log.
In addition to the decisions above, individual engines can also determine the logging format used when information in a table is updated. The logging capabilities of an individual engine can be defined as follows:
- If an engine supports row-based logging, the engine is said to be row-logging capable.
- If an engine supports statement-based logging, the engine is said to be statement-logging capable.
A given storage engine can support either or both logging formats. The following table lists the formats supported by each engine.
| Storage Engine | Row Logging Supported | Statement Logging Supported |
|---|---|---|
ARCHIVE
| Yes | Yes |
BLACKHOLE
| Yes | Yes |
CSV
| Yes | Yes |
EXAMPLE
| Yes | No |
FEDERATED
| Yes | Yes |
HEAP
| Yes | Yes |
InnoDB
| Yes | Yes when the transaction isolation level is REPEATABLE READ or SERIALIZABLE; No otherwise.
|
MyISAM
| Yes | Yes |
MERGE
| Yes | Yes |
NDBCLUSTER
| Yes | No |
In MariaDB 5.6, whether a statement is to be logged and the logging mode to be used is determined according to the type of statement (safe, unsafe, or binary injected), the binary logging format (STATEMENT, ROW, or MIXED), and the logging capabilities of the storage engine (statement capable, row capable, both, or neither). Statements may be logged with or without a warning; failed statements are not logged, but generate errors in the log. This is shown in the following decision table, where SLC stands for "statement-logging capable" and RLC stands for "row-logging capable".
| Condition | Action | ||||
|---|---|---|---|---|---|
| Type | binlog_format
| SLC | RLC | Error / Warning | Logged as |
| * | *
| No | No | Error: Cannot execute statement: Binary logging is impossible since at least one engine is involved that is both row-incapable and statement-incapable. | -
|
| Safe | STATEMENT
| Yes | No | - | STATEMENT
|
| Safe | MIXED
| Yes | No | - | STATEMENT
|
| Safe | ROW
| Yes | No | Error: Cannot execute statement: Binary logging is impossible since BINLOG_FORMAT = ROW and at least one table uses a storage engine that is not capable of row-based logging.
| -
|
| Unsafe | STATEMENT
| Yes | No | Warning: Unsafe statement binlogged in statement format, since BINLOG_FORMAT = STATEMENT
| STATEMENT
|
| Unsafe | MIXED
| Yes | No | Error: Cannot execute statement: Binary logging of an unsafe statement is impossible when the storage engine is limited to statement-based logging, even if BINLOG_FORMAT = MIXED.
| -
|
| Unsafe | ROW
| Yes | No | Error: Cannot execute statement: Binary logging is impossible since BINLOG_FORMAT = ROW and at least one table uses a storage engine that is not capable of row-based logging.
| - |
| Row Injection | STATEMENT
| Yes | No | Error: Cannot execute row injection: Binary logging is not possible since at least one table uses a storage engine that is not capable of row-based logging. | - |
| Row Injection | MIXED
| Yes | No | Error: Cannot execute row injection: Binary logging is not possible since at least one table uses a storage engine that is not capable of row-based logging. | - |
| Row Injection | ROW
| Yes | No | Error: Cannot execute row injection: Binary logging is not possible since at least one table uses a storage engine that is not capable of row-based logging. | - |
| Safe | STATEMENT
| No | Yes | Error: Cannot execute statement: Binary logging is impossible since BINLOG_FORMAT = STATEMENT and at least one table uses a storage engine that is not capable of statement-based logging.
| -
|
| Safe | MIXED
| No | Yes | - | ROW
|
| Safe | ROW
| No | Yes | - | ROW
|
| Unsafe | STATEMENT
| No | Yes | Error: Cannot execute statement: Binary logging is impossible since BINLOG_FORMAT = STATEMENT and at least one table uses a storage engine that is not capable of statement-based logging.
| - |
| Unsafe | MIXED
| No | Yes | - | ROW
|
| Unsafe | ROW
| No | Yes | - | ROW
|
| Row Injection | STATEMENT
| No | Yes | Error: Cannot execute row injection: Binary logging is not possible since BINLOG_FORMAT = STATEMENT.
| -
|
| Row Injection | MIXED
| No | Yes | - | ROW
|
| Row Injection | ROW
| No | Yes | - | ROW
|
| Safe | STATEMENT
| Yes | Yes | - | STATEMENT
|
| Safe | MIXED
| Yes | Yes | - | ROW
|
| Safe | ROW
| Yes | Yes | - | ROW
|
| Unsafe | STATEMENT
| Yes | Yes | Warning: Unsafe statement binlogged in statement format since BINLOG_FORMAT = STATEMENT.
| STATEMENT
|
| Unsafe | MIXED
| Yes | Yes | - | ROW
|
| Unsafe | ROW
| Yes | Yes | - | ROW
|
| Row Injection | STATEMENT
| Yes | Yes | Error: Cannot execute row injection: Binary logging is not possible because BINLOG_FORMAT = STATEMENT.
| - |
| Row Injection | MIXED
| Yes | Yes | - | ROW
|
| Row Injection | ROW
| Yes | Yes | - | ROW |
When a warning is produced by the determination, a standard MariaDB warning is produced (and is available using SHOW WARNINGS). The information is also written to the mysqld error log. Only one error for each error instance per client connection is logged to prevent flooding the log. The log message includes the SQL statement that was attempted.
If a slave server was started with --log-warnings enabled, the slave prints messages to the error log to provide information about its status, such as the binary log and relay log coordinates where it starts its job, when it is switching to another relay log, when it reconnects after a disconnect, and so forth.
Logging Format for Changes to MariaDB Database Tables
The contents of the grant tables in the MariaDB database can be modified directly (for example, with INSERT or DELETE) or indirectly (for example, with GRANT or CREATE USER). Statements that affect MariaDB database tables are written to the binary log using the following rules:
- Data manipulation statements that change data in
MariaDBdatabase tables directly are logged according to the setting of thebinlog_formatsystem variable. This pertains to statements such asINSERT,UPDATE,DELETE,REPLACE,DO,LOAD DATA INFILE,SELECT, andTRUNCATE TABLE. - Statements that change the
MariaDBdatabase indirectly are logged as statements regardless of the value ofbinlog_format. This pertains to statements such asGRANT,REVOKE,SET PASSWORD,RENAME USER,CREATE(all forms exceptCREATE TABLE ... SELECT),ALTER(all forms), andDROP(all forms).
CREATE TABLE ... SELECT is a combination of data definition and data manipulation. The CREATE TABLE part is logged using statement format and the SELECT part is logged according to the value of binlog_format.
The Slow Query Log
The slow query log consists of SQL statements that took more than long_query_time seconds to execute and required at least min_examined_row_limit rows to be examined. The minimum and default values of long_query_time are 0 and 10, respectively. The value can be specified to a resolution of microseconds. For logging to a file, times are written including the microseconds part. For logging to tables, only integer times are written; the microseconds part is ignored.
The time to acquire the initial table locks is not counted as execution time. mysqld writes a statement to the slow query log after it has been executed and after all locks have been released, so log order might differ from execution order.
By default, the slow query log is disabled. To specify the initial slow query log state explicitly, use --slow_query_log[={0|1}]. With no argument or an argument of 1, --slow_query_log enables the log. With an argument of 0, this option disables the log. To specify a log file name, use --slow_query_log_file=. To specify the log destination, use file_name--log-output (as described in , "Selecting General Query and Slow Query Log Output Destinations").
If you specify no name for the slow query log file, the default name is host_name-slow.log
To disable or enable the slow query log or change the log file name at runtime, use the global slow_query_log and slow_query_log_file system variables. Set slow_query_log to 0 (or OFF) to disable the log or to 1 (or ON) to enable it. Set slow_query_log_file to specify the name of the log file. If a log file already is open, it is closed and the new file is opened.
When the slow query log is enabled, the server writes output to any destinations specified by the --log-output option or log_output system variable. If you enable the log, the server opens the log file and writes startup messages to it. However, further logging of queries to the file does not occur unless the FILE log destination is selected. If the destination is NONE, the server writes no queries even if the slow query log is enabled. Setting the log file name has no effect on logging if the log destination value does not contain FILE.
The server writes less information to the slow query log (and binary log) if you use the --log-short-format option.
To include slow administrative statements such as OPTIMIZE TABLE, ANALYZE TABLE, and ALTER TABLE in the statements written to the slow query log, enable the log_slow_admin_statements system variable.
To include queries that do not use indexes for row lookups in the statements written to the slow query log, enable the log_queries_not_using_indexes system variable. When such queries are logged, the slow query log may grow quickly. It is possible to put a rate limit on these queries by setting the log_throttle_queries_not_using_indexes system variable. By default, this variable is 0, which means there is no limit. Positive values impose a per-minute limit on logging of queries that do not use indexes. The first such query opens a 60-second window within which the server logs queries up to the given limit, then suppresses additional queries. If there are suppressed queries when the window ends, the server logs a summary that indicates how many there were and the aggregate time spent in them. The next 60-second window begins when the server logs the next query that does not use indexes.
The server uses the controlling parameters in the following order to determine whether to write a query to the slow query log:
- The query must either not be an administrative statement, or
log_slow_admin_statementsmust be enabled. - The query must have taken at least
long-query-timeseconds, orlog_queries_not_using_indexesmust be enabled and the query used no indexes for row lookups. - The query must have examined at least
min_examined_row_limitrows. - The query must not be suppressed according to the
log_throttle_queries_not_using_indexessetting.
The server does not write queries handled by the query cache to the slow query log, nor queries that would not benefit from the presence of an index because the table has zero rows or one row.
By default, a replication slave does not write replicated queries to the slow query log. To change this, enable the log_slow_slave_statements system variable.
As of MariaDB 5.6.3, passwords in statements written to the slow query log are rewritten by the server not to occur literally in plain text. Before MariaDB 5.6.3, passwords in statements are not rewritten and the slow query log should be protected. See , "Administrator Guidelines for Password Security".
The slow query log can be used to find queries that take a long time to execute and are therefore candidates for optimization. However, examining a long slow query log can become a difficult task. To make this easier, you can process a slow query log file using the mysqldumpslow command to summarize the queries that appear in the log. See , "mysqldumpslow - Summarize Slow Query Log Files".
Server Log Maintenance
As described in , "MySQL Server Logs", MariaDB Server can create several different log files to help you see what activity is taking place. However, you must clean up these files regularly to ensure that the logs do not take up too much disk space.
When using MariaDB with logging enabled, you may want to back up and remove old log files from time to time and tell MariaDB to start logging to new files. See , "Database Backup Methods".
On a Linux (Red Hat) installation, you can use the mysql-log-rotate script for this. If you installed MariaDB from an RPM distribution, this script should have been installed automatically. Be careful with this script if you are using the binary log for replication. You should not remove binary logs until you are certain that their contents have been processed by all slaves.
On other systems, you must install a short script yourself that you start from cron (or its equivalent) for handling log files.
For the binary log, you can set the expire_logs_days system variable to expire binary log files automatically after a given number of days (see , "Server System Variables"). If you are using replication, you should set the variable no lower than the maximum number of days your slaves might lag behind the master. To remove binary logs on demand, use the PURGE BINARY LOGS statement (see , "PURGE BINARY LOGS Syntax").
You can force MariaDB to start using new log files by flushing the logs. Log flushing occurs when you issue a FLUSH LOGS statement or execute a mysqladmin flush-logs, mysqladmin refresh, mysqldump --flush-logs, or mysqldump --master-data command. See , "FLUSH Syntax", , "mysqladmin - Client for Administering a MariaDB Server", and , "mysqldump - A Database Backup Program". In addition, the binary log is flushed when its size reaches the value of the max_binlog_size system variable.
FLUSH LOGS supports optional modifiers to enable selective flushing of individual logs (for example, FLUSH BINARY LOGS).
A log-flushing operation does the following:
- If general query logging or slow query logging to a log file is enabled, the server closes and reopens the general query log file or slow query log file.
- If binary logging is enabled, the server closes the current binary log file and opens a new log file with the next sequence number.
- If the server was started with the
--log-erroroption to cause the error log to be written to a file, the server closes and reopens the log file.
The server creates a new binary log file when you flush the logs. However, it just closes and reopens the general and slow query log files. To cause new files to be created on Unix, rename the current log files before flushing them. At flush time, the server opens new log files with the original names. For example, if the general and slow query log files are named mysql.log and mysql-slow.log, you can use a series of commands like this:
shell>cdshell>mysql-data-directorymv mysql.log mysql.oldshell>mv mysql-slow.log mysql-slow.oldshell>mysqladmin flush-logs
On Windows, use rename rather than mv.
At this point, you can make a backup of mysql.old and mysql-slow.old and then remove them from disk.
A similar strategy can be used to back up the error log file, if there is one.
You can rename the general query log or slow query log at runtime by disabling the log:
SET GLOBAL general_log = 'OFF';
SET GLOBAL slow_query_log = 'OFF';
With the logs disabled, rename the log files externally; for example, from the command line. Then enable the logs again:
SET GLOBAL general_log = 'ON';
SET GLOBAL slow_query_log = 'ON';
This method works on any platform and does not require a server restart.
General Security Issues
- General Security Guidelines
- Password Security in MySQL
- Making MariaDB Secure Against Attackers
- Security-Related mysqld Options
- Security Issues with
LOAD DATA LOCAL- How to Run MariaDB as a Normal User
- Password Security in MySQL
This section describes some general security issues to be aware of and what you can do to make your MariaDB installation more secure against attack or misuse. For information specifically about the access control system that MariaDB uses for setting up user accounts and checking database access, see , "The MariaDB Access Privilege System".
For answers to some questions that are often asked about MariaDB Server security issues, see "MySQL 5.6 FAQ: Security".
General Security Guidelines
Anyone using MariaDB on a computer connected to the Internet should read this section to avoid the most common security mistakes.
In discussing security, we emphasize the necessity of fully protecting the entire server host (not just the MariaDB server) against all types of applicable attacks: eavesdropping, altering, playback, and denial of service. We do not cover all aspects of availability and fault tolerance here.
MySQL uses security based on Access Control Lists (ACLs) for all connections, queries, and other operations that users can attempt to perform. There is also support for SSL-encrypted connections between MariaDB clients and servers. Many of the concepts discussed here are not specific to MariaDB at all; the same general ideas apply to almost all applications.
When running MySQL, follow these guidelines whenever possible:
- Do not ever give anyone (except MariaDB
rootaccounts) access to theusertable in theMariaDBdatabase! This is critical. - Learn the MariaDB access privilege system. The
GRANTandREVOKEstatements are used for controlling access to MariaDB. Do not grant more privileges than necessary. Never grant privileges to all hosts.
Checklist:
- Try
mysql -u root. If you are able to connect successfully to the server without being asked for a password, anyone can connect to your MariaDB server as the MariaDBrootuser with full privileges! Review the MariaDB installation instructions, paying particular attention to the information about setting arootpassword. See , "Securing the Initial MariaDB Accounts". - Use the
SHOW GRANTSstatement to check which accounts have access to what. Then use theREVOKEstatement to remove those privileges that are not necessary.
- Try
- Do not store any plaintext passwords in your database. If your computer becomes compromised, the intruder can take the full list of passwords and use them. Instead, use
MD5(),SHA1(),SHA2(), or some other one-way hashing function and store the hash value. - Do not choose passwords from dictionaries. Special programs exist to break passwords. Even passwords like "xfish98" are very bad. Much better is "duag98" which contains the same word "fish" but typed one key to the left on a standard QWERTY keyboard. Another method is to use a password that is taken from the first characters of each word in a sentence (for example, "Mary had a little lamb" results in a password of "Mhall"). The password is easy to remember and type, but difficult to guess for someone who does not know the sentence.
- Invest in a firewall. This protects you from at least 50% of all types of exploits in any software. Put MariaDB behind the firewall or in a demilitarized zone (DMZ).
Checklist:
- Try to scan your ports from the Internet using a tool such as
nmap. MariaDB uses port 3306 by default. This port should not be accessible from untrusted hosts. Another simple way to check whether or not your MariaDB port is open is to try the following command from some remote machine, whereserver_hostis the host name or IP address of the host on which your MariaDB server runs:
shell>
telnetserver_host3306If you get a connection and some garbage characters, the port is open, and should be closed on your firewall or router, unless you really have a good reason to keep it open. If telnet hangs or the connection is refused, the port is blocked, which is how you want it to be.
- Try to scan your ports from the Internet using a tool such as
- Do not trust any data entered by users of your applications. They can try to trick your code by entering special or escaped character sequences in Web forms, URLs, or whatever application you have built. Be sure that your application remains secure if a user enters something like "
; DROP DATABASE mysql;". This is an extreme example, but large security leaks and data loss might occur as a result of hackers using similar techniques, if you do not prepare for them.
A common mistake is to protect only string data values. Remember to check numeric data as well. If an application generates a query such as
SELECT * FROM table WHERE ID=234when a user enters the value234, the user can enter the valueOR 1=1to cause the application to generate the querySELECT * FROM table WHERE ID=234 OR 1=1. As a result, the server retrieves every row in the table. This exposes every row and causes excessive server load. The simplest way to protect from this type of attack is to use single quotation marks around the numeric constants:SELECT * FROM table WHERE ID='234'. If the user enters extra information, it all becomes part of the string. In a numeric context, MariaDB automatically converts this string to a number and strips any trailing nonnumeric characters from it.Sometimes people think that if a database contains only publicly available data, it need not be protected. This is incorrect. Even if it is permissible to display any row in the database, you should still protect against denial of service attacks (for example, those that are based on the technique in the preceding paragraph that causes the server to waste resources). Otherwise, your server becomes unresponsive to legitimate users.
Checklist:
- Try to enter single and double quotation marks ("
'" and "'") in all of your Web forms. If you get any kind of MariaDB error, investigate the problem right away. - Try to modify dynamic URLs by adding
%22("'"),%23("#"), and%27("'") to them. - Try to modify data types in dynamic URLs from numeric to character types using the characters shown in the previous examples. Your application should be safe against these and similar attacks.
- Try to enter characters, spaces, and special symbols rather than numbers in numeric fields. Your application should remove them before passing them to MariaDB or else generate an error. Passing unchecked values to MariaDB is very dangerous!
- Check the size of data before passing it to MariaDB.
- Have your application connect to the database using a user name different from the one you use for administrative purposes. Do not give your applications any access privileges they do not need.
- Try to enter single and double quotation marks ("
- Many application programming interfaces provide a means of escaping special characters in data values. Properly used, this prevents application users from entering values that cause the application to generate statements that have a different effect than you intend:
- MySQL C API: Use the
mysql_real_escape_string()API call. - MySQL++: Use the
escapeandquotemodifiers for query streams. - PHP: Use the
mysql_real_escape_string()function (available as of PHP 4.3.0, prior to that PHP version usemysql_escape_string(), and prior to PHP 4.0.3, useaddslashes()). Note that onlymysql_real_escape_string()is character set-aware; the other functions can be "bypassed" when using (invalid) multi-byte character sets. In PHP 5, you can use themysqliextension, which supports the improved MariaDB authentication protocol and passwords, as well as prepared statements with placeholders. - Perl DBI: Use placeholders or the
quote()method. - Ruby DBI: Use placeholders or the
quote()method. - Java JDBC: Use a
PreparedStatementobject and placeholders.
Other programming interfaces might have similar capabilities.
- MySQL C API: Use the
- Do not transmit plain (unencrypted) data over the Internet. This information is accessible to everyone who has the time and ability to intercept it and use it for their own purposes. Instead, use an encrypted protocol such as SSL or SSH. MariaDB supports internal SSL connections as of version 4.0. Another technique is to use SSH port-forwarding to create an encrypted (and compressed) tunnel for the communication.
- Learn to use the tcpdump and strings utilities. In most cases, you can check whether MariaDB data streams are unencrypted by issuing a command like the following:
shell>
tcpdump -l -i eth0 -w - src or dst port 3306 | stringsThis works under Linux and should work with small modifications under other systems.Warning
If you do not see plaintext data, this does not always mean that the information actually is encrypted. If you need high security, you should consult with a security expert.
Password Security in MariaDB
- Administrator Guidelines for Password Security
- End-User Guidelines for Password Security
- Password Hashing in MySQL
- Implications of Password Hashing Changes in MariaDB for Application Programs
- End-User Guidelines for Password Security
Passwords occur in several contexts within MySQL. The following sections provide guidelines that enable administrators and end users to keep these passwords secure and avoid exposing them. There is also a discussion of how MariaDB uses password hashing internally.
Administrator Guidelines for Password Security
Database administrators should use the following guidelines to keep passwords secure.
MySQL stores passwords for user accounts in the mysql.user table. Access to this table should never be granted to any nonadministrative accounts.
A user who has access to modify the plugin directory (the value of the plugin_dir system variable) or the my.cnf file that specifies the location of the plugin directory can replace plugins and modify the capabilities provided by plugins.
Passwords can appear as plain text in SQL statements such as CREATE USER, GRANT, and SET PASSWORD, or statements that invoke the PASSWORD() function. If these statements are logged by the MariaDB server, the passwords become available to anyone with access to the logs.
As of MariaDB 5.6.3, passwords in statements written to the general query log, slow query log, and binary log are rewritten by the server not to occur literally in plain text. Password rewriting can be suppressed for the general query log by starting the server with the --log-raw option. This option may be useful for diagnostic purposes, to see the exact text of statements as received by the server, but for security reasons is not recommended for production use.
To guard against unwarranted exposure to log files, they should be located in a directory that restricts access to only the server and the database administrator. If you log to tables in the MariaDB database, access to the tables should never be granted to any nonadministrative accounts.
Replication slaves store the password for the replication master in the master.info file. Access to this file should be restricted to the database administrator.
Database backups that include tables or log files containing passwords should be protected using a restricted access mode.
End-User Guidelines for Password Security
MySQL users should use the following guidelines to keep passwords secure.
When you run a client program to connect to the MariaDB server, it is inadvisable to specify your password in a way that exposes it to discovery by other users. The methods you can use to specify your password when you run client programs are listed here, along with an assessment of the risks of each method. In short, the safest methods are to have the client program prompt for the password or to specify the password in a properly protected option file.
- Use a
-poryour_pass--password=option on the command line. For example:your_pass
shell>
mysql -u francis -pfrankdb_nameThis is convenient but insecure, because your password becomes visible to system status programs such as ps that may be invoked by other users to display command lines. MariaDB clients typically overwrite the command-line password argument with zeros during their initialization sequence. However, there is still a brief interval during which the value is visible. Also, on some systems this overwriting strategy is ineffective and the password remains visible to ps. (SystemV Unix systems and perhaps others are subject to this problem.)
If your operating environment is set up to display your current command in the title bar of your terminal window, the password remains visible as long as the command is running, even if the command has scrolled out of view in the window content area.
- Use the
-por--passwordoption on the command line with no password value specified. In this case, the client program solicits the password interactively:
shell>
mysql -u francis -pEnter password: ********db_nameThe "
*" characters indicate where you enter your password. The password is not displayed as you enter it.It is more secure to enter your password this way than to specify it on the command line because it is not visible to other users. However, this method of entering a password is suitable only for programs that you run interactively. If you want to invoke a client from a script that runs noninteractively, there is no opportunity to enter the password from the keyboard. On some systems, you may even find that the first line of your script is read and interpreted (incorrectly) as your password.
- Store your password in an option file. For example, on Unix you can list your password in the
[client]section of the.my.cnffile in your home directory:
[client]
password=your_pass
To keep the password safe, the file should not be accessible to anyone but yourself. To ensure this, set the file access mode to
400or600. For example:shell>
chmod 600 .my.cnfTo name from the command line a specific option file containing the password, use the
--defaults-file=option, wherefile_namefile_nameis the full path name to the file. For example:shell>
mysql --defaults-file=/home/francis/mysql-opts, "Using Option Files", discusses option files in more detail.
- Store your password in the
MYSQL_PWDenvironment variable. See , "Environment Variables".
This method of specifying your MariaDB password must be considered extremely insecure and should not be used. Some versions of ps include an option to display the environment of running processes. If you set
MYSQL_PWD, your password is exposed to any other user who runs ps. Even on systems without such a version of ps, it is unwise to assume that there are no other methods by which users can examine process environments.
On Unix, the mysql client writes a record of executed statements to a history file (see , "mysql History File"). By default, this file is named .mysql_history and is created in your home directory. Passwords can appear as plain text in SQL statements such as CREATE USER, GRANT, and SET PASSWORD, so if you use these statements, they are logged in the history file. To keep this file safe, use a restrictive access mode, the same way as described earlier for the .my.cnf file.
If your command interpreter is configured to maintain a history, any file in which the commands are saved will contain MariaDB passwords entered on the command line. For example, bash uses ~/.bash_history. Any such file should have a restrictive access mode.
Password Hashing in MariaDB
MySQL user accounts are listed in the user table of the MariaDB database. Each MariaDB account is assigned a password, although what is stored in the Password column of the user table is not the plaintext version of the password, but a hash value computed from it. Password hash values are computed by the PASSWORD() function.
MySQL uses passwords in two phases of client/server communication:
- When a client attempts to connect to the server, there is an initial authentication step in which the client must present a password that has a hash value matching the hash value stored in the
usertable for the account that the client wants to use. - After the client connects, it can (if it has sufficient privileges) set or change the password hashes for accounts listed in the
usertable. The client can do this by using thePASSWORD()function to generate a password hash, or by using theGRANTorSET PASSWORDstatements.
In other words, the server uses hash values during authentication when a client first attempts to connect. The server generates hash values if a connected client invokes the PASSWORD() function or uses a GRANT or SET PASSWORD statement to set or change a password.
The password hashing mechanism was updated in MariaDB to provide better security and to reduce the risk of passwords being intercepted. However, this new mechanism is understood only by MariaDB (and newer) servers and clients, which can result in some compatibility problems. A 4.1 or newer client can connect to a pre-4.1 server, because the client understands both the old and new password hashing mechanisms. However, a pre-4.1 client that attempts to connect to a 4.1 or newer server may run into difficulties. For example, a 3.23 mysql client that attempts to connect to a 5.6 server may fail with the following error message:
shell> mysql -h localhost -u root
Client does not support authentication protocol requested by server; consider upgrading MariaDB client
Another common example of this phenomenon occurs for attempts to use the older PHP MariaDB extension after upgrading to MariaDB or newer. (See , "Common Problems with MariaDB and PHP".)
The following discussion describes the differences between the old and new password mechanisms, and what you should do if you upgrade your server but need to maintain backward compatibility with pre-4.1 clients. Additional information can be found in "Client does not support authentication protocol". This information is of particular importance to PHP programmers migrating MariaDB databases from version 4.0 or lower to version 4.1 or higher.Note
This discussion contrasts 4.1 behavior with pre-4.1 behavior, but the 4.1 behavior described here actually begins with 4.1.1. MariaDB 4.1.0 is an "odd" release because it has a slightly different mechanism than that implemented in 4.1.1 and up. Differences between 4.1.0 and more recent versions are described further in MariaDB 5.5 Reference Manual.
Prior to MySQL, password hashes computed by the PASSWORD() function are 16 bytes long. Such hashes look like this:
mysql> SELECT PASSWORD('mypass');
+--------------------+
| PASSWORD('mypass') |
+--------------------+
| 6f8c114b58f2ce9e |
+--------------------+
The Password column of the user table (in which these hashes are stored) also is 16 bytes long before MariaDB 4.1.
As of MySQL, the PASSWORD() function has been modified to produce a longer 41-byte hash value:
mysql> SELECT PASSWORD('mypass');
+-------------------------------------------+
| PASSWORD('mypass') |
+-------------------------------------------+
| *6C8989366EAF75BB670AD8EA7A7FC1176A95CEF4 |
+-------------------------------------------+
Accordingly, the Password column in the user table also must be 41 bytes long to store these values:
- If you perform a new installation of MariaDB 5.6, the
Passwordcolumn is made 41 bytes long automatically. - Upgrading from MariaDB (4.1.1 or later in the 4.1 series) to MariaDB 5.6 should not give rise to any issues in this regard because both versions use the same password hashing mechanism. If you wish to upgrade an older release of MariaDB to version 5.6, you should upgrade to version 4.1 first, then upgrade the 4.1 installation to 5.6.
A widened Password column can store password hashes in both the old and new formats. The format of any given password hash value can be determined two ways:
- The obvious difference is the length (16 bytes versus 41 bytes).
- A second difference is that password hashes in the new format always begin with a "
*" character, whereas passwords in the old format never do.
The longer password hash format has better cryptographic properties, and client authentication based on long hashes is more secure than that based on the older short hashes.
The differences between short and long password hashes are relevant both for how the server uses passwords during authentication and for how it generates password hashes for connected clients that perform password-changing operations.
The way in which the server uses password hashes during authentication is affected by the width of the Password column:
- If the column is short, only short-hash authentication is used.
- If the column is long, it can hold either short or long hashes, and the server can use either format:
- Pre-4.1 clients can connect, although because they know only about the old hashing mechanism, they can authenticate only using accounts that have short hashes.
- and later clients can authenticate using accounts that have short or long hashes.
Even for short-hash accounts, the authentication process is actually a bit more secure for 4.1 and later clients than for older clients. In terms of security, the gradient from least to most secure is:
- Pre-4.1 client authenticating with short password hash
- or later client authenticating with short password hash
- or later client authenticating with long password hash
The way in which the server generates password hashes for connected clients is affected by the width of the Password column and by the --old-passwords option. A 4.1 or later server generates long hashes only if certain conditions are met: The Password column must be wide enough to hold long values and the --old-passwords option must not be given. These conditions apply as follows:
- The
Passwordcolumn must be wide enough to hold long hashes (41 bytes). If the column has not been updated and still has the pre-4.1 width of 16 bytes, the server notices that long hashes cannot fit into it and generates only short hashes when a client performs password-changing operations usingPASSWORD(),GRANT, orSET PASSWORD. This is the behavior that occurs if you have upgraded to 4.1 but have not yet run the mysql_upgrade program to widen thePasswordcolumn. - If the
Passwordcolumn is wide, it can store either short or long password hashes. In this case,PASSWORD(),GRANT, andSET PASSWORDgenerate long hashes unless the server was started with the--old-passwordsoption. That option forces the server to generate short password hashes instead.
The purpose of the --old-passwords option is to enable you to maintain backward compatibility with pre-4.1 clients under circumstances where the server would otherwise generate long password hashes. The option does not affect authentication (4.1 and later clients can still use accounts that have long password hashes), but it does prevent creation of a long password hash in the user table as the result of a password-changing operation. Were that to occur, the account no longer could be used by pre-4.1 clients. Without the --old-passwords option, the following undesirable scenario is possible:
- An old client connects to an account that has a short password hash.
- The client changes its own password. Without
--old-passwords, this results in the account having a long password hash. - The next time the old client attempts to connect to the account, it cannot, because the account has a long password hash that requires the new hashing mechanism during authentication. (Once an account has a long password hash in the user table, only 4.1 and later clients can authenticate for it, because pre-4.1 clients do not understand long hashes.)
This scenario illustrates that, if you must support older pre-4.1 clients, it is dangerous to run a 4.1 or newer server without using the --old-passwords option. By running the server with --old-passwords, password-changing operations do not generate long password hashes and thus do not cause accounts to become inaccessible to older clients. (Those clients cannot inadvertently lock themselves out by changing their password and ending up with a long password hash.)
The downside of the --old-passwords option is that any passwords you create or change use short hashes, even for 4.1 clients. Thus, you lose the additional security provided by long password hashes. If you want to create an account that has a long hash (for example, for use by 4.1 clients), you must do so while running the server without --old-passwords.
The following scenarios are possible for running a 4.1 or later server:
Scenario 1: Short Password column in user table:
- Only short hashes can be stored in the
Passwordcolumn. - The server uses only short hashes during client authentication.
- For connected clients, password hash-generating operations involving
PASSWORD(),GRANT, orSET PASSWORDuse short hashes exclusively. Any change to an account's password results in that account having a short password hash. - The
--old-passwordsoption can be used but is superfluous because with a shortPasswordcolumn, the server generates only short password hashes anyway.
Scenario 2: Long Password column; server not started with --old-passwords option:
- Short or long hashes can be stored in the
Passwordcolumn. - and later clients can authenticate using accounts that have short or long hashes.
- Pre-4.1 clients can authenticate only using accounts that have short hashes.
- For connected clients, password hash-generating operations involving
PASSWORD(),GRANT, orSET PASSWORDuse long hashes exclusively. A change to an account's password results in that account having a long password hash.
As indicated earlier, a danger in this scenario is that it is possible for accounts that have a short password hash to become inaccessible to pre-4.1 clients. A change to such an account's password made using GRANT, PASSWORD(), or SET PASSWORD results in the account being given a long password hash. From that point on, no pre-4.1 client can authenticate to that account until the client upgrades to 4.1.
To deal with this problem, you can change a password in a special way. For example, normally you use SET PASSWORD as follows to change an account password:
SET PASSWORD FOR 'some_user'@'some_host' = PASSWORD('mypass');
To change the password but create a short hash, use the OLD_PASSWORD() function instead:
SET PASSWORD FOR 'some_user'@'some_host' = OLD_PASSWORD('mypass');
OLD_PASSWORD() is useful for situations in which you explicitly want to generate a short hash.
Scenario 3: Long Password column; 4.1 or newer server started with --old-passwords option:
- Short or long hashes can be stored in the
Passwordcolumn. - and later clients can authenticate for accounts that have short or long hashes (but note that it is possible to create long hashes only when the server is started without
--old-passwords). - Pre-4.1 clients can authenticate only for accounts that have short hashes.
- For connected clients, password hash-generating operations involving
PASSWORD(),GRANT, orSET PASSWORDuse short hashes exclusively. Any change to an account's password results in that account having a short password hash.
In this scenario, you cannot create accounts that have long password hashes, because the --old-passwords option prevents generation of long hashes. Also, if you create an account with a long hash before using the --old-passwords option, changing the account's password while --old-passwords is in effect results in the account being given a short password, causing it to lose the security benefits of a longer hash.
The disadvantages for these scenarios may be summarized as follows:
In scenario 1, you cannot take advantage of longer hashes that provide more secure authentication.
In scenario 2, accounts with short hashes become inaccessible to pre-4.1 clients if you change their passwords without explicitly using OLD_PASSWORD().
In scenario 3, --old-passwords prevents accounts with short hashes from becoming inaccessible, but password-changing operations cause accounts with long hashes to revert to short hashes, and you cannot change them back to long hashes while --old-passwords is in effect.
Implications of Password Hashing Changes in MariaDB for Application Programs
An upgrade to MariaDB version 4.1 or later can cause compatibility issues for applications that use PASSWORD() to generate passwords for their own purposes. Applications really should not do this, because PASSWORD() should be used only to manage passwords for MariaDB accounts. But some applications use PASSWORD() for their own purposes anyway.
If you upgrade to 4.1 or later from a pre-4.1 version of MariaDB and run the server under conditions where it generates long password hashes, an application using PASSWORD() for its own passwords breaks. The recommended course of action in such cases is to modify the application to use another function, such as SHA1() or MD5(), to produce hashed values. If that is not possible, you can use the OLD_PASSWORD() function, which is provided for generate short hashes in the old format. However, you should note that OLD_PASSWORD() may one day no longer be supported.
If the server is running under circumstances where it generates short hashes, OLD_PASSWORD() is available but is equivalent to PASSWORD().
PHP programmers migrating their MariaDB databases from version 4.0 or lower to version 4.1 or higher should see , "MySQL PHP API".
Making MariaDB Secure Against Attackers
When you connect to a MariaDB server, you should use a password. The password is not transmitted in clear text over the connection. Password handling during the client connection sequence was upgraded in MariaDB to be very secure. If you are still using pre-4.1.1-style passwords, the encryption algorithm is not as strong as the newer algorithm. With some effort, a clever attacker who can sniff the traffic between the client and the server can crack the password. (See , "Password Hashing in MySQL", for a discussion of the different password handling methods.)
All other information is transferred as text, and can be read by anyone who is able to watch the connection. If the connection between the client and the server goes through an untrusted network, and you are concerned about this, you can use the compressed protocol to make traffic much more difficult to decipher. You can also use MySQL's internal SSL support to make the connection even more secure. See , "Using SSL for Secure Connections". Alternatively, use SSH to get an encrypted TCP/IP connection between a MariaDB server and a MariaDB client. You can find an Open Source SSH client at http://www.openssh.org/, and a commercial SSH client at http://www.ssh.com/.
To make a MariaDB system secure, you should strongly consider the following suggestions:
- Require all MariaDB accounts to have a password. A client program does not necessarily know the identity of the person running it. It is common for client/server applications that the user can specify any user name to the client program. For example, anyone can use the mysql program to connect as any other person simply by invoking it as
mysql -uifother_userdb_nameother_userhas no password. If all accounts have a password, connecting using another user's account becomes much more difficult.
For a discussion of methods for setting passwords, see , "Assigning Account Passwords".
- Never run the MariaDB server as the Unix
rootuser. This is extremely dangerous, because any user with theFILEprivilege is able to cause the server to create files asroot(for example,~root/.bashrc). To prevent this, mysqld refuses to run asrootunless that is specified explicitly using the--user=rootoption.
mysqld can (and should) be run as an ordinary, unprivileged user instead. You can create a separate Unix account named
MariaDBto make everything even more secure. Use this account only for administering MySQL. To start mysqld as a different Unix user, add auseroption that specifies the user name in the[mysqld]group of themy.cnfoption file where you specify server options. For example:[mysqld] user=mysql
This causes the server to start as the designated user whether you start it manually or by using mysqld_safe or mysql.server. For more details, see , "How to Run MariaDB as a Normal User".
Running mysqld as a Unix user other than
rootdoes not mean that you need to change therootuser name in theusertable. User names for MariaDB accounts have nothing to do with user names for Unix accounts. - Do not permit the use of symlinks to tables. (This capability can be disabled with the
--skip-symbolic-linksoption.) This is especially important if you run mysqld asroot, because anyone that has write access to the server's data directory then could delete any file in the system! See , "Using Symbolic Links for Tables on Unix". - Make sure that the only Unix user account with read or write privileges in the database directories is the account that is used for running mysqld.
- Do not grant the
PROCESSorSUPERprivilege to nonadministrative users. The output of mysqladmin processlist andSHOW PROCESSLISTshows the text of any statements currently being executed, so any user who is permitted to see the server process list might be able to see statements issued by other users such asUPDATE user SET password=PASSWORD('not_secure').
mysqld reserves an extra connection for users who have the
SUPERprivilege, so that a MariaDBrootuser can log in and check server activity even if all normal connections are in use.The
SUPERprivilege can be used to terminate client connections, change server operation by changing the value of system variables, and control replication servers. - Do not grant the
FILEprivilege to nonadministrative users. Any user that has this privilege can write a file anywhere in the file system with the privileges of the mysqld daemon. To make this a bit safer, files generated withSELECT ... INTO OUTFILEdo not overwrite existing files and are writable by everyone.
The
FILEprivilege may also be used to read any file that is world-readable or accessible to the Unix user that the server runs as. With this privilege, you can read any file into a database table. This could be abused, for example, by usingLOAD DATAto load/etc/passwdinto a table, which then can be displayed withSELECT. - Stored programs and views should be written using the security guidelines discussed in , "Access Control for Stored Programs and Views".
- If you do not trust your DNS, you should use IP addresses rather than host names in the grant tables. In any case, you should be very careful about creating grant table entries using host name values that contain wildcards.
- If you want to restrict the number of connections permitted to a single account, you can do so by setting the
max_user_connectionsvariable in mysqld. TheGRANTstatement also supports resource control options for limiting the extent of server use permitted to an account. See , "GRANTSyntax". - If the plugin directory is writable by the server, it may be possible for a user to write executable code to a file in the directory using
SELECT ... INTO DUMPFILE. This can be prevented by makingplugin_dirread only to the server or by setting--secure-file-privto a directory whereSELECTwrites can be made safely.
Security-Related mysqld Options
The following mysqld options affect security:
Table 5.5. Security Option/Variable Summary
| Name | Cmd-Line | Option file | System Var | Status Var | Var Scope | Dynamic |
|---|---|---|---|---|---|---|
| allow-suspicious-udfs | Yes | Yes | ||||
| automatic_sp_privileges | Yes | Global | Yes | |||
| chroot | Yes | Yes | ||||
| des-key-file | Yes | Yes | ||||
| local_infile | Yes | Global | Yes | |||
| local-infile | Yes | Yes | ||||
| - Variable: local_infile | ||||||
| old-passwords | Yes | Yes | Both | Yes | ||
| - Variable: old_passwords | Yes | Both | Yes | |||
| safe-user-create | Yes | Yes | ||||
| secure-auth | Yes | Yes | Global | Yes | ||
| - Variable: secure_auth | Yes | Global | Yes | |||
| secure-file-priv | Yes | Yes | Global | No | ||
| - Variable: secure_file_priv | Yes | Global | No | |||
| skip-grant-tables | Yes | Yes | ||||
| skip-name-resolve | Yes | Yes | Global | No | ||
| - Variable: skip_name_resolve | Yes | Global | No | |||
| skip-networking | Yes | Yes | Global | No | ||
| - Variable: skip_networking | Yes | Global | No | |||
| skip-show-database | Yes | Yes | Global | No | ||
| - Variable: skip_show_database | Yes | Global | No |
--allow-suspicious-udfs
This option controls whether user-defined functions that have only an
xxxsymbol for the main function can be loaded. By default, the option is off and only UDFs that have at least one auxiliary symbol can be loaded; this prevents attempts at loading functions from shared object files other than those containing legitimate UDFs. See , "User-Defined Function Security Precautions".--local-infile[={0|1}]
If you start the server with
--local-infile=0, clients cannot useLOCALinLOAD DATAstatements. See , "Security Issues withLOAD DATA LOCAL".--old-passwords
Force the server to generate short (pre-4.1) password hashes for new passwords. This is useful for compatibility when the server must support older client programs. See , "Password Hashing in MySQL".
--safe-user-create
If this option is enabled, a user cannot create new MariaDB users by using the
GRANTstatement unless the user has theINSERTprivilege for themysql.usertable or any column in the table. If you want a user to have the ability to create new users that have those privileges that the user has the right to grant, you should grant the user the following privilege:GRANT INSERT(user) ON mysql.user TO '
user_name'@'host_name';This ensures that the user cannot change any privilege columns directly, but has to use the
GRANTstatement to give privileges to other users.--secure-auth
This option causes the server to block connections by clients that attempt to use accounts that have passwords stored in the old (pre-4.1) format. Use it to prevent all use of passwords employing the old format (and hence insecure communication over the network). Before MariaDB 5.6.5, this option is disabled by default. As of MariaDB 5.6.5, it is enabled by default; to disable it, use
--skip-secure-auth.Server startup fails with an error if this option is enabled and the privilege tables are in pre-4.1 format. See "
Client does not support authentication protocol".The mysql client also has a
--secure-authoption, which prevents connections to a server if the server requires a password in old format for the client account.--secure-file-priv=path
This option limits the effect of the
LOAD-FILE()function and theLOAD DATAandSELECT ... INTO OUTFILEstatements to work only with files in the specified directory.--skip-grant-tables
This option causes the server to start without using the privilege system at all, which gives anyone with access to the server unrestricted access to all databases. You can cause a running server to start using the grant tables again by executing mysqladmin flush-privileges or mysqladmin reload command from a system shell, or by issuing a MariaDB
FLUSH PRIVILEGESstatement after connecting to the server. This option also suppresses loading of plugins that were installed with theINSTALL PLUGINstatement, user-defined functions (UDFs), and scheduled events. To cause plugins to be loaded anyway, use the--plugin-loadoption.--skip-grant-tablesis unavailable if MariaDB was configured with theDISABLE_GRANT_OPTIONScompiler flag. See , "MySQL Source-Configuration Options".--skip-name-resolve
Host names are not resolved. All
Hostcolumn values in the grant tables must be IP addresses orlocalhost.--skip-networking
Do not permit TCP/IP connections over the network. All connections to mysqld must be made using Unix socket files.
--skip-show-database
With this option, the
SHOW DATABASESstatement is permitted only to users who have theSHOW DATABASESprivilege, and the statement displays all database names. Without this option,SHOW DATABASESis permitted to all users, but displays each database name only if the user has theSHOW DATABASESprivilege or some privilege for the database. Note that any global privilege is a privilege for the database.--ssl*
Options that begin with
--sslspecify whether to permit clients to connect using SSL and indicate where to find SSL keys and certificates. See , "SSL Command Options".
Security Issues with LOAD DATA LOCAL
The LOAD DATA statement can load a file that is located on the server host, or it can load a file that is located on the client host when the LOCAL keyword is specified.
There are two potential security issues with supporting the LOCAL version of LOAD DATA statements:
- The transfer of the file from the client host to the server host is initiated by the MariaDB server. In theory, a patched server could be built that would tell the client program to transfer a file of the server's choosing rather than the file named by the client in the
LOAD DATAstatement. Such a server could access any file on the client host to which the client user has read access. - In a Web environment where the clients are connecting from a Web server, a user could use
LOAD DATA LOCALto read any files that the Web server process has read access to (assuming that a user could run any command against the SQL server). In this environment, the client with respect to the MariaDB server actually is the Web server, not the remote program being run by the user who connects to the Web server.
To deal with these problems, we changed how LOAD DATA LOCAL is handled as of MariaDB 3.23.49 and MariaDB 4.0.2 (4.0.13 on Windows):
- By default, all MariaDB clients and libraries in binary distributions are compiled with the
-DENABLED_LOCAL_INFILE=1option, to be compatible with MariaDB 3.23.48 and before. - If you build MariaDB from source but do not invoke CMake with the
-DENABLED_LOCAL_INFILE=1option,LOAD DATA LOCALcannot be used by any client unless it is written explicitly to invokemysql_options(... MYSQL_OPT_LOCAL_INFILE, 0). See , "mysql_options()". - You can disable all
LOAD DATA LOCALstatements from the server side by starting mysqld with the--local-infile=0option. - For the mysql command-line client, enable
LOAD DATA LOCALby specifying the--local-infile[=1]option, or disable it with the--local-infile=0option. For mysqlimport, local data file loading is off by default; enable it with the--localor-Loption. In any case, successful use of a local load operation requires that the server permits it. - If you use
LOAD DATA LOCALin Perl scripts or other programs that read the[client]group from option files, you can add thelocal-infile=1option to that group. However, to keep this from causing problems for programs that do not understandlocal-infile, specify it using theloose-prefix:
[client]
loose-local-infile=1
- If
LOAD DATA LOCALis disabled, either in the server or the client, a client that attempts to issue such a statement receives the following error message:
ERROR 1148: The used command is not allowed with this MariaDB version
How to Run MariaDB as a Normal User
On Windows, you can run the server as a Windows service using a normal user account.
On Unix, the MariaDB server mysqld can be started and run by any user. However, you should avoid running the server as the Unix root user for security reasons. To change mysqld to run as a normal unprivileged Unix user user_name, you must do the following:
- Stop the server if it is running (use mysqladmin shutdown).
- Change the database directories and files so that
user_namehas privileges to read and write files in them (you might need to do this as the Unixrootuser):
shell>
chown -Ruser_name/path/to/mysql/datadirIf you do not do this, the server will not be able to access databases or tables when it runs as
user_name.If directories or files within the MariaDB data directory are symbolic links,
chown -Rmight not follow symbolic links for you. If it does not, you will also need to follow those links and change the directories and files they point to. - Start the server as user
user_name. Another alternative is to start mysqld as the Unixrootuser and use the--user=option. mysqld starts up, then switches to run as the Unix useruser-nameuser_namebefore accepting any connections. - To start the server as the given user automatically at system startup time, specify the user name by adding a
useroption to the[mysqld]group of the/etc/my.cnfoption file or themy.cnfoption file in the server's data directory. For example:
[mysqld] user=
user_name
If your Unix machine itself is not secured, you should assign passwords to the MariaDB root accounts in the grant tables. Otherwise, any user with a login account on that machine can run the mysql client with a --user=root option and perform any operation. (It is a good idea to assign passwords to MariaDB accounts in any case, but especially so when other login accounts exist on the server host.) See , "Postinstallation Setup and Testing".
The MariaDB Access Privilege System
- Privileges Provided by MySQL
- Privilege System Grant Tables
- Specifying Account Names
- Access Control, Stage 1: Connection Verification
- Access Control, Stage 2: Request Verification
- When Privilege Changes Take Effect
- Causes of Access-Denied Errors
- Privilege System Grant Tables
The primary function of the MariaDB privilege system is to authenticate a user who connects from a given host and to associate that user with privileges on a database such as SELECT, INSERT, UPDATE, and DELETE. Additional functionality includes the ability to have anonymous users and to grant privileges for MySQL-specific functions such as LOAD DATA INFILE and administrative operations.
There are some things that you cannot do with the MariaDB privilege system:
- You cannot explicitly specify that a given user should be denied access. That is, you cannot explicitly match a user and then refuse the connection.
- You cannot specify that a user has privileges to create or drop tables in a database but not to create or drop the database itself.
- A password applies globally to an account. You cannot associate a password with a specific object such as a database, table, or routine.
The user interface to the MariaDB privilege system consists of SQL statements such as CREATE USER, GRANT, and REVOKE. See , "Account Management Statements".
Internally, the server stores privilege information in the grant tables of the MariaDB database (that is, in the database named MariaDB). The MariaDB server reads the contents of these tables into memory when it starts and bases access-control decisions on the in-memory copies of the grant tables.
The MariaDB privilege system ensures that all users may perform only the operations permitted to them. As a user, when you connect to a MariaDB server, your identity is determined by the host from which you connect and the user name you specify. When you issue requests after connecting, the system grants privileges according to your identity and what you want to do.
MySQL considers both your host name and user name in identifying you because there is no reason to assume that a given user name belongs to the same person on all hosts. For example, the user joe who connects from office.example.com need not be the same person as the user joe who connects from home.example.com. MariaDB handles this by enabling you to distinguish users on different hosts that happen to have the same name: You can grant one set of privileges for connections by joe from office.example.com, and a different set of privileges for connections by joe from home.example.com. To see what privileges a given account has, use the SHOW GRANTS statement. For example:
SHOW GRANTS FOR 'joe'@'office.example.com';
SHOW GRANTS FOR 'joe'@'home.example.com';
MySQL access control involves two stages when you run a client program that connects to the server:
Stage 1: The server accepts or rejects the connection based on your identity and whether you can verify your identity by supplying the correct password.
Stage 2: Assuming that you can connect, the server checks each statement you issue to determine whether you have sufficient privileges to perform it. For example, if you try to select rows from a table in a database or drop a table from the database, the server verifies that you have the SELECT privilege for the table or the DROP privilege for the database.
For a more detailed description of what happens during each stage, see , "Access Control, Stage 1: Connection Verification", and , "Access Control, Stage 2: Request Verification".
If your privileges are changed (either by yourself or someone else) while you are connected, those changes do not necessarily take effect immediately for the next statement that you issue. For details about the conditions under which the server reloads the grant tables, see , "When Privilege Changes Take Effect".
For general security-related advice, see , "General Security Issues". For help in diagnosing privilege-related problems, see , "Causes of Access-Denied Errors".
Privileges Provided by MariaDB
MySQL provides privileges that apply in different contexts and at different levels of operation:
- Administrative privileges enable users to manage operation of the MariaDB server. These privileges are global because they are not specific to a particular database.
- Database privileges apply to a database and to all objects within it. These privileges can be granted for specific databases, or globally so that they apply to all databases.
- Privileges for database objects such as tables, indexes, views, and stored routines can be granted for specific objects within a database, for all objects of a given type within a database (for example, all tables in a database), or globally for all objects of a given type in all databases).
Information about account privileges is stored in the user, db, host, tables_priv, columns_priv, and procs_priv tables in the MariaDB database (see , "Privilege System Grant Tables"). The MariaDB server reads the contents of these tables into memory when it starts and reloads them under the circumstances indicated in , "When Privilege Changes Take Effect". Access-control decisions are based on the in-memory copies of the grant tables.
Some releases of MariaDB introduce changes to the structure of the grant tables to add new access privileges or features. Whenever you update to a new version of MySQL, you should update your grant tables to make sure that they have the current structure so that you can take advantage of any new capabilities. See , "mysql_upgrade - Check Tables for MariaDB Upgrade".
The following table shows the privilege names used at the SQL level in the GRANT and REVOKE statements, along with the column name associated with each privilege in the grant tables and the context in which the privilege applies.
Table 5.6. Permissible Privileges for GRANT and REVOKE
| Privilege | Column | Context |
|---|---|---|
CREATE
| Create_priv
| databases, tables, or indexes |
DROP
| Drop_priv
| databases, tables, or views |
GRANT OPTION
| Grant_priv
| databases, tables, or stored routines |
LOCK TABLES
| Lock_tables_priv
| databases |
REFERENCES
| References_priv
| databases or tables |
EVENT
| Event_priv
| databases |
ALTER
| Alter_priv
| tables |
DELETE
| Delete_priv
| tables |
INDEX
| Index_priv
| tables |
INSERT
| Insert_priv
| tables or columns |
SELECT
| Select_priv
| tables or columns |
UPDATE
| Update_priv
| tables or columns |
CREATE TEMPORARY TABLES
| Create_tmp_table_priv
| tables |
TRIGGER
| Trigger_priv
| tables |
CREATE VIEW
| Create_view_priv
| views |
SHOW VIEW
| Show_view_priv
| views |
ALTER ROUTINE
| Alter_routine_priv
| stored routines |
CREATE ROUTINE
| Create_routine_priv
| stored routines |
EXECUTE
| Execute_priv
| stored routines |
FILE
| File_priv
| file access on server host |
CREATE TABLESPACE
| Create_tablespace_priv
| server administration |
CREATE USER
| Create_user_priv
| server administration |
PROCESS
| Process_priv
| server administration |
PROXY
| see proxies_priv table
| server administration |
RELOAD
| Reload_priv
| server administration |
REPLICATION CLIENT
| Repl_client_priv
| server administration |
REPLICATION SLAVE
| Repl_slave_priv
| server administration |
SHOW DATABASES
| Show_db_priv
| server administration |
SHUTDOWN
| Shutdown_priv
| server administration |
SUPER
| Super_priv
| server administration |
ALL [PRIVILEGES]
| server administration | |
USAGE
| server administration |
The following list provides a general description of each privilege available in MySQL. Particular SQL statements might have more specific privilege requirements than indicated here. If so, the description for the statement in question provides the details.
- The
ALLorALL PRIVILEGESprivilege specifier is shorthand. It stands for "all privileges available at a given privilege level" (exceptGRANT OPTION). For example, grantingALLat the global or table level grants all global privileges or all table-level privileges. - The
ALTERprivilege enables use ofALTER TABLEto change the structure of tables.ALTER TABLEalso requires theCREATEandINSERTprivileges. Renaming a table requiresALTERandDROPon the old table,ALTER,CREATE, andINSERTon the new table. - The
ALTER ROUTINEprivilege is needed to alter or drop stored routines (procedures and functions). - The
CREATEprivilege enables creation of new databases and tables. - The
CREATE ROUTINEprivilege is needed to create stored routines (procedures and functions). - The
CREATE TABLESPACEprivilege is needed to create, alter, or drop tablespaces and log file groups. - The
CREATE TEMPORARY TABLESprivilege enables the creation of temporary tables using theCREATE TEMPORARY TABLEstatement.
As of MariaDB 5.6.3, after a session has created a temporary table, the server performs no further privilege checks on the table. The creating session can perform any operation on the table, such as
DROP TABLE,INSERT,UPDATE, orSELECT.One implication of this behavior is that a session can manipulate its temporary tables even if the current user has no privilege to create them. Suppose that the current user does not have the
CREATE TEMPORARY TABLESprivilege but is able to execute aDEFINER-context stored procedure that executes with the privileges of a user who does haveCREATE TEMPORARY TABLESand that creates a temporary table. While the procedure executes, the session uses the privileges of the defining user. After the procedure returns, the effective privileges revert to those of the current user, which can still see the temporary table and perform any operation on it.Before MariaDB 5.6.3, other operations on a temporary table, such as
INSERT,UPDATE, orSELECT, require additional privileges for those operations for the database containing the temporary table, or for the nontemporary table of the same name.To keep privileges for temporary and nontemporary tables separate, a common workaround for this situation is to create a database dedicated to the use of temporary tables. Then for that database, a user can be granted the
CREATE TEMPORARY TABLESprivilege, along with any other privileges required for temporary table operations done by that user. - The
CREATE USERprivilege enables use ofCREATE USER,DROP USER,RENAME USER, andREVOKE ALL PRIVILEGES. - The
CREATE VIEWprivilege enables use ofCREATE VIEW. - The
DELETEprivilege enables rows to be deleted from tables in a database. - The
DROPprivilege enables you to drop (remove) existing databases, tables, and views. TheDROPprivilege is required in order to use the statementALTER TABLE ... DROP PARTITIONon a partitioned table. TheDROPprivilege is also required forTRUNCATE TABLE. If you grant theDROPprivilege for theMariaDBdatabase to a user, that user can drop the database in which the MariaDB access privileges are stored. - The
EVENTprivilege is required to create, alter, drop, or see events for the Event Scheduler. - The
EXECUTEprivilege is required to execute stored routines (procedures and functions). - The
FILEprivilege gives you permission to read and write files on the server host using theLOAD DATA INFILEandSELECT ... INTO OUTFILEstatements and theLOAD_FILE()function. A user who has theFILEprivilege can read any file on the server host that is either world-readable or readable by the MariaDB server. (This implies the user can read any file in any database directory, because the server can access any of those files.) TheFILEprivilege also enables the user to create new files in any directory where the MariaDB server has write access. As a security measure, the server will not overwrite existing files. - The
GRANT OPTIONprivilege enables you to give to other users or remove from other users those privileges that you yourself possess. - The
INDEXprivilege enables you to create or drop (remove) indexes.INDEXapplies to existing tables. If you have theCREATEprivilege for a table, you can include index definitions in theCREATE TABLEstatement. - The
INSERTprivilege enables rows to be inserted into tables in a database.INSERTis also required for theANALYZE TABLE,OPTIMIZE TABLE, andREPAIR TABLEtable-maintenance statements. - The
LOCK TABLESprivilege enables the use of explicitLOCK TABLESstatements to lock tables for which you have theSELECTprivilege. This includes the use of write locks, which prevents other sessions from reading the locked table. - The
PROCESSprivilege pertains to display of information about the threads executing within the server (that is, information about the statements being executed by sessions). The privilege enables use ofSHOW PROCESSLISTor mysqladmin processlist to see threads belonging to other accounts; you can always see your own threads. - The
PROXYprivilege enables a user to impersonate or become known as another user. See , "Proxy Users". - The
REFERENCESprivilege currently is unused. - The
RELOADprivilege enables use of theFLUSHstatement. It also enables mysqladmin commands that are equivalent toFLUSHoperations:flush-hosts,flush-logs,flush-privileges,flush-status,flush-tables,flush-threads,refresh, andreload.
The
reloadcommand tells the server to reload the grant tables into memory.flush-privilegesis a synonym forreload. Therefreshcommand closes and reopens the log files and flushes all tables. The otherflush-commands perform functions similar toxxxrefresh, but are more specific and may be preferable in some instances. For example, if you want to flush just the log files,flush-logsis a better choice thanrefresh. - The
REPLICATION CLIENTprivilege enables the use ofSHOW MASTER STATUSandSHOW SLAVE STATUS. - The
REPLICATION SLAVEprivilege should be granted to accounts that are used by slave servers to connect to the current server as their master. Without this privilege, the slave cannot request updates that have been made to databases on the master server. - The
SELECTprivilege enables you to select rows from tables in a database.SELECTstatements require theSELECTprivilege only if they actually retrieve rows from a table. SomeSELECTstatements do not access tables and can be executed without permission for any database. For example, you can useSELECTas a simple calculator to evaluate expressions that make no reference to tables:
SELECT 1+1;
SELECT PI()*2;
The
SELECTprivilege is also needed for other statements that read column values. For example,SELECTis needed for columns referenced on the right hand side ofcol_name=exprassignment inUPDATEstatements or for columns named in theWHEREclause ofDELETEorUPDATEstatements. - The
SHOW DATABASESprivilege enables the account to see database names by issuing theSHOW DATABASEstatement. Accounts that do not have this privilege see only databases for which they have some privileges, and cannot use the statement at all if the server was started with the--skip-show-databaseoption. Note that any global privilege is a privilege for the database. - The
SHOW VIEWprivilege enables use ofSHOW CREATE VIEW. - The
SHUTDOWNprivilege enables use of the mysqladmin shutdown command. There is no corresponding SQL statement. - The
SUPERprivilege enables an account to useCHANGE MASTER TO,KILLor mysqladmin kill to kill threads belonging to other accounts (you can always kill your own threads),PURGE BINARY LOGS, configuration changes usingSET GLOBALto modify global system variables, the mysqladmin debug command, enabling or disabling logging, performing updates even if theread_onlysystem variable is enabled, starting and stopping replication on slave servers, specification of any account in theDEFINERattribute of stored programs and views, and enables you to connect (once) even if the connection limit controlled by themax_connectionssystem variable is reached.
To create or alter stored functions if binary logging is enabled, you may also need the
SUPERprivilege, as described in , "Binary Logging of Stored Programs". - The
TRIGGERprivilege enables trigger operations. You must have this privilege for a table to create, drop, or execute triggers for that table. - The
UPDATEprivilege enables rows to be updated in tables in a database. - The
USAGEprivilege specifier stands for "no privileges." It is used at the global level withGRANTto modify account attributes such as resource limits or SSL characteristics without affecting existing account privileges.
It is a good idea to grant to an account only those privileges that it needs. You should exercise particular caution in granting the FILE and administrative privileges:
- The
FILEprivilege can be abused to read into a database table any files that the MariaDB server can read on the server host. This includes all world-readable files and files in the server's data directory. The table can then be accessed usingSELECTto transfer its contents to the client host. - The
GRANT OPTIONprivilege enables users to give their privileges to other users. Two users that have different privileges and with theGRANT OPTIONprivilege are able to combine privileges. - The
ALTERprivilege may be used to subvert the privilege system by renaming tables. - The
SHUTDOWNprivilege can be abused to deny service to other users entirely by terminating the server. - The
PROCESSprivilege can be used to view the plain text of currently executing statements, including statements that set or change passwords. - The
SUPERprivilege can be used to terminate other sessions or change how the server operates. - Privileges granted for the
MariaDBdatabase itself can be used to change passwords and other access privilege information. Passwords are stored encrypted, so a malicious user cannot simply read them to know the plain text password. However, a user with write access to theusertablePasswordcolumn can change an account's password, and then connect to the MariaDB server using that account.
Privilege System Grant Tables
Normally, you manipulate the contents of the grant tables in the MariaDB database indirectly by using statements such as GRANT and REVOKE to set up accounts and control the privileges available to each one. See , "Account Management Statements". The discussion here describes the underlying structure of the grant tables and how the server uses their contents when interacting with clients.
These MariaDB database tables contain grant information:
user: Contains user accounts, global privileges, and other non-privilege columns.db: Contains database-level privileges.host: Obsolete.tables_priv: Contains table-level privileges.columns_priv: Contains column-level privileges.procs_priv: Contains stored procedure and function privileges.proxies_priv: Contains proxy-user privileges.
Other tables in the MariaDB database do not hold grant information and are discussed elsewhere:
event: Contains information about Event Scheduler events: See , "Using the Event Scheduler".func: Contains information about user-defined functions: See , "Adding New Functions to MySQL".help_: These tables are used for server-side help: See , "Server-Side Help".xxxplugin: Contains information about server plugins: See , "Installing and Uninstalling Plugins", and , "The MariaDB Plugin API".proc: Contains information about stored procedures and functions: See , "Using Stored Routines (Procedures and Functions)".servers: Used by theFEDERATEDstorage engine: See , "Creating aFEDERATEDTable UsingCREATE SERVER".time_zone_: These tables contain time zone information: See , "MySQL Server Time Zone Support".xxx- Tables with
_login their name are used for logging: See , "MySQL Server Logs".
Each grant table contains scope columns and privilege columns:
- Scope columns determine the scope of each row (entry) in the tables; that is, the context in which the row applies. For example, a
usertable row withHostandUservalues of'thomas.loc.gov'and'bob'would be used for authenticating connections made to the server from the hostthomas.loc.govby a client that specifies a user name ofbob. Similarly, adbtable row withHost,User, andDbcolumn values of'thomas.loc.gov','bob'and'reports'would be used whenbobconnects from the hostthomas.loc.govto access thereportsdatabase. Thetables_privandcolumns_privtables contain scope columns indicating tables or table/column combinations to which each row applies. Theprocs_privscope columns indicate the stored routine to which each row applies. - Privilege columns indicate which privileges are granted by a table row; that is, what operations can be performed. The server combines the information in the various grant tables to form a complete description of a user's privileges. , "Access Control, Stage 2: Request Verification", describes the rules that are used to do this.
The server uses the grant tables in the following manner:
- The
usertable scope columns determine whether to reject or permit incoming connections. For permitted connections, any privileges granted in theusertable indicate the user's global privileges. Any privilege granted in this table applies to all databases on the server.
NoteBecause any global privilege is considered a privilege for all databases, any global privilege enables a user to see all database names with
SHOW DATABASESor by examining theSCHEMATAtable ofINFORMATION_SCHEMA. - The
dbtable scope columns determine which users can access which databases from which hosts. The privilege columns determine which operations are permitted. A privilege granted at the database level applies to the database and to all objects in the database, such as tables and stored programs. - The
hosttable is used in conjunction with thedbtable when you want a givendbtable row to apply to several hosts. For example, if you want a user to be able to use a database from several hosts in your network, leave theHostvalue empty in the user'sdbtable row, then populate thehosttable with a row for each of those hosts. This mechanism is described more detail in , "Access Control, Stage 2: Request Verification".
NoteThe
hosttable must be modified directly with statements such asINSERT,UPDATE, andDELETE. It is not affected by statements such asGRANTandREVOKEthat modify the grant tables indirectly. Most MariaDB installations need not use this table at all. - The
tables_privandcolumns_privtables are similar to thedbtable, but are more fine-grained: They apply at the table and column levels rather than at the database level. A privilege granted at the table level applies to the table and to all its columns. A privilege granted at the column level applies only to a specific column. - The
procs_privtable applies to stored routines. A privilege granted at the routine level applies only to a single routine. - The
proxies_privtable indicates which users can act as proxies for other users and whether proxy users can grant thePROXYprivilege to other users.
The server uses the user, db, and host tables in the MariaDB database at both the first and second stages of access control (see , "The MariaDB Access Privilege System"). The columns in the user and db tables are shown here. The host table is similar to the db table but has a specialized use as described in , "Access Control, Stage 2: Request Verification".
Table 5.7. user and db Table Columns
| Table Name | user
| db
|
|---|---|---|
| Scope columns | Host
| Host
|
User
| Db
| |
Password
| User
| |
| Privilege columns | Select_priv
| Select_priv
|
Insert_priv
| Insert_priv
| |
Update_priv
| Update_priv
| |
Delete_priv
| Delete_priv
| |
Index_priv
| Index_priv
| |
Alter_priv
| Alter_priv
| |
Create_priv
| Create_priv
| |
Drop_priv
| Drop_priv
| |
Grant_priv
| Grant_priv
| |
Create_view_priv
| Create_view_priv
| |
Show_view_priv
| Show_view_priv
| |
Create_routine_priv
| Create_routine_priv
| |
Alter_routine_priv
| Alter_routine_priv
| |
Execute_priv
| Execute_priv
| |
Trigger_priv
| Trigger_priv
| |
Event_priv
| Event_priv
| |
Create_tmp_table_priv
| Create_tmp_table_priv
| |
Lock_tables_priv
| Lock_tables_priv
| |
References_priv
| References_priv
| |
Reload_priv
| ||
Shutdown_priv
| ||
Process_priv
| ||
File_priv
| ||
Show_db_priv
| ||
Super_priv
| ||
Repl_slave_priv
| ||
Repl_client_priv
| ||
Create_user_priv
| ||
Create_tablespace_priv
| ||
| Security columns | ssl_type
| |
ssl_cipher
| ||
x509_issuer
| ||
x509_subject
| ||
plugin
| ||
authentication_string
| ||
| Resource control columns | max_questions
| |
max_updates
| ||
max_connections
| ||
max_user_connections
|
The mysql.user table plugin and authentication_string columns store authentication plugin information.
If the plugin column for an account row is empty, the server uses native authentication for connection attempts for the account: Clients must match the password in the Password column of the account row.
If an account row names a plugin in the plugin column, the server uses it to authenticate connection attempts for the account. Whether the plugin uses the value in the Password column is up to the plugin.
During the second stage of access control, the server performs request verification to make sure that each client has sufficient privileges for each request that it issues. In addition to the user, db, and host grant tables, the server may also consult the tables_priv and columns_priv tables for requests that involve tables. The latter tables provide finer privilege control at the table and column levels. They have the columns shown in the following table.
Table 5.8. tables_priv and columns_priv Table Columns
| Table Name | tables_priv
| columns_priv
|
|---|---|---|
| Scope columns | Host
| Host
|
Db
| Db
| |
User
| User
| |
Table_name
| Table_name
| |
Column_name
| ||
| Privilege columns | Table_priv
| Column_priv
|
Column_priv
| ||
| Other columns | Timestamp
| Timestamp
|
Grantor
|
The Timestamp and Grantor columns currently are unused and are discussed no further here.
For verification of requests that involve stored routines, the server may consult the procs_priv table, which has the columns shown in the following table.
Table 5.9. procs_priv Table Columns
| Table Name | procs_priv
|
|---|---|
| Scope columns | Host
|
Db
| |
User
| |
Routine_name
| |
Routine_type
| |
| Privilege columns | Proc_priv
|
| Other columns | Timestamp
|
Grantor |
The Routine_type column is an ENUM column with values of 'FUNCTION' or 'PROCEDURE' to indicate the type of routine the row refers to. This column enables privileges to be granted separately for a function and a procedure with the same name.
The Timestamp and Grantor columns currently are unused and are discussed no further here.
The proxies_priv table records information about proxy users. It has these columns:
Host,User: These columns indicate the user account that has thePROXYprivilege for the proxied account.Proxied_host,Proxied_user: These columns indicate the account of the proxied user.Grantor: Currently unused.Timestamp: Currently unused.With_grant: This column indicates whether the proxy account can grant thePROXYprivilege to other accounts.
Scope columns in the grant tables contain strings. They are declared as shown here; the default value for each is the empty string.
Table 5.10. Grant Table Scope Column Types
| Column Name | Type |
|---|---|
Host
| CHAR(60)
|
User
| CHAR(16)
|
Password
| CHAR(41)
|
Db
| CHAR(64)
|
Table_name
| CHAR(64)
|
Column_name
| CHAR(64)
|
Routine_name
| CHAR(64) |
For access-checking purposes, comparisons of User, Password, Db, and Table_name values are case sensitive. Comparisons of Host, Column_name, and Routine_name values are not case sensitive.
In the user, db, and host tables, each privilege is listed in a separate column that is declared as ENUM('N','Y') DEFAULT 'N'. In other words, each privilege can be disabled or enabled, with the default being disabled.
In the tables_priv, columns_priv, and procs_priv tables, the privilege columns are declared as SET columns. Values in these columns can contain any combination of the privileges controlled by the table. Only those privileges listed in the column value are enabled.
Table 5.11. Set-Type Privilege Column Values
| Table Name | Column Name | Possible Set Elements |
|---|---|---|
tables_priv
| Table_priv
| 'Select', 'Insert', 'Update', 'Delete', 'Create', 'Drop', 'Grant', 'References', 'Index', 'Alter', 'Create View', 'Show view', 'Trigger'
|
tables_priv
| Column_priv
| 'Select', 'Insert', 'Update', 'References'
|
columns_priv
| Column_priv
| 'Select', 'Insert', 'Update', 'References'
|
procs_priv
| Proc_priv
| 'Execute', 'Alter Routine', 'Grant' |
Administrative privileges (such as RELOAD or SHUTDOWN) are specified only in the user table. Administrative operations are operations on the server itself and are not database-specific, so there is no reason to list these privileges in the other grant tables. Consequently, to determine whether you can perform an administrative operation, the server need consult only the user table.
The FILE privilege also is specified only in the user table. It is not an administrative privilege as such, but your ability to read or write files on the server host is independent of the database you are accessing.
The mysqld server reads the contents of the grant tables into memory when it starts. You can tell it to reload the tables by issuing a FLUSH PRIVILEGES statement or executing a mysqladmin flush-privileges or mysqladmin reload command. Changes to the grant tables take effect as indicated in , "When Privilege Changes Take Effect".
When you modify an account's privileges, it is a good idea to verify that the changes set up privileges the way you want. To check the privileges for a given account, use the SHOW GRANTS statement (see , "SHOW GRANTS Syntax"). For example, to determine the privileges that are granted to an account with user name and host name values of bob and pc84.example.com, use this statement:
SHOW GRANTS FOR 'bob'@'pc84.example.com';
Specifying Account Names
MySQL account names consist of a user name and a host name. This enables creation of accounts for users with the same name who can connect from different hosts. This section describes how to write account names, including special values and wildcard rules.
In SQL statements such as CREATE USER, GRANT, and SET PASSWORD, write account names using the following rules:
- Syntax for account names is
'.user_name'@'host_name' - An account name consisting only of a user name is equivalent to
'. For example,user_name'@'%''me'is equivalent to'me'@'%'. - The user name and host name need not be quoted if they are legal as unquoted identifiers. Quotes are necessary to specify a
user_namestring containing special characters (such as "-"), or ahost_namestring containing special characters or wildcard characters (such as "%"); for example,'test-user'@'%.com'. - Quote user names and host names as identifiers or as strings, using either backticks ("
`"), single quotation marks ("'"), or double quotation marks ("'"). - The user name and host name parts, if quoted, must be quoted separately. That is, write
'me'@'localhost', not'me@localhost'; the latter is interpreted as'me@localhost'@'%'. - A reference to the
CURRENT_USER()(orCURRENT_USER) function is equivalent to specifying the current user's name and host name literally.
MySQL stores account names in grant tables in the MariaDB database using separate columns for the user name and host name parts:
- The
usertable contains one row for each account. TheUserandHostcolumns store the user name and host name. This table also indicates which global privileges the account has. - Other grant tables indicate privileges an account has for databases and objects within databases. These tables have
UserandHostcolumns to store the account name. Each row in these tables associates with the account in theusertable that has the sameUserandHostvalues.
For additional detail about grant table structure, see , "Privilege System Grant Tables".
User names and host names have certain special values or wildcard conventions, as described following.
A user name is either a nonblank value that literally matches the user name for incoming connection attempts, or a blank value (empty string) that matches any user name. An account with a blank user name is an anonymous user. To specify an anonymous user in SQL statements, use a quoted empty user name part, such as ''@'localhost'.
The host name part of an account name can take many forms, and wildcards are permitted:
- A host value can be a host name or an IP address. The name
'localhost'indicates the local host. The IP address'127.0.0.1'indicates the loopback interface. For the local host, the host value can be the IPv6 address'::1', which indicates the IPv6 loopback interface. - You can use the wildcard characters "
%" and "_" in host values. These have the same meaning as for pattern-matching operations performed with theLIKEoperator. For example, a host value of'%'matches any host name, whereas a value of'%.mysql.com'matches any host in themysql.comdomain.'192.168.1.%'matches any host in the 192.168.1 class C network.
Because you can use IP wildcard values in host values (for example,
'192.168.1.%'to match every host on a subnet), someone could try to exploit this capability by naming a host192.168.1.somewhere.com. To foil such attempts, MariaDB disallows matching on host names that start with digits and a dot. Thus, if you have a host named something like1.2.example.com, its name never matches the host part of account names. An IP wildcard value can match only IP addresses, not host names. - For a host value specified as an IP address, you can specify a netmask indicating how many address bits to use for the network number. This applies only for IPv4 addresses, not IPv6 addresses. The syntax is
host_ip/netmask
CREATE USER 'david'@'192.58.197.0/255.255.255.0';
This enables
davidto connect from any client host having an IP addressclient_ipfor which the following condition is true:client_ip&netmask=host_ipThat is, for the
CREATE USERstatement just shown:client_ip& 255.255.255.0 = 192.58.197.0IP addresses that satisfy this condition and can connect to the MariaDB server are those in the range from
192.58.197.0to192.58.197.255.The netmask can only be used to tell the server to use 8, 16, 24, or 32 bits of the address. Examples:
192.0.0.0/255.0.0.0: Any host on the 192 class A network192.168.0.0/255.255.0.0: Any host on the 192.168 class B network192.168.1.0/255.255.255.0: Any host on the 192.168.1 class C network192.168.1.1: Only the host with this specific IP address
The following netmask will not work because it masks 28 bits, and 28 is not a multiple of 8:
192.168.0.1/255.255.255.240
Access Control, Stage 1: Connection Verification
When you attempt to connect to a MariaDB server, the server accepts or rejects the connection based on your identity and whether you can verify your identity by supplying the correct password. If not, the server denies access to you completely. Otherwise, the server accepts the connection, and then enters Stage 2 and waits for requests.
Your identity is based on two pieces of information:
- The client host from which you connect
- Your MariaDB user name
Identity checking is performed using the three user table scope columns (Host, User, and Password). The server accepts the connection only if the Host and User columns in some user table row match the client host name and user name and the client supplies the password specified in that row. The rules for permissible Host and User values are given in , "Specifying Account Names".
If the User column value is nonblank, the user name in an incoming connection must match exactly. If the User value is blank, it matches any user name. If the user table row that matches an incoming connection has a blank user name, the user is considered to be an anonymous user with no name, not a user with the name that the client actually specified. This means that a blank user name is used for all further access checking for the duration of the connection (that is, during Stage 2).
The Password column can be blank. This is not a wildcard and does not mean that any password matches. It means that the user must connect without specifying a password. If the server authenticates a client using a plugin, the authentication method that the plugin implements may or may not use the password in the Password column. In this case, it is possible that an external password is also used to authenticate to the MariaDB server.
Nonblank Password values in the user table represent encrypted passwords. MariaDB does not store passwords in plaintext form for anyone to see. Rather, the password supplied by a user who is attempting to connect is encrypted (using the PASSWORD() function). The encrypted password then is used during the connection process when checking whether the password is correct. This is done without the encrypted password ever traveling over the connection. See , "User Names and Passwords".
From MySQL's point of view, the encrypted password is the real password, so you should never give anyone access to it. In particular, do not give nonadministrative users read access to tables in the MariaDB database.
The following table shows how various combinations of Host and User values in the user table apply to incoming connections.
Host Value
| User Value
| Permissible Connections |
|---|---|---|
'thomas.loc.gov'
| 'fred'
| fred, connecting from thomas.loc.gov
|
'thomas.loc.gov'
| ''
| Any user, connecting from thomas.loc.gov
|
'%'
| 'fred'
| fred, connecting from any host
|
'%'
| ''
| Any user, connecting from any host |
'%.loc.gov'
| 'fred'
| fred, connecting from any host in the loc.gov domain
|
'x.y.%'
| 'fred'
| fred, connecting from x.y.net, x.y.com, x.y.edu, and so on; this is probably not useful
|
'144.155.166.177'
| 'fred'
| fred, connecting from the host with IP address 144.155.166.177
|
'144.155.166.%'
| 'fred'
| fred, connecting from any host in the 144.155.166 class C subnet
|
'144.155.166.0/255.255.255.0'
| 'fred'
| Same as previous example |
It is possible for the client host name and user name of an incoming connection to match more than one row in the user table. The preceding set of examples demonstrates this: Several of the entries shown match a connection from thomas.loc.gov by fred.
When multiple matches are possible, the server must determine which of them to use. It resolves this issue as follows:
- Whenever the server reads the
usertable into memory, it sorts the rows. - When a client attempts to connect, the server looks through the rows in sorted order.
- The server uses the first row that matches the client host name and user name.
The server uses sorting rules that order rows with the most-specific Host values first. Literal host names and IP addresses are the most specific. (The specificity of a literal IP address is not affected by whether it has a netmask, so 192.168.1.13 and 192.168.1.0/255.255.255.0 are considered equally specific.) The pattern '%' means "any host" and is least specific. The empty string '' also means "any host" but sorts after '%'. Rows with the same Host value are ordered with the most-specific User values first (a blank User value means "any user" and is least specific).
To see how this works, suppose that the user table looks like this:
+-----------+----------+-
| Host | User | ...
+-----------+----------+-
| % | root | ...
| % | jeffrey | ...
| localhost | root | ...
| localhost | | ...
+-----------+----------+-
When the server reads the table into memory, it sorts the rows using the rules just described. The result after sorting looks like this:
+-----------+----------+-
| Host | User | ...
+-----------+----------+-
| localhost | root | ...
| localhost | | ...
| % | jeffrey | ...
| % | root | ...
+-----------+----------+-
When a client attempts to connect, the server looks through the sorted rows and uses the first match found. For a connection from localhost by jeffrey, two of the rows from the table match: the one with Host and User values of 'localhost' and '', and the one with values of '%' and 'jeffrey'. The 'localhost' row appears first in sorted order, so that is the one the server uses.
Here is another example. Suppose that the user table looks like this:
+----------------+----------+-
| Host | User | ...
+----------------+----------+-
| % | jeffrey | ...
| thomas.loc.gov | | ...
+----------------+----------+-
The sorted table looks like this:
+----------------+----------+-
| Host | User | ...
+----------------+----------+-
| thomas.loc.gov | | ...
| % | jeffrey | ...
+----------------+----------+-
A connection by jeffrey from thomas.loc.gov is matched by the first row, whereas a connection by jeffrey from any host is matched by the second.Note
It is a common misconception to think that, for a given user name, all rows that explicitly name that user are used first when the server attempts to find a match for the connection. This is not true. The preceding example illustrates this, where a connection from thomas.loc.gov by jeffrey is first matched not by the row containing 'jeffrey' as the User column value, but by the row with no user name. As a result, jeffrey is authenticated as an anonymous user, even though he specified a user name when connecting.
If you are able to connect to the server, but your privileges are not what you expect, you probably are being authenticated as some other account. To find out what account the server used to authenticate you, use the CURRENT_USER() function. (See , "Information Functions".) It returns a value in user_name@host_nameUser and Host values from the matching user table row. Suppose that jeffrey connects and issues the following query:
mysql> SELECT CURRENT_USER();
+----------------+
| CURRENT_USER() |
+----------------+
| @localhost |
+----------------+
The result shown here indicates that the matching user table row had a blank User column value. In other words, the server is treating jeffrey as an anonymous user.
Another way to diagnose authentication problems is to print out the user table and sort it by hand to see where the first match is being made.
Access Control, Stage 2: Request Verification
After you establish a connection, the server enters Stage 2 of access control. For each request that you issue through that connection, the server determines what operation you want to perform, then checks whether you have sufficient privileges to do so. This is where the privilege columns in the grant tables come into play. These privileges can come from any of the user, db, host, tables_priv, columns_priv, or procs_priv tables. (You may find it helpful to refer to , "Privilege System Grant Tables", which lists the columns present in each of the grant tables.)
The user table grants privileges that are assigned to you on a global basis and that apply no matter what the default database is. For example, if the user table grants you the DELETE privilege, you can delete rows from any table in any database on the server host! It is wise to grant privileges in the user table only to people who need them, such as database administrators. For other users, you should leave all privileges in the user table set to 'N' and grant privileges at more specific levels only. You can grant privileges for particular databases, tables, columns, or routines.
The db and host tables grant database-specific privileges. Values in the scope columns of these tables can take the following forms:
- A blank
Uservalue in thedbtable matches the anonymous user. A nonblank value matches literally; there are no wildcards in user names. - The wildcard characters "
%" and "_" can be used in theHostandDbcolumns of either table. These have the same meaning as for pattern-matching operations performed with theLIKEoperator. If you want to use either character literally when granting privileges, you must escape it with a backslash. For example, to include the underscore character ("_") as part of a database name, specify it as "\_" in theGRANTstatement. - A
'%'Hostvalue in thedbtable means "any host." A blankHostvalue in thedbtable means "consult thehosttable for further information" (a process that is described later in this section). - A
'%'or blankHostvalue in thehosttable means "any host." - A
'%'or blankDbvalue in either table means "any database."
The server reads the db and host tables into memory and sorts them at the same time that it reads the user table. The server sorts the db table based on the Host, Db, and User scope columns, and sorts the host table based on the Host and Db scope columns. As with the user table, sorting puts the most-specific values first and least-specific values last, and when the server looks for matching entries, it uses the first match that it finds.
The tables_priv, columns_priv, and procs_priv tables grant table-specific, column-specific, and routine-specific privileges. Values in the scope columns of these tables can take the following forms:
- The wildcard characters "
%" and "_" can be used in theHostcolumn. These have the same meaning as for pattern-matching operations performed with theLIKEoperator. - A
'%'or blankHostvalue means "any host." - The
Db,Table_name,Column_name, andRoutine_namecolumns cannot contain wildcards or be blank.
The server sorts the tables_priv, columns_priv, and procs_priv tables based on the Host, Db, and User columns. This is similar to db table sorting, but simpler because only the Host column can contain wildcards.
The server uses the sorted tables to verify each request that it receives. For requests that require administrative privileges such as SHUTDOWN or RELOAD, the server checks only the user table row because that is the only table that specifies administrative privileges. The server grants access if the row permits the requested operation and denies access otherwise. For example, if you want to execute mysqladmin shutdown but your user table row does not grant the SHUTDOWN privilege to you, the server denies access without even checking the db or host tables. (They contain no Shutdown_priv column, so there is no need to do so.)
For database-related requests (INSERT, UPDATE, and so on), the server first checks the user's global privileges by looking in the user table row. If the row permits the requested operation, access is granted. If the global privileges in the user table are insufficient, the server determines the user's database-specific privileges by checking the db and host tables:
- The server looks in the
dbtable for a match on theHost,Db, andUsercolumns. TheHostandUsercolumns are matched to the connecting user's host name and MariaDB user name. TheDbcolumn is matched to the database that the user wants to access. If there is no row for theHostandUser, access is denied. - If there is a matching
dbtable row and itsHostcolumn is not blank, that row defines the user's database-specific privileges. - If the matching
dbtable row'sHostcolumn is blank, it signifies that thehosttable enumerates which hosts should be permitted access to the database. In this case, a further lookup is done in thehosttable to find a match on theHostandDbcolumns. If nohosttable row matches, access is denied. If there is a match, the user's database-specific privileges are computed as the intersection (not the union!) of the privileges in thedbandhosttable entries; that is, the privileges that are'Y'in both entries. (This way you can grant general privileges in thedbtable row and then selectively restrict them on a host-by-host basis using thehosttable entries.)
After determining the database-specific privileges granted by the db and host table entries, the server adds them to the global privileges granted by the user table. If the result permits the requested operation, access is granted. Otherwise, the server successively checks the user's table and column privileges in the tables_priv and columns_priv tables, adds those to the user's privileges, and permits or denies access based on the result. For stored-routine operations, the server uses the procs_priv table rather than tables_priv and columns_priv.
Expressed in boolean terms, the preceding description of how a user's privileges are calculated may be summarized like this:
global privileges OR (database privileges AND host privileges)
OR table privileges OR column privileges OR routine privileges
It may not be apparent why, if the global user row privileges are initially found to be insufficient for the requested operation, the server adds those privileges to the database, table, and column privileges later. The reason is that a request might require more than one type of privilege. For example, if you execute an INSERT INTO ... SELECT statement, you need both the INSERT and the SELECT privileges. Your privileges might be such that the user table row grants one privilege and the db table row grants the other. In this case, you have the necessary privileges to perform the request, but the server cannot tell that from either table by itself; the privileges granted by the entries in both tables must be combined.
The host table is not affected by the GRANT or REVOKE statements, so it is unused in most MariaDB installations. If you modify it directly, you can use it for some specialized purposes, such as to maintain a list of secure servers on the local network that are granted all privileges.
You can also use the host table to indicate hosts that are not secure. Suppose that you have a machine public.your.domain that is located in a public area that you do not consider secure. You can enable access to all hosts on your network except that machine by using host table entries like this:
+--------------------+----+-
| Host | Db | ...
+--------------------+----+-
| public.your.domain | % | ... (all privileges set to 'N')
| %.your.domain | % | ... (all privileges set to 'Y')
+--------------------+----+-
When Privilege Changes Take Effect
When mysqld starts, it reads all grant table contents into memory. The in-memory tables become effective for access control at that point.
If you modify the grant tables indirectly using account-management statements such as GRANT, REVOKE, SET PASSWORD, or RENAME USER, the server notices these changes and loads the grant tables into memory again immediately.
If you modify the grant tables directly using statements such as INSERT, UPDATE, or DELETE, your changes have no effect on privilege checking until you either restart the server or tell it to reload the tables. If you change the grant tables directly but forget to reload them, your changes have no effect until you restart the server. This may leave you wondering why your changes seem to make no difference!
To tell the server to reload the grant tables, perform a flush-privileges operation. This can be done by issuing a FLUSH PRIVILEGES statement or by executing a mysqladmin flush-privileges or mysqladmin reload command.
A grant table reload affects privileges for each existing client connection as follows:
- Table and column privilege changes take effect with the client's next request.
- Database privilege changes take effect the next time the client executes a
USEstatement.db_name
NoteClient applications may cache the database name; thus, this effect may not be visible to them without actually changing to a different database or flushing the privileges.
- Global privileges and passwords are unaffected for a connected client. These changes take effect only for subsequent connections.
If the server is started with the --skip-grant-tables option, it does not read the grant tables or implement any access control. Anyone can connect and do anything, which is insecure. To cause a server thus started to read the tables and enable access checking, flush the privileges.
Causes of Access-Denied Errors
If you encounter problems when you try to connect to the MariaDB server, the following items describe some courses of action you can take to correct the problem.
- Make sure that the server is running. If it is not, clients cannot connect to it. For example, if an attempt to connect to the server fails with a message such as one of those following, one cause might be that the server is not running:
shell>
MariaDBERROR 2003: Can't connect to MariaDB server on 'host_name' (111) shell>MariaDBERROR 2002: Can't connect to local MariaDB server through socket '/tmp/mysql.sock' (111) - It might be that the server is running, but you are trying to connect using a TCP/IP port, named pipe, or Unix socket file different from the one on which the server is listening. To correct this when you invoke a client program, specify a
--portoption to indicate the proper port number, or a--socketoption to indicate the proper named pipe or Unix socket file. To find out where the socket file is, you can use this command:
shell>
netstat -ln | grep mysql - Make sure that the server has not been configured to ignore network connections or (if you are attempting to connect remotely) that it has not been configured to listen only locally on its network interfaces. If the server was started with
--skip-networking, it will not accept TCP/IP connections at all. If the server was started with--bind-address=127.0.0.1, it will listen for TCP/IP connections only locally on the loopback interface and will not accept remote connections. - Check to make sure that there is no firewall blocking access to MariaDB. Your firewall may be configured on the basis of the application being executed, or the port number used by MariaDB for communication (3306 by default). Under Linux or Unix, check your IP tables (or similar) configuration to ensure that the port has not been blocked. Under Windows, applications such as ZoneAlarm or the Windows XP personal firewall may need to be configured not to block the MariaDB port.
- The grant tables must be properly set up so that the server can use them for access control. For some distribution types (such as binary distributions on Windows, or RPM distributions on Linux), the installation process initializes the
MariaDBdatabase containing the grant tables. For distributions that do not do this, you must initialize the grant tables manually by running the mysql_install_db script. For details, see , "Unix Postinstallation Procedures".
To determine whether you need to initialize the grant tables, look for a
MariaDBdirectory under the data directory. (The data directory normally is nameddataorvarand is located under your MariaDB installation directory.) Make sure that you have a file nameduser.MYDin theMariaDBdatabase directory. If not, execute the mysql_install_db script. After running this script and starting the server, test the initial privileges by executing this command:shell>
mysql -u root testThe server should let you connect without error.
- After a fresh installation, you should connect to the server and set up your users and their access permissions:
shell>
mysql -u root mysqlThe server should let you connect because the MariaDB
rootuser has no password initially. That is also a security risk, so setting the password for therootaccounts is something you should do while you're setting up your other MariaDB accounts. For instructions on setting the initial passwords, see , "Securing the Initial MariaDB Accounts". - If you have updated an existing MariaDB installation to a newer version, did you run the mysql_upgrade script? If not, do so. The structure of the grant tables changes occasionally when new capabilities are added, so after an upgrade you should always make sure that your tables have the current structure. For instructions, see , "mysql_upgrade - Check Tables for MariaDB Upgrade".
- If a client program receives the following error message when it tries to connect, it means that the server expects passwords in a newer format than the client is capable of generating:
shell>
MariaDBClient does not support authentication protocol requested by server; consider upgrading MariaDB clientFor information on how to deal with this, see , "Password Hashing in MySQL", and "
Client does not support authentication protocol". - Remember that client programs use connection parameters specified in option files or environment variables. If a client program seems to be sending incorrect default connection parameters when you have not specified them on the command line, check any applicable option files and your environment. For example, if you get
Access deniedwhen you run a client without any options, make sure that you have not specified an old password in any of your option files!
You can suppress the use of option files by a client program by invoking it with the
--no-defaultsoption. For example:shell>
mysqladmin --no-defaults -u root versionThe option files that clients use are listed in , "Using Option Files". Environment variables are listed in , "Environment Variables".
- If you get the following error, it means that you are using an incorrect
rootpassword:
shell>
mysqladmin -u root -pAccess denied for user 'root'@'localhost' (using password: YES)xxxxverIf the preceding error occurs even when you have not specified a password, it means that you have an incorrect password listed in some option file. Try the
--no-defaultsoption as described in the previous item.For information on changing passwords, see , "Assigning Account Passwords".
If you have lost or forgotten the
rootpassword, see "How to Reset the Root Password". - If you change a password by using
SET PASSWORD,INSERT, orUPDATE, you must encrypt the password using thePASSWORD()function. If you do not usePASSWORD()for these statements, the password will not work. For example, the following statement assigns a password, but fails to encrypt it, so the user is not able to connect afterward:
SET PASSWORD FOR 'abe'@'
host_name' = 'eagle';Instead, set the password like this:
SET PASSWORD FOR 'abe'@'
host_name' = PASSWORD('eagle');The
PASSWORD()function is unnecessary when you specify a password using theCREATE USERorGRANTstatements or the mysqladmin password command. Each of those automatically usesPASSWORD()to encrypt the password. See , "Assigning Account Passwords", and , "CREATE USERSyntax". localhostis a synonym for your local host name, and is also the default host to which clients try to connect if you specify no host explicitly.
To avoid this problem on such systems, you can use a
--host=127.0.0.1option to name the server host explicitly. This will make a TCP/IP connection to the local mysqld server. You can also use TCP/IP by specifying a--hostoption that uses the actual host name of the local host. In this case, the host name must be specified in ausertable row on the server host, even though you are running the client program on the same host as the server.- The
Access deniederror message tells you who you are trying to log in as, the client host from which you are trying to connect, and whether you were using a password. Normally, you should have one row in theusertable that exactly matches the host name and user name that were given in the error message. For example, if you get an error message that containsusing password: NO, it means that you tried to log in without a password. - If you get an
Access deniederror when trying to connect to the database withmysql -u, you may have a problem with theuser_nameusertable. Check this by executingmysql -u root mysqland issuing this SQL statement:
SELECT * FROM user;
The result should include a row with the
HostandUsercolumns matching your client's host name and your MariaDB user name. - If the following error occurs when you try to connect from a host other than the one on which the MariaDB server is running, it means that there is no row in the
usertable with aHostvalue that matches the client host:
Host ... is not allowed to connect to this MariaDB server
You can fix this by setting up an account for the combination of client host name and user name that you are using when trying to connect.
If you do not know the IP address or host name of the machine from which you are connecting, you should put a row with
'%'as theHostcolumn value in theusertable. After trying to connect from the client machine, use aSELECT USER()query to see how you really did connect. Then change the'%'in theusertable row to the actual host name that shows up in the log. Otherwise, your system is left insecure because it permits connections from any host for the given user name.On Linux, another reason that this error might occur is that you are using a binary MariaDB version that is compiled with a different version of the
glibclibrary than the one you are using. In this case, you should either upgrade your operating system orglibc, or download a source distribution of MariaDB version and compile it yourself. A source RPM is normally trivial to compile and install, so this is not a big problem. - If you specify a host name when trying to connect, but get an error message where the host name is not shown or is an IP address, it means that the MariaDB server got an error when trying to resolve the IP address of the client host to a name:
shell>
mysqladmin -u root -pAccess denied for user 'root'@'' (using password: YES)xxxx-hsome_hostnameverIf you try to connect as
rootand get the following error, it means that you do not have a row in theusertable with aUsercolumn value of'root'and that mysqld cannot resolve the host name for your client:Access denied for user ''@'unknown'
These errors indicate a DNS problem. To fix it, execute mysqladmin flush-hosts to reset the internal DNS host cache. See , "DNS Lookup Optimization and the Host Cache".
Some permanent solutions are:
- Determine what is wrong with your DNS server and fix it.
- Specify IP addresses rather than host names in the MariaDB grant tables.
- Put an entry for the client machine name in
/etc/hostson Unix or\windows\hostson Windows. - Start mysqld with the
--skip-name-resolveoption. - Start mysqld with the
--skip-host-cacheoption. - On Unix, if you are running the server and the client on the same machine, connect to
localhost. Unix connections tolocalhostuse a Unix socket file rather than TCP/IP. - On Windows, if you are running the server and the client on the same machine and the server supports named pipe connections, connect to the host name
.(period). Connections to.use a named pipe rather than TCP/IP.
- If
mysql -u root testworks butmysql -hresults inyour_hostname-u root testAccess denied(whereyour_hostnameis the actual host name of the local host), you may not have the correct name for your host in theusertable. A common problem here is that theHostvalue in theusertable row specifies an unqualified host name, but your system's name resolution routines return a fully qualified domain name (or vice versa). For example, if you have an entry with host'pluto'in theusertable, but your DNS tells MariaDB that your host name is'pluto.example.com', the entry does not work. Try adding an entry to theusertable that contains the IP address of your host as theHostcolumn value. (Alternatively, you could add an entry to theusertable with aHostvalue that contains a wildcard; for example,'pluto.%'. However, use ofHostvalues ending with "%" is insecure and is not recommended!) - If
mysql -uworks butuser_nametestmysql -udoes not, you have not granted access to the given user for the database nameduser_nameother_dbother_db. - If
mysql -uworks when executed on the server host, butuser_namemysql -hdoes not work when executed on a remote client host, you have not enabled access to the server for the given user name from the remote host.host_name-uuser_name - If you cannot figure out why you get
Access denied, remove from theusertable all entries that haveHostvalues containing wildcards (entries that contain'%'or'_'characters). A very common error is to insert a new entry withHost='%'andUser=', thinking that this enables you to specifysome_user'localhostto connect from the same machine. The reason that this does not work is that the default privileges include an entry withHost='localhost'andUser=''. Because that entry has aHostvalue'localhost'that is more specific than'%', it is used in preference to the new entry when connecting fromlocalhost! The correct procedure is to insert a second entry withHost='localhost'andUser=', or to delete the entry withsome_user'Host='localhost'andUser=''. After deleting the entry, remember to issue aFLUSH PRIVILEGESstatement to reload the grant tables. See also , "Access Control, Stage 1: Connection Verification". - If you are able to connect to the MariaDB server, but get an
Access deniedmessage whenever you issue aSELECT ... INTO OUTFILEorLOAD DATA INFILEstatement, your entry in theusertable does not have theFILEprivilege enabled. - If you change the grant tables directly (for example, by using
INSERT,UPDATE, orDELETEstatements) and your changes seem to be ignored, remember that you must execute aFLUSH PRIVILEGESstatement or a mysqladmin flush-privileges command to cause the server to reload the privilege tables. Otherwise, your changes have no effect until the next time the server is restarted. Remember that after you change therootpassword with anUPDATEstatement, you will not need to specify the new password until after you flush the privileges, because the server will not know you've changed the password yet! - If your privileges seem to have changed in the middle of a session, it may be that a MariaDB administrator has changed them. Reloading the grant tables affects new client connections, but it also affects existing connections as indicated in , "When Privilege Changes Take Effect".
- If you have access problems with a Perl, PHP, Python, or ODBC program, try to connect to the server with
mysql -uoruser_namedb_namemysql -u. If you are able to connect using the mysql client, the problem lies with your program, not with the access privileges. (There is no space betweenuser_name-pyour_passdb_name-pand the password; you can also use the--password=syntax to specify the password. If you use theyour_pass-por--passwordoption with no password value, MariaDB prompts you for the password.) - For testing purposes, start the mysqld server with the
--skip-grant-tablesoption. Then you can change the MariaDB grant tables and use the mysqlaccess script to check whether your modifications have the desired effect. When you are satisfied with your changes, execute mysqladmin flush-privileges to tell the mysqld server to reload the privileges. This enables you to begin using the new grant table contents without stopping and restarting the server. - If you get the following error, you may have a problem with the
dborhosttable:
Access to database denied
If the entry selected from the
dbtable has an empty value in theHostcolumn, make sure that there are one or more corresponding entries in thehosttable specifying which hosts thedbtable entry applies to. This problem occurs infrequently because thehosttable is rarely used. - If everything else fails, start the mysqld server with a debugging option (for example,
--debug=d,general,query). This prints host and user information about attempted connections, as well as information about each command issued. See MySQL Internals: Porting. - If you have any other problems with the MariaDB grant tables and feel you must post the problem to the mailing list, always provide a dump of the MariaDB grant tables. You can dump the tables with the mysqldump mysql command. To file a bug report, see the instructions at , "How to Report Bugs or Problems". In some cases, you may need to restart mysqld with
--skip-grant-tablesto run mysqldump.
MySQL User Account Management
- User Names and Passwords
- Adding User Accounts
- Removing User Accounts
- Setting Account Resource Limits
- Assigning Account Passwords
- Pluggable Authentication
- Proxy Users
- Using SSL for Secure Connections
- Connecting to MariaDB Remotely from Windows with SSH
- Auditing MariaDB Account Activity
- Adding User Accounts
This section describes how to set up accounts for clients of your MariaDB server. It discusses the following topics:
- The meaning of account names and passwords as used in MariaDB and how that compares to names and passwords used by your operating system
- How to set up new accounts and remove existing accounts
- How to change passwords
- Guidelines for using passwords securely
- How to use secure connections with SSL
See also , "Account Management Statements", which describes the syntax and use for all user-management SQL statements.
User Names and Passwords
MySQL stores accounts in the user table of the MariaDB database. An account is defined in terms of a user name and the client host or hosts from which the user can connect to the server. The account may also have a password. For information about account representation in the user table, see , "Privilege System Grant Tables". MariaDB 5.6 supports authentication plugins, so it is possible that an account authenticates using some external authentication method. See , "Pluggable Authentication".
There are several distinctions between the way user names and passwords are used by MariaDB and the way they are used by your operating system:
- User names, as used by MariaDB for authentication purposes, have nothing to do with user names (login names) as used by Windows or Unix. On Unix, most MariaDB clients by default try to log in using the current Unix user name as the MariaDB user name, but that is for convenience only. The default can be overridden easily, because client programs permit any user name to be specified with a
-uor--useroption. Because this means that anyone can attempt to connect to the server using any user name, you cannot make a database secure in any way unless all MariaDB accounts have passwords. Anyone who specifies a user name for an account that has no password is able to connect successfully to the server. - MySQL user names can be up to 16 characters long. Operating system user names, because they are completely unrelated to MariaDB user names, may be of a different maximum length. For example, Unix user names typically are limited to eight characters.
WarningThe limit on MariaDB user name length is hard-coded in the MariaDB servers and clients, and trying to circumvent it by modifying the definitions of the tables in the
MariaDBdatabase does not work.You should never alter any of the tables in the
MariaDBdatabase in any manner whatsoever except by means of the procedure that is described in , "mysql_upgrade - Check Tables for MariaDB Upgrade". Attempting to redefine MySQL's system tables in any other fashion results in undefined (and unsupported!) behavior. - The server uses MariaDB passwords stored in the
usertable to authenticate client connections using MariaDB native authentication (against passwords stored in themysql.usertable). These passwords have nothing to do with passwords for logging in to your operating system. There is no necessary connection between the "external" password you use to log in to a Windows or Unix machine and the password you use to access the MariaDB server on that machine.
If the server authenticates a client using a plugin, the authentication method that the plugin implements may or may not use the password in the
usertable. In this case, it is possible that an external password is also used to authenticate to the MariaDB server. - MySQL encrypts passwords stored in the
usertable using its own algorithm. This encryption is the same as that implemented by thePASSWORD()SQL function but differs from that used during the Unix login process. Unix password encryption is the same as that implemented by theENCRYPT()SQL function. See the descriptions of thePASSWORD()andENCRYPT()functions in , "Encryption and Compression Functions".
From version 4.1 on, MariaDB employs a stronger authentication method that has better password protection during the connection process than in earlier versions. It is secure even if TCP/IP packets are sniffed or the
MariaDBdatabase is captured. (In earlier versions, even though passwords are stored in encrypted form in theusertable, knowledge of the encrypted password value could be used to connect to the MariaDB server.) , "Password Hashing in MySQL", discusses password encryption further. - It is possible to connect to the server regardless of character set settings if the user name and password contain only ASCII characters. To connect when the user name or password contain non-ASCII characters, the client should call the
mysql_options()C API function with theMYSQL_SET_CHARSET_NAMEoption and appropriate character set name as arguments. This causes authentication to take place using the specified character set. Otherwise, authentication will fail unless the server default character set is the same as the encoding in the authentication defaults.
Standard MariaDB client programs support a
--default-character-setoption that causesmysql_options()to be called as just described. In addition, character set autodetection is supported as described in , "Connection Character Sets and Collations". For programs that use a connector that is not based on the C API, the connector may provide an equivalent tomysql_options()that can be used instead. Check the connector documentation.The preceding notes do not apply for
ucs2,utf16, andutf32, which are not permitted as client character sets.
When you install MySQL, the grant tables are populated with an initial set of accounts. The names and access privileges for these accounts are described in , "Securing the Initial MariaDB Accounts", which also discusses how to assign passwords to them. Thereafter, you normally set up, modify, and remove MariaDB accounts using statements such as CREATE USER, GRANT, and REVOKE. See , "Account Management Statements".
When you connect to a MariaDB server with a command-line client, specify the user name and password as necessary for the account that you want to use:
shell> mysql --user=monty --password=password db_name
If you prefer short options, the command looks like this:
shell> mysql -u monty -ppassword db_name
There must be no space between the -p option and the following password value.
If you omit the password value following the --password or -p option on the command line, the client prompts for one.
Specifying a password on the command line should be considered insecure. See , "End-User Guidelines for Password Security". You can use an option file to avoid giving the password on the command line.
For additional information about specifying user names, passwords, and other connection parameters, see , "Connecting to the MariaDB Server".
Adding User Accounts
You can create MariaDB accounts in two ways:
- By using statements intended for creating accounts, such as
CREATE USERorGRANT. These statements cause the server to make appropriate modifications to the grant tables. - By manipulating the MariaDB grant tables directly with statements such as
INSERT,UPDATE, orDELETE.
The preferred method is to use account-creation statements because they are more concise and less error-prone than manipulating the grant tables directly. CREATE USER and GRANT are described in , "Account Management Statements".
Another option for creating accounts is to use one of several available third-party programs that offer capabilities for MariaDB account administration. phpMyAdmin is one such program.
The following examples show how to use the mysql client program to set up new accounts. These examples assume that privileges have been set up according to the defaults described in , "Securing the Initial MariaDB Accounts". This means that to make changes, you must connect to the MariaDB server as the MariaDB root user, and the root account must have the INSERT privilege for the MariaDB database and the RELOAD administrative privilege.
As noted in the examples where appropriate, some of the statements will fail if the server's SQL mode has been set to enable certain restrictions. In particular, strict mode (STRICT_TRANS_TABLES, STRICT_ALL_TABLES) and NO_AUTO_CREATE_USER will prevent the server from accepting some of the statements. Workarounds are indicated for these cases. For more information about SQL modes and their effect on grant table manipulation, see , "Server SQL Modes", and , "GRANT Syntax".
First, use the mysql program to connect to the server as the MariaDB root user:
shell> mysql --user=root mysql
If you have assigned a password to the root account, you will also need to supply a --password or -p option, both for this mysql command and for those later in this section.
After connecting to the server as root, you can add new accounts. The following statements use GRANT to set up four new accounts:
mysql>CREATE USER 'monty'@'localhost' IDENTIFIED BY 'some_pass';mysql>GRANT ALL PRIVILEGES ON *.* TO 'monty'@'localhost'->WITH GRANT OPTION;mysql>CREATE USER 'monty'@'%' IDENTIFIED BY 'some_pass';mysql>GRANT ALL PRIVILEGES ON *.* TO 'monty'@'%'->WITH GRANT OPTION;mysql>CREATE USER 'admin'@'localhost';mysql>GRANT RELOAD,PROCESS ON *.* TO 'admin'@'localhost';mysql>CREATE USER 'dummy'@'localhost';
The accounts created by these statements have the following properties:
- Two of the accounts have a user name of
montyand a password ofsome_pass. Both accounts are superuser accounts with full privileges to do anything. The'monty'@'localhost'account can be used only when connecting from the local host. The'monty'@'%'account uses the'%'wildcard for the host part, so it can be used to connect from any host.
It is necessary to have both accounts for
montyto be able to connect from anywhere asmonty. Without thelocalhostaccount, the anonymous-user account forlocalhostthat is created by mysql_install_db would take precedence whenmontyconnects from the local host. As a result,montywould be treated as an anonymous user. The reason for this is that the anonymous-user account has a more specificHostcolumn value than the'monty'@'%'account and thus comes earlier in theusertable sort order. (usertable sorting is discussed in , "Access Control, Stage 1: Connection Verification".) - The
'admin'@'localhost'account has no password. This account can be used only byadminto connect from the local host. It is granted theRELOADandPROCESSadministrative privileges. These privileges enable theadminuser to execute the mysqladmin reload, mysqladmin refresh, and mysqladmin flush-xxxcommands, as well as mysqladmin processlist . No privileges are granted for accessing any databases. You could add such privileges later by issuing otherGRANTstatements. - The
'dummy'@'localhost'account has no password. This account can be used only to connect from the local host. No privileges are granted. It is assumed that you will grant specific privileges to the account later.
The statements that create accounts with no password will fail if the NO_AUTO_CREATE_USER SQL mode is enabled. To deal with this, use an IDENTIFIED BY clause that specifies a nonempty password.
To check the privileges for an account, use SHOW GRANTS:
mysql> SHOW GRANTS FOR 'admin'@'localhost';
+-----------------------------------------------------+
| Grants for admin@localhost |
+-----------------------------------------------------+
| GRANT RELOAD, PROCESS ON *.* TO 'admin'@'localhost' |
+-----------------------------------------------------+
As an alternative to CREATE USER and GRANT, you can create the same accounts directly by issuing INSERT statements and then telling the server to reload the grant tables using FLUSH PRIVILEGES:
shell>mysql --user=root mysqlmysql>INSERT INTO user->VALUES('localhost','monty',PASSWORD('some_pass'),->'Y','Y','Y','Y','Y','Y','Y','Y','Y','Y','Y','Y','Y','Y');mysql>INSERT INTO user->VALUES('%','monty',PASSWORD('some_pass'),->'Y','Y','Y','Y','Y','Y','Y','Y','Y','Y','Y','Y','Y','Y',->'Y','Y','Y','Y','Y','Y','Y','Y','Y','Y','Y','Y','Y','Y',->'','','','',0,0,0,0);mysql>INSERT INTO user SET Host='localhost',User='admin',->Reload_priv='Y', Process_priv='Y';mysql>INSERT INTO user (Host,User,Password)->VALUES('localhost','dummy','');mysql>FLUSH PRIVILEGES;
When you create accounts with INSERT, it is necessary to use FLUSH PRIVILEGES to tell the server to reload the grant tables. Otherwise, the changes go unnoticed until you restart the server. With CREATE USER, FLUSH PRIVILEGES is unnecessary.
The reason for using the PASSWORD() function with INSERT is to encrypt the password. The CREATE USER statement encrypts the password for you, so PASSWORD() is unnecessary.
The 'Y' values enable privileges for the accounts. Depending on your MariaDB version, you may have to use a different number of 'Y' values in the first two INSERT statements. The INSERT statement for the admin account employs the more readable extended INSERT syntax using SET.
In the INSERT statement for the dummy account, only the Host, User, and Password columns in the user table row are assigned values. None of the privilege columns are set explicitly, so MariaDB assigns them all the default value of 'N'. This is equivalent to what CREATE USER does.
If strict SQL mode is enabled, all columns that have no default value must have a value specified. In this case, INSERT statements must explicitly specify values for the ssl_cipher, x509_issuer, and x509_subject columns.
To set up a superuser account, it is necessary only to insert a user table row with all privilege columns set to 'Y'. The user table privileges are global, so no entries in any of the other grant tables are needed.
The next examples create three accounts and give them access to specific databases. Each of them has a user name of custom and password of obscure.
To create the accounts with CREATE USER and GRANT, use the following statements:
shell>mysql --user=root mysqlmysql>CREATE USER 'custom'@'localhost' IDENTIFIED BY 'obscure';mysql>GRANT SELECT,INSERT,UPDATE,DELETE,CREATE,DROP->ON bankaccount.*->TO 'custom'@'localhost';mysql>CREATE USER 'custom'@'host47.example.com' IDENTIFIED BY 'obscure';mysql>GRANT SELECT,INSERT,UPDATE,DELETE,CREATE,DROP->ON expenses.*->TO 'custom'@'host47.example.com';mysql>CREATE USER 'custom'@'server.domain' IDENTIFIED BY 'obscure';mysql>GRANT SELECT,INSERT,UPDATE,DELETE,CREATE,DROP->ON customer.*->TO 'custom'@'server.domain';
The three accounts can be used as follows:
- The first account can access the
bankaccountdatabase, but only from the local host. - The second account can access the
expensesdatabase, but only from the hosthost47.example.com. - The third account can access the
customerdatabase, but only from the hostserver.domain.
To set up the custom accounts without GRANT, use INSERT statements as follows to modify the grant tables directly:
shell>mysql --user=root mysqlmysql>INSERT INTO user (Host,User,Password)->VALUES('localhost','custom',PASSWORD('obscure'));mysql>INSERT INTO user (Host,User,Password)->VALUES('host47.example.com','custom',PASSWORD('obscure'));mysql>INSERT INTO user (Host,User,Password)->VALUES('server.domain','custom',PASSWORD('obscure'));mysql>INSERT INTO db->(Host,Db,User,Select_priv,Insert_priv,->Update_priv,Delete_priv,Create_priv,Drop_priv)->VALUES('localhost','bankaccount','custom',->'Y','Y','Y','Y','Y','Y');mysql>INSERT INTO db->(Host,Db,User,Select_priv,Insert_priv,->Update_priv,Delete_priv,Create_priv,Drop_priv)->VALUES('host47.example.com','expenses','custom',->'Y','Y','Y','Y','Y','Y');mysql>INSERT INTO db->(Host,Db,User,Select_priv,Insert_priv,->Update_priv,Delete_priv,Create_priv,Drop_priv)->VALUES('server.domain','customer','custom',->'Y','Y','Y','Y','Y','Y');mysql>FLUSH PRIVILEGES;
The first three INSERT statements add user table entries that permit the user custom to connect from the various hosts with the given password, but grant no global privileges (all privileges are set to the default value of 'N'). The next three INSERT statements add db table entries that grant privileges to custom for the bankaccount, expenses, and customer databases, but only when accessed from the proper hosts. As usual when you modify the grant tables directly, you must tell the server to reload them with FLUSH PRIVILEGES so that the privilege changes take effect.
To create a user who has access from all machines in a given domain (for example, mydomain.com), you can use the "%" wildcard character in the host part of the account name:
mysql> CREATE USER 'myname'@'%.mydomain.com' IDENTIFIED BY 'mypass';
To do the same thing by modifying the grant tables directly, do this:
mysql>INSERT INTO user (Host,User,Password,...)->VALUES('%.mydomain.com','myname',PASSWORD('mypass'),...);mysql>FLUSH PRIVILEGES;
Removing User Accounts
To remove an account, use the DROP USER statement, which is described in , "DROP USER Syntax".
Setting Account Resource Limits
One means of limiting use of MariaDB server resources is to set the global max_user_connections system variable to a nonzero value. This limits the number of simultaneous connections that can be made by any given account, but places no limits on what a client can do once connected. In addition, setting max_user_connections does not enable management of individual accounts. Both types of control are of interest to many MariaDB administrators, particularly those working for Internet Service Providers.
In MariaDB 5.6, you can limit use of the following server resources for individual accounts:
- The number of queries that an account can issue per hour
- The number of updates that an account can issue per hour
- The number of times an account can connect to the server per hour
- The number of simultaneous connections to the server by an account
Any statement that a client can issue counts against the query limit (unless its results are served from the query cache). Only statements that modify databases or tables count against the update limit.
An "account" in this context corresponds to a row in the mysql.user table. That is, a connection is assessed against the User and Host values in the user table row that applies to the connection. For example, an account 'usera'@'%.example.com' corresponds to a row in the user table that has User and Host values of usera and %.example.com, to permit usera to connect from any host in the example.com domain. In this case, the server applies resource limits in this row collectively to all connections by usera from any host in the example.com domain because all such connections use the same account.
Before MariaDB 5.0.3, an "account" was assessed against the actual host from which a user connects. This older method accounting may be selected by starting the server with the --old-style-user-limits option. In this case, if usera connects simultaneously from host1.example.com and host2.example.com, the server applies the account resource limits separately to each connection. If usera connects again from host1.example.com, the server applies the limits for that connection together with the existing connection from that host.
To set resource limits for an account, use the GRANT statement (see , "GRANT Syntax"). Provide a WITH clause that names each resource to be limited. The default value for each limit is zero (no limit). For example, to create a new account that can access the customer database, but only in a limited fashion, issue these statements:
mysql>CREATE USER 'francis'@'localhost' IDENTIFIED BY 'frank';mysql>GRANT ALL ON customer.* TO 'francis'@'localhost'->WITH MAX_QUERIES_PER_HOUR 20->MAX_UPDATES_PER_HOUR 10->MAX_CONNECTIONS_PER_HOUR 5->MAX_USER_CONNECTIONS 2;
The limit types need not all be named in the WITH clause, but those named can be present in any order. The value for each per-hour limit should be an integer representing a count per hour. For MAX_USER_CONNECTIONS, the limit is an integer representing the maximum number of simultaneous connections by the account. If this limit is set to zero, the global max_user_connections system variable value determines the number of simultaneous connections. If max_user_connections is also zero, there is no limit for the account.
To modify existing limits for an account, use a GRANT USAGE statement at the global level (ON *.*). The following statement changes the query limit for francis to 100:
mysql>GRANT USAGE ON *.* TO 'francis'@'localhost'->WITH MAX_QUERIES_PER_HOUR 100;
The statement modifies only the limit value specified and leaves the account otherwise unchanged.
To remove a limit, set its value to zero. For example, to remove the limit on how many times per hour francis can connect, use this statement:
mysql>GRANT USAGE ON *.* TO 'francis'@'localhost'->WITH MAX_CONNECTIONS_PER_HOUR 0;
As mentioned previously, the simultaneous-connection limit for an account is determined from the MAX_USER_CONNECTIONS limit and the max_user_connections system variable. Suppose that the global max_user_connections value is 10 and three accounts have resource limits specified with GRANT:
GRANT ... TO 'user1'@'localhost' WITH MAX_USER_CONNECTIONS 0;
GRANT ... TO 'user2'@'localhost' WITH MAX_USER_CONNECTIONS 5;
GRANT ... TO 'user3'@'localhost' WITH MAX_USER_CONNECTIONS 20;
user1 has a connection limit of 10 (the global max_user_connections value) because it has a zero MAX_USER_CONNECTIONS limit). user2 and user3 have connection limits of 5 and 20, respectively, because they have nonzero MAX_USER_CONNECTIONS limits.
The server stores resource limits for an account in the user table row corresponding to the account. The max_questions, max_updates, and max_connections columns store the per-hour limits, and the max_user_connections column stores the MAX_USER_CONNECTIONS limit. (See , "Privilege System Grant Tables".)
Resource-use counting takes place when any account has a nonzero limit placed on its use of any of the resources.
As the server runs, it counts the number of times each account uses resources. If an account reaches its limit on number of connections within the last hour, further connections for the account are rejected until that hour is up. Similarly, if the account reaches its limit on the number of queries or updates, further queries or updates are rejected until the hour is up. In all such cases, an appropriate error message is issued.
Resource counting is done per account, not per client. For example, if your account has a query limit of 50, you cannot increase your limit to 100 by making two simultaneous client connections to the server. Queries issued on both connections are counted together.
The current per-hour resource-use counts can be reset globally for all accounts, or individually for a given account:
- To reset the current counts to zero for all accounts, issue a
FLUSH USER_RESOURCESstatement. The counts also can be reset by reloading the grant tables (for example, with aFLUSH PRIVILEGESstatement or a mysqladmin reload command). - The counts for an individual account can be set to zero by re-granting it any of its limits. To do this, use
GRANT USAGEas described earlier and specify a limit value equal to the value that the account currently has.
Counter resets do not affect the MAX_USER_CONNECTIONS limit.
All counts begin at zero when the server starts; counts are not carried over through a restart.
For the MAX_USER_CONNECTIONS limit, an edge case can occur if the account currently has open the maximum number of connections permitted to it: A disconnect followed quickly by a connect can result in an error (ER_TOO_MANY_USER_CONNECTIONS or ER_USER_LIMIT_REACHED) if the server has not fully processed the disconnect by the time the connect occurs. When the server finishes disconnect processing, another connection will once more be permitted.
Assigning Account Passwords
Required credentials for clients that connect to the MariaDB server can include a password. This section describes how to assign passwords for MariaDB accounts. In MariaDB 5.6, it is also possible for clients to authenticate using plugins. For information, see , "Pluggable Authentication".
To assign a password when you create a new account with CREATE USER, include an IDENTIFIED BY clause:
mysql>CREATE USER 'jeffrey'@'localhost'->IDENTIFIED BY 'mypass';
To assign or change a password for an existing account, one way is to issue a SET PASSWORD statement:
mysql>SET PASSWORD FOR->'jeffrey'@'localhost' = PASSWORD('mypass');
MySQL stores passwords in the user table in the MariaDB database. Only users such as root that have update access to the MariaDB database can change the password for other users. If you are not connected as an anonymous user, you can change your own password by omitting the FOR clause:
mysql> SET PASSWORD = PASSWORD('mypass');
You can also use a GRANT USAGE statement at the global level (ON *.*) to assign a password to an account without affecting the account's current privileges:
mysql>GRANT USAGE ON *.* TO 'jeffrey'@'localhost'->IDENTIFIED BY 'mypass';
To assign a password from the command line, use the mysqladmin command:
shell> mysqladmin -u user_name -h host_name password 'newpwd'
The account for which this command sets the password is the one with a user table row that matches user_name in the User column and the client host from which you connect in the Host column.
It is preferable to assign passwords using one of the preceding methods, but it is also possible to modify the user table directly. In this case, you must also use FLUSH PRIVILEGES to cause the server to reread the grant tables. Otherwise, the change remains unnoticed by the server until you restart it.
- To establish a password for a new account, provide a value for the
Passwordcolumn:
mysql>
INSERT INTO mysql.user (Host,User,Password)->VALUES('localhost','jeffrey',PASSWORD('mypass'));mysql>FLUSH PRIVILEGES; - To change the password for an existing account, use
UPDATEto set thePasswordcolumn value:
mysql>
UPDATE mysql.user SET Password = PASSWORD('bagel')->WHERE Host = 'localhost' AND User = 'francis';mysql>FLUSH PRIVILEGES;
During authentication when a client connects to the server, MariaDB treats the password in the user table as an encrypted hash value (the value that PASSWORD() would return for the password). When assigning a password to an account, it is important to store an encrypted value, not the plaintext password. Use the following guidelines:
- When you assign a password using
CREATE USER,GRANTwith anIDENTIFIED BYclause, or the mysqladmin password command, they encrypt the password for you. Specify the literal plaintext password:
mysql>
CREATE USER 'jeffrey'@'localhost'->IDENTIFIED BY 'mypass'; - For
CREATE USERorGRANT, you can avoid sending the plaintext password if you know the hash value thatPASSWORD()would return for the password. Specify the hash value preceded by the keywordPASSWORD:
mysql>
CREATE USER 'jeffrey'@'localhost'->IDENTIFIED BY PASSWORD '*90E462C37378CED12064BB3388827D2BA3A9B689'; - When you assign an account a nonempty password using
SET PASSWORD,INSERT, orUPDATE, you must use thePASSWORD()function to encrypt the password, otherwise the password is stored as plaintext. Suppose that you assign a password like this:
mysql>
SET PASSWORD FOR->'jeffrey'@'localhost' = 'mypass';The result is that the literal value
'mypass'is stored as the password in theusertable, not the encrypted value. Whenjeffreyattempts to connect to the server using this password, the value is encrypted and compared to the value stored in theusertable. However, the stored value is the literal string'mypass', so the comparison fails and the server rejects the connection with anAccess deniederror.
In MariaDB 5.6, enabling the read-only system variable prevents the use of the SET PASSWORD statement by any user not having the SUPER privilege.Note
PASSWORD() encryption differs from Unix password encryption. See , "User Names and Passwords".
Pluggable Authentication
- The Native Authentication Plugins
- The Clear-Text Client-Side Authentication Plugin
- The Socket Peer-Credential Authentication Plugin
- The Test Authentication Plugin
- The Clear-Text Client-Side Authentication Plugin
When a client connects to the MariaDB server, the server uses the user name provided by the client and the client host to select the appropriate account row from the mysql.user table. It then uses this row to authenticate the client.
In MariaDB 5.6, the server authenticates clients using plugins, as follows:
- The server determines from the account row which authentication plugin applies for the client:
- If the account row specifies no plugin name, the server uses native authentication; that is, authentication against the password stored in the
Passwordcolumn of the account row. This is the same authentication method provided by MariaDB servers older than 5.5.7, before pluggable authentication was implemented, but now is implemented using two plugins that are built in and cannot be disabled. - If the account row specifies a plugin, the server invokes it to authenticate the user. If the server cannot find the plugin, an error occurs.
- If the account row specifies no plugin name, the server uses native authentication; that is, authentication against the password stored in the
- The plugin returns a status to the server indicating whether the user is permitted to connect.
Pluggable authentication enables two important capabilities:
- External authentication: Pluggable authentication makes it possible for clients to connect to the MariaDB server with credentials that are appropriate for authentication methods other than native authentication based on passwords stored in the
mysql.usertable. For example, plugins can be created to use external authentication methods such as PAM, Windows login IDs, LDAP, or Kerberos. - Proxy users: If a user is permitted to connect, an authentication plugin can return to the server a user name different from the name of the connecting user, to indicate that the connecting user is a proxy for another user. While the connection lasts, the proxy user is treated, for purposes of access control, as having the privileges of a different user. In effect, one user impersonates another. For more information, see , "Proxy Users".
Several authentication plugins are available in MySQL. The following sections provide details about specific plugins.
- Plugins that perform native authentication that matches the password against the
Passwordcolumn of the account row. See , "The Native Authentication Plugins". Native authentication is the default for accounts that have no plugin named explicitly in their account row. - A client-side plugin that sends the password to the server without hashing or encryption. This plugin can be used by server-side plugins that require access to the password exactly as provided by the client user. See , "The Clear-Text Client-Side Authentication Plugin".
- A plugin that authenticates clients that connect from the local host through the Unix socket file. See , "The Socket Peer-Credential Authentication Plugin".
- A test plugin that authenticates using MariaDB native authentication. This plugin is intended for testing and development purposes, and as an example of how to write an authentication plugin. See , "The Test Authentication Plugin".
For information about current restrictions on the use of pluggable authentication, including which connectors support which plugins, see "Restrictions on Pluggable Authentication".
Third-party connector developers should read that section to determine the extent to which a connector can take advantage of pluggable authentication capabilities and what steps to take to become more compliant.
If you are interested in writing your own authentication plugins, see , "Writing Authentication Plugins".
In general, pluggable authentication uses corresponding plugins on the server and client sides, so you use a given authentication method like this:
- On the server host, install the appropriate library containing the server plugin, if necessary, so that the server can use it to authenticate client connections. Similarly, on each client host, install the appropriate library containing the client plugin for use by client programs.
- Create MariaDB accounts that specify use of the plugin for authentication.
- When a client connects, the server plugin tells the client program which client plugin to use for authentication.
The remainder of this section provides general instructions for installing and using authentication plugins. The instructions use an an example authentication plugin included in MariaDB distributions (see , "The Test Authentication Plugin"). The procedure is similar for other authentication plugins; substitute the appropriate plugin and file names.
The example authentication plugin has these characteristics:
- The server-side plugin name is
test_plugin_server. - The client-side plugin name is
auth_test_plugin. - Both plugins are located in the shared library object file named
auth_test_plugin.soin the plugin directory (the directory named by theplugin_dirsystem variable). The file name suffix might differ on your system.
Install and use the example authentication plugin as follows:
- Make sure that the plugin library is installed on the server and client hosts.
- Install the server-side test plugin at server startup or at runtime:
- To install the plugin at startup, use the
--plugin-loadoption. For example, use these lines in amy.cnfoption file:
[mysqld]
plugin-load=test_plugin_server=auth_test_plugin.so
With this plugin-loading method, the option must be given each time you start the server. The plugin is not installed if you omit the option.
- To install the plugin at runtime, use the
INSTALL PLUGINstatement:
mysql>
INSTALL PLUGIN test_plugin_server SONAME 'auth_test_plugin.so';This installs the plugin permanently and need be done only once.
PAM authentication, when not done through proxy users or groups, requires the MariaDB account to have the same user name as the Unix account. Because MariaDB user names are limited to 16 characters (see , "Privilege System Grant Tables"), this limits PAM nonproxy authentication to Unix accounts with names of at most 16 characters.
- To install the plugin at startup, use the
- Verify that the plugin is installed. For example, use
SHOW PLUGINS:
mysql>
SHOW PLUGINS\G... *************************** 21. row *************************** Name: test_plugin_server Status: ACTIVE Type: AUTHENTICATION Library: auth_test_plugin.so License: GPLFor other ways to check the plugin, see , "Obtaining Server Plugin Information".
- To specify that a MariaDB user must be authenticated using the plugin, name it in the
IDENTIFIED WITHclause of theCREATE USERstatement that creates the user:
CREATE USER 'testuser'@'localhost' IDENTIFIED WITH test_plugin_server;
- Connect to the server using a client program. The test plugin authenticates the same way as native MariaDB authentication, so provide the usual
--userand--passwordoptions that you normally use to connect to the server. For example:
shell>
mysql --user=your_name--password=your_passFor connections by
testuser, the server sees that the account must be authenticated using the server-side plugin namedtest_plugin_serverand communicates to the client program which client-side plugin it must use-in this case,auth_test_plugin.In the case that the account uses the authentication method that is the default for both the server and the client program, the server need not communicate to the client which plugin to use, and a round trip in client/server negotiation can be avoided. Currently this is true for accounts that use native MariaDB authentication (
mysql_native_password).The
--default-auth=option can be specified on the mysql command line to make explicit which client-side plugin the program can expect to use, although the server will override this if the user account requires a different plugin.plugin-nameIf mysql does not find the plugin, specify a
--plugin-dir=option to indicate where the plugin is located.dir_name
If you start the server with the --skip-grant-tables option, authentication plugins are not used even if loaded because the server performs no client authentication and permits any client to connect. Because this is insecure, you might want to use --skip-grant-tables in conjunction with --skip-networking to prevent remote clients from connecting.
The Native Authentication Plugins
MySQL includes two plugins that implement the same kind of native authentication that older servers provide; that is, authentication against passwords stored in the Password column of the mysql.user table:
- The
mysql_native_passwordauthentication plugin implements the same default authentication against themysql.usertable as used prior to the implementation of pluggable authentication. - The
mysql_old_passwordplugin Implements authentication as used before MariaDB that is based on shorter password hash values. For information about this authentication method, see , "Password Hashing in MySQL".
The native authentication plugins are backward compatible. Clients older than MariaDB 5.5.7 do not support authentication plugins but use native authentication, so they can connect to servers from 5.5.7 and up.
The following tables show the plugin names. Both are considered to implement native authentication even though only one has "native" in the name.
Table 5.12. MariaDB Native Password Authentication Plugin
| Server-side plugin name | mysql_native_password
|
| Client-side plugin name | mysql_native_password
|
| Library object file name | None (built in) |
Table 5.13. MariaDB Native Old-Password Authentication Plugin
| Server-side plugin name | mysql_old_password
|
| Client-side plugin name | mysql_old_password
|
| Library object file name | None (built in) |
Each plugin exists in both client and server form. MariaDB client programs use mysql_native_password by default. The --default-auth option can be used to specify either plugin explicitly:
shell>mysql --default-auth=mysql_native_password ...shell>mysql --default-auth=mysql_old_password ...
The server-side plugins are built into the server and cannot be disabled by unloading them. The client-side plugins are built into the libmysql client library as of MariaDB 5.5.7 and available to any program linked against libmysql from that version or newer.
For general information about pluggable authentication in MySQL, see , "Pluggable Authentication".
The Clear-Text Client-Side Authentication Plugin
As of MariaDB 5.6.2, a client-side authentication plugin is available that sends the password to the server without hashing or encryption. This plugin is built into the MariaDB client library.
The following table shows the plugin name.
Table 5.14. MariaDB Clear Text Authentication Plugin
| Server-side plugin name | None, see discussion |
| Client-side plugin name | mysql_clear_password
|
| Library object file name | None (built in) |
With native MariaDB authentication, the client performs one-way hashing on the password before sending it to the server. This enables the client to avoid sending the password in clear text. See , "Password Hashing in MySQL". However, because the hash algorithm is one way, the original password cannot be recovered on the server side.
One-way hashing cannot be done for authentication schemes that require the server to receive the password as entered on the client side. In such cases, the mysql_clear_password client-side plugin can be used to send the password to the server in clear text. There is no corresponding server-side plugin. Rather, the client-side plugin can be used by any server-side plugin that needs a clear text password.
For general information about pluggable authentication in MySQL, see , "Pluggable Authentication".Note
Sending passwords in clear text may be a security problem in some configurations. To avoid problems if there is any possibility that the password would be intercepted, clients should connect to MariaDB Server using a method that protects the password. Possibilities include SSL (see , "Using SSL for Secure Connections"), IPsec, or a private network.
The Socket Peer-Credential Authentication Plugin
As of MariaDB 5.6.2, a server-side authentication plugin is available that authenticates clients that connect from the local host through the Unix socket file.
The source code for this plugin can be examined as a relatively simple example demonstrating how to write a loadable authentication plugin.
The following table shows the plugin and library file names. The file name suffix might differ on your system. The file location is the directory named by the plugin_dir system variable. For installation information, see , "Pluggable Authentication".
Table 5.15. MariaDB Socket Peer-Credential Authentication Plugin
| Server-side plugin name | auth_socket
|
| Client-side plugin name | None, see discussion |
| Library object file name | auth_socket.so |
The auth_socket authentication plugin authenticates clients that connect from the local host through the Unix socket file. The plugin uses the SO_PEERCRED socket option to obtain information about the user running the client program. The plugin checks whether the user name matches the MariaDB user name specified by the client program to the server, and permits the connection only if the names match. The plugin can be built only on systems that support the SO_PEERCRED option, such as Linux.
Suppose that a MariaDB account is created for a user named valerie who is to be authenticated by the auth_socket plugin for connections from the local host through the socket file:
CREATE USER 'valerie'@'localhost' IDENTIFIED WITH auth_socket;
If a user on the local host with a login name of stefanie invokes mysql with the option --user=valerie to connect through the socket file, the server uses auth_socket to authenticate the client. The plugin determines that the --user option value (valerie) differs from the client user's name (stephanie) and refuses the connection. If a user named valerie tries the same thing, the plugin finds that the user name and the MariaDB user name are both valerie and permits the connection. However, the plugin refuses the connection even for valerie if the connection is made using a different protocol, such as TCP/IP.
For general information about pluggable authentication in MySQL, see , "Pluggable Authentication".
The Test Authentication Plugin
MySQL includes a test plugin that authenticates using MariaDB native authentication, but is a loadable plugin (not built in) and must be installed prior to use. It can authenticate against either normal or older (shorter) password hash values.
This plugin is intended for testing and development purposes, and not for use in production environments. The test plugin source code is separate from the server source, unlike the built-in native plugin, so it can be examined as a relatively simple example demonstrating how to write a loadable authentication plugin.
The following table shows the plugin and library file names. The file name suffix might differ on your system. The file location is the directory named by the plugin_dir system variable. For installation information, see , "Pluggable Authentication".
Table 5.16. MariaDB Test Authentication Plugin
| Server-side plugin name | test_plugin_server
|
| Client-side plugin name | auth_test_plugin
|
| Library object file name | auth_test_plugin.so |
Because the test plugin authenticates the same way as native MariaDB authentication, provide the usual --user and --password options that you normally use for accounts that use native authentication when you connect to the server. For example:
shell> mysql --user=your_name --password=your_pass
For general information about pluggable authentication in MySQL, see , "Pluggable Authentication".
Proxy Users
When authentication to the MariaDB server occurs through an authentication plugin, the plugin may request that the connecting (external) user be treated as a different user for privilege-checking purposes. This enables the external user to be a proxy for the second user; that is, to have the privileges of the second user. In other words, the external user is a "proxy user" (a user who can impersonate or become known as another user) and the second user is a "proxied user" (a user whose identity can be taken on by a proxy user).
This section describes how the proxy user capability works. For general information about authentication plugins, see , "Pluggable Authentication". If you are interested in writing your own authentication plugins that support proxy users, see , "Implementing Proxy User Support in Authentication Plugins".
For proxying to occur, these conditions must be satisfied:
- When a connecting client should be treated as a proxy user, the plugin must return a different name, to indicate the proxied user name.
- Proxy user accounts must be set up to be authenticated by the plugin. Use the
CREATE USERorGRANTstatement to associate accounts with plugins. - Proxy user accounts must have the
PROXYprivilege for the proxied accounts. Use theGRANTstatement for this.
Consider the following definitions:
CREATE USER 'empl_external'@'localhost'
 IDENTIFIED WITH auth_plugin AS 'auth_string';
CREATE USER 'employee'@'localhost'
 IDENTIFIED BY 'employee_pass';
GRANT PROXY
 ON 'employee'@'localhost'
 TO 'empl_external'@'localhost';
When a client connects as empl_external from the local host, MariaDB uses auth_plugin to perform authentication. If auth_plugin returns the employee user name to the server (based on the content of 'auth_string' and perhaps by consulting some external authentication system), that serves as a request to the server to treat this client, for purposes of privilege checking, as the employee local user.
In this case, empl_external is the proxy user and employee is the proxied user.
The server verifies that proxy authentication for employee is possible for the empl_external user by checking whether empl_external has the PROXY privilege for employee. (If this privilege had not been granted, an error would occur.)
When proxying occurs, the USER() and CURRENT_USER() functions can be used to see the difference between the connecting user and the account whose privileges apply during the current session. For the example just described, those functions return these values:
mysql> SELECT USER(), CURRENT_USER();
+-------------------------+--------------------+
| USER() | CURRENT_USER() |
+-------------------------+--------------------+
| empl_external@localhost | employee@localhost |
+-------------------------+--------------------+
The IDENTIFIED WITH clause that names the authentication plugin may be followed by an AS clause specifying a string that the server passes to the plugin when the user connects. It is up to each plugin whether the AS clause is required. If it is required, the format of the authentication string depends on how the plugin intends to use it. Consult the documentation for a given plugin for information about the authentication string values it accepts.
Granting the Proxy Privilege
A special PROXY privilege is needed to enable an external user to connect as and have the privileges of another user. To grant this privilege, use the GRANT statement. For example:
GRANT PROXY ON 'proxied_user' TO 'proxy_user';
proxy_user must represent a valid externally authenticated MariaDB user at connection time or connection attempts fail. proxied_user must represent a valid locally authenticated user at connection time or connection attempts fail.
The corresponding REVOKE syntax is:
REVOKE PROXY ON 'proxied_user' FROM 'proxy_user';
MySQL GRANT and REVOKE syntax extensions work as usual. For example:
GRANT PROXY ON 'a' TO 'b', 'c', 'd';
GRANT PROXY ON ''@'' TO 'd';
GRANT PROXY ON 'a' TO 'd' IDENTIFIED BY ...;
GRANT PROXY ON 'a' TO 'd' WITH GRANT OPTION;
REVOKE PROXY ON 'a' FROM 'b', 'c', 'd';
In the preceding example, ''@'' is the default proxy user and means "any user." The default proxy user is discussed later in this section.
The PROXY privilege can be granted in these cases:
- By
proxied_userfor itself: The value ofUSER()must exactly matchCURRENT_USER()andproxied_user, for both the user name and host name parts of the account name. - By a user that has
GRANT PROXY ... WITH GRANT OPTIONforproxied_user.
The root account created by default during MariaDB installation has the PROXY ... WITH GRANT OPTION privilege for ''@'', that is, for all users. This enables root to set up proxy users, as well as to delegate to other accounts the authority to set up proxy users. For example, root can do this:
CREATE USER 'admin'@'localhost' IDENTIFIED BY 'test';
GRANT PROXY ON ''@'' TO 'admin'@'localhost' WITH GRANT OPTION;
Now the admin user can manage all the specific GRANT PROXY mappings. For example, admin can do this:
GRANT PROXY ON sally TO joe;
Default Proxy Users
To specify that some or all users should connect using a given external plugin, create a "blank" MariaDB user, set it up to use that plugin for authentication, and let the plugin return the real authenticated user name (if different from the blank user). For example, suppose that there exists a hypothetical plugin named ldap_auth that implements LDAP authentication:
CREATE USER ''@'' IDENTIFIED WITH ldap_auth AS 'O=Oracle, OU=MySQL';
CREATE USER 'developer'@'localhost' IDENTIFIED BY 'developer_pass';
CREATE USER 'manager'@'localhost' IDENTIFIED BY 'manager_pass';
GRANT PROXY ON 'manager'@'localhost' TO ''@'';
GRANT PROXY ON 'developer'@'localhost' TO ''@'';
Now assume that a client tries to connect as follows:
mysql --user=myuser --password='myuser_pass' ...
The server will not find myuser defined as a MariaDB user. But because there is a blank user account (''@''), that matches the client user name and host name, the server authenticates the client against that account: The server invokes ldap_auth, passing it myuser and myuser_pass as the user name and password.
If the ldap_auth plugin finds in the LDAP directory that myuser_pass is not the correct password for myuser, authentication fails and the server rejects the connection.
If the password is correct and ldap_auth finds that myuser is a developer, it returns the user name developer to the MariaDB server, rather than myuser. The server verifies that ''@'' can authenticate as developer (because it has the PROXY privilege to do so) and accepts the connection. The session proceeds with myuser having the privileges of developer. (These privileges should be set up by the DBA using GRANT statements, not shown.) The USER() and CURRENT_USER() functions return these values:
mysql> SELECT USER(), CURRENT_USER();
+------------------+---------------------+
| USER() | CURRENT_USER() |
+------------------+---------------------+
| myuser@localhost | developer@localhost |
+------------------+---------------------+
If the plugin instead finds in the LDAP directory that myuser is a manager, it returns manager as the user name and the session proceeds with myuser having the privileges of manager.
mysql> SELECT USER(), CURRENT_USER();
+------------------+-------------------+
| USER() | CURRENT_USER() |
+------------------+-------------------+
| myuser@localhost | manager@localhost |
+------------------+-------------------+
For simplicity, external authentication cannot be multilevel: Neither the credentials for developer nor those for manager are taken into account in the preceding example. However, they are still used if a client tries to authenticate directly against the developer or manager account, which is why those accounts should be assigned passwords.
The default proxy account uses '' in the host part, which matches any host. If you set up a default proxy user, take care to also check for accounts with '%' in the host part, because that also matches any host, but has precedence over '' by the rules that the server uses to sort account rows internally (see , "Access Control, Stage 1: Connection Verification").
Suppose that a MariaDB installation includes these two accounts:
CREATE USER ''@'' IDENTIFIED WITH some_plugin;
CREATE USER ''@'%' IDENTIFIED BY 'some_password';
The intent of the first account is to serve as the default proxy user, to be used to authenticate connections for users who do not otherwise match a more-specific account. The second account might have been created, for example, to enable users without their own account as the anonymous user.
However, in this configuration, the first account will never be used because the matching rules sort ''@'%' ahead of ''@''. For accounts that do not match any more-specific account, the server will attempt to authenticate them against ''@'%' rather than ''@''.
If you intend to create a default proxy user, check for other existing "match any user" accounts that will take precedence over the default proxy user and thus prevent that user from working as intended. It may be necessary to remove any such accounts.
Proxy User System Variables
Two system variables help trace the proxy login process:
proxy_user: This value isNULLif proxying is not used. Otherwise, it indicates the proxy user account. For example, if a client authenticates through the default proxy account, this variable will be set as follows:
mysql>
SELECT @@proxy_user;+--------------+ | @@proxy_user | +--------------+ | ''@'' | +--------------+external_user: Sometimes the authentication plugin may use an external user to authenticate to the MariaDB server. For example, when using Windows native authentication, a plugin that authenticates using the windows API does not need the login ID passed to it. However, it still uses an Windows user ID to authenticate. The plugin may return this external user ID (or the first 512 UTF-8 bytes of it) to the server using theexternal_userread-only session variable. If the plugin does not set this variable, its value isNULL.
Using SSL for Secure Connections
MySQL supports secure (encrypted) connections between MariaDB clients and the server using the Secure Sockets Layer (SSL) protocol. This section discusses how to use SSL connections. For information on how to require users to use SSL connections, see the discussion of the REQUIRE clause of the GRANT statement in , "GRANT Syntax".
The standard configuration of MariaDB is intended to be as fast as possible, so encrypted connections are not used by default. For applications that require the security provided by encrypted connections, the extra computation to encrypt the data is worthwhile.
MySQL enables encryption on a per-connection basis. You can choose a normal unencrypted connection or a secure encrypted SSL connection according the requirements of individual applications.
Secure connections are based on the OpenSSL API and are available through the MariaDB C API. Replication uses the C API, so secure connections can be used between master and slave servers.
Another way to connect securely is from within an SSH connection to the MariaDB server host. For an example, see , "Connecting to MariaDB Remotely from Windows with SSH".
Basic SSL Concepts
To understand how MariaDB uses SSL, it is necessary to explain some basic SSL and X509 concepts. People who are familiar with these can skip this part of the discussion.
By default, MariaDB uses unencrypted connections between the client and the server. This means that someone with access to the network could watch all your traffic and look at the data being sent or received. They could even change the data while it is in transit between client and server. To improve security a little, you can compress client/server traffic by using the --compress option when invoking client programs. However, this does not foil a determined attacker.
When you need to move information over a network in a secure fashion, an unencrypted connection is unacceptable. Encryption is the way to make any kind of data unreadable. In fact, today's practice requires many additional security elements from encryption algorithms. They should resist many kind of known attacks such as changing the order of encrypted messages or replaying data twice.
SSL is a protocol that uses different encryption algorithms to ensure that data received over a public network can be trusted. It has mechanisms to detect any data change, loss, or replay. SSL also incorporates algorithms that provide identity verification using the X509 standard.
X509 makes it possible to identify someone on the Internet. It is most commonly used in e-commerce applications. In basic terms, there should be some company called a "Certificate Authority" (or CA) that assigns electronic certificates to anyone who needs them. Certificates rely on asymmetric encryption algorithms that have two encryption keys (a public key and a secret key). A certificate owner can show the certificate to another party as proof of identity. A certificate consists of its owner's public key. Any data encrypted with this public key can be decrypted only using the corresponding secret key, which is held by the owner of the certificate.
If you need more information about SSL, X509, or encryption, use your favorite Internet search engine to search for the keywords in which you are interested.
Using SSL Connections
To use SSL connections between the MariaDB server and client programs, your system must support either OpenSSL or yaSSL and your version of MariaDB must be built with SSL support.
To make it easier to use secure connections, MariaDB is bundled with yaSSL. (MySQL and yaSSL employ the same licensing model, whereas OpenSSL uses an Apache-style license.) yaSSL support initially was available only for a few platforms, but now it is available on all MariaDB platforms supported by Oracle Corporation.
To get secure connections to work with MariaDB and SSL, you must do the following:
- If you are not using a binary (precompiled) version of MariaDB that has been built with SSL support, and you are going to use OpenSSL rather than the bundled yaSSL library, install OpenSSL if it has not already been installed. We have tested MariaDB with OpenSSL 0.9.6. To obtain OpenSSL, visit http://www.openssl.org.
Building MariaDB using OpenSSL requires a shared OpenSSL library, otherwise linker errors occur. Alternatively, build MariaDB using yaSSL.
- If you are not using a binary (precompiled) version of MariaDB that has been built with SSL support, configure a MariaDB source distribution to use SSL. When you configure MySQL, invoke CMake like this:
shell>
cmake . -DWITH_SSL=bundledThat configures the distribution to use the bundled yaSSL library. To use the system SSL library instead, specify the option as
-DWITH_SSL=systeminstead. See , "MySQL Source-Configuration Options".Note that yaSSL support on Unix platforms requires that either
/dev/urandomor/dev/randombe available to retrieve true random numbers. For additional information (especially regarding yaSSL on Solaris versions prior to 2.8 and HP-UX), see Bug #13164. - Make sure that the
userin theMariaDBdatabase includes the SSL-related columns (beginning withssl_andx509_). If yourusertable does not have these columns, it must be upgraded; see , "mysql_upgrade - Check Tables for MariaDB Upgrade". - To check whether a server binary is compiled with SSL support, invoke it with the
--ssloption. An error will occur if the server does not support SSL:
shell>
mysqld --ssl --help060525 14:18:52 [ERROR] mysqld: unknown option '--ssl'To check whether a running mysqld server supports SSL, examine the value of the
have_sslsystem variable (if you have nohave_sslvariable, check forhave_openssl):mysql>
SHOW VARIABLES LIKE 'have_ssl';+---------------+-------+ | Variable_name | Value | +---------------+-------+ | have_ssl | YES | +---------------+-------+If the value is
YES, the server supports SSL connections. If the value isDISABLED, the server supports SSL connections but was not started with the appropriate--ssl-options (described later in this section).xxx
To enable SSL connections, the proper SSL-related options must be used (see , "SSL Command Options").
To start the MariaDB server so that it permits clients to connect using SSL, use the options that identify the key and certificate files the server needs when establishing a secure connection:
shell>mysqld --ssl-ca=ca-cert.pem\--ssl-cert=server-cert.pem\--ssl-key=server-key.pem
--ssl-caidentifies the Certificate Authority (CA) certificate.--ssl-certidentifies the server public key. This can be sent to the client and authenticated against the CA certificate that it has.--ssl-keyidentifies the server private key.
To establish a secure connection to a MariaDB server with SSL support, the options that a client must specify depend on the SSL requirements of the user account that the client uses. (See the discussion of the REQUIRE clause in , "GRANT Syntax".)
If the account has no special SSL requirements or was created using a GRANT statement that includes the REQUIRE SSL option, a client can connect securely by using just the --ssl-ca option:
shell> mysql --ssl-ca=ca-cert.pem
To require that a client certificate also be specified, create the account using the REQUIRE X509 option. Then the client must also specify the proper client key and certificate files or the server will reject the connection:
shell>mysql --ssl-ca=ca-cert.pem\--ssl-cert=client-cert.pem\--ssl-key=client-key.pem
In other words, the options are similar to those used for the server. Note that the Certificate Authority certificate has to be the same.
A client can determine whether the current connection with the server uses SSL by checking the value of the Ssl_cipher status variable. The value of Ssl_cipher is nonempty if SSL is used, and empty otherwise. For example:
mysql> SHOW STATUS LIKE 'Ssl_cipher';
+---------------+--------------------+
| Variable_name | Value |
+---------------+--------------------+
| Ssl_cipher | DHE-RSA-AES256-SHA |
+---------------+--------------------+
For the mysql client, you can use the STATUS or \s command and check the SSL line:
mysql> \s
...
SSL: Not in use
...
Or:
mysql> \s
...
SSL: Cipher in use is DHE-RSA-AES256-SHA
...
To establish a secure connection from within an application program, use the mysql_ssl_set() C API function to set the appropriate certificate options before calling mysql-real-connect(). See , "mysql_ssl_set()". After the connection is established, you can use mysql_get_ssl_cipher() to determine whether SSL is in use. A non-NULL return value indicates a secure connection and names the SSL cipher used for encryption. A NULL return value indicates that SSL is not being used. See , "mysql_get_ssl_cipher()".
SSL Command Options
The following list describes options that are used for specifying the use of SSL, certificate files, and key files. They can be given on the command line or in an option file. These options are not available unless MariaDB has been built with SSL support. See , "Using SSL Connections".
Table 5.17. SSL Option/Variable Summary
| Name | Cmd-Line | Option file | System Var | Status Var | Var Scope | Dynamic |
|---|---|---|---|---|---|---|
| have_openssl | Yes | Global | No | |||
| have_ssl | Yes | Global | No | |||
| skip-ssl | Yes | Yes | ||||
| ssl | Yes | Yes | ||||
| ssl-ca | Yes | Yes | Global | No | ||
| - Variable: ssl_ca | Yes | Global | No | |||
| ssl-capath | Yes | Yes | Global | No | ||
| - Variable: ssl_capath | Yes | Global | No | |||
| ssl-cert | Yes | Yes | Global | No | ||
| - Variable: ssl_cert | Yes | Global | No | |||
| ssl-cipher | Yes | Yes | Global | No | ||
| - Variable: ssl_cipher | Yes | Global | No | |||
| ssl-crl | Yes | Yes | Global | No | ||
| - Variable: ssl_crl | Yes | Global | No | |||
| ssl-crlpath | Yes | Yes | Global | No | ||
| - Variable: ssl_crlpath | Yes | Global | No | |||
| ssl-key | Yes | Yes | Global | No | ||
| - Variable: ssl_key | Yes | Global | No | |||
| ssl-verify-server-cert | Yes | Yes |
--ssl
For the server, this option specifies that the server permits SSL connections. For a client program, it permits the client to connect to the server using SSL. This option is not sufficient in itself to cause an SSL connection to be used. You must also specify the
--ssl-caoption, and possibly the--ssl-certand--ssl-keyoptions.This option is more often used in its opposite form to override any other SSL options and indicate that SSL should not be used. To do this, specify the option as
--skip-sslor--ssl=0.Note that use of
--ssldoes not require an SSL connection. For example, if the server or client is compiled without SSL support, a normal unencrypted connection is used.The secure way to require use of an SSL connection is to create an account on the server that includes a
REQUIRE SSLclause in theGRANTstatement. Then use that account to connect to the server, where both the server and the client have SSL support enabled.The
REQUIREclause permits other SSL-related restrictions as well. The description ofREQUIREin , "GRANTSyntax", provides additional detail about which SSL command options may or must be specified by clients that connect using accounts that are created using the variousREQUIREoptions.--ssl-ca=file_name
The path to a file that contains a list of trusted SSL CAs.
--ssl-capath=dir_name
The path to a directory that contains trusted SSL CA certificates in PEM format.
--ssl-cert=file_name
The name of the SSL certificate file to use for establishing a secure connection.
--ssl-cipher=cipher_list
A list of permissible ciphers to use for SSL encryption. For greatest portability,
cipher_listshould be a list of one or more cipher names, separated by colons. Examples:--ssl-cipher=AES128-SHA --ssl-cipher=DHE-RSA-AES256-SHA:AES128-SHA
This format is understood both by OpenSSL and yaSSL. OpenSSL supports a more flexible syntax for specifying ciphers, as described in the OpenSSL documentation at http://www.openssl.org/docs/apps/ciphers.html. However, this extended syntax will fail if used with a MariaDB installation compiled against yaSSL.
If no cipher in the list is supported, SSL connections will not work.
--ssl-crl=file_name
The path to a file containing certificate revocation lists in PEM format. Revocation lists work for MariaDB distributions compiled against OpenSSL (but not yaSSL).
If neither
--ssl-crlnor--ssl-crlpathis given, no CRL checks are performed, even if the CA path contains certificate revocation lists.This option was added in MariaDB 5.6.3.
--ssl-crlpath=dir_name
The path to a directory that contains files containing certificate revocation lists in PEM format. Revocation lists work for MariaDB distributions compiled against OpenSSL (but not yaSSL).
If neither
--ssl-crlnor--ssl-crlpathis given, no CRL checks are performed, even if the CA path contains certificate revocation lists.This option was added in MariaDB 5.6.3.
--ssl-key=file_name
The name of the SSL key file to use for establishing a secure connection.
If the key file is protected by a passphrase, and the MariaDB distribution was built using OpenSSL or (as of MariaDB 5.6.3) yaSSL, the program will prompt the user for the passphrase. The password must be given interactively; it cannot be stored in a file. If the passphrase is incorrect, the program continues as if it could not read the key. Before MariaDB 5.6.3, an error occurs if the key file is protected by a passphrase for distributions built using yaSSL.
--ssl-verify-server-cert
This option is available for client programs only, not the server. It causes the server's Common Name value in the certificate that the server sends to the client to be verified against the host name that the client uses for connecting to the server, and the connection is rejected if there is a mismatch. This feature can be used to prevent man-in-the-middle attacks. Verification is disabled by default.
If you use SSL when establishing a client connection, you can tell the client not to authenticate the server certificate by specifying neither --ssl-ca nor --ssl-capath. The server still verifies the client according to any applicable requirements established using GRANT statements for the client, and it still uses any --ssl-ca/--ssl-capath values that were passed to server at startup time.
Setting Up SSL Certificates for MariaDB
This section demonstrates how to set up SSL certificate and key files for use by MariaDB servers and clients. The first example shows a simplified procedure such as you might use from the command line. The second shows a script that contains more detail. The first two examples are intended for use on Unix and both use the openssl command that is part of OpenSSL. The third example describes how to set up SSL files on Windows.
Following the third example, instructions are given for using the files to test SSL connections. You can also use the files as described in , "Using SSL Connections".
Example 1: Creating SSL Files from the Command Line on Unix
The following example shows a set of commands to create MariaDB server and client certificate and key files. You will need to respond to several prompts by the openssl commands. To generate test files, you can press Enter to all prompts. To generate files for production use, you should provide nonempty responses.
# Create clean environment shell>rm -rf newcertsshell>mkdir newcerts && cd newcerts# Create CA certificate shell>openssl genrsa 2048 > ca-key.pemshell>openssl req -new -x509 -nodes -days 1000 \-key ca-key.pem -out ca-cert.pem# Create server certificate, remove passphrase, and sign it shell>openssl req -newkey rsa:2048 -days 1000 \-nodes -keyout server-key.pem -out server-req.pemshell>openssl rsa -in server-key.pem -out server-key.pemshell>openssl x509 -req -in server-req.pem -days 1000 \-CA ca-cert.pem -CAkey ca-key.pem -set_serial 01 -out server-cert.pem# Create client certificate, remove passphrase, and sign it shell>openssl req -newkey rsa:2048 -days 1000 \-nodes -keyout client-key.pem -out client-req.pemshell>openssl rsa -in client-key.pem -out client-key.pemshell>openssl x509 -req -in client-req.pem -days 1000 \-CA ca-cert.pem -CAkey ca-key.pem -set_serial 01 -out client-cert.pem
After generating the certificates, verify them:
mysql> openssl verify -CAfile ca-cert.pem server-cert.pem client-cert.pem
Example 2: Creating SSL Files Using a Script on Unix
Here is an example script that shows how to set up SSL certificates for MySQL:
DIR=`pwd`/openssl PRIV=$DIR/private mkdir $DIR $PRIV $DIR/newcerts cp /usr/share/ssl/openssl.cnf $DIR replace ./demoCA $DIR -- $DIR/openssl.cnf
# Create necessary files: $database, $serial and $new_certs_dir
# directory (optional)
touch $DIR/index.txt echo '01' > $DIR/serial
#
# Generation of Certificate Authority(CA)
#
openssl req -new -x509 -keyout $PRIV/cakey.pem -out $DIR/ca-cert.pem \
 -days 3600 -config $DIR/openssl.cnf
# Sample output:
# Using configuration from /home/monty/openssl/openssl.cnf
# Generating a 1024 bit RSA private key
# ................++++++
# .........++++++
# writing new private key to '/home/monty/openssl/private/cakey.pem'
# Enter PEM pass phrase:
# Verifying password - Enter PEM pass phrase:
# -----
# You are about to be asked to enter information that will be
# incorporated into your certificate request.
# What you are about to enter is what is called a Distinguished Name
# or a DN.
# There are quite a few fields but you can leave some blank
# For some fields there will be a default value,
# If you enter '.', the field will be left blank.
# -----
# Country Name (2 letter code) [AU]:FI
# State or Province Name (full name) [Some-State]:.
# Locality Name (eg, city) []:
# Organization Name (eg, company) [Internet Widgits Pty Ltd]:MariaDB Foundation
# Organizational Unit Name (eg, section) []:
# Common Name (eg, YOUR name) []:MySQL admin
# Email Address []:
#
# Create server request and key
#
openssl req -new -keyout $DIR/server-key.pem -out \
 $DIR/server-req.pem -days 3600 -config $DIR/openssl.cnf
# Sample output:
# Using configuration from /home/monty/openssl/openssl.cnf
# Generating a 1024 bit RSA private key
# ..++++++
# ..........++++++
# writing new private key to '/home/monty/openssl/server-key.pem'
# Enter PEM pass phrase:
# Verifying password - Enter PEM pass phrase:
# -----
# You are about to be asked to enter information that will be
# incorporated into your certificate request.
# What you are about to enter is what is called a Distinguished Name
# or a DN.
# There are quite a few fields but you can leave some blank
# For some fields there will be a default value,
# If you enter '.', the field will be left blank.
# -----
# Country Name (2 letter code) [AU]:FI
# State or Province Name (full name) [Some-State]:.
# Locality Name (eg, city) []:
# Organization Name (eg, company) [Internet Widgits Pty Ltd]:MariaDB Foundation
# Organizational Unit Name (eg, section) []:
# Common Name (eg, YOUR name) []:MySQL server
# Email Address []:
#
# Please enter the following 'extra' attributes
# to be sent with your certificate request
# A challenge password []:
# An optional company name []:
#
# Remove the passphrase from the key
#
openssl rsa -in $DIR/server-key.pem -out $DIR/server-key.pem
#
# Sign server cert
#
openssl ca -policy policy_anything -out $DIR/server-cert.pem \
 -config $DIR/openssl.cnf -infiles $DIR/server-req.pem
# Sample output:
# Using configuration from /home/monty/openssl/openssl.cnf
# Enter PEM pass phrase:
# Check that the request matches the signature
# Signature ok
# The Subjects Distinguished Name is as follows
# countryName :PRINTABLE:'FI'
# organizationName :PRINTABLE:'MariaDB Foundation'
# commonName :PRINTABLE:'MySQL admin'
# Certificate is to be certified until Sep 13 14:22:46 2003 GMT
# (365 days)
# Sign the certificate? [y/n]:y
#
#
# 1 out of 1 certificate requests certified, commit? [y/n]y
# Write out database with 1 new entries
# Data Base Updated
#
# Create client request and key
#
openssl req -new -keyout $DIR/client-key.pem -out \
 $DIR/client-req.pem -days 3600 -config $DIR/openssl.cnf
# Sample output:
# Using configuration from /home/monty/openssl/openssl.cnf
# Generating a 1024 bit RSA private key
# .....................................++++++
# .............................................++++++
# writing new private key to '/home/monty/openssl/client-key.pem'
# Enter PEM pass phrase:
# Verifying password - Enter PEM pass phrase:
# -----
# You are about to be asked to enter information that will be
# incorporated into your certificate request.
# What you are about to enter is what is called a Distinguished Name
# or a DN.
# There are quite a few fields but you can leave some blank
# For some fields there will be a default value,
# If you enter '.', the field will be left blank.
# -----
# Country Name (2 letter code) [AU]:FI
# State or Province Name (full name) [Some-State]:.
# Locality Name (eg, city) []:
# Organization Name (eg, company) [Internet Widgits Pty Ltd]:MariaDB Foundation
# Organizational Unit Name (eg, section) []:
# Common Name (eg, YOUR name) []:MySQL user
# Email Address []:
#
# Please enter the following 'extra' attributes
# to be sent with your certificate request
# A challenge password []:
# An optional company name []:
#
# Remove the passphrase from the key
#
openssl rsa -in $DIR/client-key.pem -out $DIR/client-key.pem
#
# Sign client cert
#
openssl ca -policy policy_anything -out $DIR/client-cert.pem \
 -config $DIR/openssl.cnf -infiles $DIR/client-req.pem
# Sample output:
# Using configuration from /home/monty/openssl/openssl.cnf
# Enter PEM pass phrase:
# Check that the request matches the signature
# Signature ok
# The Subjects Distinguished Name is as follows
# countryName :PRINTABLE:'FI'
# organizationName :PRINTABLE:'MariaDB Foundation'
# commonName :PRINTABLE:'MySQL user'
# Certificate is to be certified until Sep 13 16:45:17 2003 GMT
# (365 days)
# Sign the certificate? [y/n]:y
#
#
# 1 out of 1 certificate requests certified, commit? [y/n]y
# Write out database with 1 new entries
# Data Base Updated
#
# Create a my.cnf file that you can use to test the certificates
#
cnf=''
cnf='$cnf [client]'
cnf='$cnf ssl-ca=$DIR/ca-cert.pem'
cnf='$cnf ssl-cert=$DIR/client-cert.pem'
cnf='$cnf ssl-key=$DIR/client-key.pem'
cnf='$cnf [mysqld]'
cnf='$cnf ssl-ca=$DIR/ca-cert.pem'
cnf='$cnf ssl-cert=$DIR/server-cert.pem'
cnf='$cnf ssl-key=$DIR/server-key.pem'
echo $cnf | replace ' ' '
' > $DIR/my.cnf
Example 3: Creating SSL Files on Windows
Download OpenSSL for Windows. An overview of available packages can be seen here: http://www.slproweb.com/products/Win32OpenSSL.html Choose the Win32 OpenSSL Light or Win64 OpenSSL Light package, depending on your architecture (32-bit or 64-bit). The default installation location will be C:\OpenSSL-Win32 or C:\OpenSSL-Win64, depending on which package you downloaded. The following instructions assume a default location of C:\OpenSSL-Win32. Modify this as necessary if you are using the 64-bit package.
if a message occurs during setup indicating '...critical component is missing: Microsoft Visual C++ 2008 Redistributables', cancel the setup and download one of the following packages as well, again depending on your architecture (32-bit or 64-bit):
- Visual C++ 2008 Redistributables (x86), available at: http://www.microsoft.com/downloads/details.aspx?familyid=9B2DA534-3E03-4391-8A4D-074B9F2BC1BF
- Visual C++ 2008 Redistributables (x64), available at: http://www.microsoft.com/downloads/details.aspx?familyid=bd2a6171-e2d6-4230-b809-9a8d7548c1b6
After installing the additional package, restart the OpenSSL setup.
During installation, leave the default C:\OpenSSL-Win32 as the install path, and also leave the default option 'Copy OpenSSL DLL files to the Windows system directory' selected.
When the installation has finished, add C:\OpenSSL-Win32\bin to the Windows System Path variable of your server:
- On the Windows desktop, right-click the My Computer icon, and select Properties.
- Select the Advanced tab from the System Properties menu that appears, and click the Environment Variables button.
- Under System Variables, select Path, then click the Edit button. The Edit System Variable dialogue should appear.
- Add
';C:\OpenSSL-Win32\bin'to the end (notice the semicolon). - Press OK 3 times.
- Check that OpenSSL was correctly integrated into the Path variable by opening a new command console (Start>Run>cmd.exe) and verifying that OpenSSL is available:
Microsoft Windows [Version ...] Copyright (c) 2006 Microsoft Corporation. All rights reserved. C:\Windows\system32>
cd \C:\>opensslOpenSSL>exit<<< If you see the OpenSSL prompt, installation was successful. C:\>
Depending on your version of Windows, the preceding instructions might be slightly different.
After OpenSSL has been installed, use instructions similar to those from from Example 1 (shown earlier in this section), with the following changes:
- Change the following Unix commands:
# Create clean environment shell>
rm -rf newcertsshell>mkdir newcerts && cd newcertsOn Windows, use these commands instead:
# Create clean environment shell>
md c:\newcertsshell>cd c:\newcerts - When a
'\'character is shown at the end of a command line, this'\'character must be removed and the command lines entered all on a single line.
Testing SSL Connections
To test SSL connections, start the server as follows, where $DIR is the path name to the directory where the sample my.cnf option file (or my.ini on Windows) is located:
shell> mysqld --defaults-file=$DIR/my.cnf &
Then invoke a client program using the same option file:
shell> mysql --defaults-file=$DIR/my.cnf
If you have a MariaDB source distribution, you can also test your setup by modifying the preceding my.cnf file to refer to the demonstration certificate and key files in the mysql-test/std_data directory of the distribution.
Connecting to MariaDB Remotely from Windows with SSH
This section describes how to get a secure connection to a remote MariaDB server with SSH. The information was provided by David Carlson <dcarlson@mplcomm.com>.
- Install an SSH client on your Windows machine. As a user, the best nonfree one I have found is from
SecureCRTfrom http://www.vandyke.com/. Another option isf-securefrom http://www.f-secure.com/. You can also find some free ones onGoogleat http://directory.google.com/Top/Computers/Internet/Protocols/SSH/Clients/Windows/. - Start your Windows SSH client. Set
Host_Name =. Setyourmysqlserver_URL_or_IPuserid=to log in to your server. Thisyour_useriduseridvalue might not be the same as the user name of your MariaDB account. - Set up port forwarding. Either do a remote forward (Set
local_port: 3306,remote_host:,yourmysqlservername_or_ipremote_port: 3306) or a local forward (Setport: 3306,host: localhost,remote port: 3306). - Save everything, otherwise you will have to redo it the next time.
- Log in to your server with the SSH session you just created.
- On your Windows machine, start some ODBC application (such as Access).
- Create a new file in Windows and link to MariaDB using the ODBC driver the same way you normally do, except type in
localhostfor the MariaDB host server, notyourmysqlservername.
At this point, you should have an ODBC connection to MySQL, encrypted using SSH.
Auditing MariaDB Account Activity
Applications can use the following guidelines to perform auditing that ties database activity to MariaDB accounts.
MySQL accounts correspond to rows in the mysql.user table. When a client connects successfully, the server authenticates the client to a particular row in this table. The User and Host column values in this row uniquely identify the account and correspond to the ' format in which account names are written in SQL statements.
user_name'@'host_name'
The account used to authenticate a client determines which privileges the client has. Normally, the CURRENT_USER() function can be invoked to determine which account this is for the client user. Its value is constructed from the User and Host columns of the user table row for the account.
However, there are circumstances under which the CURRENT_USER() value corresponds not to the client user but to a different account. This occurs in contexts when privilege checking is not based the client's account:
- Stored routines (procedures and functions) defined with the
SQL SECURITY DEFINERcharacteristic - Views defined with the
SQL SECURITY DEFINERcharacteristic - Triggers and events
In those contexts, privilege checking is done against the DEFINER account and CURRENT_USER() refers to that account, not to the account for the client who invoked the stored routine or view or who caused the trigger to activate. To determine the invoking user, you can call the USER() function, which returns a value indicating the actual user name provided by the client and the host from which the client connected. However, this value does not necessarily correspond directly to an account in the user table, because the USER() value never contains wildcards, whereas account values (as returned by CURRENT_USER()) may contain user name and host name wildcards.
For example, a blank user name matches any user, so an account of ''@'localhost' enables clients to connect as an anonymous user from the local host with any user name. If this case, if a client connects as user1 from the local host, USER() and CURRENT_USER() return different values:
mysql> SELECT USER(), CURRENT_USER();
+-----------------+----------------+
| USER() | CURRENT_USER() |
+-----------------+----------------+
| user1@localhost | @localhost |
+-----------------+----------------+
The host name part of an account can contain wildcards, too. If the host name contains a '%' or '_' pattern character or uses netmask notation, the account can be used for clients connecting from multiple hosts and the CURRENT_USER() value will not indicate which one. For example, the account 'user2'@'%.example.com' can be used by user2 to connect from any host in the example.com domain. If user2 connects from remote.example.com, USER() and CURRENT_USER() return different values:
mysql> SELECT USER(), CURRENT_USER();
+--------------------------+---------------------+
| USER() | CURRENT_USER() |
+--------------------------+---------------------+
| user2@remote.example.com | user2@%.example.com |
+--------------------------+---------------------+
If an application must invoke USER() for user auditing (for example, if it does auditing from within triggers) but must also be able to associate the USER() value with an account in the user table, it is necessary to avoid accounts that contain wildcards in the User or Host column. Specifically, do not permit User to be empty (which creates an anonymous-user account), and do not permit pattern characters or netmask notation in Host values. All accounts must have a nonempty User value and literal Host value.
With respect to the previous examples, the ''@'localhost' and 'user2'@'%.example.com' accounts should be changed not to use wildcards:
RENAME USER ''@'localhost' TO 'user1'@'localhost';
RENAME USER 'user2'@'%.example.com' TO 'user2'@'remote.example.com';
If user2 must be able to connect from several hosts in the example.com domain, there should be a separate account for each host.
To extract the user name or host name part from a CURRENT-USER() or USER() value, use the SUBSTRING() function:
mysql>SELECT SUBSTRING_INDEX(CURRENT_USER(),'@',1);+---------------------------------------+ | SUBSTRING_INDEX(CURRENT_USER(),'@',1) | +---------------------------------------+ | user1 | +---------------------------------------+ mysql>SELECT SUBSTRING_INDEX(CURRENT_USER(),'@',-1);+----------------------------------------+ | SUBSTRING_INDEX(CURRENT_USER(),'@',-1) | +----------------------------------------+ | localhost | +----------------------------------------+
Running Multiple MariaDB Instances on One Machine
- Setting Up Multiple Data Directories
- Running Multiple MariaDB Instances on Windows
- Running Multiple MariaDB Instances on Unix
- Using Client Programs in a Multiple-Server Environment
- Running Multiple MariaDB Instances on Windows
In some cases, you might want to run multiple instances of MariaDB on a single machine. You might want to test a new MariaDB release while leaving an existing production setup undisturbed. Or you might want to give different users access to different mysqld servers that they manage themselves. (For example, you might be an Internet Service Provider that wants to provide independent MariaDB installations for different customers.)
It is possible to use a different MariaDB server binary per instance, or use the same binary for multiple instances, or any combination of the two approaches. For example, you might run a server from MariaDB 5.5 and one from MariaDB 5.6, to see how different versions handle a given workload. Or you might run multiple instances of the current production version, each managing a different set of databases.
Whether or not you use distinct server binaries, each instance that you run must be configured with unique values for several operating parameters. This eliminates the potential for conflict between instances. Parameters can be set on the command line, in option files, or by setting environment variables. See , "Specifying Program Options". To see the values used by a given instance, connect to it and execute a SHOW VARIABLES statement.
The primary resource managed by a MariaDB instance is the data directory. Each instance should use a different data directory, the location of which is specified using the --datadir= option. For methods of configuring each instance with its own data directory, and warnings about the dangers of failing to do so, see , "Setting Up Multiple Data Directories".
path
In addition to using different data directories, several other options must have different values for each server instance:
--port=port_num
--portcontrols the port number for TCP/IP connections. Alternatively, if the host has multiple network addresses, you can use--bind-addressto cause each server to listen to a different address.--socket=path
--socketcontrols the Unix socket file path on Unix or the named pipe name on Windows. On Windows, it is necessary to specify distinct pipe names only for those servers configured to permit named-pipe connections.--shared-memory-base-name=name
This option is used only on Windows. It designates the shared-memory name used by a Windows server to permit clients to connect using shared memory. It is necessary to specify distinct shared-memory names only for those servers configured to permit shared-memory connections.
--pid-file=file_name
This option indicates the path name of the file in which the server writes its process ID.
If you use the following log file options, their values must differ for each server:
--general_log_file=file_name--log-bin[=file_name]--slow_query_log_file=file_name--log-error[=file_name]
For further discussion of log file options, see , "MySQL Server Logs".
To achieve better performance, you can specify the following option differently for each server, to spread the load between several physical disks:
Having different temporary directories also makes it easier to determine which MariaDB server created any given temporary file.
If you have multiple MariaDB installations in different locations, you can specify the base directory for each installation with the --basedir= option. This causes each instance to automatically use a different data directory, log files, and PID file because the default for each of those parameters is relative to the base directory. In that case, the only other options you need to specify are the path--socket and --port options. Suppose that you install different versions of MariaDB using tar file binary distributions. These install in different locations, so you can start the server for each installation using the command bin/mysqld_safe under its corresponding base directory. mysqld_safe determines the proper --basedir option to pass to mysqld, and you need specify only the --socket and --port options to mysqld_safe.
As discussed in the following sections, it is possible to start additional servers by specifying appropriate command options or by setting environment variables. However, if you need to run multiple servers on a more permanent basis, it is more convenient to use option files to specify for each server those option values that must be unique to it. The --defaults-file option is useful for this purpose.
Setting Up Multiple Data Directories
Each MariaDB Instance on a machine should have its own data directory. The location is specified using the --datadir= option.
path
There are different methods of setting up a data directory for a new instance:
- Create a new data directory
- Copy an existing data directory
The following discussion provides more detail about each method.Warning
Normally, you should never have two servers that update data in the same databases. This may lead to unpleasant surprises if your operating system does not support fault-free system locking. If (despite this warning) you run multiple servers using the same data directory and they have logging enabled, you must use the appropriate options to specify log file names that are unique to each server. Otherwise, the servers try to log to the same files.
Even when the preceding precautions are observed, this kind of setup works only with MyISAM and MERGE tables, and not with any of the other storage engines. Also, this warning against sharing a data directory among servers always applies in an NFS environment. Permitting multiple MariaDB servers to access a common data directory over NFS is a very bad idea. The primary problem is that NFS is the speed bottleneck. It is not meant for such use. Another risk with NFS is that you must devise a way to ensure that two or more servers do not interfere with each other. Usually NFS file locking is handled by the lockd daemon, but at the moment there is no platform that performs locking 100% reliably in every situation.
Create a New Data Directory
With this method, the data directory will be in the same state as when you first install MySQL. It will have the default set of MariaDB accounts and no user data.
On Unix, initialize the data directory by running mysql_install_db. See , "Unix Postinstallation Procedures".
On Windows, the data directory is included in the MariaDB distribution:
- MySQL Zip archive distributions for Windows contain an unmodified data directory. You can unpack such a distribution into a temporary location, then copy it
datadirectory to where you are setting up the new instance. - Windows MSI package installers create and set up the data directory that the installed server will use, but also create a pristine "template" data directory named
dataunder the installation directory. After an installation has been performed using an MSI package, the template data directory can be copied to set up additional MariaDB instances.
Copy an Existing Data Directory
With this method, any MariaDB accounts or user data present in the data directory are carried over to the new data directory.
- Stop the existing MariaDB instance using the data directory. This must be a clean shutdown so that the instance flushes any pending changes to disk.
- Copy the data directory to the location where the new data directory should be.
- Copy the
my.cnformy.inioption file used by the existing instance. This serves as a basis for the new instance. - Modify the new option file so that any pathnames referring to the original data directory refer to the new data directory. Also, modify any other options that must be unique per instance, such as the TCP/IP port number and the log files. For a list of parameters that must be unique per instance, see , "Running Multiple MariaDB Instances on One Machine".
- Start the new instance, telling it to use the new option file.
Running Multiple MariaDB Instances on Windows
- Starting Multiple MariaDB Instances at the Windows Command Line
- Starting Multiple MariaDB Instances as Windows Services
You can run multiple servers on Windows by starting them manually from the command line, each with appropriate operating parameters, or by installing several servers as Windows services and running them that way. General instructions for running MariaDB from the command line or as a service are given in , "Installing MariaDB on Microsoft Windows". The following sections describe how to start each server with different values for those options that must be unique per server, such as the data directory. These options are listed in , "Running Multiple MariaDB Instances on One Machine".
Starting Multiple MariaDB Instances at the Windows Command Line
The procedure for starting a single MariaDB server manually from the command line is described in , "Starting MariaDB from the Windows Command Line". To start multiple servers this way, you can specify the appropriate options on the command line or in an option file. It is more convenient to place the options in an option file, but it is necessary to make sure that each server gets its own set of options. To do this, create an option file for each server and tell the server the file name with a --defaults-file option when you run it.
Suppose that you want to run mysqld on port 3307 with a data directory of C:\mydata1, and mysqld-debug on port 3308 with a data directory of C:\mydata2. Use this procedure:
- Make sure that each data directory exists, including its own copy of the
MariaDBdatabase that contains the grant tables. - Create two option files. For example, create one file named
C:\my-opts1.cnfthat looks like this:
[mysqld]
datadir = C:/mydata1
port = 3307
Create a second file named
C:\my-opts2.cnfthat looks like this:[mysqld] datadir = C:/mydata2 port = 3308
- Use the
--defaults-fileoption to start each server with its own option file:
C:\>
C:\mysql\bin\mysqld --defaults-file=C:\my-opts1.cnfC:\>C:\mysql\bin\mysqld-debug --defaults-file=C:\my-opts2.cnfEach server starts in the foreground (no new prompt appears until the server exits later), so you will need to issue those two commands in separate console windows.
To shut down the servers, connect to each using the appropriate port number:
C:\>C:\mysql\bin\mysqladmin --port=3307 shutdownC:\>C:\mysql\bin\mysqladmin --port=3308 shutdown
Servers configured as just described permit clients to connect over TCP/IP. If your version of Windows supports named pipes and you also want to permit named-pipe connections, use the mysqld or mysqld-debug server and specify options that enable the named pipe and specify its name. Each server that supports named-pipe connections must use a unique pipe name. For example, the C:\my-opts1.cnf file might be written like this:
[mysqld]
datadir = C:/mydata1
port = 3307
enable-named-pipe socket = mypipe1
Modify C:\my-opts2.cnf similarly for use by the second server. Then start the servers as described previously.
A similar procedure applies for servers that you want to permit shared-memory connections. Enable such connections with the --shared-memory option and specify a unique shared-memory name for each server with the --shared-memory-base-name option.
Starting Multiple MariaDB Instances as Windows Services
On Windows, a MariaDB server can run as a Windows service. The procedures for installing, controlling, and removing a single MariaDB service are described in , "Starting MariaDB as a Windows Service".
To set up multiple MariaDB services, you must make sure that each instance uses a different service name in addition to the other parameters that must be unique per instance.
For the following instructions, suppose that you want to run the mysqld server from two different versions of MariaDB that are installed at C:\mysql-5.5.9 and C:\mysql-5.6.6, respectively. (This might be the case if you are running 5.5.9 as your production server, but also want to conduct tests using 5.6.6.)
To install MariaDB as a Windows service, use the --install or --install-manual option. For information about these options, see , "Starting MariaDB as a Windows Service".
Based on the preceding information, you have several ways to set up multiple services. The following instructions describe some examples. Before trying any of them, shut down and remove any existing MariaDB services.
- Approach 1: Specify the options for all services in one of the standard option files. To do this, use a different service name for each server. Suppose that you want to run the 5.5.9 mysqld using the service name of
mysqld1and the 5.6.6 mysqld using the service namemysqld2. In this case, you can use the[mysqld1]group for 5.5.9 and the[mysqld2]group for 5.6.6. For example, you can set upC:\my.cnflike this:
# options for mysqld1 service
[mysqld1]
basedir = C:/mysql-5.5.9
port = 3307
enable-named-pipe socket = mypipe1
# options for mysqld2 service
[mysqld2]
basedir = C:/mysql-5.6.6
port = 3308
enable-named-pipe socket = mypipe2
Install the services as follows, using the full server path names to ensure that Windows registers the correct executable program for each service:
C:\>
C:\mysql-5.5.9\bin\mysqld --install mysqld1C:\>C:\mysql-5.6.6\bin\mysqld --install mysqld2To start the services, use the services manager, or use NET START with the appropriate service names:
C:\>
NET START mysqld1C:\>NET START mysqld2To stop the services, use the services manager, or use NET STOP with the appropriate service names:
C:\>
NET STOP mysqld1C:\>NET STOP mysqld2 - Approach 2: Specify options for each server in separate files and use
--defaults-filewhen you install the services to tell each server what file to use. In this case, each file should list options using a[mysqld]group.
With this approach, to specify options for the 5.5.9 mysqld, create a file
C:\my-opts1.cnfthat looks like this:[mysqld] basedir = C:/mysql-5.5.9 port = 3307 enable-named-pipe socket = mypipe1
For the 5.6.6 mysqld, create a file
C:\my-opts2.cnfthat looks like this:[mysqld] basedir = C:/mysql-5.6.6 port = 3308 enable-named-pipe socket = mypipe2
Install the services as follows (enter each command on a single line):
C:\>
C:\mysql-5.5.9\bin\mysqld --install mysqld1--defaults-file=C:\my-opts1.cnfC:\>C:\mysql-5.6.6\bin\mysqld --install mysqld2--defaults-file=C:\my-opts2.cnfWhen you install a MariaDB server as a service and use a
--defaults-fileoption, the service name must precede the option.After installing the services, start and stop them the same way as in the preceding example.
To remove multiple services, use mysqld --remove for each one, specifying a service name following the --remove option. If the service name is the default (MariaDB), you can omit it.
Running Multiple MariaDB Instances on Unix
One way is to run multiple MariaDB instances on Unix is to compile different servers with different default TCP/IP ports and Unix socket files so that each one listens on different network interfaces. Compiling in different base directories for each installation also results automatically in a separate, compiled-in data directory, log file, and PID file location for each server.
Assume that an existing 5.5 server is configured for the default TCP/IP port number (3306) and Unix socket file (/tmp/mysql.sock). To configure a new 5.6.6 server to have different operating parameters, use a CMake command something like this:
shell>cmake . -DMYSQL_TCP_PORT=port_number\-DMYSQL_UNIX_ADDR=file_name\-DCMAKE_INSTALL_PREFIX=/usr/local/mysql-5.6.6
Here, port_number and file_name must be different from the default TCP/IP port number and Unix socket file path name, and the CMAKE_INSTALL_PREFIX value should specify an installation directory different from the one under which the existing MariaDB installation is located.
If you have a MariaDB server listening on a given port number, you can use the following command to find out what operating parameters it is using for several important configurable variables, including the base directory and Unix socket file name:
shell> mysqladmin --host=host_name --port=port_number variables
With the information displayed by that command, you can tell what option values not to use when configuring an additional server.
If you specify localhost as the host name, mysqladmin defaults to using a Unix socket file connection rather than TCP/IP. To explicitly specify the connection protocol, use the --protocol={TCP|SOCKET|PIPE|MEMORY} option.
You need not compile a new MariaDB server just to start with a different Unix socket file and TCP/IP port number. It is also possible to use the same server binary and start each invocation of it with different parameter values at runtime. One way to do so is by using command-line options:
shell> mysqld_safe --socket=file_name --port=port_number
To start a second server, provide different --socket and --port option values, and pass a --datadir= option to mysqld_safe so that the server uses a different data directory.
path
Alternatively, put the options for each server in a different option file, then start each server using a --defaults-file option that specifies the path to the appropriate option file. For example, if the option files for two server instances are named /usr/local/mysql/my.cnf and /usr/local/mysql/my.cnf2, start the servers like this: command:
shell>mysqld_safe --defaults-file=/usr/local/mysql/my.cnfshell>mysqld_safe --defaults-file=/usr/local/mysql/my.cnf2
Another way to achieve a similar effect is to use environment variables to set the Unix socket file name and TCP/IP port number:
shell>MYSQL_UNIX_PORT=/tmp/mysqld-new.sockshell>MYSQL_TCP_PORT=3307shell>export MYSQL_UNIX_PORT MYSQL_TCP_PORTshell>mysql_install_db --user=mysqlshell>mysqld_safe --datadir=/path/to/datadir &
This is a quick way of starting a second server to use for testing. The nice thing about this method is that the environment variable settings apply to any client programs that you invoke from the same shell. Thus, connections for those clients are automatically directed to the second server.
, "Environment Variables", includes a list of other environment variables you can use to affect MariaDB programs.
On Unix, the mysqld_multi script provides another way to start multiple servers. See , "mysqld_multi - Manage Multiple MariaDB Servers".
Using Client Programs in a Multiple-Server Environment
To connect with a client program to a MariaDB server that is listening to different network interfaces from those compiled into your client, you can use one of the following methods:
- Start the client with
--host=host-name--port=to connect using TCP/IP to a remote server, withport_number--host=127.0.0.1--port=to connect using TCP/IP to a local server, or withport_number--host=localhost--socket=to connect to a local server using a Unix socket file or a Windows named pipe.file_name - Start the client with
--protocol=TCPto connect using TCP/IP,--protocol=SOCKETto connect using a Unix socket file,--protocol=PIPEto connect using a named pipe, or--protocol=MEMORYto connect using shared memory. For TCP/IP connections, you may also need to specify--hostand--portoptions. For the other types of connections, you may need to specify a--socketoption to specify a Unix socket file or Windows named-pipe name, or a--shared-memory-base-nameoption to specify the shared-memory name. Shared-memory connections are supported only on Windows. - On Unix, set the
MYSQL_UNIX_PORTandMYSQL_TCP_PORTenvironment variables to point to the Unix socket file and TCP/IP port number before you start your clients. If you normally use a specific socket file or port number, you can place commands to set these environment variables in your.loginfile so that they apply each time you log in. See , "Environment Variables". - Specify the default Unix socket file and TCP/IP port number in the
[client]group of an option file. For example, you can useC:\my.cnfon Windows, or the.my.cnffile in your home directory on Unix. See , "Using Option Files". - In a C program, you can specify the socket file or port number arguments in the
mysql_real_connect()call. You can also have the program read option files by callingmysql-options(). See , "C API Function Descriptions". - If you are using the Perl
DBD::mysqlmodule, you can read options from MariaDB option files. For example:
$dsn = 'DBI:mysql:test;mysql_read_default_group=client;'
 . 'mysql_read_default_file=/usr/local/mysql/data/my.cnf';
$dbh = DBI->connect($dsn, $user, $password);
See , "MySQL Perl API".
Other programming interfaces may provide similar capabilities for reading option files.
Tracing mysqld Using DTrace
The DTrace probes in the MariaDB server are designed to provide information about the execution of queries within MariaDB and the different areas of the system being utilized during that process. The organization and triggering of the probes means that the execution of an entire query can be monitored with one level of probes (query-start and query-done) but by monitoring other probes you can get successively more detailed information about the execution of the query in terms of the locks used, sort methods and even row-by-row and storage-engine level execution information.
The DTrace probes are organized so that you can follow the entire query process, from the point of connection from a client, through the query execution, row-level operations, and back out again. You can think of the probes as being fired within a specific sequence during a typical client connect/execute/disconnect sequence, as shown in the following figure.
Figure 5.1. The MariaDB Architecture Using Pluggable Storage Engines
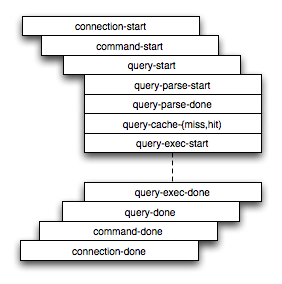
Global information is provided in the arguments to the DTrace probes at various levels. Global information, that is, the connection ID and user/host and where relevant the query string, is provided at key levels (connection-start, command-start, query-start, and query-exec-start). As you go deeper into the probes, it is assumed either you are only interested in the individual executions (row-level probes provide information on the database and table name only), or that you will combine the row-level probes with the notional parent probes to provide the information about a specific query. Examples of this will be given as the format and arguments of each probe are provided.
For more information on DTrace and writing DTrace scripts, read the DTrace User Guide.
MySQL 5.6 includes support for DTrace probes on Solaris 10 Update 5 (Solaris 5/08) on SPARC, x86 and x86_64 platforms. Probes are also supported on Mac OS X 10.4 and higher. Enabling the probes should be automatic on these platforms. To explicitly enable or disable the probes during building, use the -DENABLE-DTRACE=1 or -DENABLE_DTRACE=0 option to CMake.
mysqld DTrace Probe Reference
- Connection Probes
- Command Probes
- Query Probes
- Query Parsing Probes
- Query Cache Probes
- Query Execution Probes
- Row-Level Probes
- Read Row Probes
- Index Probes
- Lock Probes
- Filesort Probes
- Statement Probes
- Network Probes
- Keycache Probes
- Command Probes
MySQL supports the following static probes, organized into groups of functionality.
Table 5.18. MariaDB DTrace Probes
| Group | Probes | Introduced |
|---|---|---|
| Connection | connection-start, connection-done
| 5.4.0 |
| Command | command-start, command-done
| 5.4.0 |
| Query | query-start, query-done
| 5.4.0 |
| Query Parsing | query-parse-start, query-parse-done
| 5.4.0 |
| Query Cache | query-cache-hit, query-cache-miss
| 5.4.0 |
| Query Execution | query-exec-start, query-exec-done
| 5.4.0 |
| Row Level | insert-row-start, insert-row-done
| 5.4.0 |
update-row-start, update-row-done
| 5.4.0 | |
delete-row-start, delete-row-done
| 5.4.0 | |
| Row Reads | read-row-start, read-row-done
| 5.4.0 |
| Index Reads | index-read-row-start, index-read-row-done
| 5.4.0 |
| Lock | handler-rdlock-start, handler-rdlock-done
| 5.4.0 |
handler-wrlock-start, handler-wrlock-done
| 5.4.0 | |
handler-unlock-start, handler-unlock-done
| 5.4.0 | |
| Filesort | filesort-start, filesort-done
| 5.4.0 |
| Statement | select-start, select-done
| 5.4.0 |
insert-start, insert-done
| 5.4.0 | |
insert-select-start, insert-select-done
| 5.4.0 | |
update-start, update-done
| 5.4.0 | |
multi-update-start, multi-update-done
| 5.4.0 | |
delete-start, delete-done
| 5.4.0 | |
multi-delete-start, multi-delete-done
| 5.4.0 | |
| Network | net-read-start, net-read-done, net-write-start, net-write-done
| 5.4.0 |
| Keycache | keycache-read-start, keycache-read-block, keycache-read-done, keycache-read-hit, keycache-read-miss, keycache-write-start, keycache-write-block, keycache-write-done
| 5.4.0 |
When extracting the argument data from the probes, each argument is available as arg, starting with Narg0. To identify each argument within the definitions they are provided with a descriptive name, but you must access the information using the corresponding arg parameter.
N
Connection Probes
The connection-start and connection-done probes enclose a connection from a client, regardless of whether the connection is through a socket or network connection.
connection-start(connectionid, user, host)
connection-done(status, connectionid)
connection-start: Triggered after a connection and successful login/authentication have been completed by a client. The arguments contain the connection information:
connectionid: Anunsigned longcontaining the connection ID. This is the same as the process ID shown as theIdvalue in the output fromSHOW PROCESSLIST.user: The username used when authenticating. The value will be blank for the anonymous user.host: The host of the client connection. For a connection made using UNIX sockets, the value will be blank.
connection-done: Triggered just as the connection to the client has been closed. The arguments are:
status: The status of the connection when it was closed. A logout operation will have a value of 0; any other termination of the connection has a nonzero value.connectionid: The connection ID of the connection that was closed.
The following D script will quantify and summarize the average duration of individual connections, and provide a count, dumping the information every 60 seconds:
#!/usr/sbin/dtrace -s mysql*:::connection-start
{
 self->start = timestamp;
}
mysql*:::connection-done
/self->start/
{
 @ = quantize(((timestamp - self->start)/1000000));
 self->start = 0;
}
tick-60s
{
 printa(@);
}
When executed on a server with a large number of clients you might see output similar to this:
 1 57413 :tick-60s
 value ------------- Distribution ------------- count
 -1 | 0
 0 |@@@@@@@@@@@@@@@@@@@@@@@@@@@@@@@@@@@@@@@@ 30011
 1 | 59
 2 | 5
 4 | 20
 8 | 29
 16 | 18
 32 | 27
 64 | 30
 128 | 11
 256 | 10
 512 | 1
 1024 | 6
 2048 | 8
 4096 | 9
 8192 | 8
 16384 | 2
 32768 | 1
 65536 | 1
 131072 | 0
 262144 | 1
 524288 | 0
Command Probes
The command probes are executed before and after a client command is executed, including any SQL statement that might be executed during that period. Commands include operations such as the initialization of the DB, use of the COM_CHANGE_USER operation (supported by the MariaDB protocol), and manipulation of prepared statements. Many of these commands are used only by the MariaDB client API from various connectors such as PHP and Java.
command-start(connectionid, command, user, host)
command-done(status)
command-start: Triggered when a command is submitted to the server.
connectionid: The connection ID of the client executing the command.command: An integer representing the command that was executed. Possible values are shown in the following table.
Value Name Description 00 COM_SLEEP Internal thread state 01 COM_QUIT Close connection 02 COM_INIT_DB Select database ( USE ...)03 COM_QUERY Execute a query 04 COM_FIELD_LIST Get a list of fields 05 COM_CREATE_DB Create a database (deprecated) 06 COM_DROP_DB Drop a database (deprecated) 07 COM_REFRESH Refresh connection 08 COM_SHUTDOWN Shutdown server 09 COM_STATISTICS Get statistics 10 COM_PROCESS_INFO Get processes ( SHOW PROCESSLIST)11 COM_CONNECT Initialize connection 12 COM_PROCESS_KILL Kill process 13 COM_DEBUG Get debug information 14 COM_PING Ping 15 COM_TIME Internal thread state 16 COM_DELAYED_INSERT Internal thread state 17 COM_CHANGE_USER Change user 18 COM_BINLOG_DUMP Used by a replication slave or mysqlbinlog to initiate a binary log read 19 COM_TABLE_DUMP Used by a replication slave to get the master table information 20 COM_CONNECT_OUT Used by a replication slave to log a connection to the server 21 COM_REGISTER_SLAVE Used by a replication slave during registration 22 COM_STMT_PREPARE Prepare a statement 23 COM_STMT_EXECUTE Execute a statement 24 COM_STMT_SEND_LONG_DATA Used by a client when requesting extended data 25 COM_STMT_CLOSE Close a prepared statement 26 COM_STMT_RESET Reset a prepared statement 27 COM_SET_OPTION Set a server option 28 COM_STMT_FETCH Fetch a prepared statement user: The user executing the command.host: The client host.
command-done: Triggered when the command execution completes. Thestatusargument contains 0 if the command executed successfully, or 1 if the statement was terminated before normal completion.
The command-start and command-done probes are best used when combined with the statement probes to get an idea of overall execution time.
Query Probes
The query-start and query-done probes are triggered when a specific query is received by the server and when the query has been completed and the information has been successfully sent to the client.
query-start(query, connectionid, database, user, host)
query-done(status)
query-start: Triggered after the query string has been received from the client. The arguments are:
query: The full text of the submitted query.connectionid: The connection ID of the client that submitted the query. The connection ID equals the connection ID returned when the client first connects and theIdvalue in the output fromSHOW PROCESSLIST.database: The database name on which the query is being executed.user: The username used to connect to the server.host: The hostname of the client.
query-done: Triggered once the query has been executed and the information has been returned to the client. The probe includes a single argument,status, which returns 0 when the query is successfully executed and 1 if there was an error.
You can get a simple report of the execution time for each query using the following D script:
#!/usr/sbin/dtrace -s
#pragma D option quiet dtrace:::BEGIN
{
 printf('%-20s %-20s %-40s %-9s\n', 'Who', 'Database', 'Query', 'Time(ms)');
}
mysql*:::query-start
{
 self->query = copyinstr(arg0);
 self->connid = arg1;
 self->db = copyinstr(arg2);
 self->who = strjoin(copyinstr(arg3),strjoin('@',copyinstr(arg4)));
 self->querystart = timestamp;
}
mysql*:::query-done
{
 printf('%-20s %-20s %-40s %-9d\n',self->who,self->db,self->query,
 (timestamp - self->querystart) / 1000000);
}
When executing the above script you should get a basic idea of the execution time of your queries:
shell> ./query.d Who Database Query Time(ms)
root@localhost test select * from t1 order by i limit 10 0
root@localhost test set global query_cache_size=0 0
root@localhost test select * from t1 order by i limit 10 776
root@localhost test select * from t1 order by i limit 10 773
root@localhost test select * from t1 order by i desc limit 10 795
Query Parsing Probes
The query parsing probes are triggered before the original SQL statement is parsed and when the parsing of the statement and determination of the execution model required to process the statement has been completed:
query-parse-start(query)
query-parse-done(status)
query-parse-start: Triggered just before the statement is parsed by the MariaDB query parser. The single argument,query, is a string containing the full text of the original query.query-parse-done: Triggered when the parsing of the original statement has been completed. Thestatusis an integer describing the status of the operation. A0indicates that the query was successfully parsed. A1indicates that the parsing of the query failed.
For example, you could monitor the execution time for parsing a given query using the following D script:
#!/usr/sbin/dtrace -s
#pragma D option quiet mysql*:::query-parse-start
{
 self->parsestart = timestamp;
 self->parsequery = copyinstr(arg0);
}
mysql*:::query-parse-done
/arg0 == 0/
{
 printf('Parsing %s: %d microseconds\n', self->parsequery,((timestamp - self->parsestart)/1000));
}
mysql*:::query-parse-done
/arg0 != 0/
{
 printf('Error parsing %s: %d microseconds\n', self->parsequery,((timestamp - self->parsestart)/1000));
}
In the above script a predicate is used on query-parse-done so that different output is generated based on the status value of the probe.
When running the script and monitoring the execution:
shell> ./query-parsing.d Error parsing select from t1 join (t2) on (t1.i = t2.i) order by t1.s,t1.i limit 10: 36 ms Parsing select * from t1 join (t2) on (t1.i = t2.i) order by t1.s,t1.i limit 10: 176 ms
Query Cache Probes
The query cache probes are fired when executing any query. The query-cache-hit query is triggered when a query exists in the query cache and can be used to return the query cache information. The arguments contain the original query text and the number of rows returned from the query cache for the query. If the query is not within the query cache, or the query cache is not enabled, then the query-cache-miss probe is triggered instead.
query-cache-hit(query, rows)
query-cache-miss(query)
query-cache-hit: Triggered when the query has been found within the query cache. The first argument,query, contains the original text of the query. The second argument,rows, is an integer containing the number of rows in the cached query.query-cache-miss: Triggered when the query is not found within the query cache. The first argument,query, contains the original text of the query.
The query cache probes are best combined with a probe on the main query so that you can determine the differences in times between using or not using the query cache for specified queries. For example, in the following D script, the query and query cache information are combined into the information output during monitoring:
#!/usr/sbin/dtrace -s
#pragma D option quiet dtrace:::BEGIN
{
 printf('%-20s %-20s %-40s %2s %-9s\n', 'Who', 'Database', 'Query', 'QC', 'Time(ms)');
}
mysql*:::query-start
{
 self->query = copyinstr(arg0);
 self->connid = arg1;
 self->db = copyinstr(arg2);
 self->who = strjoin(copyinstr(arg3),strjoin('@',copyinstr(arg4)));
 self->querystart = timestamp;
 self->qc = 0;
}
mysql*:::query-cache-hit
{
 self->qc = 1;
}
mysql*:::query-cache-miss
{
 self->qc = 0;
}
mysql*:::query-done
{
 printf('%-20s %-20s %-40s %-2s %-9d\n',self->who,self->db,self->query,(self->qc ? 'Y' : 'N'),
 (timestamp - self->querystart) / 1000000);
}
When executing the script you can see the effects of the query cache. Initially the query cache is disabled. If you set the query cache size and then execute the query multiple times you should see that the query cache is being used to return the query data:
shell> ./query-cache.d root@localhost test select * from t1 order by i limit 10 N 1072
root@localhost set global query_cache_size=262144 N 0
root@localhost test select * from t1 order by i limit 10 N 781
root@localhost test select * from t1 order by i limit 10 Y 0
Query Execution Probes
The query execution probe is triggered when the actual execution of the query starts, after the parsing and checking the query cache but before any privilege checks or optimization. By comparing the difference between the start and done probes you can monitor the time actually spent servicing the query (instead of just handling the parsing and other elements of the query).
query-exec-start(query, connectionid, database, user, host, exec_type)
query-exec-done(status)
Note
The information provided in the arguments for query-start and query-exec-start are almost identical and designed so that you can choose to monitor either the entire query process (using query-start) or only the execution (using query-exec-start) while exposing the core information about the user, client, and query being executed.
query-exec-start: Triggered when the execution of a individual query is started. The arguments are:
query: The full text of the submitted query.connectionid: The connection ID of the client that submitted the query. The connection ID equals the connection ID returned when the client first connects and theIdvalue in the output fromSHOW PROCESSLIST.database: The database name on which the query is being executed.user: The username used to connect to the server.host: The hostname of the client.exec_type: The type of execution. Execution types are determined based on the contents of the query and where it was submitted. The values for each type are shown in the following table.
Value Description 0 Executed query from sql_parse, top-level query. 1 Executed prepared statement 2 Executed cursor statement 3 Executed query in stored procedure
query-exec-done: Triggered when the execution of the query has completed. The probe includes a single argument,status, which returns 0 when the query is successfully executed and 1 if there was an error.
Row-Level Probes
The *row-{start,done} probes are triggered each time a row operation is pushed down to a storage engine. For example, if you execute an INSERT statement with 100 rows of data, then the insert-row-start and insert-row-done probes will be triggered 100 times each, for each row insert.
insert-row-start(database, table)
insert-row-done(status)
update-row-start(database, table)
update-row-done(status)
delete-row-start(database, table)
delete-row-done(status)
insert-row-start: Triggered before a row is inserted into a table.insert-row-done: Triggered after a row is inserted into a table.update-row-start: Triggered before a row is updated in a table.update-row-done: Triggered before a row is updated in a table.delete-row-start: Triggered before a row is deleted from a table.delete-row-done: Triggered before a row is deleted from a table.
The arguments supported by the probes are consistent for the corresponding start and done probes in each case:
database: The database name.table: The table name.status: The status; 0 for success or 1 for failure.
Because the row-level probes are triggered for each individual row access, these probes can be triggered many thousands of times each second, which may have a detrimental effect on both the monitoring script and MySQL. The DTrace environment should limit the triggering on these probes to prevent the performance being adversely affected. Either use the probes sparingly, or use counter or aggregation functions to report on these probes and then provide a summary when the script terminates or as part of a query-done or query-exec-done probes.
The following example script summarizes the duration of each row operation within a larger query:
#!/usr/sbin/dtrace -s
#pragma D option quiet dtrace:::BEGIN
{
 printf('%-2s %-10s %-10s %9s %9s %-s \n',
 'St', 'Who', 'DB', 'ConnID', 'Dur ms', 'Query');
}
mysql*:::query-start
{
 self->query = copyinstr(arg0);
 self->who = strjoin(copyinstr(arg3),strjoin('@',copyinstr(arg4)));
 self->db = copyinstr(arg2);
 self->connid = arg1;
 self->querystart = timestamp;
 self->rowdur = 0;
}
mysql*:::query-done
{
 this->elapsed = (timestamp - self->querystart) /1000000;
 printf('%2d %-10s %-10s %9d %9d %s\n',
 arg0, self->who, self->db,
 self->connid, this->elapsed, self->query);
}
mysql*:::query-done
/ self->rowdur /
{
 printf('%34s %9d %s\n', '', (self->rowdur/1000000), '-> Row ops');
}
mysql*:::insert-row-start
{
 self->rowstart = timestamp;
}
mysql*:::delete-row-start
{
 self->rowstart = timestamp;
}
mysql*:::update-row-start
{
 self->rowstart = timestamp;
}
mysql*:::insert-row-done
{
 self->rowdur += (timestamp-self->rowstart);
}
mysql*:::delete-row-done
{
 self->rowdur += (timestamp-self->rowstart);
}
mysql*:::update-row-done
{
 self->rowdur += (timestamp-self->rowstart);
}
Running the above script with a query that inserts data into a table, you can monitor the exact time spent performing the raw row insertion:
St Who DB ConnID Dur ms Query
 0 @localhost test 13 20767 insert into t1(select * from t2)
 4827 -> Row ops
Read Row Probes
The read row probes are triggered at a storage engine level each time a row read operation occurs. These probes are specified within each storage engine (as opposed to the *row-start probes which are in the storage engine interface). These probes can therefore be used to monitor individual storage engine row-level operations and performance. Because these probes are triggered around the storage engine row read interface, they may be hit a significant number of times during a basic query.
read-row-start(database, table, scan_flag)
read-row-done(status)
read-row-start: Triggered when a row is read by the storage engine from the specifieddatabaseandtable. Thescan_flagis set to 1 (true) when the read is part of a table scan (that is, a sequential read), or 0 (false) when the read is of a specific record.read-row-done: Triggered when a row read operation within a storage engine completes. Thestatusreturns 0 on success, or a positive value on failure.
Index Probes
The index probes are triggered each time a a row is read using one of the indexes for the specified table. The probe is triggered within the corresponding storage engine for the table.
index-read-row-start(database, table)
index-read-row-done(status)
index-read-row-start: Triggered when a row is read by the storage engine from the specifieddatabaseandtable.index-read-row-done: Triggered when an indexed row read operation within a storage engine completes. Thestatusreturns 0 on success, or a positive value on failure.
Lock Probes
The lock probes are called whenever an external lock is requested by MariaDB for a table using the corresponding lock mechanism on the table as defined by the table's engine type. There are three different types of lock, the read lock, write lock, and unlock operations. Using the probes you can determine the duration of the external locking routine (that is, the time taken by the storage engine to implement the lock, including any time waiting for another lock to become free) and the total duration of the lock/unlock process.
handler-rdlock-start(database, table)
handler-rdlock-done(status)
handler-wrlock-start(database, table)
handler-wrlock-done(status)
handler-unlock-start(database, table)
handler-unlock-done(status)
handler-rdlock-start: Triggered when a read lock is requested on the specifieddatabaseandtable.handler-wrlock-start: Triggered when a write lock is requested on the specifieddatabaseandtable.handler-unlock-start: Triggered when an unlock request is made on the specifieddatabaseandtable.handler-rdlock-done: Triggered when a read lock request completes. Thestatusis 0 if the lock operation succeeded, or>0on failure.handler-wrlock-done: Triggered when a write lock request completes. Thestatusis 0 if the lock operation succeeded, or>0on failure.handler-unlock-done: Triggered when an unlock request completes. Thestatusis 0 if the unlock operation succeeded, or>0on failure.
You can use arrays to monitor the locking and unlocking of individual tables and then calculate the duration of the entire table lock using the following script:
#!/usr/sbin/dtrace -s
#pragma D option quiet mysql*:::handler-rdlock-start
{
 self->rdlockstart = timestamp;
 this->lockref = strjoin(copyinstr(arg0),strjoin('@',copyinstr(arg1)));
 self->lockmap[this->lockref] = self->rdlockstart;
 printf('Start: Lock->Read %s.%s\n',copyinstr(arg0),copyinstr(arg1));
}
mysql*:::handler-wrlock-start
{
 self->wrlockstart = timestamp;
 this->lockref = strjoin(copyinstr(arg0),strjoin('@',copyinstr(arg1)));
 self->lockmap[this->lockref] = self->rdlockstart;
 printf('Start: Lock->Write %s.%s\n',copyinstr(arg0),copyinstr(arg1));
}
mysql*:::handler-unlock-start
{
 self->unlockstart = timestamp;
 this->lockref = strjoin(copyinstr(arg0),strjoin('@',copyinstr(arg1)));
 printf('Start: Lock->Unlock %s.%s (%d ms lock duration)\n',
 copyinstr(arg0),copyinstr(arg1),
 (timestamp - self->lockmap[this->lockref])/1000000);
}
mysql*:::handler-rdlock-done
{
 printf('End: Lock->Read %d ms\n',
 (timestamp - self->rdlockstart)/1000000);
}
mysql*:::handler-wrlock-done
{
 printf('End: Lock->Write %d ms\n',
 (timestamp - self->wrlockstart)/1000000);
}
mysql*:::handler-unlock-done
{
 printf('End: Lock->Unlock %d ms\n',
 (timestamp - self->unlockstart)/1000000);
}
When executed, you should get information both about the duration of the locking process itself, and of the locks on a specific table:
Start: Lock->Read test.t2
End: Lock->Read 0 ms Start: Lock->Unlock test.t2 (25743 ms lock duration)
End: Lock->Unlock 0 ms Start: Lock->Read test.t2
End: Lock->Read 0 ms Start: Lock->Unlock test.t2 (1 ms lock duration)
End: Lock->Unlock 0 ms Start: Lock->Read test.t2
End: Lock->Read 0 ms Start: Lock->Unlock test.t2 (1 ms lock duration)
End: Lock->Unlock 0 ms Start: Lock->Read test.t2
End: Lock->Read 0 ms
Filesort Probes
The filesort probes are triggered whenever a filesort operation is applied to a table. For more information on filesort and the conditions under which it occurs, see , "ORDER BY Optimization".
filesort-start(database, table)
filesort-done(status, rows)
filesort-start: Triggered when the filesort operation starts on a table. The two arguments to the probe,databaseandtable, will identify the table being sorted.filesort-done: Triggered when the filesort operation completes. Two arguments are supplied, thestatus(0 for success, 1 for failure), and the number of rows sorted during the filesort process.
An example of this is in the following script, which tracks the duration of the filesort process in addition to the duration of the main query:
#!/usr/sbin/dtrace -s
#pragma D option quiet dtrace:::BEGIN
{
 printf('%-2s %-10s %-10s %9s %18s %-s \n',
 'St', 'Who', 'DB', 'ConnID', 'Dur microsec', 'Query');
}
mysql*:::query-start
{
 self->query = copyinstr(arg0);
 self->who = strjoin(copyinstr(arg3),strjoin('@',copyinstr(arg4)));
 self->db = copyinstr(arg2);
 self->connid = arg1;
 self->querystart = timestamp;
 self->filesort = 0;
 self->fsdb = '';
 self->fstable = '';
}
mysql*:::filesort-start
{
 self->filesort = timestamp;
 self->fsdb = copyinstr(arg0);
 self->fstable = copyinstr(arg1);
}
mysql*:::filesort-done
{
 this->elapsed = (timestamp - self->filesort) /1000;
 printf('%2d %-10s %-10s %9d %18d Filesort on %s\n',
 arg0, self->who, self->fsdb,
 self->connid, this->elapsed, self->fstable);
}
mysql*:::query-done
{
 this->elapsed = (timestamp - self->querystart) /1000;
 printf('%2d %-10s %-10s %9d %18d %s\n',
 arg0, self->who, self->db,
 self->connid, this->elapsed, self->query);
}
Executing a query on a large table with an ORDER BY clause that triggers a filesort, and then creating an index on the table and then repeating the same query, you can see the difference in execution speed:
St Who DB ConnID Dur microsec Query
 0 @localhost test 14 11335469 Filesort on t1
 0 @localhost test 14 11335787 select * from t1 order by i limit 100
 0 @localhost test 14 466734378 create index t1a on t1 (i)
 0 @localhost test 14 26472 select * from t1 order by i limit 100
Statement Probes
The individual statement probes are provided to give specific information about different statement types. For the start probes the string of the query is provided as a the only argument. Depending on the statement type, the information provided by the corresponding done probe will differ. For all done probes the status of the operation (0 for success, >0 for failure) is provided. For SELECT, INSERT, INSERT ... (SELECT FROM ...), DELETE, and DELETE FROM t1,t2 operations the number of rows affected is returned.
For UPDATE and UPDATE t1,t2 ... statements the number of rows matched and the number of rows actually changed is provided. This is because the number of rows actually matched by the corresponding WHERE clause, and the number of rows changed can differ. MariaDB does not update the value of a row if the value already matches the new setting.
select-start(query)
select-done(status,rows)
insert-start(query)
insert-done(status,rows)
insert-select-start(query)
insert-select-done(status,rows)
update-start(query)
update-done(status,rowsmatched,rowschanged)
multi-update-start(query)
multi-update-done(status,rowsmatched,rowschanged)
delete-start(query)
delete-done(status,rows)
multi-delete-start(query)
multi-delete-done(status,rows)
select-start: Triggered before aSELECTstatement.select-done: Triggered at the end of aSELECTstatement.insert-start: Triggered before aINSERTstatement.insert-done: Triggered at the end of anINSERTstatement.insert-select-start: Triggered before anINSERT ... SELECTstatement.insert-select-done: Triggered at the end of anINSERT ... SELECTstatement.update-start: Triggered before anUPDATEstatement.update-done: Triggered at the end of anUPDATEstatement.multi-update-start: Triggered before anUPDATEstatement involving multiple tables.multi-update-done: Triggered at the end of anUPDATEstatement involving multiple tables.delete-start: Triggered before aDELETEstatement.delete-done: Triggered at the end of aDELETEstatement.multi-delete-start: Triggered before aDELETEstatement involving multiple tables.multi-delete-done: Triggered at the end of aDELETEstatement involving multiple tables.
The arguments for the statement probes are:
query: The query string.status: The status of the query.0for success, and>0for failure.rows: The number of rows affected by the statement. This returns the number rows found forSELECT, the number of rows deleted forDELETE, and the number of rows successfully inserted forINSERT.rowsmatched: The number of rows matched by theWHEREclause of anUPDATEoperation.rowschanged: The number of rows actually changed during anUPDATEoperation.
You use these probes to monitor the execution of these statement types without having to monitor the user or client executing the statements. A simple example of this is to track the execution times:
#!/usr/sbin/dtrace -s
#pragma D option quiet dtrace:::BEGIN
{
 printf('%-60s %-8s %-8s %-8s\n', 'Query', 'RowsU', 'RowsM', 'Dur (ms)');
}
mysql*:::update-start, mysql*:::insert-start,
mysql*:::delete-start, mysql*:::multi-delete-start,
mysql*:::multi-delete-done, mysql*:::select-start,
mysql*:::insert-select-start, mysql*:::multi-update-start
{
 self->query = copyinstr(arg0);
 self->querystart = timestamp;
}
mysql*:::insert-done, mysql*:::select-done,
mysql*:::delete-done, mysql*:::multi-delete-done, mysql*:::insert-select-done
/ self->querystart /
{
 this->elapsed = ((timestamp - self->querystart)/1000000);
 printf('%-60s %-8d %-8d %d\n',
 self->query,
 0,
 arg1,
 this->elapsed);
 self->querystart = 0;
}
mysql*:::update-done, mysql*:::multi-update-done
/ self->querystart /
{
 this->elapsed = ((timestamp - self->querystart)/1000000);
 printf('%-60s %-8d %-8d %d\n',
 self->query,
 arg1,
 arg2,
 this->elapsed);
 self->querystart = 0;
}
When executed you can see the basic execution times and rows matches:
Query RowsU RowsM Dur (ms)
select * from t2 0 275 0
insert into t2 (select * from t2) 0 275 9
update t2 set i=5 where i > 75 110 110 8
update t2 set i=5 where i < 25 254 134 12
delete from t2 where i < 5 0 0 0
Another alternative is to use the aggregation functions in DTrace to aggregate the execution time of individual statements together:
#!/usr/sbin/dtrace -s
#pragma D option quiet mysql*:::update-start, mysql*:::insert-start,
mysql*:::delete-start, mysql*:::multi-delete-start,
mysql*:::multi-delete-done, mysql*:::select-start,
mysql*:::insert-select-start, mysql*:::multi-update-start
{
 self->querystart = timestamp;
}
mysql*:::select-done
{
 @statements['select'] = sum(((timestamp - self->querystart)/1000000));
}
mysql*:::insert-done, mysql*:::insert-select-done
{
 @statements['insert'] = sum(((timestamp - self->querystart)/1000000));
}
mysql*:::update-done, mysql*:::multi-update-done
{
 @statements['update'] = sum(((timestamp - self->querystart)/1000000));
}
mysql*:::delete-done, mysql*:::multi-delete-done
{
 @statements['delete'] = sum(((timestamp - self->querystart)/1000000));
}
tick-30s
{
 printa(@statements);
}
The script just shown aggregates the times spent doing each operation, which could be used to help benchmark a standard suite of tests.
 delete 0
 update 0
 insert 23
 select 2484
 delete 0
 update 0
 insert 39
 select 10744
 delete 0
 update 26
 insert 56
 select 10944
 delete 0
 update 26
 insert 2287
 select 15985
Network Probes
The network probes monitor the transfer of information from the MariaDB server and clients of all types over the network. The probes are defined as follows:
net-read-start()
net-read-done(status, bytes)
net-write-start(bytes)
net-write-done(status)
net-read-start: Triggered when a network read operation is started.net-read-done: Triggered when the network read operation completes. Thestatusis anintegerrepresenting the return status for the operation,0for success and1for failure. Thebytesargument is an integer specifying the number of bytes read during the process.net-start-bytes: Triggered when data is written to a network socket. The single argument,bytes, specifies the number of bytes written to the network socket.net-write-done: Triggered when the network write operation has completed. The single argument,status, is an integer representing the return status for the operation,0for success and1for failure.
You can use the network probes to monitor the time spent reading from and writing to network clients during execution. The following D script provides an example of this. Both the cumulative time for the read or write is calculated, and the number of bytes. Note that the dynamic variable size has been increased (using the dynvarsize option) to cope with the rapid firing of the individual probes for the network reads/writes.
#!/usr/sbin/dtrace -s
#pragma D option quiet
#pragma D option dynvarsize=4m dtrace:::BEGIN
{
 printf('%-2s %-30s %-10s %9s %18s %-s \n',
 'St', 'Who', 'DB', 'ConnID', 'Dur microsec', 'Query');
}
mysql*:::query-start
{
 self->query = copyinstr(arg0);
 self->who = strjoin(copyinstr(arg3),strjoin('@',copyinstr(arg4)));
 self->db = copyinstr(arg2);
 self->connid = arg1;
 self->querystart = timestamp;
 self->netwrite = 0;
 self->netwritecum = 0;
 self->netwritebase = 0;
 self->netread = 0;
 self->netreadcum = 0;
 self->netreadbase = 0;
}
mysql*:::net-write-start
{
 self->netwrite += arg0;
 self->netwritebase = timestamp;
}
mysql*:::net-write-done
{
 self->netwritecum += (timestamp - self->netwritebase);
 self->netwritebase = 0;
}
mysql*:::net-read-start
{
 self->netreadbase = timestamp;
}
mysql*:::net-read-done
{
 self->netread += arg1;
 self->netreadcum += (timestamp - self->netreadbase);
 self->netreadbase = 0;
}
mysql*:::query-done
{
 this->elapsed = (timestamp - self->querystart) /1000000;
 printf('%2d %-30s %-10s %9d %18d %s\n',
 arg0, self->who, self->db,
 self->connid, this->elapsed, self->query);
 printf('Net read: %d bytes (%d ms) write: %d bytes (%d ms)\n',
 self->netread, (self->netreadcum/1000000),
 self->netwrite, (self->netwritecum/1000000));
}
When executing the above script on a machine with a remote client, you can see that approximately a third of the time spent executing the query is related to writing the query results back to the client.
St Who DB ConnID Dur microsec Query
 0 root@::ffff:192.168.0.108 test 31 3495 select * from t1 limit 1000000
Net read: 0 bytes (0 ms) write: 10000075 bytes (1220 ms)
Keycache Probes
The keycache probes are triggered when using the index key cache used with the MyISAM storage engine. Probes exist to monitor when data is read into the keycache, cached key data is written from the cache into a cached file, or when accessing the keycache.
Keycache usage indicates when data is read or written from the index files into the cache, and can be used to monitor how efficient the memory allocated to the keycache is being used. A high number of keycache reads across a range of queries may indicate that the keycache is too small for size of data being accessed.
keycache-read-start(filepath, bytes, mem_used, mem_free)
keycache-read-block(bytes)
keycache-read-hit()
keycache-read-miss()
keycache-read-done(mem_used, mem_free)
keycache-write-start(filepath, bytes, mem_used, mem_free)
keycache-write-block(bytes)
keycache-write-done(mem_used, mem_free)
When reading data from the index files into the keycache, the process first initializes the read operation (indicated by keycache-read-start), then loads blocks of data (keycache-read-block), and then the read block is either matches the data being identified (keycache-read-hit) or more data needs to be read (keycache-read-miss). Once the read operation has completed, reading stops with the keycache-read-done.
Data will be read from the index file into the keycache only when the specified key is not already within the keycache.
keycache-read-start: Triggered when the keycache read operation is started. Data is read from the specifiedfilepath, reading the specified number ofbytes. Themem_usedandmem_availindicate memory currently used by the keycache and the amount of memory available within the keycache.keycache-read-block: Triggered when the keycache reads a block of data, of the specified number ofbytes, from the index file into the keycache.keycache-read-hit: Triggered when the block of data read from the index file matches the key data requested.keycache-read-miss: Triggered when the block of data read from the index file does not match the key data needed.keycache-read-done: Triggered when the keycache read operation has completed. Themem_usedandmem_availindicate memory currently used by the keycache and the amount of memory available within the keycache.
Keycache writes occur when the index information is updated during an INSERT, UPDATE, or DELETE operation, and the cached key information is flushed back to the index file.
keycache-write-start: Triggered when the keycache write operation is started. Data is written to the specifiedfilepath, reading the specified number ofbytes. Themem_usedandmem_availindicate memory currently used by the keycache and the amount of memory available within the keycache.keycache-write-block: Triggered when the keycache writes a block of data, of the specified number ofbytes, to the index file from the keycache.keycache-write-done: Triggered when the keycache write operation has completed. Themem_usedandmem_availindicate memory currently used by the keycache and the amount of memory available within the keycache.
| Prev | Next | |
| MySQL Programs | Home | Chapter 6. Backup and Recovery |