Crystal Reports Visual Studio .NET
Previous Top Next


clip0505

Description
Download Link

Runnable Demo - See it in action!

Runnable Demo (EXE file) (19MB)


Data Files, DLL Files, Thinstall Project - everything you need to build it yourself.


Project files (ZIP file) (19MB)
This demo requires Thinstall Version 2.519 or higher to build & run.


How to use Thinstall to deploy Crystal Reports for .NET Applications without Installation

This example demonstrates how to:

· Link your application, report files, .NET applications, .NET Framework and the Crystal Reports Runtime into a single EXE file
· Run Crystal Reports based application with no installation or registry changes


First, let's assume our source code is located at c:\source, and our compiled .NET EXE is placed at c:\source\bin\Debug

Step 1. Import the .NET Framework and managed portions of Crystal Reports Runtime.

This can be done 2 ways. The easiest way is to:
- Start with a new project
- Enter your EXE for "Input EXE" (i.e. c:\source\bin\Debug\myprog.exe)
- Select Languages -> .NET -> Import .NET Framework

Alternatively, if you use the new project wizard and specify the directory where your EXE resides, Thinstall will collect the managed dependencies automatically along with all other files in the EXE directory.

Step 2. Import unmanaged portions of Crystal Reports

Use Menu -> Virtual Files -> Add Virtual Directory, fill in the settings shown below.

clip0497

Note: Many applications do not need SSChart and other graphic files - these can be deleted from your project to reduce your EXE size. Other files like regwiz.exe and .hlp files can also be deleted from your project.

Step 3. Add Crystal Reports virtual registry keys that are normally added by its installer

- Export the registry sub tree HKEY_LOCAL_MACHINE\SOFTWARE\Crystal Decisions\Crystal Reports\VSNET using regedit to .reg format.
- Import the .reg file into Thinstall using Menu -> Virtual Files -> Import REGEDIT .reg script
This will generate a .threg file and add it to your project.
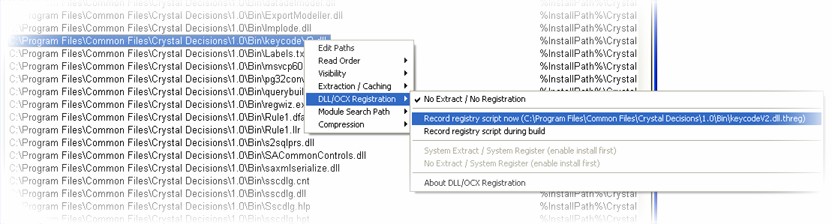
- Edit the .threg file using a text editor to look like this (notice the change in bold)

"HKEY_LOCAL_MACHINE\SOFTWARE\Crystal Decisions\Crystal Reports\VSNET"
{
value VS7NET 01 "%InstallPath%\Crystal Decisions\1.0\Bin\"
value VS7SupportPath 01 "%InstallPath%\Crystal Decisions\1.0\SSChart\"
}

"HKEY_LOCAL_MACHINE\SOFTWARE\Crystal Decisions\Crystal Reports\VSNET\Keycodes"

"HKEY_LOCAL_MACHINE\SOFTWARE\Crystal Decisions\Crystal Reports\VSNET\Keycodes\CR9 NET"
{
value "" 01 1#0aAAP50-GS00000-U7000RN#0a131399967#0a1255626267#0a
value LaunchCount 04 1f000000
}


Step 4. Record a registry script for the Crystal Reports COM controls

Select ALL .dll files in your project that are located under the path:
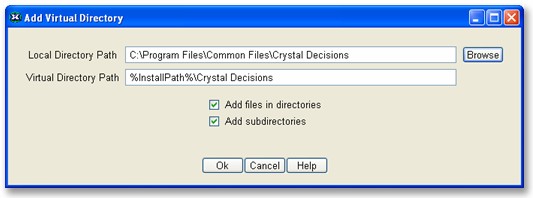
C:\Program Files\Common Files\Crystal Decisions.

- Right-click
- Select DLL/OCX Registration -> Record registry script now

clip0498

This will generate .threg files for each COM control that Crystal Reports uses and add it to your Thinstall project. The .threg file allows COM controls to be used by Crystal Reports without requiring registration.

Step 5. Enable the option "Patch External Exports"

Crystal Reports uses a very non-standard method of looking up function addresses. It tries to obtain function addresses by scanning memory, presumably this is an optimization for their loader. Because of this behavior it is necessary to enable the option "Path External Exports". (Menu -> Options -> External Module Loading)

clip0499

Step 6. Add extra Runtime DLLs required by Crystal Reports for Windows 98

Use Menu -> Virtual Files -> Add Single Virtual File to add the following files to your project.

c:\windows\system32\dbghelp.dll
c:\windows\system32\usp10.dll


Step 7. Click Build! to generate an EXE that runs without installation.
(Don't forget to disable compression for fast test building)


Special notes:
To keep this demo simple, we did not modify our .NET security settings before linking. You should do this to ensure your application can run from a LAN drive.