Creating a disjoint rollover
A disjoint rollover swaps in an image under a web object when the pointer rolls over another web object. In response to a pointer rolling over or clicking a trigger image, an image appears in a different location on the web page. The image that is rolled over is considered the trigger; the image that changes is considered the target.
As with simple rollovers that use just one slice, you first have to set up the trigger and target slices and the frame in which the swap image resides. Then you can link the trigger to the target slice with a behavior line.
|
NOTE |
The trigger for a disjoint rollover doesn't have to be a slice. Hotspots and buttons also have behavior handles that can be used to create disjoint rollovers. For more information on hotspots, see Creating hotspots. For more information about buttons, see Creating button symbols. |
To attach a disjoint rollover to a selected image:
- Select Edit > Insert > Slice or Hotspot to attach a slice or hotspot to the trigger image.
NOTE
This step is not necessary if the selected object is a button or if a slice or hotspot already covers the image.
- Create a new frame by clicking the New/Duplicate Frame button in the Frames panel.
- Place a second image, to be used as the target, in the new frame in the desired location on the canvas. You can place the image anywhere other than beneath the slice you created in step 1.
- Select the image, and then select Edit > Insert > Slice to attach a slice to the image.
- Select Frame 1 in the Frames panel to return to the frame that has the original image.
- Select the slice, hotspot, or button that covers the trigger area (the original image) and place the pointer over the behavior handle. The pointer changes to a hand.
- Drag the behavior handle for the trigger slice or hotspot to the target slice you created in step 4.
The behavior line extends from the center of the trigger to the upper-left corner of the target slice, and the Swap Image dialog box opens.
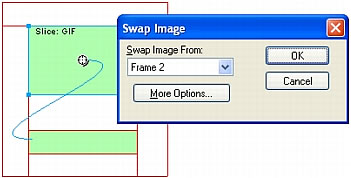
- From the Swap Image From pop-up menu, select the frame you created in step 2, and click OK.
- Click the Preview button to preview and test the disjoint rollover.

