Batch processing
Batch processing is a convenient way to automatically convert a group of graphic files. These are the batch-processing options:
- Convert a selection of files to another format.
- Convert a selection of files to the same format with different optimization settings.
- Scale exported files.
- Find and replace text, colors, URLs, fonts, and non-Web216 colors.
- Rename groups of files by any combination of adding a prefix, adding a suffix, replacing a substring, and replacing blanks.
- Perform commands on a selection of files.
To batch-process files:
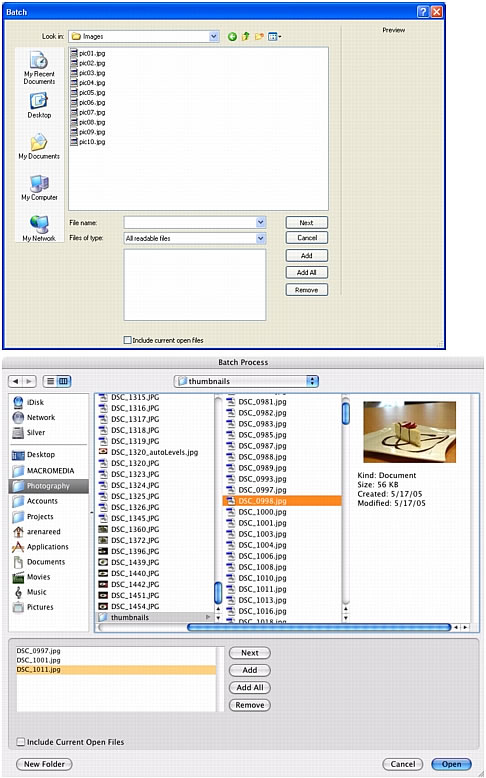
- Select File > Batch Process, and select the files to process. You can select files from different folders, and you can also include all currently open documents in the batch. As you're working through the wizard, you can use the Back button if you need to make any changes to your file selection.
You also have the option of not selecting any files at all while using the wizard if you only want to save the batch-process script for later use.
NOTE
If the files you select are locked or checked in from a Dreamweaver site, you are prompted to unlock them or check them out before proceeding.
- Click one of the following in the Batch (Windows) or Batch Process (Macintosh) dialog box:
Add adds selected files and folders to the list of files to batch-process. If a folder is selected, all valid, readable files in the folder are added to the batch process.
NOTE
Valid files are files that have been created, named, and saved. If the latest file version is not saved, you are asked to save it, and you can then continue the batch process. If you don't save the file, the entire batch process ends.
Add All adds all valid files in the currently selected folder to the list of files to batch-process.
Remove removes selected files from the list of files to batch-process.
- Select Include Current Open Files to add all currently open files.
These files do not appear in the list of files to batch-process, but they are included in the process.
- Click Next, then do one or both of the following:
- To add a task to the batch, select it in the Batch Options list and click Add. Each task can be added only once. For more information on the Scale option, see Scaling graphics with a batch process. For more information on the Rename option, see Changing filenames with a batch process. For more information on adding commands, see Performing commands with a batch process.
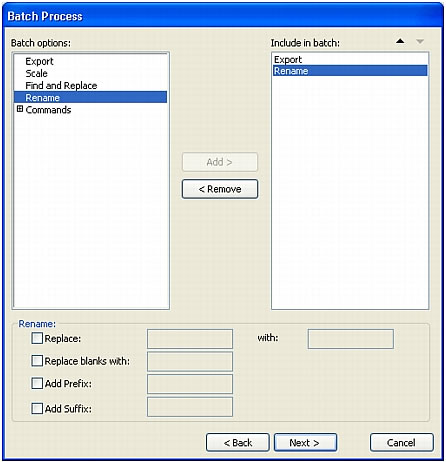
- To reorder the list, select the task in the Include in Batch list and click the up and down arrow buttons.

NOTE
The order in which tasks appear in the Include in Batch list is the order in which the tasks are performed during the batch process, with the exception of Export and Rename, which are always performed last.
- To add a task to the batch, select it in the Batch Options list and click Add. Each task can be added only once. For more information on the Scale option, see Scaling graphics with a batch process. For more information on the Rename option, see Changing filenames with a batch process. For more information on adding commands, see Performing commands with a batch process.
- To view extra options for a task, select the task in the Include in Batch list.
- Select settings for each option as required.
To remove a task from the batch, select the task in the Include in Batch list and click Remove.
- Click Next.
- Select options for saving processed files:
Same Location as Original File saves the file in the same location as its source file and overwrites the source file if the filenames are the same and in the same format.
Custom Location lets you select a location in which to save the processed files.
- Select Backups to select backup options for the original files.
It is always safer to back up files. For more information, see Specifying the batch process output location.
- Click Save Script if you want to save the batch process settings for future use.
For more information, see Saving batch processes as scripts.
- Click Batch to perform your batch process.
At the end of the batch process, if any of the files added to the batch were not able to be processed, a notification appears that alerts you to the problem.
In addition, a log file named FireworksBatchLog.txt is created during the batch process. It lists all of the files processed, the specific files that could not be opened (if any), and other information. You can find this log file at:
- \\Documents and Settings\username\Application Data\Adobe\FireWorks\FireworksBatchLog.txt (Windows)
- /Users/username/Library/Application Support/Adobe FireWorks/FireworksBatchLog.txt (Macintosh)

