We need the Audio.Stop action to stop playing the song that we loaded with the Audio.Load action on the On Show event. We need the Audio.Play action to start playing the "normal" background music that we paused with the Audio.Pause action on the On Show event. The whole progression will go something like this:
Step 1: Page opens
Step 2: Audio.Pause -- pauses the background music
Step 3: Audio.Load -- loads our page-specific song
Step 4: Page closes
Step 5: Audio.Stop -- stops our page-specific song
Step 6: Audio.Play -- unpauses the background music
7 ) C li ck O K t o c on f i rm y ou r c h a ng e s .
Clicking OK on the script editor will finish adding the four actions to the two page events, confirming all of the changes that you've made. The properties pane will show that there are "2 Lines" of action script for both the On Show and On Close events.
You now have two actions on the On Show event (Audio.Pause and Audio.Load), and two actions on the On Close event (Audio.Stop and Audio.Play).
8 ) P rev i e w t h e p r oj ec t , a nd go t o t h e A bou t T e d p a g e .
As soon as you jump to the About Ted page, the background music will pause, and the audio file that you selected in step 3 will begin playing in its place. This is the result of the two actions on the page's On Show event, firing one after the other in sequence.
9 ) C li ck on t h e Back bu tt on t o re t u r n t o t h e ma in p a g e .
As you leave the About Ted page, the audio file that you selected in step 3 will stop playing, and the original background music will continue where it left off. This time, it's the two actions you added to the On Close event at work.
10 ) E x i t t h e p rev i e w a nd s ave t h e p r oj ec t .
When you're done previewing the project, exit the application and return to the AutoPlay design environment.
That's it for this lesson! Be sure to save your changes before moving on.
In this lesson, you learned how to:
• Change the default object sounds for your project
• Set object-specific sound effects
• Add background music
• Pause the background audio while a page is shown
• Load and play an audio file
L ess o n 9 : P u b li s h i n g
This lesson will walk you through the final stage of AutoPlay project development: building and publishing your AutoPlay application.
What You'll Learn
In this lesson, you'll learn how to:
• Build to a folder on your hard drive
• Build a compressed executable
• Burn a CD-R, CD-RW, DVD±R, DVD±RW or BD-R/RE
How Long Will It Take?
This lesson takes approximately 10 minutes to do.
If you're continuing from Lesson 8, you should still have AutoPlay running with the Tutorial project open. If so, you're ready to move on to the next exercise: Building to a Folder.
Otherwise, you'll need to open the project file that you saved at the end of Lesson 8.
1 ) Op e n t h e Tu t o r i a l. a u t opl ay f il e t h a t y ou s ave d in L e ss on 8 .
When you save a project, AutoPlay automatically creates a project folder for it inside your "My Documents\AutoPlay Media Studio 8\Projects" folder. This project folder is where everything that belongs to the project is stored-including the project file, which contains all of the settings used in the project.
The project folder and the project file always have the same name that you gave to the project when it was created. The project file's name ends with a ".autoplay" file extension.
Since you named this project "Tutorial" in Lesson 1, the name of the project folder will be Tutorial, and the name of the project file will be Tutorial.autoplay. So, the path to the project file should be something like:
...\My Documents\AutoPlay Media Studio 8\Projects\Tutorial\Tutorial.autoplay To open the project, you just need to open that project file.
Building to a Folder
The fastest publishing method is to build the project to a folder on your hard drive.
When you publish your project to a folder, AutoPlay uses the settings in the project file to generate an executable for your application. It then copies this executable-along with the entire contents of your project's CD_ROOT folder-to the output folder of your choice.
The only difference between building to a folder, and burning a CD, is where your application ends up. Building to a folder is essentially like preparing the contents of a CD in a folder before burning it.
![]()
Note: When you choose Publish > Build, a "Publish Warning" dialog may be shown. See Running on Windows Vista or Later for more information.
1 ) C hoo s e P ubli s h > B uild t o op e n t h e P ubli s h wi z ar d.
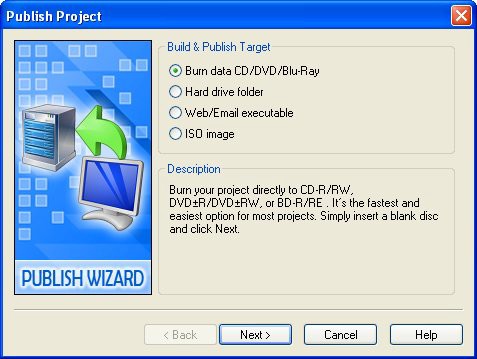
The first page of the Publish wizard lets you choose how you want to publish your AutoPlay application. The option you select on this page determines (a) what options are available when you click Next, and (b) what the end result of the build process will be.
2 ) S e l ec t t h e Har d Dr i ve Fold er op t ion, a nd c li ck Nex t .
You're going to publish the project to a folder on your hard drive, so select the Hard Drive Folder option.
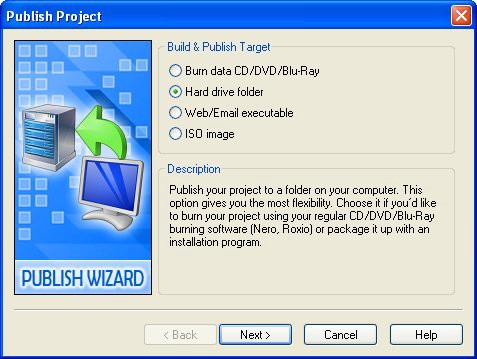
Clicking Next will bring you to the second page of the wizard where you can specify the output folder.

Tip: Even if you're planning to burn your project to a CD, it's a good idea to build it to a folder at least once first. That way, you can test your application without wasting a CD-R, or having to wait for a slow CD-RW burn. Once you've made sure that everything works the way you intended, you can either re-publish the project using a different method, or burn the contents of the output folder using an external CD burning program.
3 ) I n t h e Ou t pu t Fold er f i e ld, t y p e C : \ A u t o P l ay Ou t pu t .
The output folder is simply the location where you want the application to be built. You can use any folder for this purpose, but it's best to create a new folder, since any existing files will be deleted before the application is built.
![]()
Warning! Any files in the output folder will be deleted during the build process! Be very careful not to use a folder that contains any files or subfolders you want to keep.