Once you've typed that text onto the script editor, you can click OK to confirm the changes that you've made to the object's On Click event.
And that's it! You've just added an action, programmer-style.
6 ) S ave t h e p r oj ec t .
Always save the project! As much fun as it was to add these video controls, there's no point having to do it all over again if something unexpected happens. (Is that the rumble of thunder I hear off in the distance...?)
7 ) C hoo s e P a g e > P rev i e w P a g e a nd t ry ou t t h e c u s t o m v id e o c on t r ol s . Wh e n y ou' re don e t ry ing i t ou t , ex i t t h e p rev i e w.
That's it for this lesson.
In this lesson, you learned how to:
• Add a panel image to frame a video
• Add an attractive text banner to the page
• Add a video object
• Customize the video object's built-in control panel
• Make your own video controls from scratch
• Control the video with a few simple actions
L ess o n 8 : Au d i o
Audio is an important part of any multimedia application. Sound effects help make interactive objects like buttons "come alive," and provide useful cues to the user to help them recognize which objects are interactive. Background music can help set the right mood or enhance the emotional impact of your work. And in many cases, audio is an integral part of the application, whether it's in the form of music that you're distributing with an AutoPlay CD, or training materials presented in the form of spoken instructions.
In this lesson, you'll learn the basics of working with audio files, so you can make your applications sing...or talk...or maybe even inspire your users to get up and dance.
What You'll Learn
In this lesson, you'll learn how to:
• Change the default object sounds for your project
• Set object-specific sound effects
• Add background music
• Pause the background audio while a page is shown
• Load and play an audio file
How Long Will It Take?
This lesson takes approximately 35 minutes to do.
If you're continuing from Lesson 7, you should still have AutoPlay running with the Tutorial project open. If so, you're ready to move on to the next exercise: Changing the Default Object Sounds.
Otherwise, you'll need to open the project file that you saved at the end of Lesson 7.
1 ) Op e n t h e Tu t o r i a l. a u t opl ay f il e t h a t y ou s ave d in L e ss on 7 .
When you save a project, AutoPlay automatically creates a project folder for it inside your "My Documents\AutoPlay Media Studio 8\Projects" folder. This project folder is where everything that belongs to the project is stored-including the project file, which contains all of the settings used in the project.
The project folder and the project file always have the same name that you gave to the project when it was created. The project file's name ends with a ".autoplay" file extension.
Since you named this project "Tutorial" in Lesson 1, the name of the project folder will be Tutorial, and the name of the project file will be Tutorial.autoplay. So, the path to the project file should be something like:
...\My Documents\AutoPlay Media Studio 8\Projects\Tutorial\Tutorial.autoplay To open the project, you just need to open that project file.
Changing the Default Object Sounds
With the exception of the Flash, PDF, RichText, input, listbox, web, progress, combobox, tree and grid objects, all of the objects in AutoPlay can trigger two kinds of sound effects: one for when the user moves the mouse over them (a "highlight" sound), and another for when the user clicks on them (a "click" sound). For each object's sound effect, you have the option of playing either no sound at all, a custom sound specific to that object, or a standard sound defined in the project settings.
The standard sound makes it easy to change the sound effects for all of the objects in your project at once, without having to go to each object and change its sound settings individually.
In order to demonstrate how the default object sounds work, let's temporarily change the standard highlight sound for all objects in the project.
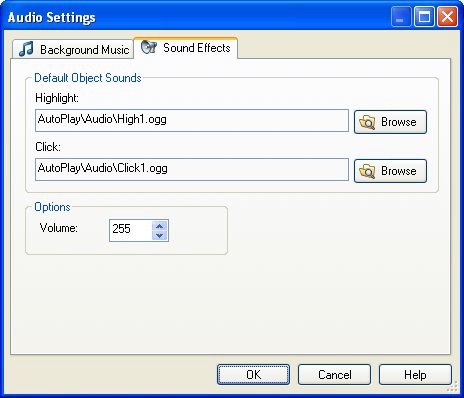
1 ) C hoo s e P r oj ec t > A udio. Wh e n t h e A udio S e tt ing s di a log op e n s , c li ck on t h e S ound Eff ec t s t a b.
The Sound Effects tab is where you can choose the default highlight and click sound for all objects in the project-or at least, for all of the objects in the project that have their highlight or click sound set to "Standard." Any changes that you make on this tab will immediately affect the whole project.
2 ) C li ck t h e b r ow s e bu tt on n ex t t o t h e H ighligh t s e tt ing. Wh e n t h e
S e l ec t Fil e di a log op e n s , c li ck t h e G a ll ery bu tt on, a nd n av ig a t e in t o t h e S ound Eff ec t s f old er .
AutoPlay comes with a number of sample sound effects that you can use in your projects. These sound effects are all in Ogg Vorbis format. Ogg Vorbis is an open-source audio compression format similar to MP3, but capable of greater sound quality and even smaller file sizes. Unlike other audio formats, Ogg Vorbis is patent and license free, making it an excellent choice for the distribution of digital audio.
![]()
Note: The MP3 codec is licensed by Fraunhofer IIS-A. If you generate revenue using music in MP3 format, you are responsible for paying them a percentage of each sale.