Ogg Vorbis files end in .ogg.
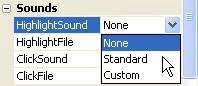
3 ) C li ck on s o me o f t h e s ound f il e s t o p rev i e w t h em . Wh e n y ou f ind on e t h a t y ou li ke , c li ck O K t o s e l ec t i t a s t h e n e w s t a nd ar d highligh t s ound.
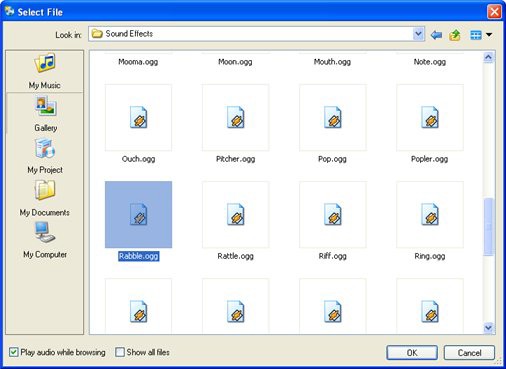
There's a "Play audio while browsing" option at the bottom of the Select File dialog that appears when you're browsing for audio files. It's turned on by default, so when you click on a sound file, it will automatically begin playing in the background. (You can turn the option off if you prefer to browse in silence.)
![]()
Note: Make sure you have your computer speakers turned on. If you don't have computer speakers, just hum something catchy, close your eyes and pick a file at random.
4 ) C li ck O K on t h e A udio S e tt ing s di a log t o acce p t t h e c h a ng e .
P rev i e w t h e p r oj ec t a nd m o ve y ou r m ou s e o ver t h e bu tt on s t o h ear t h e
n e w highligh t s ound s . E x i t t h e p rev i e w wh e n y ou ' re don e .
To preview the project, press F5. When the application opens, move your mouse over the buttons. The sound you picked as the default highlight sound should play when you move the mouse over each of the button objects.
All buttons have their highlight sound set to "Standard" by default. When you changed the standard highlight sound for the project, you changed the highlight sounds for all of the buttons in the project at once.
When you're ready to exit the preview, just click on the Exit button.
5 ) S wi t c h t o P a g e1 a nd c li ck on t h e E ma il A dd re ss l a b e l obj ec t . I n t h e S ound s ca t e go ry o f t h e p r op er t i e s p a n e , s e t H ighligh tS ound t o
" St a nd ar d " in s t ea d o f " N on e . "
This will make the Email Address object play the standard highlight sound whenever the mouse moves over it. Since we're using this label as an interactive object, like the buttons on the page, making it play the same highlight sound will help the user identify the label as something they can click on.
Note: The Email Address label object is the one with "ted@sellersrealty.com" on it.
![]()
6 ) C hoo s e P r oj ec t > A udio, a nd c h a ng e t h e s t a nd ar d highligh t s ound b ack t o H igh 1 .ogg.
To change the highlight sound back to High1.ogg, choose Project > Audio and click on the Sound Effects tab. Click the highlight setting's browse button, and use the Select File dialog to select the High1.ogg file. Click OK on the Select File dialog, then click OK on the Audio Settings dialog, and you're done.
7 ) P rev i e w t h e p r oj ec t a nd m o ve y ou r m ou s e o ver t h e obj ec t s on t h e p a g e t o h ear t h e highligh t s ound. E x i t t h e p rev i e w wh e n y ou' re don e .
The highlight sounds have all been changed back to the original highlight sound. And since you set the Email Address label object's highlight sound to "Standard," it now has the same highlight sound as well.
Aren't you glad you didn't have to change the sound for all objects in the project one object at a time? And this tutorial is fairly small...imagine working on a hundred-page project with thousands of buttons in it. This feature may not seem that exciting at first glance, but in the long run it can be a real time saver.
![]()
Tip: It's a good idea to use the default object sounds wherever possible, because it makes it much easier to change the sounds throughout your project later.
Setting Object-Specific Sound Effects
You aren't always going to want every object to use the same sound. Some objects were just made to sound different. Luckily, AutoPlay lets you specify a custom sound for each object's sound setting. In fact, if you wanted, every object in your project could have a unique sound.
Let's give the Email Address label object a custom click sound.
1 ) C li ck on t h e E ma il A dd re ss l a b e l obj ec t .
The Email Address label object still needs a sound effect for when the user clicks on it. We could use the standard click sound if we wanted, but since clicking on this object does something a bit different, let's make the click sound a bit different as well.
(When the user clicks on this object, the File.OpenEmail action starts a new message in the user's regular email program. Since this happens "outside" of the application-like clicking on a web link that opens a pop-up page in another window-we'll reflect the difference by giving the object a different kind of click sound.)
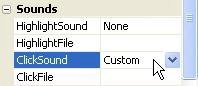
2 ) I n t h e S ound s ca t e go ry o f t h e p r op er t i e s p a n e , c h a ng e C li ck S ound f r o m " N on e " t o " C u s t o m . "
By default, label objects are configured to make no sound at all. When you set the ClickSound setting to "Custom," the object will use whatever file you specify in the ClickFile setting.
3 ) C li ck on t h e C li ck Fil e s e tt ing, a nd t h e n c li ck t h e b r ow s e bu tt on. Wh e n t h e S e l ec t Fil e di a log a pp ear s , c li ck t h e G a ll ery bu tt on, a nd n av ig a t e in t o t h e S ound Eff ec t s f old er .
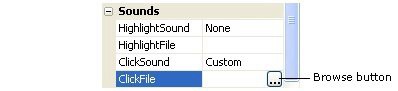
Clicking on the browse button opens the Select File dialog so you can select the audio file that you want to use for the object's click sound.
The Sound Effects folder should be where you were browsing the last time you selected an audio file, so you shouldn't have to do anything to navigate into it. If you followed the past few steps, you're already there.
![]()
Note: The Select File dialog always opens up at the same place you navigated to the last time you selected that kind of file.
4 ) S e l ec t t h e Ra bbl e .ogg f il e , a nd c li ck O K .
This will give the Email Address label object a "pop" sound when you click on it.
The fil es i n the Sound Effects fol der have such cool names
Adding Background Music
AutoPlay makes it really easy to add a list of songs and have them play in the background. Like a soundtrack in a movie, background music can enhance the mood and add atmosphere and emotion to your application.
1 ) C hoo s e P r oj ec t > A udio. Wh e n t h e A udio S e tt ing s di a log op e n s , c li ck on t h e Back g r ound M u s i c t a b.
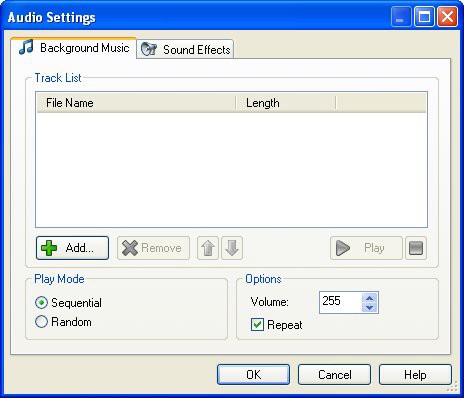
The Background Music tab is where you can put together a list of songs that will be played in sequence while the user is browsing your application.
The songs can be played back sequentially, in the order that they are listed, or you can choose to have them play back at random.
You can also specify the volume at which the background audio will play, and whether the whole list should repeat-which is to say, whether the background music should start over from the beginning when the last track has been played.
2 ) C li ck t h e A dd bu tt on. Wh e n t h e S e l ec t Fil e di a log a pp ear s , c li ck t h e G a ll ery bu tt on, a nd n av ig a t e in t o t h e " M u s i c " f old er .
The first time you click the Add button on the Background Music tab, the Select File dialog automatically takes you to the Music folder. (From that point on, it remembers what folder you were in the last time you selected a background music audio file.)
3 ) S e l ec t t h e f il e n ame d " Ac ou s t i c Fol k ( s ho r t ) .ogg " a nd c li ck O K .
As you add songs to the list, they are automatically copied into your project's Audio folder, so that they will be included when you publish the project to a folder or burn it to a CD. This song will end up in the project folder as "CD_ROOT\AutoPlay\Audio\
Acoustic Folk (short).ogg."
4 ) A dd s o me m o re s ong s t o t h e li s t .
You can add all of the sample songs if you want, or just pick and choose the ones you like. Feel free to add some favorite songs to the mix from your own collection, too.
Note: The songs will be played back in the same order that they appear in on the list.
![]()