
When you ctrl-click on the Phone label object, it becomes selected in addition to the Email Address label object. The end result is that both objects are selected.
One of the objects has a normal bounding box, with solid edges and little white resize handles. But the other object has a bounding box made up of blue dashes, with no resize handles on it at all.
The object with the normal bounding box is called the dominant object. The dominant object is used as a point of reference when you align and resize objects using the tools in the Align menu. (We'll use those tools a bit later in this lesson.)
The other object is just part of the current selection. The dashed-line bounding box means that the object is selected but not dominant. As for the missing resize handles, you can only ever resize one object at a time with the mouse. When you have more than one object selected, the dominant object is the only one you're allowed to resize. So, the resize handles only appear on the dominant object.
Most of the settings are still listed on the properties pane, but some of them are blank, with no values in them at all. And the Name setting, which used to be at the top of the properties pane, isn't even there any more.
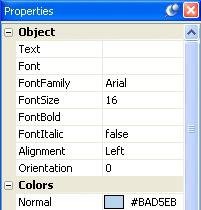
If a setting is blank, it means that the setting has different values between the selected objects. A setting will only show a value if all of the selected objects have that same value for the setting.
For example, because our two label objects have different text in them, the Text setting is blank. But, since they both have the same Alignment setting, the value of the Alignment setting is visible.
The Name setting is missing because you can't give the same name to more than one object at once. (As you'll see in this lesson, you can actually use the properties pane to change the settings for multiple objects.)
![]()
Tip: Feel free to shift-click instead if you prefer. When you're working with objects in AutoPlay, shift-clicking and ctrl-clicking are exactly the same.
3 ) C t r l - c li ck on t h e M a iling A dd re ss l a b e l obj ec t s .
The Mailing Address label objects are added to the selection. Notice that now the last object clicked has the solid bounding box, and the object that was dominant before the Phone label object has a dashed-line bounding box instead.

![]()
Note: When you add an object to the selection, it becomes the dominant object. (The dominant object is always the last object you clicked on.)
4 ) C t r l - c li ck on t h e i ma g e obj ec t t o a dd i t t o t h e s e l ec t ion.
When you add the image object to the selection, most of the settings will disappear from the properties pane. This is because there are two different kinds of objects selected-namely, label objects and image objects.
Whenever there are multiple objects selected, the properties pane only shows the settings that all of those objects have in common. In this case, you only see the settings that exist in both label objects and image objects.
In fact, all that's left are a handful of settings in the various categories which exist across all of the selected objects.
5 ) C t r l - c li ck on t h e i ma g e obj ec t a g a in t o rem o ve i t f r o m t h e s e l ec t ion.
If you ctrl-click on an object that is already selected, it is removed from the current selection. This is also known as "deselecting" the object.
6 ) C li ck on t h e p a g e s u r f ace t o d e s e l ec t a ll o f t h e obj ec t s .
Clicking on the page surface deselects any objects that are currently selected, and selects the page instead. (You can tell the page is selected because the page settings appear in the properties pane.)
7 ) C li ck on t h e p a g e s u r f ace a nd, whil e holding down t h e m ou s e bu tt on, d ra g a rec t a ngl e ar ound t h e E ma il A dd re ss , P hon e a nd M a iling A dd re ss l a b e l obj ec t s .
This is known as drag selecting. It basically involves drawing a temporary "box" around the objects that you want to select, by dragging the mouse from one point to another while the left mouse button is held down.

Note: To drag select a bunch of objects, position the mouse pointer somewhere on the page surface near the objects. (Don't position it on an object, or you'll just end up moving that object instead.) Click the left mouse button and, while holding it down, begin to move the mouse. A temporary drag-select rectangle will appear to outline the selection area. "Stretch" this rectangle by dragging the mouse until the selection area includes all of the items you want to select, then let go of the mouse button. When you release the mouse button, any items within (or touching) the selection area will be selected, and the drag-select rectangle will disappear.