
There are all sorts of things you can do with multiple objects, like move them all at once, line them up, group them together, or even change some of their properties in one fell swoop.
This is something you'll do a lot, and as you'll see in this lesson, it's really easy once you know how.
What You'll Learn
In this lesson, you'll learn how to:
· Select multiple objects
· Move more than one object at a time
· Change the settings of several objects at once
· Align objects to each other
· Align objects to the page
· Arrange objects in the z-order
· Remove unused files from the project
· Group objects together
· Pin objects (so they can't be moved or resized)
· Distribute objects evenly
· Lock objects (so they stay out of your way)
How Long Will It Take?
This lesson takes approximately 35 minutes to do.
If you're continuing from Lesson 2, you should still have AutoPlay running with the Tutorial project open. If so, you're ready to move on to the next exercise: Selecting Multiple Objects.
Otherwise, you'll need to open the project file that you saved at the end of Lesson 2.
1 ) Op e n t h e Tu t o r i a l. a u t opl ay f il e t h a t y ou s ave d in L e ss on 2 .
When you save a project, AutoPlay automatically creates a project folder for it inside your "My Documents\AutoPlay Media Studio 8\Projects" folder. This project folder is where everything that belongs to the project is stored including the project file, which contains all of the settings used in the project.
The project folder and the project file always have the same name that you gave to the project when it was created. The project file's name ends with a ".autoplay" file extension.
Since you named this project "Tutorial" in Lesson 1, the name of the project folder will be Tutorial, and the name of the project file will be Tutorial.autoplay. So, the path to the project file should be something like:
...\My Documents\AutoPlay Media Studio 8\Projects\Tutorial\Tutorial.autoplay To open the project, you just need to open that project file.
Selecting Multiple Objects
The first step to doing anything with multiple objects is to select the objects you want to work with.
Note: If you're used to selecting multiple files in Windows, you probably already know how to select multiple objects in AutoPlay. Just like in Windows, you either ctrl-click, shift-click, or drag- select. The only difference is that when you're working with objects in AutoPlay, ctrl-clicking and shift-clicking both do the same thing.
1 ) C li ck on t h e E ma il A dd re ss l a b e l obj ec t t o s e l ec t i t .
When you click on the label object, the bounding box appears, and its settings show up in the properties pane.
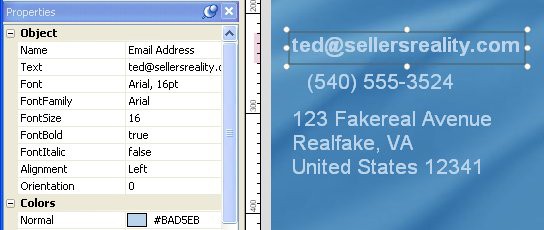
Before you move on to the next step, notice the way the object's bounding box looks, and take a quick peak at the properties pane to see the number of settings that are visible. (Both of those things will change when you have more than one object selected.)
2 ) H old t h e C t r l key down a nd c li ck on t h e P hon e l a b e l obj ec t . ( Thi s i s k nown a s c t r l - c li ck ing. )
Ctrl-clicking (pronounced "control-clicking") adds an object to the current selection. In this case, the current selection consists of a single label object named Email Address.
Note: This is just like ctrl-clicking in Windows to select multiple files or folders.
![]()