When you drag-select objects, the object that is closest to the mouse pointer when you release the mouse button becomes the dominant object. So, if you started dragging from above the Email
Address label object, and ended up with the mouse pointer just below the Mailing Address label object, the Mailing Address label object would be the dominant object.
![]()
Tip: If you already have a bunch of objects selected, you can add more objects to the selection by drag-selecting them with the ctrl key (or shift key) held down. Holding the ctrl or shift keys down while drag-selecting adds objects to the current selection.
Moving Multiple Objects
When you have multiple objects selected, you can move them easily by dragging them with the mouse.
1 ) Dra g t h e l a b e l obj ec t s t o s o me wh ere e l s e on t h e p a g e .

Moving multiple objects is just like moving a single object. When you drag one, all the other selected objects come with it.
So, just click on one of the selected objects, and, while holding down the mouse button, drag the objects where you want them to go.
Note: When multiple objects are selected, they all move together.
![]()
2 ) C hoo s e E di t > U ndo.
When you choose Edit > Undo, the last change that was made to the project is undone. In this case, the three label objects jump back to where they were before you moved them.
Tip: An even faster way to undo the last change is by pressing Ctrl+Z.
![]()
3 ) C hoo s e E di t > Re do.
When you choose Edit > Redo, the last change that you undid is redone. Its kind of like undoing the undo.
Tip: You can also redo the last thing that you undid by pressing Ctrl+Y.
![]()
4 ) C hoo s e E di t > U ndo a g a in.
If you're wondering what all this undoing and redoing has to do with moving objects, well, there
is a point to it.
Moving objects and then undoing the move can be a very useful technique. You often wont know exactly where you want your objects to go until you've moved them around a bit. Knowing that you can just undo the move if you don't like where the objects end up frees you to try different ideas. (Sure, you could just move the objects back by hand, but using undo gets them back to that same exact spot a lot faster.)
It also doesn't hurt to know how to go back a step if you happen to make a mistake, like moving the wrong object by accident.
As for undoing and redoing, this can be helpful when you're trying to decide between two different positions. Just move the objects from one place to another, and then use the undo and redo commands to go back and forth between the two options. Do the objects look better over here, or over there? Hmmm...here...no, definitely there.
This kind of undo/redo dance lets you do a quick before-and-after comparison for any change that you make to the project.
Aligning Objects
When multiple objects are selected, a number of alignment tools become available. You can use these tools to line the objects up horizontally, vertically, or both.
1 ) Wi t h t h e t h ree l a b e l obj ec t s s t ill s e l ec t e d, c li ck on t h e f i r s t M a iling A dd re ss obj ec t t o make i t do m in a n t .
When you have multiple objects selected, clicking on one of them makes it the dominant object. There can only be one dominant object at a time, so if the object you click on isn't already the dominant object, it becomes the dominant object instead of the one that was dominant before.
Note: The dominant object is the one with the normal bounding box.
![]()
2 ) C hoo s e A lign > Ce n t er H o r i z on t a l.
When you choose Align > Center Horizontal, all of the selected objects are centered horizontally with the dominant object.
In other words, the objects line up so that the horizontal midpoint of each object is in line with the horizontal midpoint of the dominant object.


Notice that the dominant object didn't move, but the other ones did. The dominant object serves as the anchor for any alignment operations that you perform.
3 ) C li ck on t h e E ma il A dd re ss l a b e l obj ec t , t h e n c hoo s e A lign > L e ft .
Clicking on the Email Address label object makes it the dominant object, so when you choose Align > Left, the Email Address label object stays put, and the other objects are aligned to it.
![]()
Note: The key to performing object alignments is knowing what the objects will line up with. Luckily, its quite simple: the objects are always aligned to the dominant object.
4 ) Dra g t h e s e t h ree l a b e l obj ec t s o ver t o t h e l e ft s id e o f t h e p a g e .
Don't worry about positioning them carefully; we just want to get them out of the way for a while.

![]()
Note: You can drag objects onto the work area, but only the objects (or parts) that are located on the page will be visible in the finished application. If any objects extend onto the work area, a warning will occur when you preview or build the project.
5 ) C li ck on L a b e l 1 (t h e on e wi t h T e d S e ll er s on i t ) .
When you click on Label1, it becomes the only selected object. The other objects aren't selected any more, because you didn't ctrl-click on Label1 to add it to the selection - you only clicked on it to select it.
Clicking on an object that isn't selected deselects any objects that currently are. Its essentially like saying I want to select this object now, and only this one.
6 ) S hi ft- c li ck on L a b e l 2 (t h e on e wi t h R E A L T Y L T D . on i t ) .
Remember: when you're working with objects in AutoPlay, shift-clicking is exactly the same as ctrl-clicking. (You can use whichever key you prefer.)
![]()
Tip: When selecting multiple objects, use the last-clicked object is dominant rule to your advantage. Plan the order you ctrl-click on stuff so that the object you want to align to is the last one you click on.
7 ) R igh t- c li ck on t h e T e d S e ll er s l a b e l obj ec t a nd c hoo s e A lign > Ce n t er H o r i z on t a l.
When you have multiple objects selected, right-clicking on one of the objects makes it the dominant object. It also opens the right-click menu.
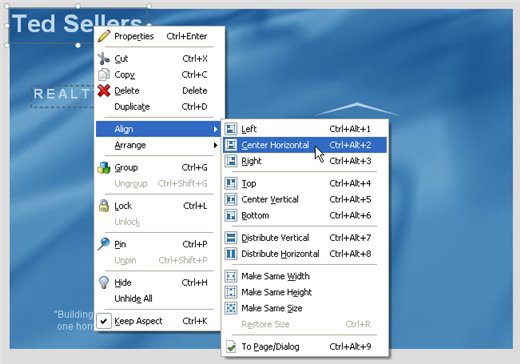
As you can see, right-clicking on an object gives you easy access to the same alignment tools that are in the Align menu.
Tip: The right-click menu is a very fast way to access the alignment tools.
![]()