If the current value is the last item in the list, it just goes back to the beginning. Since the FontBold setting only gives you two options to choose from - namely, true and false - double- clicking on the value goes from false back to true.
Tip: You can toggle a setting between true and false by double-clicking on it.
![]()
7 ) D oubl e - c li ck on t h e L a b e l 2 obj ec t (t h e on e wi t h R E A L T Y L T D . on i t ) . On t h e L a b e l P r op er t i e s di a log, c li ck Fon t t o op e n t h e Fon t
di a log. S e t t h e f on t s t y l e t o B old a nd t h e s i z e t o 12 , a nd c li ck O K .
You can also change the font settings by double-clicking on the object to open the Label Properties dialog, and then clicking the Font button to open the Font dialog.
To change the font style, just select Bold from the list. To set the font size, either highlight the original size (16) and type in 12, or just select 12 from the list.
Clicking OK on the Font dialog will accept these changes and close the Font dialog.

Note: The Font dialog appears on top of the Label Properties dialog, and it must be closed before you can exit from the Label Properties dialog. Because the Font dialog is smaller, part of the Label Properties dialog will be visible behind the Font dialog. A common mistake is to click on the wrong dialogs OK button. Luckily, the Font dialog wont let you sneak around it like that. If you click the wrong OK button, the Font dialogs title bar will flash (and you might hear your computers alert sound). If this happens, just click the other OK button.
8 ) C li ck O K t o c lo s e t h e L a b e l P r op er t i e s di a log.
Clicking OK on the Label Properties dialog will accept the changes that you made to the object
(i.e. the changes that you made to the Font settings) and close the Label Properties dialog.
Why are there different ways to change the font settings?
AutoPlay is designed to be as intuitive and flexible as possible. Having more than one way to perform a task allows you to pick the method that you like best, or that is most convenient at the time.
Some people only use the properties pane, while others only use the double-click dialogs. And some just use whatever they feel like using at the time.
Feel free to use whichever method you prefer when you're working with AutoPlay. Its your program...use it the way that makes sense for you.
Changing Text Colors
Label objects don't have to be black and white. Far from it! AutoPlay lets you set four different colors for each label object - one for each of the three different states that a label object can be in, as well as a disabled color.
What's this about three different states?
Well, each object is able to display three different colors in response to what the user does with the mouse. Normally, when the mouse pointer is not over the label object, the Normal color is used for the text. If the user positions the mouse pointer over the label object, the Highlight color is used instead. And if the user clicks on the object, the Down color is used.
These three different situations - normal, highlighting and clicking, are the three states that the label object can be in.
So why three states? Well, it turns out that label objects can be made to do something when the users clicks on them, or moves the mouse onto (or off of) them. By using different colors for the three states, you can provide visual cues for the user to help them see that those label objects are interactive.
In other words, the three colors let you make label objects that look and act like hyperlinks, similar to the links you're used to seeing on web pages.
This is probably a lot easier to understand if you can see it in action, so lets turn one of our label objects into that kind of interactive label.

Note: There is actually a fourth state, too, for when the object has been purposefully disabled. This allows you to grey out an object to make it look unclickable when it has ceased to be interactive. You usually don't need to use this state, though, unless you're building a more complex application.
1 ) C li ck on t h e E ma il A dd re ss l a b e l obj ec t t o s e l ec t i t . M ake s u re t h e C olo r s ca t e go ry i s op e n in t h e p r op er t i e s p a n e .
If the Colors category is closed, it will look like this:

To open it, either double-click on the category heading, or click once on the little + symbol to the left of it.
Once the category is open, it will look like this:
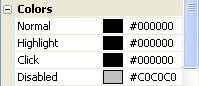
2 ) D oubl e - c li ck on t h e N o rma l c olo r a nd t y p e # b a d 5e b.
Double-clicking on a color setting highlights all of the text in it, so that what you type replaces the existing value. In this case, you want to change the default value of #000000, which is the hexadecimal color value for black, to #BAD5EB, which is the hexadecimal color value for a light blue-grey that looks good against the pages background image.
![]()
Note: When typing in hexadecimal color values, you don't have to use capital letters. AutoPlay will automatically capitalize the letters for you.