Okay.
But that doesn't mean you have to stick with the names that AutoPlay gives your objects. In fact, after a while, remembering which object is which can get a bit difficult if they all have names like Image9, Label6 and Label22.
Luckily, its easy to change the name of an object to anything you want. To illustrate the point, lets rename three of our label objects to make them a bit more memorable.
1 ) C li ck on t h e obj ec t n ame d L a b e l 3 . I n t h e p r op er t i e s p a n e , c h a ng e t h e Name t o E ma il A dd re ss .
Since this label object contains Ted Sellers fake email address, it makes sense to give the object a name that reflects that.
To change the objects name, just edit the text in the Name field so it contains Email Address instead of Label3.
Note that its perfectly fine to include spaces in object names. Of course, you don't have to use spaces...we could have named this object Email, Address or label_email or even JimBob for that matter.
Tip: For some good advice on choosing names for objects, see Naming Objects.
![]()
2 ) Re n ame t h e L a b e l 4 obj ec t t o P hon e a nd t h e L a b e l 5 obj ec t t o M a iling A dd re ss .
You can rename these other objects the same way: just click on the object, and change the text in the Name field.
Or, you can change the name by double-clicking on the object (to open the Properties dialog), clicking on the Attributes tab, and then changing the Name setting there.
![]()
Note: Just because you can rename objects, doesn't mean you have to. For example, our page only has one image object on it, so we don't really need to give it a special name. (It shouldn't be too hard to remember which object Image1 refers to.)
Changing Font Settings
Every label object contains text, but that doesn't mean they all have to look the same. AutoPlay gives you full control over several font settings.
1 ) C li ck on t h e L a b e l 1 obj ec t (t h e on e wi t h T e d S e ll er s on i t ) . I n t h e p r op er t i e s p a n e , c li ck on t h e Fon t s e tt ing, a nd t h e n c li ck t h e e di t bu tt on t o b r ing up t h e Fon t di a log.
The Font dialog is where you can adjust all the font-related settings for the currently selected object.
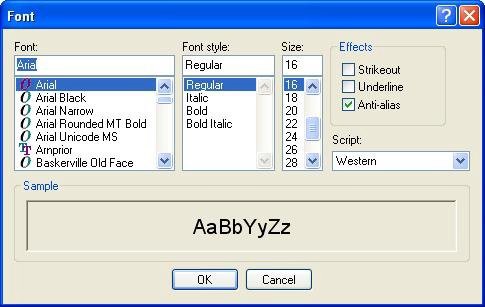
2 ) I n t h e Fon t di a log, c h a ng e t h e f on t t o T a ho ma , t h e f on t s t y l e t o
B old, a nd t h e s i z e t o 36 . L eave t h e o t h er s e tt ing s t h e s ame . C li ck O K
wh e n y ou ' re don e .
The first setting on the left side of the Font dialog lets you specify the font family you want to use. To switch to a different font, you can either type the name of the font into the text field, or select it from the list below.
To find Tahoma quickly in the list, select a name in the list (it doesn't matter which one), and press the T key. The list will jump to the first font that begins with the letter T. Tahoma shouldn't be too far away. When you find it, just click on it in the list to select it.
Similarly, to set the font style to Bold, just click on the word Bold in the list of font styles. To set the size to 36, either type in 36 in the Size field, or click on the number 36 in the list.
When you click OK, the label object will automatically use the new font settings.
Tip: You can also set some of the font settings in the properties pane.
![]()
3 ) C h a ng e t h e O r i e n t a t ion f r o m 0 t o 270 .
Changing the orientation changes the direction that the text is written in.
To illustrate this, well turn the Ted Sellers label on its side and make its text read from the top down, so it would read normally (from left to right) if you tilted your head 90 degrees to the right.
![]()
To do this, click on the Orientation setting in the Properties Pane, click the select button, and then choose 270 from the list. This will orient the text 270 degrees counter-clockwise, so that it is written vertically from the top down.
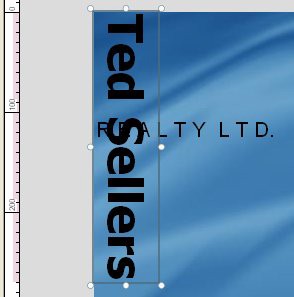
Pretty neat, eh?
4 ) C h a ng e t h e o r i e n t a t ion b ack t o 0 .
Setting the label objects orientation back to 0 will return it to normal, so it reads from left to right without any head tilting. (This assumes you're not lying on your side or hanging upside down, but you get the picture.)
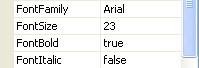
5 ) I n t h e p r op er t i e s p a n e , s e t Fon t F am il y b ack t o Ar i a l, a nd c h a ng e Fon tS i z e t o 23 .
You can also change some font settings without opening the Font dialog, by using the four individual font settings in the properties pane.
These settings provide a quick way to change the most common font settings right from the properties pane. (As you'll see in lesson 3, these settings are especially helpful when working with multiple objects.)
Changing the FontFamily setting is equivalent to choosing the font. In fact, what we normally consider the name of a font is technically referred to as the fonts family. Arial, Times New Roman, Garamond...each of these refer to a different font family. The reason they're called families is because they encompass all of the different variations within that font...such as Bold, Italic, etc. Each font is actually made up of a collection of different sub-fonts, one for each of the various styles within the family. The Arial family comprises Arial Bold, Arial Italic, Arial Bold Italic, and so on.
To change the FontFamily setting, just click on it, then click the select button and choose Arial from the list. (The same trick applies to this list - you can press the a key to jump to the first font name that begins with the letter A.)
To change the FontSize setting, either edit the text in the field to replace 36 with 23, or click the little up/down arrows to change the size one point at a time.
6 ) S e l ec t t h e E ma il A dd re ss l a b e l obj ec t . I n t h e p r op er t i e s p a n e , s e t t h e Fon t B old s e tt ing t o t r u e .
To change the FontBold setting, you could click on the setting, click the select button, and then choose true from the list. But theres an even easier way to change a true-or-false setting like this one: just double-click on the word false.
![]()
Tip: If a setting offers you a list of values to choose from, you can double-click on the current value to advance to the next item in the list.