When you set the Normal color, you should see the label objects text change from black to light blue-grey.
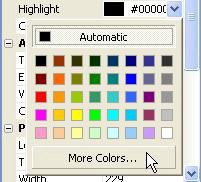
3 ) To c h a ng e t h e H ighligh t c olo r , f i r s t c li ck t h e s e l ec t bu tt on t o op e n t h e c olo r c hoo s er , t h e n c li ck on M o re C olo r s ... a t t h e bo tt o m .
In order to make our label object look like a hyperlink, we want the highlight color to be a lighter version of the normal color. That way, the user will see the text highlight when they move the mouse over it. The color chooser doesn't have the color we want, though, so we need to go one step further. That's where the More Colors... link comes in.
Clicking on More Colors... at the bottom of the color chooser opens the Colors dialog.
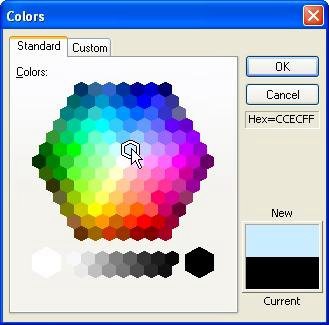
4 ) On t h e C olo r s di a log, s e l ec t t h e ligh t blu e c olo r on e po s i t ion up a nd t o t h e r igh t f r o m t h e whi t e c olo r in t h e ce n t er ( i t s h exa d ec i ma l va lu e i s CC E C FF ) . C li ck O K wh e n y ou ' re don e .
The Colors dialog has two tabs: Standard, and Custom. The Standard tab, which is selected by default, has a broader selection of the standard Windows colors for you to pick from. In this case, you want to select the color that is immediately up and to the right from the color in the center.
When you're done changing the color, click OK to close the Colors dialog. The color you selected will show up in the properties pane as the objects new Highlight color. You won't be able to see the real effect of changing the Highlight color, though, until you actually see the project running.

Note: The text color will change to the Highlight color when the user moves the mouse onto the object. Since the objects size and shape are determined by its bounding box, this means the color will change when the mouse pointer crosses over the edge of the bounding box (like crossing the border into the objects territory).
5 ) To c h a ng e t h e C li ck c olo r , op e n t h e C olo r s di a log ( b y c li ck ing on M o re C olo r s ... a t t h e bo tt o m o f t h e c olo r c hoo s er ) , a nd c li ck on t h e C u s t o m t a b.
If you cant find the color you want on the Standard tab, you can switch to the Custom tab to create a custom color from scratch.
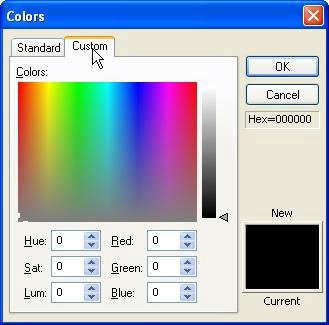
The Custom tab lets you select a color from a limitless palette, either by clicking on the color map, or by setting the Hue/Saturation/Luminosity or Red/Green/Blue values directly. If you've used any photo editing tools, you're probably already familiar with this interface, or have used one like it.
For the Click color, we want a color that is similar to the Highlight color, but a little bit lighter. Theres a really easy way to do this using the custom tab, but first we have to prime it with the Highlight color. (Right now, the Custom tab is showing the settings for the current Click color, which is black. Starting from scratch like this would make it harder to pick a color that is similar to the Highlight color.)
6 ) C li ck on t h e St a nd ar d t a b, a nd c li ck on t h e s ame c olo r t h a t y ou s e l ec t e d in s t e p 4 . Th e n c li ck on t h e C u s t o m t a b a g a in.
Going back to the Standard tab and selecting the same light blue-grey color that you selected in step 4 will set the Click color to that color. This doesn't actually change the objects Down setting...at least, not until you click OK and accept the changes. But it gives us a better starting point to create a similar color for the labels Click state.
When you return to the Custom tab, you'll see the color settings for that light blue-grey color.
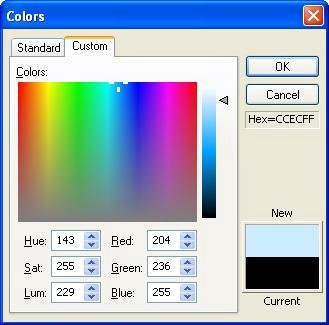
7 ) Dra g t h e lu m ino s i t y s lid er up a bi t t o make t h e c olo r b r igh t er .
The luminosity slider is the vertical bar with the little triangle next to it, just to the right of the big color map. You can drag the triangle up and down to change the colors luminosity, without changing its saturation or hue.
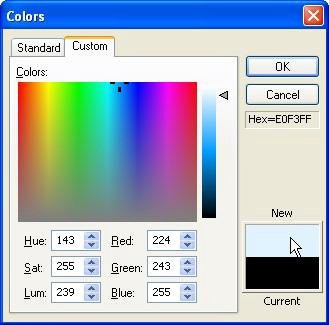
Pick a color that is noticeably brighter than the Highlight color. (I set the luminosity to about 239, which resulted in a color whose red, green and blue values were 224, 243, and 255, respectively.)
8 ) C li ck O K t o f ini s h s e tt ing t h e C li ck c olo r .
When you click OK, the Colors dialog closes, and the color you created shows up in the properties pane as the objects new Click color. Once again, you wont be able to see any other effects of this change to the object until you see the project running.
![]()

Note: The text color will change to the Click color when the user clicks inside the objects bounding box.