The RadASM/HLA Integrated Development Environment
 Integrated Development Environments
An integrated development environment (IDE) traditionally incorporates a text editor, a compiler/assembler, a linker, a debugger, a project manager, and other development tools under the control of a single main application. Integrated doesn't necessarily mean that a single program provides all these functions. However, the IDE does automatically run each of these applications as needed. An application developer sees a single "user interface" to all these tools and doesn't have to learn different sets of commands for each of the components needed to build an application.
The central component of most IDEs is the editor and project manager. A project in a typical IDE is a related collection of files that contain information needed to build a complete application. This could, for example, include assembly language source files, header files, object files, libraries, resource files, and binary data files. The point of an IDE project is to collect and manage these files to make it easy to keep track of them.
Most IDEs manage the files specific to a given project by placing those files in a single subdirectory. Shared files (such as library and shared object code files) may appear elsewhere but the files that are only used for the project generally appear within the project directory. This makes manipulation of the project as a whole a bit easier.
RadASM, created by Ketil Olsen, is a relatively generic integrated development environment. Many IDEs only work with a single language or a single compiler. RadASM, though designed specifically for assembly language development, works with a fair number of different assemblers. The nice thing about this approach is that you may continue to use RadASM when you switch from one assembler to another. This spares you the effort of having to learn a completely new IDE should you want to switch from one assembler to another (e.g., switching between FASM, MASM, NASM, TASM, and HLA is relatively painless because RadASM supports all of these assemblers. RadASM is extremely customizable, allowing you to easily set it up with different assemblers/compilers or even modify it according to your own personal tastes. Although the version of RadASM that ships with HLA has been specifically set up to work seamlessly with RadAsm, it's nice to know that you can customize RadASM however you choose..
 HLA Project Organization
A RadASM/HLA project is a collection of all the files specific to a given executable program. This includes project-specific source files, resource files, object files, header files, makefiles, and so on. Share library, object, and header files are logically a part of an HLA project, though they generally are not physically present in the set of files that comprise a project (i.e., you don't make copies of these files for each project you produce). Whether a given file is physically a part of the project or just logically a part of a project, a RadASM/HLA project cannot compile correctly without all the files that make up the project.
This document will adopt the (reasonable) convention of placing each HLA project in its own subdirectory. A given project directory will contain the following files and directories:
- All source files specific to the project (this includes make files, .hla, .hhf, .rc, .rap [RadASM project] and other files created specifically for this project, but does not include any standard library header or generic library files that all projects use).
- A "makefile" file to be processed by a "make" program or a batch file to compile and combine all the files in a project.
- A "Tmp" subdirectory where HLA can place temporary files it creates during compilation (normally these files wind up in the same directory as the HLA source files; placing them in the "Tmp" directory prevents clutter of the main project directory).
A "Bak" subdirectory where backup files can be kept.
The RadASM IDE provides the ability to maintain projects directly. However, the combination of RadASM/HLA and a "make" program provides a superior solution to the standard RadASM project paradigm. Therefore, this document will assume that you're using makefiles in your RadASM projects (the next section describes the "make" program, so if you're not familiar with it, keep on reading...).
The drawback to using makefiles to maintain the project is that you've got to manually create the makefile; RadASM won't do this for you automatically (as it does with its own projects). Fortunately, 90% of your makefile creations will simply be copying an existing makefile to your project's directory, editing the file, and changing the filenames from the previous project to the current project (indeed, this operation is so common that you'll find a generic makefile in the "sniplets" RadASM directory accompanying the HLA download. You can easily create a copy of this generic makefile from RadASM's "Tools > Sniplets" menu, as you'll see soon enough).
 Using Makefiles
Although RadASM provides a true IDE for HLA that supports projects, browsing, and other nice features, the best way to manage your Win32 assembly projects (even within RadASM) is via a makefile. Since the use of make is going to be a fundamental assumption in this book (e.g., most examples will include a makefile), it's probably wise to discuss the use of make here for those who may be unfamiliar with this program.
The main purpose of a program like make (or nmake, if you're using Microsoft's version of the program) is to automatically manage the compilation and linking of a multi-module project. Although it is theoretically possible to write a single, self-contained, assembly language source file that assembles directly to an executable file, in practice this is rarely done. Instead, programs are usually broken up into separate source files by logical function. In order to save time during development, you don't always have to recompile every source file that makes up the application. Instead, you need only recompile those source files that have been changed (or depend upon changes in other source files). This can save a considerable amount of time during development if your project consists of many different source files that you're compiling and linking together and you make a single change to one of these source files (because you will only have to recompile the file you've changed rather than all files in the system).
Note that you will have to obtain a make utility program in order to use make files. If you've got any Microsoft development tools, then you've probably got a copy of Microsoft's nmake.exe program lying around. Ditto for Borland tools. The Free Software Foundation (FSF - the GNU folks) have their own version of make as well. If you don't have a copy of a make utility, you can download Borland's version as part of their C++ command line compiler package that they distribute free on their website (though you do have to register with Borland to receive this). Check out the C++Builder Downloads page at
http://www.borland.com/products/downloads/download_cbuilder.html
Click on the "compiler" link in order to download Borland's command line C++ compiler (that includes the make.exe utility). If this link is broken, just visit http://www.borland.com and follow the downloads link.
Although separate compilation reduces assembly time and promotes code reuse and modularity, it is not without its own drawbacks. Suppose you have a program that consists of two modules: pgma.hla and pgmb.hla. Also suppose that you've already compiled both modules so that the files pgma.obj and pgmb.obj exist. Finally, you make changes to pgma.hla and pgmb.hla and compile the pgma.hla file but forget to compile the pgmb.hla file. Therefore, the pgmb.obj file will be out of date since this object file does not reflect the changes made to the pgmb.hla file. If you link the program's modules together, the resulting executable file will only contain the changes to the pgma.hla file, it will not have the updated object code associated with pgmb.hla. As projects get larger they tend to have more modules associated with them, and as more programmers begin working on the project, it gets very difficult to keep track of which object modules are up to date.
This complexity would normally cause someone to recompile all modules in a project, even if many of the object files are up to date, simply because it might seem too difficult to keep track of which modules are up to date and which are not. Doing so, of course, would eliminate many of the benefits that separate compilation offers. Fortunately, the make program can solve this problem for you. The make program, with a little help, can figure out which files need to be reassemble and which files have up to date .OBJ files. With a properly defined make file, you can easily assemble only those modules that absolutely must be assembled to generate a consistent program.
A make file is a text file that lists compile-time dependencies between files. An .EXE file, for example, is dependent on the source code whose assembly produce the executable. If you make any changes to the source code you will (probably) need to reassemble or recompile the source code to produce a new executable file1.
Typical dependencies include the following:
- An executable file generally depends only on the set of object files that the linker combines to form the executable.
- A given object code file depends on the assembly language source files that were assembled to produce that object file. This includes the assembly language source files (.HLA) and any files included during that assembly (generally .HHF files).
The source files and include files generally don't depend on anything.
A make file generally consists of a dependency statement followed by a set of commands to handle that dependency. A dependency statement takes the following form:
dependent-file : list of files
pgm.exe: pgma.obj pgmb.obj --Windows make/nmake example
This statement says that pgm.exe is dependent upon pgma.obj and pgmb.obj. Any changes that occur to pgma.obj or pgmb.obj will require the generation of a new pgm.exe file.
The make program uses a time/date stamp to determine if a dependent file is out of date with respect to the files it depends upon. Any time you make a change to a file, the operating system will update a modification time and date associated with the file. The make program compares the modification date/time stamp of the dependent file against the modification date/time stamp of the files it depends upon. If the dependent file's modification date/time is earlier than one or more of the files it depends upon, or one of the files it depends upon is not present, then make assumes that some operation must be necessary to update the dependent file.
When an update is necessary, make executes the set of commands following the dependency statement. Presumably, these commands would do whatever is necessary to produce the updated file.
The dependency statement must begin in column one. Any commands that must execute to resolve the dependency must start on the line immediately following the dependency statement and each command must be indented one tabstop. The pgm.exe statement above would probably look something like the following:
hla -e:pgm.exe pgma.obj pgmb.obj
(The "-e:pgm.exe" option tells HLA to name the executable file pgm.exe.)
If you need to execute more than one command to resolve the dependencies, you can place several commands after the dependency statement in the appropriate order. Note that you must indent all commands one tab stop. The make program ignores any blank lines in a make file. Therefore, you can add blank lines, as appropriate, to make the file easier to read and understand.
There can be more than a single dependency statement in a make file. In the example above, for example, executable (pgm.exe) depends upon the object files (pgma.obj and pgmb.obj). Obviously, the object files depend upon the source files that generated them. Therefore, before attempting to resolve the dependencies for the executable, make will first check out the rest of the make file to see if the object files depend on anything. If they do, make will resolve those dependencies first. Consider the following make file:
hla -e:pgm.exe pgma.obj pgmb.obj
The make.exe program will process the first dependency line it finds in the file. However, the files that pgm.exe depends upon themselves have dependency lines. Therefore, make will first ensure that pgma.obj and pgmb.obj are up to date before attempting to execute HLA to link these files together. Therefore, if the only change you've made has been to pgmb.hla, make takes the following steps (assuming pgma.obj exists and is up to date).
- The make program processes the first dependency statement. It notices that dependency lines for pgma.obj and pgmb.obj (the files on which pgm.exe depends) exist. So it processes those statements first.
- The make program processes the pgma.obj dependency line. It notices that the pgma.obj file is newer than the pgma.hla file, so it does not execute the command following this dependency statement.
- The make program processes the pgmb.obj dependency line. It notes that pgmb.obj is older than pgmb.hla (since we just changed the pgmb.hla source file). Therefore, make executes the command following on the next line. This generates a new pgmb.obj file that is now up to date.
- Having processed the pgma.obj and pgmb.obj dependencies, make now returns its attention to the first dependency line. Since make just created a new pgmb.obj file, its date/time stamp will be newer than pgm.exe's. Therefore, make will execute the HLA command that links pgma.obj and pgmb.obj together to form the new pgm.exe file.
Note that a properly written make file will instruct the make program to assemble only those modules absolutely necessary to produce a consistent executable file. In the example above, make did not bother to assemble pgma.hla since its object file was already up to date.
There is one final thing to emphasize with respect to dependencies. Often, object files are dependent not only on the source file that produces the object file, but any files that the source file includes as well. In the previous example, there (apparently) were no such include files. Often, this is not the case. A more typical make file might look like the following:
hla -e:pgm.exe pgma.obj pgmb.obj
Note that any changes to the pgm.hhf file will force the make program to recompile both pgma.hla and pgmb.hla since the pgma.obj and pgmb.obj files both depend upon the pgm.hhf include file. Leaving include files out of a dependency list is a common mistake programmers make that can produce inconsistent executable files.
Note that you would not normally need to specify the HLA Standard Library include files. the Standard Library ".lib" files, or any Windows library files (e.g., kernel32.lib) in the dependency list. True, your resulting executable file does depend on this code, but this code rarely changes, so you can safely leave it out of your dependency list. Should you make a modification to the Standard Library, simply delete any old executable and object files to force a reassembly of the entire system.
The make program, by default, assumes that it will be processing a make file named makefile. When you run the make program, it looks for makefile in the current directory. If it doesn't find this file, it complains and terminates2. Therefore, it is a good idea to collect the files for each project you work on into their own subdirectory and give each project its own makefile. Then to create an executable, you need only change into the appropriate subdirectory and run the make program.
The make program will only execute a single dependency in a make file, plus any other dependencies referenced by that one item (e.g., the pgm.exe dependency line in the previous example depends upon pgma.obj and pgmb.obj, both of which have their own dependencies). By default, the make program executes the first dependency it finds in the makefile plus any dependencies that are subservient to this first item. In particular, if a dependency line exists in the makefile that is not referenced (directly or indirectly) from the main dependency item, then make will ignore that dependency item unless you explicitly request it's execution.
If you want to execute some dependency other than the first dependency in the make file, you can specify the dependency on the make command line when running make from the Windows' command prompt. For example, a common convention in make files is to create a "clean" dependency that cleans up all the files the compile creates. A typical "clean" dependency line for an HLA compilation might look like the following:
The first thing you'll notice is that the "clean" item doesn't have a dependency list. When an item like "clean" appears without a dependency list, make will always execute the commands that follow. Another peculiarity to the "clean" dependency is that there (usually) isn't a file named clean in the current directory whose date/time stamp the make program can check. If a file doesn't exist, then make will assume that the file is always out of date. A common convention is to specify non-existent filenames (like clean) in a makefile as commands that someone would explicitly execute from within make. Of course, such usage (generally) assumes that you don't actually build a file named "clean" (or whatever name you choose to use).
Since, by default, you typically don't want to execute a command line "clean" when running make, you wouldn't usually place the clean dependency first in the make file (nor would you typically refer to clean within some other dependency list). Since make doesn't normally execute any dependency items that aren't "reachable" from the first dependency item in the make file, you might wonder how you'd tell make to execute the clean command. To specify the execution of some dependency other than the first (default) item in the make file, all you need to is specify the target you want to create (e.g., "clean") on the make command line. For example, to execute the clean command, you'd using a Windows command prompt statement like the following:
This command does not tell make to use a different make file. It will still open and use the file named makefile in the current directory3; however, instead of executing the first dependency it finds in makefile, it will search for the target "clean" and execute that dependency.
By convention, most programmers use the first dependency in a make file to build the executable based on the current build state of the program (that is, it will compile and link only those files necessary to create an up-to-date executable). Most programmers, by convention, will also include a "clean" target in their make file. The clean command deletes all object and intermediate files that the compiler generates; this ensures that the next build of the program will recompile every source file in the project, even if the original objects (and other targets) were up-to-date already. Doing a clean before building the application is useful when you've changed something that is not listed in the dependency lists but on which the final executable still depends (like the HLA Standard Library). Doing a clean is also a good way to do a sanity check when you're running into problems and you suspect that the dependency lists aren't completely correct.
Beyond clean there aren't too many "standard" target definitions you'll see programmers using in their make files, though it's common for different make files to have some additional commands beyond building the default target and cleaning up temporary compiler files. When using make with the RadASM/HLA package, however, there is an assumption that you've created the following dependencies in your make file:
build: This will be the default command (i.e., the first command appearing in the make file). It will build an executable by building any out-of-date files and linking everything together. A typical build dependency will look like this:
This tells make to go execute the dependency for pgm.exe (which would normally be the default dependency in the file).
buildall: This command will rebuild the entire application. It begins by doing a clean, and then it does a build. This command generally takes the following form:
compileRC: This command will compile any resource files into .RES files. Though the current example does not have any resource files, a typical entry in the make file might look like the following:
syntax: This command will compile any HLA files into .ASM files just to check their syntax. Using the pgma.hla/pgmb.hla example given earlier, a typical compile dependency line might look like the following:
run: This command will build the executable (if necessary) and then run it. The dependency line typically looks like the following:
pgm <<any necessary command line parameters>>
clean: This is the command that deletes any compiler/assembler/linker produced temporary files, backup files, and the executable file. A typical clean command is
One nice feature that a standard make program provides is variables. The make program allows you to create textual variables in a make file using the following syntax:
All text beyond the equals sign ("=") to the end of the physical line4 is associated with the identifier and the make program will substitute that text whenever it encounters "$(identifier)" in your text file. This behavior is quite similar to TEXT constants in the HLA language. As an example, consider the following make file fragment:
hla -e:$(executable) $(sources)
Because of the textual substitution that takes place, this is equivalent to the following make file fragment:
hla -e:pgm.exe pgma.hla pgmb.hla
You can even assign variable names from the make command line using syntax like the following:
make executable=pgm.exe sources="pgma.hla pgmb.hla"
This is an important fact we'll use because it allows us to create a generic makefile that RadASM can use to compile a given project by simply supplying the file names on the command line.
Although this section discusses the make program in sufficient detail to handle most RadASM projects you will be working on, keep in mind that the make program provides considerable functionality that this document does not discuss. For more details, consult the vendor's documentation accompanying the version of make that you're using. This document will assume that you're using Borland's make (version 4.0 or later) or some version of Microsoft's nmake. Every make file in this book has been tested with both of these versions of make. These make files may work with other versions of make as well. If you don't already have a copy of make, note that you can download Borland's make as part of the Borland C++ 5.5 compiler (see the directions for downloading this file earlier in this section).
Because of the variations in the way different make programs work, the makefiles appearing in this document will be relatively simple, not taking advantage of too many special make features. The generic makefile we'll usually start with looks like this:
buildall: clean $(hlafile).exe
echo No Resource Files to Process!
$(hlafile).exe: $(hlafile).hla
hla $(DEBUG) $(WINAPP) -p:tmp $(hlafile)
RadASM will fill in the $(hlafile) make variable with the project's (source file's) name. The "$(DEBUG)" variable will be filled in by RadASM (you'll see how later in this document) and will expand to an empty string if $(DEBUG) is not defined. The $(WINAPP) variable is another variable set by RadASM; it will contain the text "-w" if compiling a Windows GUI app, it will be the empty string if compiling a console application.
 Installing RadASM
The easiest way to install RadASM/HLA is to run the hlasetup.exe program found on Webster (HLA v1.58 or later). This program automatically installs HLA and RadASM, sets up appropriate environment variables, and modifies various RadASM ini files for proper use on your system. Just run hlasetup.exe, answer a few questions about where you want the files placed, and you're in business.
For those who've already installed HLA and don't want to bother reinstalling everything, you can download the RadASM/HLA package from Webster, unzip that file, and install the code manually. The main thing you have to do is copy the RadASM directory into your x:\hla subdirectory and then execute the "PatchRadASM" application from within the "x:\hla" subdirectory. This goes in and patches all the *hla.ini files in the "x:\hla\radasm" subdirectory so that the know where the "x:\hla" subdirectory can be found. You may also edit these files manually and modify the line that says "$A=C:\HLA" so that it refers to the directory containing your HLA files and directories.
Note: Unless you're willing to learn how to customize RadASM and modify several files yourself, you must install the RadASM directory in the HLA subdirectory (wherever it is on the disk). If you're using RadASM with other assemblers and need to keep RadASM in some spot other than in the HLA subdirectory, please see the "RadASM customization" information at the end of this document and take a look at the *hla.ini files on Webster.
If you're an expert RadASM user and you only want to add HLA support to an existing RadASM setup, you can download the HLA-specific RadASM files directly from Webster and make the appropriate modifications yourself. This document will not describe how to do this; this is a task intended for advanced RadASM users only (for support, check out the RadASM forum at www.masmforum.com).
 Running RadASM
Like most Windows applications, you can run RadASM by double-clicking on its icon or by double clicking on a "RadASM Project" file (".rap" suffix). Simply double-clicking on the RadASM icon brings up a window similar to the one appearing in See RadASM Opening Screen..
 RadASM Opening Screen

The main portion of the RadASM window is broken down into three panes. The larger of the three panes is where text editing takes place. The upper right hand pane is the "project management" window. The pane in the lower right hand corner lists the properties of the currently opened project.
 The RadASM Project Management Window
The project management window initially lists the project folders you've created; you can select an existing project by double-clicking on the project's folder in this window. For example, RadASM ships with two sample projects, Dialog (that creates a small dialog box application) and hw (that creates a small "Hello World" console application). Assuming you're running RadASM prior to creating any new projects beyond these two default projects, the Project pane will look something like See Default RadASM Project Pane..
 Default RadASM Project Pane
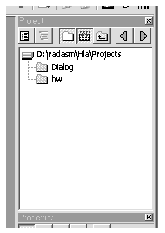
Double-clicking on the hw folder opens the folder containing that project. This changes the pane to look something like that appearing in See RadASM Project Pane With hw Folder Opened..
 RadASM Project Pane With hw Folder Opened
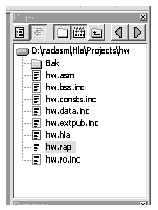
By default, RadASM does not show all the files present in the folder you've opened. Instead, RadASM filters out files that don't have a certain file suffix. By default, RadASM only displays files with the following suffixes:
.hhf
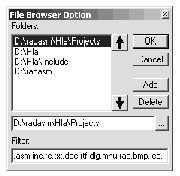
This list is actually designed to generically handle all file types for every assembler that RadASM works with. HLA users might actually want to drop ".asm" and ".inc" from this list as files with these suffixes are temporary files that HLA produces (much like ".obj" files, which don't normally appear in this list). You can change the filter suffixes in one of two places. The first place is in the radasm.ini file. Search for the " [FileBrowser] " section and edit the line that begins with " Filter=... ". You can delete or add suffixes to your heart's content on this line. The second way to change the default filters, arguably the easiest way, is within RadASM itself. From the application's menu, select "Option>File Browser" (that is, select the "File Browser" menu item from the "Option" menu). This brings up the dialog box appearing in See RadASM File Browser Options Dialog Box.. The text edit box at the bottom of this dialog window (labelled "Filter:") lets you edit the suffixes that RadASM uses for filtering files in the Project window pane.
 RadASM File Browser Options Dialog Box
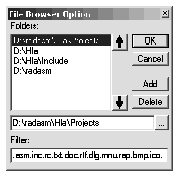
By default, RadASM only displays those files whose file suffixes appears in the filter list. If, for some reason, you need to see all files that appear in a project subdirectory, you can turn the file filtering off. There is a toolbar button at the top of the Project window pane that lets you activate or deactivate file filtering (this is the button in the middle of the project pane, if you let the mouse cursor hover over it for a few seconds the tool-tip help displays "file filter"). Clicking on this button toggles the display mode. So clicking on this button once will deactivate file filtering, to display all the files in the directory, clicking on this button a second time reactivates file filtering. See File Filtering in RadASM's Project Pane. shows the effects of clicking on this button.
 File Filtering in RadASM's Project Pane

If you've descended into a subdirectory by double-clicking on it's folder icon and you decide to return to an upper level directory, you can move to that upper level directory by clicking on the "Up One Level" button in the RadASM Project pane (see See RadASM "Up One Level" Directory Navigation Button.).
 RadASM "Up One Level" Directory Navigation Button
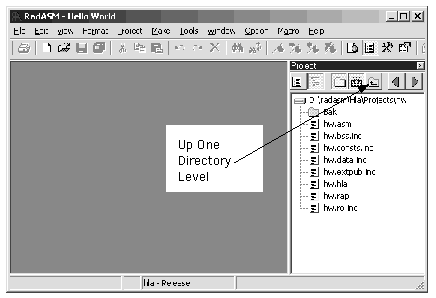
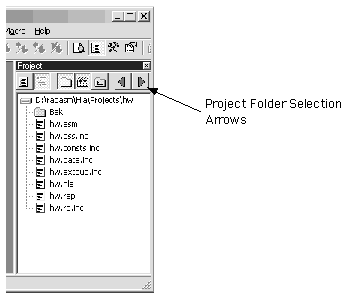
The left and right arrow buttons allow you to quickly scan through several different directories in the system (see See Project Folder Selection Arrows.). By default, RadASM displays a couple of interesting (HLA-related) subdirectories in the Project pane when you scan through the list using the left and right arrows in the Project pane. In general, however, you'll want to customize the directories RadASM visits when you press these two arrow buttons. You can add (or change) directory paths in the " [FileBrowser] " section of the radasm.ini file, though it's probably easier to select the "Option>File Browser" menu item to open up the File Browser Option dialog box and make your changes there (see See RadASM File Browser Options Dialog Box.). The "Folders:" list in the File Browser Option dialog box lists all the directories that RadASM will rotate through when you press the left and right buttons in the Project window pane. You can add, delete, edit, and rearrange the items in this list.
 Project Folder Selection Arrows
To edit an existing entry, click on that entry with the mouse and then edit the directory path appearing in the text edit box immediately below the "Folders:" list (see See RadASM File Browser Options Dialog Box.). You may either type in the path directly, or browse for the path by pressing the "browse" button immediately to the right of the text entry box (see See The RadASM File Browser Option "Browse" Button.).
 The RadASM File Browser Option "Browse" Button
To delete an entry from the File Browser Option list, select that item with the mouse and then press the "Delete" button appearing in the File Browser Option Window. To add a new entry to the list, press the "Add" button and then type the path into the text edit box (or use the browse button to locate the subdirectory you want to add). Note: do not type the new entry in and then press "Add". This sequence will change the currently selected item and then add a new, blank, entry. The correct sequence is to first press the "Add" button, and then edit the blank entry that RadASM creates.
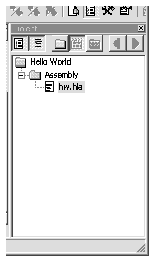
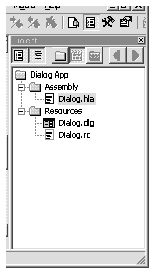
The remaining buttons in the Project window are only applicable to open projects. Note that opening a project folder is not the same thing as opening a RadASM project. To open a RadASM project you must either create a new project or open an existing ".rap" file. For example, you can open the "Hello World" project in the hw directory by double-clicking on the hw.rap file that appears in the project window. Opening the hw.rap file does two things to the RadASM windows: first, it displays the hw.hla source file in the editor window and, second, it switches the Project window pane from "File Browser mode" to "Project Browser mode." In project browser mode RadASM displays only the files you've explicitly added to the project. Any incidental or generated files will not appear here (unless you explicitly add them). For example, whereas the "File Browser" mode displays several ".inc" and ".asm" files (assuming you've not removed these suffixes from the file filter), the "Project Browser mode" only displays the hw.hla file because this is the only file that was originally added to the project. Another difference between the file browser and project browser modes is the fact that RadASM displays the files in "pseudo-directories" according to the file's type. For example, it displays the hw.hla file under the sub-heading "Assembly" (see See Project Window "Project Browser Mode".). The hw.rap project is a relatively simple project, only having a single assembly file. The Dialog.rap project (that appears in the "Dialog" project folder) is a slightly more complex application, having a couple of resource files in addition to an assembly file (see See Dialog.rap Project Browser Display.). Note that you can "flatten" RadASM's view of these files by pressing the "Project Groups" button in the Project window pane (see See Effect of Pressing the "Project Groups" Button.). Pressing this button a second time restores the project groups display (remember, you can always determine which button is which by letting the mouse cursor float above each button for a few seconds).
 Project Window "Project Browser Mode"
 Dialog.rap Project Browser Display
 Effect of Pressing the "Project Groups" Button

When you've got a project loaded, RadASM displays the project view by default. By pressing the "File Browser" and "Project Browser" buttons in the Project window pane, you can switch between these two views of your files (see See The Project Browser and File Browser Buttons.).
 The Project Browser and File Browser Buttons

 Compiling and Executing an Existing RadASM Project
To see how to use RadASM to compile and run a simple HLA program, begin by double-clicking on the hw.rap file. This is found in the ...Radasm\hla\projects\hw folder. When RadAsm opens up, you should see a display similar to See Selecting the HW.HLA Project.; if not, then press the project browser and project groups buttons.
 Selecting the HW.HLA Project

Just for fun, bring up the hw.hla program into the main editor by double-clicking on the hw.hla file icon in the project manager window. Here's what that file looks like:
stdout.put( "Hello, World of Assembly Language", nl, nl );
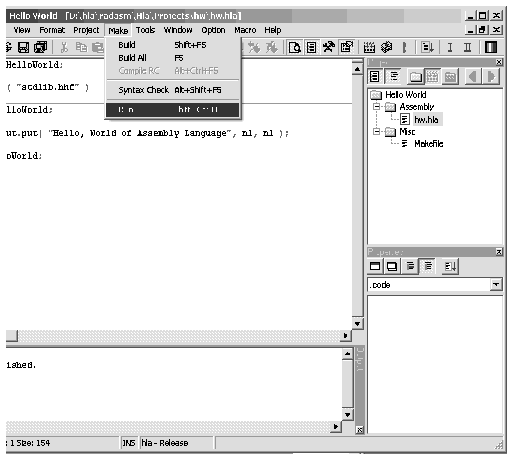
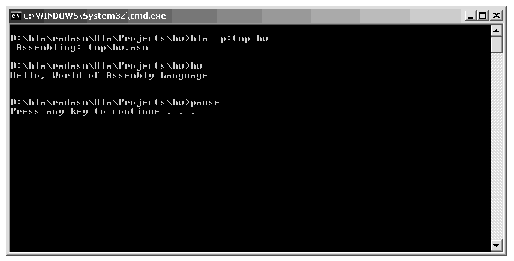
To run the Hello World program from RadASM, simply select the "Run" entry from the Make menu (see See Running the Hello World Program From RadASM.). This produces the program output found in See HW.HLA Program Output.. When you press the enter key, the console window will close and control returns to RadASM.
 Running the Hello World Program From RadASM
 HW.HLA Program Output
The other options in the RadASM "Make" menu have the following effect:
- Build- compiles the project; if you're using makefiles in your RadASM projects, this option will only compile those files absolutely necessary to create the executable.
- Build All- cleans out all the old object and executable files and rebuilds the executable from scratch.
- Compile Resource- Used to compile any resource files associated with this project (note that Build and Build All will also compile the resource files, if necessary).
- Syntax Check - does a syntax compile on the HLA files, without actually building the whole application. Faster than building the whole project if you simply want to check for typos in your source code.
- Run - Runs the executable (if you're using makefiles, this will also build the application if the executable is not current; if you're not using makefiles, you must manually build the application before running it).
 Creating a New Project in RadASM
While the two default projects that RadASM supplies are useful for demonstrating the RadASM Project window pane, you're probably far more interested in creating your own RadASM/HLA projects. Creating your own project is a relatively straight-forward process using RadASM's project creation wizard. To begin this process, select the "File>New Project" menu item. This opens the project wizard dialog box (see See RadASM Project Wizard Dialog Box.).
 RadASM Project Wizard Dialog Box
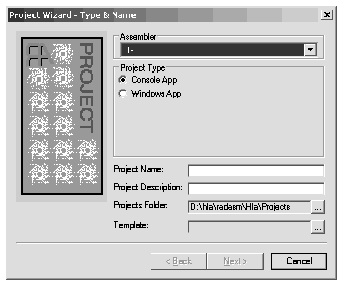
The "Assembler" pop-up menu list lets you select the assembler that you want to use for this project. Remember, RadASM supports a variety of different assemblers and the "rules" are different for each one. Because you're probably using HLA (if you're reading this document), you'll want to select the HLA assembler from this list. HLA should be the default (in fact, only) assembler in this list. If you're not using the radasm.ini file supplied on Webster, then you should make sure that HLA appears first in this list in the radasm.ini file.
The "Project Type" group is a set of radio buttons that let you select the type of project you're creating. RadASM populates this list of radio buttons from the " [Project] " section of the hla.ini file. The " Type=... " statement in this section specifies the valid projects that RadASM will create. RadASM creates the radio button items in the order the project type names appear in the " Type=... " list; the first item in the list is the one that will have the default selection. If you're going to be developing Windows' GUI applications most of the time, you'll probably want to change this list so that "Windows App" appears first in the list. This will slightly streamline the use of the Project Wizard because you won't have to explicitly select "Windows App" every time you create a new Windows application. The standard default is a Console App because that's the type of program most beginning HLA programmers create. You can actually add new project types to this list by modifying the hla.ini file. However, most HLA programmers will be creating either Win32 GUI apps or Win32 console apps, hence the standard release of RadASM/HLA supports these two application types. If you want to creat your own project types, see the discussion on customizing RadASM later in this manual.
The "Project Name:" text entry box is where you specify the name of the project you're creating. RadASM will create a folder by this name and any other default files it creates (within the project folder) will also have this name as their filename prefix. The text you enter at this point must be a valid Windows filename. Note that this should be a simple file name, not a path. You'll supply the path to this file/directory in a moment. This name should be a base filename (that is, no extension). RadASM will create other filenames by attaching appropriate extensions to the name you supply here (e.g., ".hla" and ".exe"). So if you specify a name like "myProject" here, RadASM will create a directory named "myProject" to hold your files and it will also create a "myProject.hla" file (among other files). When you actually build your program, RadASM (by default) will create an exectuable named "myProject.exe".
The "Project Description:" text entry box allows you to place a descriptive comment that describes the project. This is any arbitrary text you choose. It should be a brief (one-line) description of the project.
The "Projects Folder:" text entry box is where you select the path to the spot in the file system where RadASM will create the project folder. You can type the path in directly, or you can press the browse button to the right of this text entry box and use a Windows' dialog box to select the subdirectory that will hold the project's folder.
The "Template:" text entry box and browse button lets you select a template for your project. If you don't select a template, then RadASM will create an empty project for you (i.e., the main ".hla" file will be empty). If you select one of the templates (e.g., the ".tpl" files found in the RadASM\Hla\Templates directory) then RadASM will create a "skeletal" project based on the project template you've chosen. See RadASM/HLA Templates. lists some of the typical templates you will find.
 RadASM/HLA Templates
Generally, it's a good idea to select one of these templates when creating a new project. These templates automatically create any extraneous files a project needs (such as batch files and make files) and inserts these files into your new project. This spares you the effort of manually creating these files and inserting them into the project.
The RadASM/HLA package provides (at least) 16 different templates5. There are four different template categories, each category containing four templates. Not all of these template files will be visible when you press the "template browse" button. The cons*.tpl files are only visible if you've selected the "Console App" radio button. The win32*.tpl, WPA*.tpl, and empty*.tpl files will only be visible if you've selected the "Windows App" radio button in the "Project Type" box.
Within a given template category (cons*, win32*, WPA*, empty*) there are four choices available to you. For example when selecting one of the console templates you could choose consApp.tpl, consAppBatch.tpl, consAppMake.tpl, or consNMake.tpl. The difference between these project types is how RadASM will build (compile/assemble) the project.
The *App.tpl template files tell RadASM to directly build your application (using commands found in the .tpl file). You can think of this as the "native" RadASM build mode. The only problem with this approach is that it is not very flexible (in terms of handling multi-filecompilations) and it always rebuilds the entire project. As a result, projects that use the native RadASM build scheme are really suitable only for small (usually single-file) projects.
The *AppBatch.tpl template files tell RadASM to invoke various batch files when building the application. The template will actually create simple versions of these batch files for you: build.bat, compilerc.bat, syntax.bat, and run.bat. These batch files correspond to the items in the RadASM Make menu (note that the "Build" and "Build All" menu items both run the build.bat file). By default, these batch files only support a the creation of an application built around a single HLA source file (just like a native RadASM build). However, you can always edit these batch files to do a more sophisticated compilation. A later section will describe how to edit these batch files.
The *AppMake.tpl and *AppNMake.tpl template files tell RadASM to invoke a make utility (a generic make.exe program or Microsoft's nmake.exe utility, based on which template you select). The template creates a generic makefile for you (automatically) that handles all the menu items in the RadASM Make menu. Using make is, without question, the best way to use RadASM. Make is far more efficient for larger projects than using batch files or RadASM's built-in compilation capabilities. However, there are two drawbacks to using make: first, you have to have a copy of the make.exe (or nmake.exe) program (though this utility is available for free, see how to get a copy of this program in the section on make, earlier in this document); the second drawback is that you will have to edit the makefile that these templates create before you can build anything complex with them, i.e., if you want to create a sophisticated multi-file project, you'll need to make other changes to the makefile that the template creates. See the section on make earlier in this document for the details associated with the make language.
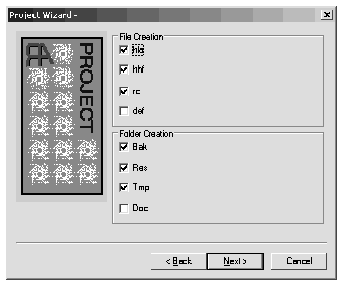
Once you've selected the assembler type, project type, entered the project name and description, and optionally selected the folder and a template, press the "Next>" button to move on to the next window of the Project Wizard dialog. This dialog box appears in See Project Wizard Dialog Box #2.. In this dialog box you select the initial set of files and folders that RadASM will create in the project's folder for you. At the very least, you're going to want a ".hla" file and a "Tmp" subdirectory. It's probably a good idea to create a "BAK" subdirectory as well (RadASM will maintain backup files in that subdirectory, if it is present). More complex Windows applications will probably need a header file (".HHF") and if you're creating fancy GUI applications, you may need a resource file (".RC") as well. If you're creating a dynamically linked library (DLL), you'll probably want a definition file (".DEF") as well. If you plan on writing documentation, you might want to create a DOC subdirectory - the choice is yours. Check the files and folders you want to create and press the "Next >" button in the dialog box. Note that simple console applications (the type of applications most beginning HLA users create) require only a ".hla" file and a "Tmp" directory.
 Project Wizard Dialog Box #2
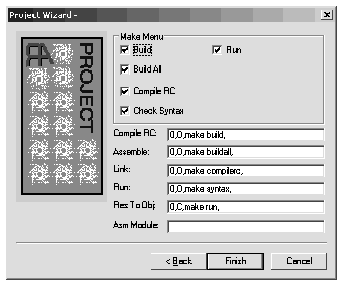
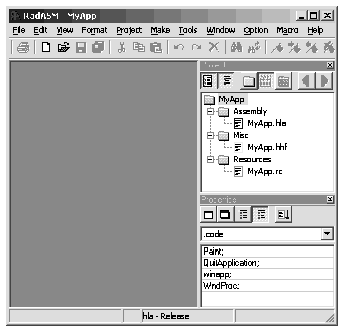
The last dialog box of the Project Wizard lets you specify the options present in the Make menu and the commands each of these options executes (see See Project Wizard Dialog Box #3.). You should ignore all these options and just press the finish button. Generally, you will not customize this output; you will normally just hit the "finish" button to complete the construction of your project. If you do want to change these options, do it from the "Project>Project Options" menu item once you've created the project See Typical RadASM Window After Project Creation. shows what the RadASM window looks like after create a sample "Windows App" application based on the win32app.tpl template (this project was given the name "MyApp").
 Project Wizard Dialog Box #3
 Typical RadASM Window After Project Creation
 Working With RadASM Projects
Of course, once you've created a RadASM project, you can open up that project and continue work on it at some later point. RadASM saves all the project information in a ".rap" (RadAsm Project) file. This ".rap" file keeps track of all the files associated with the project, project-specific options, and so on. These project files are actually text files, you can load them into a text editor (e.g., RadASM's editor) if you want to see their format. As a general rule, however, you should not modify this file directly. Instead, let RadASM take care of this file's maintenance.
There are several ways to open an existing RadASM project file - you can double-click on the .rap file's icon within Windows and RadASM will begin running and automatically load that project. Another way to open a RadASM project is to select the "File>Open Project" menu item and open some ".rap" file via this open command. A third way to open a RadASM project is to use the File Browser to find a ".rap" file in one of your project directories and double-click on the project file's icon (the ".rap" file) that appears in the project browser. Any one of these schemes will open the project file you've specified.
RadASM only allows one open project at a time. If you have a currently open project and you open a second project, RadASM will first close the original project. You can also explicitly close a project, without concurrently opening another project, by selecting the "File>Close Project" menu item.
Once you've opened a RadASM project, RadASM's "Project" menu becomes a lot more interesting. When you create a project, RadASM gives you the option of adding certain "stock" files to the project (either empty files, or files with data if you select a template when creating the project). All of the files that RadASM creates bear the project's name (with differing suffixes). As a result, you can only create one ".hla" file (and likewise, only one ".hhf" file, only one ".rc" file, etc.). For smaller assembly projects, this is all you'll probably need. However, as you begin writing more complex applications, you'll probably want additional assembly source files (".hla" files), additional header files (".hhf"), and so on. RadASM's Project menu is where you'll handle these tasks (and many others). See The RadASM Project Menu. shows the entries that are present in the Project menu.
 The RadASM Project Menu

To add new, empty, files to a RadASM project, you use the "Project > Add New" menu item. This opens up a new submenu that lets you select an assembly file (".hla" file), an include file (".hhf"), a resource compiler file (".rc"), a text file, and so on. Selecting one of these submenu items opens up an "Add New File" dialog box that lets you specify the filename for the file. Enter the filename and RadASM will create an empty text file with the name you've specified. Later on, you can edit this source file with RadASM and add whatever text is necessary to that file. Note that RadASM will automatically add that file to the appropriate group based on the file's type (i.e., it's suffix).
The "Project > Add Existing" sub-menu lets you add a pre-existing file to a project. This is a useful option for creating a RadASM project out of an existing HLA (non-RadASM) project or adding files from some other project (e.g., library routines) into the current project. Note that this option does not create a copy of the files you specify, it simply notes (in the ".rad" file) that the current project includes that file. To avoid problems, you should make a copy of the actual source file to the current project's folder before adding it to the project; then add the version you've just copied to your project. It's generally unwise to add the same source file to several different projects. If you change that source file in one project, the changes are automatically reflected in every other project that links this file in. Sometimes this is desirable, but most of the time programmers expect changes to a source file to be localized to the current project. That's why it's always best to make a copy of a source file when adding that file to a new project. In those cases where you do want the changes reflect to every application that includes the file, it's better to build a library module project and link the resulting ".lib" file with your project rather than recompile the source file in.
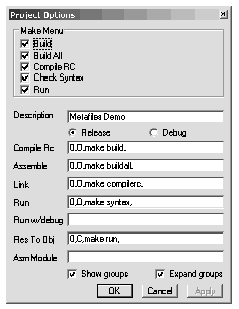
The "Project > Project options" menu item opens up a "Project Options" dialog box that lets you modify certain project options (see See "Project > Project Options" Dialog Box.). This dialog box lets you change certain options that were set up when you first created the project using the "File > New Project" Project Wizard dialogs. Most of the items in this dialog box should have been described earlier, but a few of the items do need a short explanation.
 "Project > Project Options" Dialog Box

The Project Options dialog box provides two radio buttons that let you select whether RadASM will do a "debug build" or a "release build." Be sure that the "Release" radio button is selected. The Debug option instructs HLA to insert certain debugging information into your executable file (e.g., for use by OllyDbg). We will not consider that option in this document.
 Build Options with RadASM/HLA
Before discussing how to actually edit and compile programs using RadASM, we need to stop for a moment and discuss the internal operation of RadASM and how it controls programs like HLA. RadASM was created to be a very flexible system supporting multiple assemblers and different ways of building applications. In one respect, this flexibility is very good - it is exactly this flexibility that allows RadASM to work with HLA (rather than just with Microsoft's assembler, for which RadASM was initially created). On the other hand, there is a down side to this flexibility - creating HLA projects is a little bit more involved than it has to be had RadASM been written specifically for HLA. In this section we'll discuss the extra work involved with creating and maintaining RadASM projects.
Take another look at See "Project > Project Options" Dialog Box.. Beside the labels "Compile RC", "Assemble", "Link", etc., you'll find some editable strings. These strings are special RadASM commands that tell RadASM what to do whenever you select an item from RadASM's "Make" menu. Originally, the labels next to each of these text edit boxes corresponded to menu items in the RadASM "Make" menu; HLA, however, has renamed the menu items in the "Make" menu, so they no longer correspond to the labels appearing in the "Project Options" dialog box (See "Project > Project Options" Dialog Box.). See Correspondence Between Project Options and Make Menu. shows the relationship between the labels in the Project Options dialog box and the Make menu.
 Correspondence Between Project Options and Make Menu
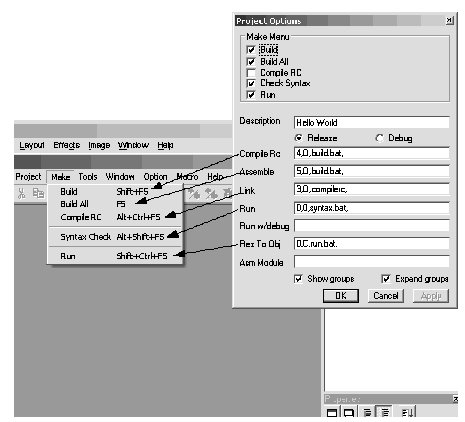
The text appearing in the corresponding text edit box in the Project Options dialog box is a command that RadASM executes whenever you select the corresponding item from the Make menu. Here's the syntax for each of these entries:
DEL, OUT, CMD, FILE {,FILE,...}
DEL is a numeric entry that specfies which files to delete prior to executing the command. Normally, this should be zero (which means "don't delete any files.").
OUT is either "O", "OT", or "C" meaning that the command's output goes to the RadASM output windows ("OT"), the command produces no output (and any output is ignored, "O"), or RadASM opens up a console (command-line) window and sends all output to that window ("C"). For most commands except "RUN", you'll probably want the command's output to go to the RadASM output window; when running the program you'll probably want the output to go to a console window (at least, if you're writing a console application).
CMD is the command (command-line prompt command) to execute in response to this Make menu selection. This includes the program's name and any command line parameters (though you don't usually specify the filenames to process here).
FILE is a special numeric designation (internal to RadASM) that specifies the file that the CMD is to process. We'll normally leave this blank, see the discussion on RadASM customization later in this document for more details on this entry.
There are three common ways people use to have RadASM run HLA to compile an HLA project: direct command execution, batch file execution, and make file execution. Each of these execution modes have their own set of advantages and disadvantages.
Direction command execution is the default mode for RadASM/HLA "out of the box." This mode has the advantage of being the easiest to use. For the most part, it doesn't require the creation of any special files in order to build a given project (though the "run" command works best if you create a batch file for it). There are several disadvantages to this approach. First, it doesn't work with HLA on all versions of Windows. Another disadvantage to this approach is that it's mainly useful for single-file projects (unless you're willing to delve deep into RadASM and learn all about customizing it for your own purposes). Yet another disadvantage is that you have to manually build eachcomponent of the project when using the direct command execution. In general, the disadvantages would outweigh the advantages of this execution mode were it not for the fact that the direct command approach works best for simple projects as it doesn't require the creation of any batch or makefiles. However, once you've created a few HLA projects and get comfortable with RadASM, you'll probably want to shift to one of the other RadASM operation modes. Note that running in this mode is equivalent to creating a project with one of the *App.tpl templates (also note that template settings always override the default settings).
Batch file execution is the second mode of operation that RadASM/HLA supports. In this mode of operation each of the RadASM commands in the Project Options dialog box executes a batch file and that batch file handles whatever set of tasks is necessary for the specified Make menu option. See RadASM in Batch Execution Mode (Project Options). shows the Project Options dialog box with the commands to execute when operating in batch mode. Note that each of the commands simply execute a batch file (build.bat, compilerc.bat, syntax.bat, and run.bat).
 RadASM in Batch Execution Mode (Project Options)
The batch files specified in the Project Options dialog box must appear in the same directory as the other files for project (e.g., along with the source files). These batch files contain a list of command-prompt commands to execute whenever you select one of the menu items from the Make menu. Here are the contents for each of the generic batch files supplied with RadASM/HLA:
echo "No Resource Files to Compile!"
The advantage of the batch file execution scheme over the direct execution scheme is that you can execute several commands within a batch file (unlike the direct command execution scheme). This lets you compile multi-file projects and execute other command-line actions within the batch file. Also, the batch file scheme works with all versions of Windows. Furthermore, the batch file scheme doesn't require any additional utility programs to achieve this flexibility. Batch files have two main disadvantages. First, you have to write a set of batch files for every project you create (though for single-file projects, the generic batch files work fine; editing the batch files is only necessary for more sophisticated projects). The second problem with batch files is they force a rebuild of every file in a multi-file project, even if such work is unnecessary.
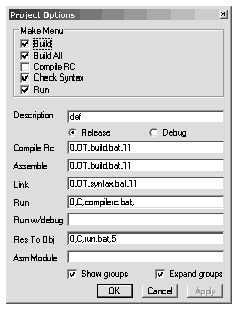
The makefile execution scheme is the most flexible of the three. Like the batch file scheme, you can execute multiple commands and this scheme works with all versions of Windows. A big advantage of makefiles over batch files is that you can easily handle large multi-file projects using makefiles and you can build the projects only recompiling the files that are necessary. Like batch files, one disadvantage to using makefiles is that you have to maintain a separate "makefile" the directs the compilation. Another disadvantage to the makefile scheme is that you have to have a separate "make" utility installed on your system (if you don't already have a copy of make, you can obtain one for free from Borland; see the section on "Make" for more details). See Makefile Execution Scheme (Project Options). show the command set for RadASM when using the makefile execution scheme with Borland's "make.exe" program (note: to use Microsoft's "nmake.exe" program, simply change each occurrence of "make" to "nmake" in the dialog box).
 Makefile Execution Scheme (Project Options)
The version of RadASM that ships with HLA includes several versions of the "hla.ini" initialization file that RadASM uses. These files are the following:
- hla.ini - this is the actual file that RadASM uses. As shipped, this is the same as hla_2000.ini (the direct execution mode file).
- hla_2000.ini - this is the version of the hla.ini file that supports direct command execution. If you ever change hla.ini and you want to restore the direct execution form, simply make a copy of this file and rename it to hla.ini.
- hla_bat.ini - this is the version of the hla.ini file that supports batch mode execution. If you want to use batch mode execution, make a copy of this file and rename the copy to "hla.ini".
- hla_make.ini - this is the version of the hla.ini file that supports Borland's make.exe application for the makefile execution mode (actually, this .ini file supports makefile execution using any make program named "make.exe"). If you want to use makefile mode execution, make a copy of this file and rename the copy to "hla.ini".
hla_nmake.ini - this is the version of the hla.ini file that supports Microsoft's nmake.exe application for the makefile execution mode. If you want to use makefile mode execution, make a copy of this file and rename the copy to "hla.ini".
Note that the execution mode specified by the "hla.ini" files is only available when you create a new project without using a template (template files override the settings in the hla.ini file). Each RadASM project file you create (the ".rap" file) maintains the execution mode as part of that project. Should you change the execution mode by copying some new file over the top of hla.ini, you do not change the execution modes for any pre-existing projects. If you want to change the execution mode of an existing project, you will have to select the "Project>Project Options" menu item and edit the entries in the project option dialog box.
The remainder of this document will assume that you're using the flexible "makefile" execution mode and that you're creating makefiles for each of your projects. Therefore, to follow along with the examples that appear in the remainder of this document, you should make a copy of the hla_make.ini (or hla_nmake.ini) file and rename it to hla.ini. Another alternative is to always use one of the *AppMake.tpl or *AppNMake.tpl templates when creating new projects.
 Editing HLA Source Files Within RadASM
The RadASM text editor is quite similar to most Windows based text editors you've used in the past (i.e., RadASM generally adheres to the Microsoft Common User Access (CUA) conventions. So the cursor keys, the mouse, and various control-key combinations (e.g., ctrl-Z, ctrl-X, and ctrl-C) behave exactly as you would expect in a Windows application. Because this is an advanced programming book, this chapter will assume that you've used a CUA-compliant editor (e.g., Visual Studio) in the past and we'll not waste time discussing mundane things like how to select text, cutting and pasting, and other stuff like that. Instead, this section will concentrate on the novel features you'll find in the RadASM editor.
Of course, the first file navigation aid to consider is the Project Browser pane. We've already discussed this RadASM feature in earlier sections of this document, but it's worth repeating that the Project Browser pane lets you quickly switch between the files you're editing in a RadASM project. Just double-click on the icon of the file you want to edit and that file will appear in the RadASM editor window pane.
Immediately below the Project Browser pane is the "Properties" pane (if this pane is not present, you can bring it up by selecting "View > Properties" from the RadASM View menu). This pane contains two main components: a pull down-down menu item that lets you select the information that RadASM displays in the lower half of this window. If not already selected, you should select the ".code" item from this list. The ".code" item tells RadASM to list all the sections of code that it recognizes as procedures (or the main program) in an HLA source file (see See The HLA Properties Window Pane.).
 The HLA Properties Window Pane
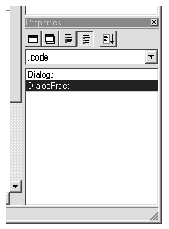
One very useful RadASM feature is that you can quickly jump to the start of a procedure's body (at the begin statement) by simply double-clicking on that procedure's name in the Properties Window pane. In the example appearing in See The HLA Properties Window Pane. (this is the "Dialog" project supplied with RadASM for HLA), double-clicking on the "Dialog;" and "DialogProc;" lines in this list box automatically navigates to the start of the code for the selected procedure.
The pull-down menu in the Properties window lets you select the type of objects the assembler provides. For example, by selecting ".const" you can take a look at constant declarations in HLA. The "macro" selection lets you view the macro definitions that appear in the source file. As this chapter was first being written, the other property items weren't 100% functional; hopefully by the time you read this RadASM will have additional support for other types of HLA declarations.
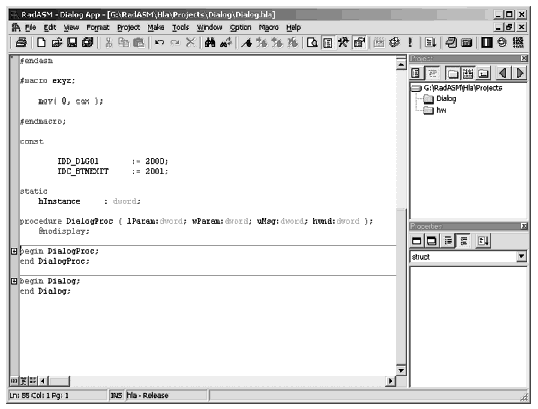
Another neat feature that RadASM provides is an "outline" view of the source file. Looking back at See The HLA Properties Window Pane. you'll notice that " begin DialogProc; " statement has a rectangle with a minus sign in it just to the left of the source code line. Clicking on this box closes up all the code between the begin and the corresponding end in the source file. See RadASM Outline View (with Collapsed Procedures). shows what the source file looks like when the Dialog and DialogProc procedures are collapsed in outline mode. The neat thing about outline mode is that it lets you view the "big picture" without out the mind-numbing details of the source code for each procedure in the program. In outline view, you can quickly skim through the source file looking for important code and "drill down" to a greater level of detail by opening up the code for a procedure you're interested in looking at. You can also rapidly collapse or expand all procedure levels by pressing the "expand" or "collapse" buttons appearing on the lower left hand corner of the text editor window (see See RadASM Outline View (with Collapsed Procedures).).
 RadASM Outline View (with Collapsed Procedures)
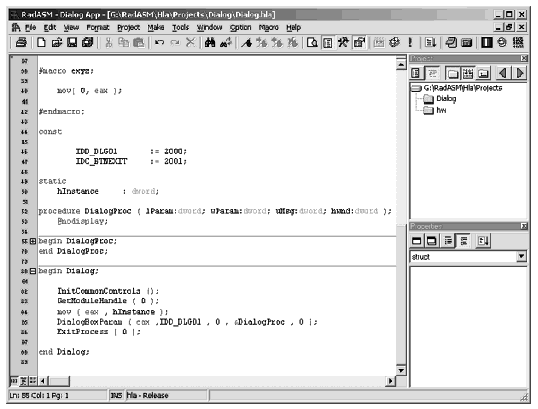
Another useful feature RadASM provides is the ability to display line numbers with each line of source code. Pressing on the line number icon in the lower-left hand corner of the text editor window (the icon with the "123" in it) toggles the display of line numbers in the editor's window. See See Displaying Line Numbers in RadASM's Editor. to see what the source file looks like with line numbers displayed. The line number display mode is quite useful when searching for a line containing a syntax error (as reported by HLA). Note that you can also navigate to a given line number by pressing ctrl-G and entering the line number (you can also select "Edit > Goto line" from the "Edit" menu).
 Displaying Line Numbers in RadASM's Editor
Another useful navigation feature in RadASM is support for bookmarks. A bookmark is just a point in the source file that you can mark. You can create a bookmark by selecting a line of text (by clicking the mouse on the gray bar next to the line) and selecting "Edit > Toggle BookMark" or by pressing shift-F8. You can navigate between the bookmarks by pressing F8 or ctrl-F8 (these move to the next or previous bookmarks in the source file). RadASM (by default) provides several icons on it's toolbar to toggle bookmarks, navigate to the previous or next bookmark, or clear all the bookmarks. Which method (edit menu, function keys, or toolbar) is most convenient simply depends on where your hands and the mouse cursor currently sits.
The RadASM "Format" menu also provides some useful features for editing HLA programs. The "Format > Indent" and "Format > Outdent" items (also accessible by pressing F9 and ctrl-F9) move a selected block of text in or out four spaces (so you can indent text between an if and endif , for example). You can also convert tabs in a document to spaces (or vice versa) from the "Format > Convert > Spaces To Tab" and "Format > Convert > Tab To Spaces" menu selections.
You'll notice that RadASM provides syntax coloring in the editor window (that is, it sets the text color for various classes of reserved words and symbols to different colors, making them easy to identify with a quick glance in the editor window). The hla.ini file accompanying the RadASM/HLA release contains a set of reasonable color definitions for HLA's different reserved word types. However, if you don't particularly agree with this color scheme, it's really easy to change the colors that RadASM uses for syntax highlighting. Just select the "Options > Colors & Keywords" menu item and select an item from the Syntax/Group list box (See Option>Colors & Keywords Dialog Box with Group#00 Selected. shows what this dialog box looks like with the Group #00 item selected). By double-clicking on an item within the Group list box, you can change the color for all the items in that particular group (e.g., see See Color Selection Dialog Box.). RadASM automatically updates the hla.ini file to remember your choice of colors the next time you run RadASM.
 Option>Colors & Keywords Dialog Box with Group#00 Selected

 Color Selection Dialog Box

You can also set the display fonts to something you're happier with if the default font (Courier New, typically) isn't to your liking. This is also achievable from the RadASM "Option" menu.
 Managing Complex Projects with RadASM
One of the main reasons for using a project-oriented integrated development environment like RadASM is to streamline the development of complex projects. For the sake of argument, we'll define a "simple" project as any HLA project consisting of a single ".hla" source file and, possibly, a header file. A complex project will be any application that requires multiple source files, object modules, library modules, and resource files that must be separately compiled and linked together to form a single exectuable file. Though an IDE such as RadASM is helpful when working on simple projects, a development environment is most effective when working on larger, complex projects.
Although it is possible to maintain certain complex projects using RadASM's native capabilities, by far the best solution for complex projects is to use a make utility or (if you don't have access to a make utility) batch files to control the compilation process. Though it requires a little additional labor to set up a set of batch files or a make file, the flexibility you gain by using this approach is well worth the small amount of additional effort (effort that will be repaid many times over during the project's development).
Before describing how to write batch files and makefiles to take over control of the compilation process from RadASM, perhaps it would be wise to offer a small justification for this approach. After all, RadASM has some very sophisiticated schemes for building projects, why not stick with RadASM's native approach? Well, there are several reasons. First, although RadASM's general nature is a wonderful attribute of the system (e.g., it allows HLA to work with RadASM even though it was originally designed for MASM), sometimes a specific solution is more efficient or more powerful than a general solution. Second, although RadASM is a great development environment, sometimes it's just easier or more convenient to compile a project from the command line prompt; by using batch or make files in your RadASM projects, you can easily work from the command line or from within RadASM and know that you're building your project exactly the same way in both cases. Also, tools like the make utility have been around for quite some time and contain lots of features that you won't find in a less mature system like RadASM. Fortunately, RadASM is flexible enough to allow the use of batch and make files when working on a project, so you get the best of both worlds - the convenience of an integrated development environment, and the power and flexibility of make files.
 Project Maintenance with Batch Files
The batch file approach is usable by those who do not have access to a make utility (or those who want to distribute RadASM projects to others who might not have a make utility available). Although batch files are more flexible than native RadASM builds, you should really attempt to use the make file approach unless there are some extenuating reasons why you would rather go with the batch file approach (e.g., the need to distribute RadASM/HLA projects to people who might not have a make utility).
A batch file is simple an ASCII text file that contains a sequence of command-line commands. The Windows command-line interpreter executes each line of text in a batch file just as though you'd typed those commands directly into a command window. By placing multiple commands in a batch file, you can execute as many commands as necessary to build your project. For example, suppose you have a little utility that increments a version number embedded in an HLA header file. You could execute a batch file that bumps up the version number and builds the HLA application using the following sequence of commands:
hla FileThatIncludesVersionFile.hla
Batch files also let you specify command-line parameters, e.g.,
You may refer to these command-line parameters within the batch file using %1, %2, %3, etc. For example, the default build.bat file that RadASM will create for you if you specify the use of one of the *AppBatch.tpl template files is
RadASM (by default) invokes this build.bat file using a command line like the following:
The batch file processor substitutes "filename.hla" for the "%1" within the batch file.
The big problem with RadASM's native compilation facilities is that it doesn't particularly know what files you want to compile. It will supply the main project name (or, with appropriate customization, all the files in a given project), but it won't let you easily pick and choose which files you want to process. That's where batch files (and makefiles) are useful. In a project-specific batch file, you can easily specify any or all files that you want to compile and link together into a single executable. For example, if you have a project that combines two HLA files, a resource (.rc) file, and a specialized library, you could handle this compilation with the following command in a batch file:
hla myProj.hla subroutines.hla resources.rc speciallib.lib
Such a command line could not be built (automatically) from within RadASM. This is particularly true if some of the files are not present in the project's directory (e.g., common object and library files present in a separate subdirectory).
If you create a project with one of the *AppBatch.tpl templates, or create a generic project using the hla_batch.ini file as your hla.ini file, then RadASM will, by default, connect the following Make menu items to the following batch files.
 RadASM/HLA Make Menu/Batch File Correspondence
Note that the Build and Build All menu items both invoke the same batch file. The Build menu item's intent is to build the application by compiling only those files that absolutely need to be compiled. This feature is generally available only if you're using make files. Therefore, if you choose the Build menu item when using batch files, it will generally recompile all files in the application. The Compile Resource and Syntax Check menu items in the Make menu will invoke their corresponding batch files that will contain commands to compile a resource file (if any) or run the HLA compiler in a "compile to assembly" mode (no object or executable output, i.e., a syntax check of the file).
The run.bat file is somewhat special. The default run.bat file takes the following form:
RadASM will pass a command line parameter of the form "projectname.exe" to the run.bat file. Assuming that your project has compiled the files to produce the executable "projectname.exe", this batch file will execute your application and then wait until you hit the enter key before it closes up the console window that executes the batch file (this gives you the opportunity to review any output produced by console applications).
If you would prefer to execute different batch commands when selecting items from RadASM's Make menu, you can specify the commands to execute by selecting the "Project>Project Options" menu item. This opens up a dialog box that let's you specify the command line parameters for each of the menu items. See the discussion elsewhere in this document for more details.
In general, batch files are not the most appropriate way to deal with complex projects. Make files are a much better solution. Therefore, unless you absolutely have to, you should avoid using the RadASM/HLA batch file compilation scheme.
 Project Maintenance with Make Files
Makefiles provide the best way to build complex projects when using RadASM/HLA. They are more efficient, they are safer, and they give you more control over the compilation process than you will get with RadASM's native mode or when using batch files. For most projects, the make file build scheme is, by far, the best. There are, of course, a couple of disadvantages to using make files. Specifically, you need to have a make utility in order to use makefiles and you need to learn the "make language" in order to use make files. Fortunately, a decent version of make is available for free from Borland and learning make is not that difficult (see the discussion of make earlier in this document). However, the advantages of make files far outweigh the disadvantages, so you should give make files serious consideration if you're not sure which RadASM/HLA compilation scheme to use.
Here are the commands that RadASM executes whenever you select an item from RadASM's make menu when using make files to build your application:
Build All menu item: make buildall
Syntax Check menu item: make syntax
Compile Resource menu item: make compilerc
These commands all assume that there is a single file, "makefile" present in the project directory. These commands will execute the build, buildall, syntax, compilerc, or run dependencies in the makefile, respectively. Here's what the default makefile (supplied with RadASM/HLA) looks like:
buildall: clean $(hlafile).exe
echo No Resource Files to Process!
$(hlafile).exe: $(hlafile).hla
hla $(DEBUG) -p:tmp $(hlafile)
For simple projects (i.e., projects consisting of a single HLA source file), you'll be able to use the makefile as-is. RadASM automatically supplies the project's name as the "hlafile" variable to build your project whenever you select an item from the RadASM "Make" menu. For more complex projects, you're going to want to edit this makefile extensively to add additional dependencies and commands.
The build dependency in this make file executes whenever someone selects the "Make>Build" menu item in RadASM. The intent of this command is to build the application with as little processing as possible. That is, if several of the files needed to build the final executable have already been compiled into object files, this command should not recompile those files, it should use the up-to-date objects as-is and only recompile those files whose source files are newer than the object files.
The buildall dependency in the makefile executes whenever someone selects the "Make>Build All" menu item in RadASM. The intent of this command is to do a complete build of the system, ignoring any object files that are already up to date. The typical execution of this command involves deleting all temporary files (e.g., object files) by executing the "clean" operation, and then doing a build.
The compilerc dependency executes whenever you select the RadASM "Make>Compile Resource" menu item. In the default make file provided with RadASM/HLA, this command simply displays a brief diagnostic message. If your project has some resource files that you need to compile with Microsoft's resource compiler, then you would normally specify the dependencies and commands needed to process those resource files after the compilerc dependency. For example, if your project includes a resource file named "myProject.rc", you'd typically edit the makefile to add/modify the following:
build: $(hlafile).exe $(hlafile).res
buildall: clean $(hlafile).exe $(hlafile).res
Of course, once you start making major modifications to the makefile, you can probably drop the use of the $(hlafile) variable and use the direct filenames (variables are great for generic makefiles; however, they tend to obscure makefiles created for a specific project). That is, for a project like "myProject" with a "myProject.hla" file and a "myProject.rc" file you'd probably just create a makefile like the following:
myProject.exe: myProject.hla myProject.res
hla $(DEBUG) -p:tmp myProject myProject.res
Always remember! If you use the RadASM template facility to create a new project and
 RadASM Menus
The following sections describe many of the RadASM menu items and their applicability to HLA software development. For a full discussion of each menu item, please see the on-line RadASM help file.
 The RadASM File Menu
The RadASM file menu provides all the common file operations you'd expect in a Windows application, plus a few RadASM specific entries (see See RadASM File Menu.).
 RadASM File Menu
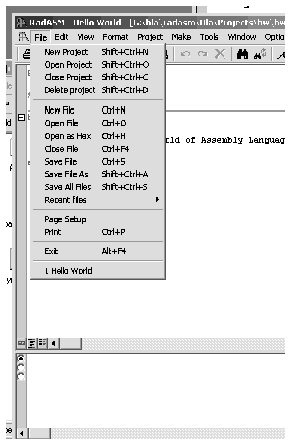
 File>New Project
This menu option lets you create a new project using RadASM (this process was explained in detail earlier in this document). When using RadASM/HLA, you're best bet is to always create a new RadASM project using one of the RadASM templates supplied with the RadASM/HLA package. The end result of the "File>New Project" selection is a new project directory with associated files (including a RadASM ".rap" file that describes the project plus any source files you've created for the project).
 File>Open Project
This menu option opens a dialog box that lets you open an existing RadASM project (.rap file). See See RadASM Open Project Dialog Box. for details. From this dialog box you can locate the .rap file for your particular project and selecting that file will open up the project and its associated files.
 RadASM Open Project Dialog Box
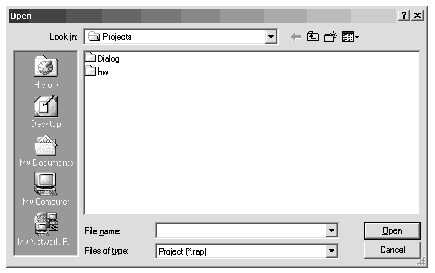
 File>Close Project
Selecting this menu item closes any open project (you may only have one project open at a time). If any modifications have been made to any files in the project, you will be asked whether you want to save them before closing the project. Note that this menu item is only active if you have a currently open project.
 File>Delete Project
This menu item deletes the currently open project. Use this option with care. Once you delete a project it is gone. This menu item is only active if you have an open project and it deletes that project.
 File>New File
The options creates a new text file and opens up a window for that text file in the editor. Note that this file does not automatically become a part of any project (including the currently open project, if there is one). See the discussion of the Project menu earlier in this document if you want to insert a file into the currently opened project.
 File>Open
This command opens a text file found on the disk. This file does not have to belong to a currently opened project, and once opened it does not become part of the current project.
 File>Open as Hex
This command opens an arbtrarily typed file (not necessarily a text file) in a hex-editor window (see See Hex Editor Window. for an example of the display of the "hw.exe" file in hex format). Note that you can edit this file (using hex values) and save the result back to disk. This is for advanced programmers only! You can do some serious damage to an executable file if you go poking around in it.
 Hex Editor Window

 File>Close File
This command closes the topmost open window. If there are any outstanding modifications, you will be asked if you want to save the file before closing it.
 File>Save File
This saves the top-most open file to disk, without closing the file. Any old data in the file on the disk is replaced.
 File>Save File As
This saves the data in the top-most open file under a different name. The old data in the original file is unchanged. Note that the default name for the top-most file changes to whatever name you supply, so future saves of this file will save their data to the new file rather than the old file.
 File>Save All Files
This quickly saves all modifies files that are open in the editor.
 File>Recent Files
This is a hierarchical menu item. Selecting this menu item opens up a secondary menu listing files you've recently edited with RadASM. You may open one of these files by selecting the specified file from the list.
 File>Page Setup
Opens a generic Windows' Printer Set-up dialog.
 File>Print
Opens the generic Window's printer dialog box.
 File>Exit
 Edit Menu Items
 Edit>Undo, Redo, Cut, Copy, Paste, Delete, Select All
Generic editing options available in most Windows applications
 Edit>Find, Find Next, Find Previous, Replace, Find Word
Opens up a very typical find (or replace) dialog box. (see See Find Dialog Box.). Note that by checking the "project" box, you can instruct RadASM to search for a string throughout a project. All the other options are standard Windows' User Interface items that you've seen before.
 Find Dialog Box

 Edit>Goto Line
This menu item opens up a small dialog box that lets you enter a line number. RadASM displays that line in the top-most open window.
 Edit>Expand Block
This menu item expands or compresses a begin..end block in an HLA source file (outline mode).
 Edit> Next/Previous/Got/Toggle/Clear Bookmark
RadASM provides a bookmark facility that lets you place markers (bookmarks) on lines of code in your source file. You can quickly navigate between bookmarks by selecting the Next/Previous Bookmark menu items (or by pressing F8 or Ctrl-F8). You can also jump to a specific bookmark (Goto Bookmark) or clear all the set bookmarks in your source file. Bookmarks are especially useful for quickly switching between two sections of code in a source file.
 The View Menu
The View menu lets you hide or make visible certain components of the RadASM user interface. This menu allows you to enable or disable the following components:
Status Bar
 Format Menu
The format menu contains several useful items that operate on the text within your source file.
 Format>Indent
Indents the selected lines of text by one tab stop (the indentation is to the right).
 Format>Outdent
Outdents the selected lines of text by one tab stop (the outdention is to the left).
 Format>Comment
This command places the HLA line comment delimeter ("//") at the beginning of each line.
 Format>Uncomment
This command deletes the comment delimiters appearing at the beginning of a block of selected lines.
 The Project Menu
The project menu contains several items that let you manage your RadASM projects.
 Project>Add New
This menu item lets you add a new file to a project. This is a hierarchical menu item that lets you add source (.hla) files, header (.hhf) files, resource (.rc) files, text (.txt) files, dialog (.dlg) files, menu (.mnu) files, module (.hla) files, or other arbitrary files to your project.
With a bit of project customization, you can have RadASM build a multi-module project by adding module files to your project. However, if you're interested in creating complex multi-module projects, you're probably better off using makefiles to control your project builds. For more information about modules in RadASM, please consult the RadASM on-line documentation.
As its name suggests, this menu option creates a new (empty) file to add to a project. You will have to edit the file this option creates in order to place data in the file.
 Project>Add Existing
This is another hierarchical menu item that lets you select some file on your hard drive and add it to the current project. If you've got some existing files you'd like to convert to a RadASM project, this is the option you use to add those files to a project. Note that this option does not copy the file into your project; it simply creates a link to the file whereever it is on the disk. If you want a copy of the file in your project's directory you should copy the file to your project directory before adding the file to your project.
 Project>Resource
This menu item lets you edit your resource file in a structured fashion. This includes AVI data, Bitmaps, cursors, icons, images, midi data, and so on. This option opens a dialog box that lets you select the resource type, the internal program identifier and value, and the file containing the resource data. By pressing the "export" button in the dialog box that comes up, you can get the text to cut and paste to a resource (.rc) file. See See Project>Resource Dialog Box (and Export Output). for an example.
 Project>Resource Dialog Box (and Export Output)

 Project>Stringtable
This menu item opens up a dialog box that lets you create string resources. You type in strings, identifiers, and values, and then press the export button (see See Project>Stringtable Dialog Box.). The dialog box writes to the output window a data set that you can cut and paste into a resource (.rc) file.
 Project>Stringtable Dialog Box

 Project>Versioninfo
This menu item creates a version information resource. You enter all the appropriate information in the dialog box that comes up (see See Project>Versioninfo Menu Item.), press the export button, and RadASM writes a resource (.rc) file compatible block of text to the output window that you can cut and paste to an appropriate resource file.
 Project>Versioninfo Menu Item
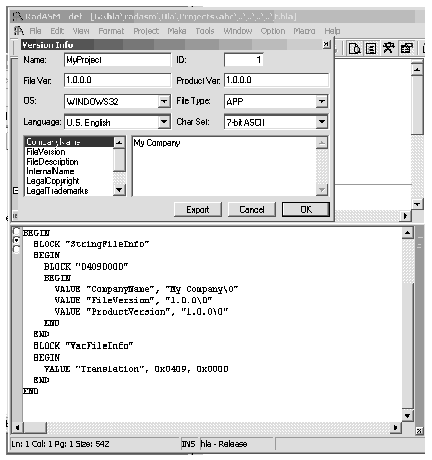
 Project>Set Assembler
This option is only available if you've set up RadASM to work with other assemblers in addition to HLA. The RadASM/HLA package leaves this option disabled, by default.
 Project>Remove From Project
This menu item removes the selected file (selected in the project browser) from the project.
 Project>Create Template
This menu item lets you create your own custom templates for RadASM projects. See the on-line help for more details concerning the creation of templates.
 Project>Project Options
This is one of the more important options under the Project menu. This option (which has been discussed earlier) lets you set various options for the currently opened project. This includes the selection of debug/release mode, which items appear in the make menu, and the specification of commands to execute for each of the items in the make menu. See the discussion earlier in this document or the on-line help for more details.
 Project>Main Project Files
This lets you specify the file types that a project can use. Note that it is *very* dangerous to modify this file list for an existing project. You can easily break RadASM/HLA's build facility by changing these names. Only expert RadASM users should play with this dialog box/menu item See the on-line help and the RadASM customization guid for more details.
 Make Menu
The make menu has been fully discussed elsewhere in this document. Note that RadASM/HLA uses a special layout for the Make menu that is not typical of RadASM when used with other assemblers. Therefore, when reading the on-line help, you'll notice that the items don't correspond to the items present in the RadASM/HLA make menu. As it turns out, the items in this menu are customizable on a project by project basis (which is how they got changed for RadASM/HLA). See the section on Customizing RadASM for more details.
 The Tools Menu
This menu runs various little applications ("applets") including the "sniplets" manager, the notepad editor, the Windows calculator, the command line prompt (command window), ASCII table, and a toolbar generator application. Of these, the "sniplets manager" is probably of greatest interest to HLA programmers. The sniplets manager lets you save short pieces of code ("sniplets") that you can cut and paste into your current project. You can expand the available sniplets by saving files in the ..RadASM\HLA\Sniplets subdirectory.
 The Window Menu
This menu lets you organize the window display in RadASM. The principle items you use in this menu are the file listings at the bottom of the Window Menu. From here, you can quickly select (and bring to the front) any given editor window that is currently open.
 The Option Menu
This menu lets you open up dialog boxes that control how RadASM operates. Most of the items in this menu are for advanced RadASM users only, so we'll not spend a whole lot of time discussing them, but a few of the menu items are quite useful and deserve a quick mention.
 Option>Code Editor Options
This menu item opens the Code Editor Options dialog box (see See Code Editor Option Dialog Box.) that lets you set various editor-wide options that are useful while editing projects.
 Code Editor Option Dialog Box
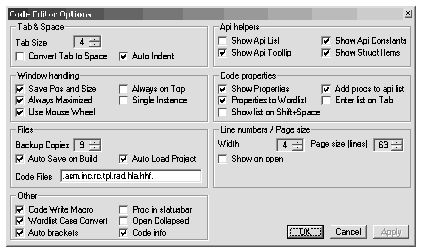
 Options>Colors & Keywords
This menu item lets you select the colors that RadASM will use for syntax high-lighting and other purposes within the editor. You can also choose the keywords that RadASM will recognize (for coloring purpose) within this dialog box (see See Colors & Keyword Dialog Box.).
 Colors & Keyword Dialog Box
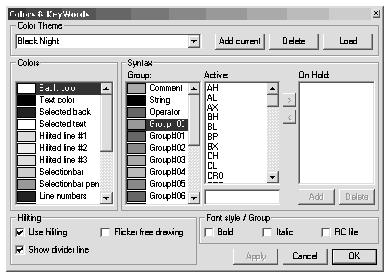
 Options>Code Editor Font
This menu item brings up a font selection dialog. RadASM uses this font whenever displaying source code. Note that you should always choose a fixed pitch font (e.g., courier or fixedsys) when editing source code. Mainly, you'll use this option to change the size of the font in your display windows.
 Options>Line Number Font
This brings up a font dialog box that lets you choose the font RadASM uses when displaying line numbers. This is usually a smaller font than used for code or text.
 Options>Text Editor Font
This brings up a font selection dialog box that lets you choosethe font used when editing text files. Typically, this would be the same font as the code.
 Options>Printer Options, Printer Font
Th Printer Options dialog lets you specify page headings and output color capabilities for print-outs from RadASM.
The Printer Font menu item opens up a font selection dialog that lets you choose the output font when printing text from RadASM.
 Options>File Browser
This menu item opens up a small dialog box that lets you select the directories that RadASM will cycle through when pressing the arrow buttons in the project browser pane. This dialog also lets you select the file filters the project browser window will use when displaying files.
 Options>External File Types
This menu lets you specify various non-RadASM recognized file types and the applications that RadASM will open in order to process such files.
 Options>Sniplets
This menu item opens a dialog box that lets you tell RadASM how you want to cut and paste sniplets into your code.
 Options>Set Paths
This option brings up a dialog box that lets you specify where RadASM can find certain folders in the system. Generally, it's dangerous to mess with these paths as the RadASM/HLA installation should set these paths up properly for you. Be sure to consult the RadASMini.rtf document (shipped with RadASM) if you want to change these items.
 Customizing RadASM
RadASM is a relatively generic integrated development environment for assembly language development. This single programs supports the HLA, MASM, TASM, NASM, and FASM assemblers. Each of these different assemblers feature different tool sets (executable programs), command line parameters, and ancillary tools. In order to control the execution of these different programs, the RadASM system uses ".INI" files to let you specifically configure RadASM for the assembler(s) you're using. HLA users will probably want to make modifications to two different ".INI" files that RadASM reads: radasm.ini and hla.ini. You'll find these two files in the subdirectory containing the radasm.exe executable file. Both files are plain ASCII text files that you can edit with any regular text editor (including the editor that is built into RadASM).
The RadASM package includes an ".RTF" (Word/Wordpad) documentation file that explains the basic format of these ".INI" files that RadASM uses. Readers interested in making major changes to these ".INI" files, or those attempting to adopt RadASM to a different assembler, will want to read that document. In this chapter, we'll explore the modifications to a basic set of ".INI" files that a typical HLA user might want to make. The assumption is that you're starting with the stock radasm.ini and hla.ini files that come with RadASM and you're wanting to customize them to support the development paradigm that this document proposes.
 The RADASM.INI Initialization File
The radasm.ini file specifies all the generic parameters that RadASM uses. In particular, this ".INI" file specifies initial window settings, file histories, OS and language information, and menu entries for certain user modifiable menus. RadASM, itself, actually modifies most of the information in this ".ini" file. However, there are a few entries an HLA user will need to change and a couple of entries an HLA user may want to change. We'll discuss those sections here.
Note: there is a preconfigured radasm.ini file found in the WPA samples subdirectory. This initialization file is compatible with all the sample programs found in this book and is a good starting point should you decide to make your own customizations to RadASM.
The first item of interest in the radasm.ini file is the "[Assembler]" section. This section in the ".INI" file specifies which assemblers RadASM supports and which assembler is the default assembler it will use when creating new projects. By default, the "[Assembler]" section takes the following form:
Assembler=masm,fasm,tasm,nasm,hla
The first assembler in this list is the default assembler RadASM will use when creating a new project. The standard radasm.ini file is set up to assume that MASM is the default assembler (the first assembler in the list is the default assembler). HLA users will probably want to tell RadASM to use HLA as the default assembler, this is easily achieved by changing the "Assembler=" statement to the following:
Assembler=hla,masm,fasm,tasm,nasm
Changing the default assembler is the only "necessary" change that you'll need to make. However, there are a few additional changes you'll probably want that will make using RadASM a little nicer. Again, by default, RadASM assumes that you're developing MASM32 programs. Therefore, the help menu contains several entries that bring up help information for MASM32 users. While some of this information is, arguably, of interest to HLA users, a good part of the default help information doesn't apply at all to HLA. Fortunately, RadASM's radasm.ini file lets you specify the entries in RadASM's help menu and where to locate the help files for those menu entries. The "[MenuHelp]" and "[F1-Help]" sections specify where RadASM will look when the user requests help information (by selecting an item from the "Help" menu or by pressing the F1 key, respectively). The default radasm.ini file specifies these two sections as follows:
2=&X86 Op Codes,0,H,$H\x86eas.hlp
Each numbered line in the "[MenuHelp]" section corresponds to an entry in RadASM's "Help" menu. These entries must be have sequential numbers starting from one and these numbers specify the order of the item in the "Help" menu (the order in the radasm.ini file does not specify the order of the entries in the "Help" menu, you do not have to specify the "[MenuHelp]" entries in numeric order, RadASM will rearrange them according to the numbers you specify). Entry entry in the "[MenuHelp]" section takes the following form:
menu# = Menu Text, accelerator, H, helpfile
where "menu#" is a numeric value (these values must start from one and there can be no gaps in the set), "Menu Text" is the text that RadASM will display in the menu for that particular item, accelerator is a Windows' accelerator key value (generally, this is zero, meaning no accelerator value), "H" is required by RadASM to identify this as a "Help" entry, and "helpfile" is the path to the help file to display (or a program that will bring up a help file).
You may have noticed the ampersand character ("&") in the menu text. The ampersand precedes the character you can press on the keyboard to select a menu item when the menu is opened. For example, pressing "X" when the menu is open (with the "[HelpMenu]" items in this example) selects the "X86 Op Codes" menu entry.
You will note that the paths in the "[MenuHelp]" section all begin with "$H". This is a RadASM shorthand for "the path where RadASM can find all the help files." There is no requirement that you use this shortcut or even place all your help files in the same directory. You could just also specify the path to a particular help file using a fully qualified pathname like c:\hla\doc\Win32.hlp. However, it's often convenient to specify paths using the various shortcuts that RadASM provides. RadASM supplies the shortcuts found in See Path Shortcuts for Use in RadASM ".INI" Files..
 Path Shortcuts for Use in RadASM ".INI" Files
You can define several of these variables in the hla.ini file. See the next section for details.
As noted earlier, the default help entries are really intended for MASM32 users and do not particularly apply to HLA users. Therefore, it's a good idea to change the "[MenuHelp]" entries to reflect the location of some HLA-related help files. Here are the "[MenuHelp]" entries that might be more appropriate for an HLA installation (assuming, of course, you've placed all these help files in a common directory on your system):
4=&HLA Reference,0,H,$H\PDF\HLARef.pdf
5=HLA Standard &Library,0,H,$H\pdf\HLAStdlib.pdf
6=&Kernel32 API,0,H,$H\pdf\kernelref.pdf
7=&User32 API,0,H,$H\pdf\userRef.pdf
8=&GDI32 API,0,H,$H\pdf\GDIRef.pdf
Here's a suggestion for the F1, Ctrl-F1, Shift-F1, and Ctrl-Shift-F1 help items:
These are probably the extent of the changes you'll want to make to the radasm.ini file for HLA use; there are, however, several other options you can change in this file, please see the radASMini.rtf file that accompanies the RadASM package for more details on the contents of this file.
 The HLA.INI Initialization File
The hla.ini file is actually where most of the customization for HLA takes place inside RadASM. This file lets you customize RadASM's operation specifically for HLA6. The hla.ini file appearing in the WPA subdirectory (on the accompanying CD-ROM or in the Webster HLA/Examples download file) contains a set of default values that provide a good starting point for your own customizations.
Note: although hla.ini provides a good starting point for a system, you will probably need to make changes to this file in order for it to work on your specific system. Without these changes, RadASM may not work on your system.
Without question, the first section to look at in the hla.ini file is the section that begins with " [Paths] ". This is where you tell RadASM the paths to various directories where it expects to find various files it needs (see See Path Shortcuts for Use in RadASM ".INI" Files. for the meaning of these various path values). A typical " [Paths] " section might look like the following:
Note that the $A prefix specifies the path where RadASM can find the executables for HLA. In fact, RadASM does not run HLA directly (remember, we're going to have the make program run HLA for us), but the application path ( $A ) becomes a prefix directory we'll use for defining other directory prefixes. Be sure to check this path in your copy of the hla.ini file and verify that it points at your main HLA subdirectory (usually "C:\HLA" though this may be different if you've installed HLA elsewhere).
The $R prefix specifies the path to the subdirectory containing RadASM. RadASM automatically sets up this prefix, you don't have to explicitly set its value. The remaining subdirectory paths are based off either the $A prefix or the $R prefix.
The "[Project]" section of the hla.ini file is where the fun really begins. This section takes the following form in the default file provided in the WPA subdirectory:
Type=Console App,Dialog App,Windows App,DLL
MenuMake=Build,Build All,Compile RC,Check Syntax,Run
The line beginning with " Type= " specifies the type of projects RadASM supports for HLA. The default configuration supports console applications ("Console App"), dialog applications ("Dialog App"), Windows applications ("Windows App"), and dynamic linked library ("DLL"). The names are arbitrary, though other sections of the hla.ini file will use these names. Whenever you create a new project in HLA, it will create a list of "Project Type" names based on the list of names appearing after " Type= " in the " [Project] " section. Adding a string to this comma-separated list will add a new name to the project types that the RadASM user can select from (note, however, that to actually support these project types requires some extra work later on in the hla.ini file). See RadASM Project Types. shows what the New Project dialog box in RadASM displays in response to the entries on the "Type=..." line.
 RadASM Project Types
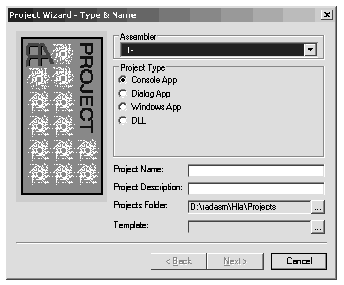
The line beginning with "Files=" in the "[Project]" section specifies the suffixes for the files that RadASM will associate with this project. The "hla" and "hhf" entries, of course, are the standard file types that HLA uses. The ".rc" file type is for resource compiler files (we'll talk about the resource compiler in a later chapter). If you want to be able to create additional file types and include them in a RadASM project, you would add their suffix here.
The "Folders=..." statement tells RadASM what subdirectories it should allow the user to create when they start a new project. The make file system we're going to use will assume the presence of a "Tmp" directory, hence that option needs to be present in the list. the "bak", "res", and "doc" directories let the user create those subdirectories.
See File and Folder Creation Dialog Box in RadASM. shows the dialog box that displays the information found on the "Files=" and "Folders=" lines. By checking the appropriate boxes in the File Creation group, the RadASM user can tell RadASM to create a file with the project's name and the appropriate suffix as part of the project. Similarly, by checking the appropriate boxes in the Folder Creation group, the RadASM user can tell RadASM to create the appropriate directories.
 File and Folder Creation Dialog Box in RadASM

The "MenuMake=..." line specifies the IDE options that will be available for processing the files in this project. Unlike the other options, you cannot specify an arbitrary list of commands here. RadASM provides five items in the Make menu that you can modify, you don't have the option of adding additional items here (you can disable options if you want fewer, though). Originally, these five slots were intended for the following commands:
- Compile RC (compile a resource file)
- Assemble (assemble the currently open file)
- Link (create an EXE from the object files)
- Run (execute the EXE file, building it if necessary)
Res To Obj (convert a resource file to an object file)
Because these options aren't as applicable to HLA projects as they are to MASM projects (on which the original list was built), the default hla.ini file co-opts these make items for operations that make more sense for the way we're going to be building HLA applications in this book. You can actually turn these make items on or off on a project by project basis (for certain types of projects, certain make objects may not make sense). See RadASM Make Menu Selection Dialog Box. shows the dialog box that RadASM displays and presents this information. Note that in the version used here, RadASM only displays the correct labels for the check boxes in the Make Menu group. The labels on the text entry boxes should also be "Build", "Build All", "Compile RC", "Check Syntax", and "Run" (in that order), but these labels turn out to be hard-coded to the original MASM specifications. Fortunately, you won't normally use these text entry boxes (the default text appearing in them appears in the hla.ini file), so you can ignore the fact that they are mis-labelled here.
 RadASM Make Menu Selection Dialog Box
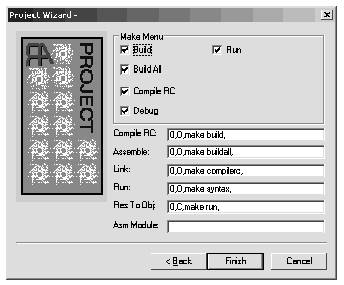
For each of the project types you specify on the " Type=... " line in the " [Project] " section, you must add a section to the hla.ini file, using that project type's name, that tells RadASM how to deal with projects of that type. In the hla.ini file we're discussing here, the project types are "Console App", "Dialog App", "Windows App", and "DLL" so we will need to have sections names " [Console App] ", " [Dialog App] ", " [Windows App] ", and " [DLL] ". It also turns out that RadASM requires one additional section named " [MakeDefNoProject] " that RadASM uses to process files in the IDE that are not associated with a specific project.
When running RadASM, you can have exactly one project open (or no project at all open, just some arbitrary files) at a time. This project will be one of the types specified on the " Type=... " line in the " [Project] " section. Based on the open project, RadASM may execute a different set of commands for each of the items in the Make menu; the actual commands selected are specified in the project-specific sections of the hla.ini file. Here's what the " [MakeDefNoProject] " section looks like:
The "MenuMake=..." line specifies which items in the RadASM Make menu will be active when a project of this type is active in RadASM (or, in the case of MakeDefNoProject , when no project is loaded). This is a list of boolean values (true=1, false=0) that specify whether the menu items in the Make menu will be active or deactivated. Each of these values correspond to the items on the MenuMake line in the "[Project]" section (in our case, this corresponds to "Build", "Build All", "Compile RC", "Syntax Check", and "Run", in that order). A "1" activates the corresponding menu item, a zero deactivates it. For most HLA project types, we'll generally leave all of these options enabled. The exception is DLL; normally you don't "run" DLLs so we'll disable the run option when building DLL projects.
The remaining lines specify the actions RadASM will take whenever you select one of the items from the Make menu. To understand how these items work, let's first take a look at another section in the hla.ini file, the " [MenuMake] " section:
Each item in the " [MenuMake] " section corresponds to a menu entry in the Make menu. The numbers specify the index to the menu entry (e.g., "1=" specifies the first menu item, "2=" specifies the second menu item, etc.). The first item after the "n=" prefix specifies the actual text that will appear in the Make menu. If this text is just the character "-" then RadASM displays a menu separator for that particular entry. As you can see, the default menu entries are "Build", "Build All", "Compile RC", "Syntax", and "Run".
The next item, following the menu item text, is the accelerator value. These are "magic" values that specify keystrokes that do the same job as selecting items from the menu. For example, 55 (in the "Build" item) corresponds to Shift+F5, 31 (in "Build All") corresponds to F5. We'll discuss accelerators in a later chapter. So just ignore (and copy verbatim) these files for right now.
The third item on each line is always the letter "M". This tells RadASM that this is a make menu item.
The fourth entry on each line is probably the most important. This is the command to execute when someone selects this particular menu item. This is either some text containing the command line to execute or a numeric index into the current project type. As you can see in this example, each of the commands use an index value (one through five in this example). These numbers correspond to the lines in each of the project sections. For example, if you select the "Build" option from the Make menu, RadASM notes that it is to execute command #1. It goes to the current project type section and locates the line that begins with "1=..." and executes that operation, e.g.,
In a similar vein, selecting "Build All" from the Make menu instructs RadASM to execute the command that begins with "2=..." in the current project type's section (i.e., " 2=0,O,make buildall, "). And so on.
The lines in the project type section are divided into two groups, those that begin with 1, 2, 3, 4, or 5 and those that begin with 11, 12, 13, 14, or 15. The "[MenuMake]" command index selects one of the commands from these two groups based on whether RadASM is producing a "release build" or a "debug build". Release builds always execute the command specified by the "[MenuMake]" command index (i.e. 1-5). If you're building a debug version, then RadASM executes the commands in the range 11-15 in response to command indexes 1-5. We'll ignore debug builds for the time being (we'll discuss them in a later chapter on debugging). So for right now, we'll always assume that we're building a release image.
The fields of each of the indexed commands in the project type section have the following meanings:
index = delete_option, output_option, command, files
The delete_option item specifies which files to delete before doing the build. If this entry is zero, then RadASM will not delete any files before the build. Because we're having a make file do the actual build for us, and it can take care of cleaning up any files that need to be deleted first, we'll always put a zero here when using RadASM with HLA.
The output_option item is either "C", "O" (that's an "oh" not a "zero"), or zero. This specifies whether the output of the command will go to a Windows console window ("C"), the RadASM output window ("O", which is "oh"), or the output will simply be thrown away (zero). We'll usually want the output sent to RadASM's output window, so most of the time you'll see the letter "O" ("oh") here.
The command entry is the command line text that RadASM will pass on to windows whenever you execute this command. This can be any valid command prompt operation. For our purposes, we'll always use a make command with a single parameter to specify the type of make operation to perform. Here are the commands we're going to support in RadASM:
- Build - "make build"
- Build All - "make buildall"
- Compile RC - "make compilerc"
- Syntax - "make syntax"
Run - "make run"
Now it's up to the makefile to handle each of these various commands properly (using the standard makefile scheme we defined in the first chapter).
This may seem like a considerable amount of indirection -- why not just place the commands directly in the " [MenuMake] " section? However, this scheme is quite flexible and makes it easy to adjust the options on a project type by project type basis (in fact, it's even possible to set these options on a project by project basis).
With this discussion out of the way, it's time to look at the various project type sections. Without further ado, here they are:
Console applications, by default, want to create an .HLA file and a .HHF file, a BAK folder and a TMP folder. All menu items are active for building and running console apps (that is, there are five ones after " MenuMake "). Finally, the commands ("1=..." "2=...", etc.) are all the standard build commands.
By default, dialog applications will create HLA, HHF, RC, and DEF files and they will create a BAK and a TMP subdirectory. All five menu items will be active and dialog apps use the standard command set.
By default, window applications will create HLA, HHF, RC, and DEF files and they will create a BAK, RES, DOC, and a TMP subdirectory. All five menu items will be active and dialog apps use the standard command set.
The hla.ini file allows you to control several other features in RadASM. The options we've discussed in this chapter are the crucial ones you must set up, most of the remaining options are of an aesthetic or non-crucial nature, so we won't bother discussing them here. Please see the RadASM documentation (the RTF file mentioned earlier) for details on these other options.
Once you've made the appropriate changes to the hla.ini file (and, of course, you've made a backup of your original file, right?), then you can copy the file to the RadASM subdirectory and replace the existing hla.ini file with your new one. After doing this, RadASM should operate with the new options when you run RadASM..
1. Obviously, if you only change comments or other statements in the source file that do not affect the executable file, a recompile or reassembly will not be necessary. To be safe, though, we will assume any change to the source file will require a reassembly.
2. The "-ffilename"command line option that lets you specify the name of the makefile. See the manual for your version of make for details.
3. You can tell make to use a different file by specifying the "-f" command line option. Check out make's documentation for more details.
4. If you need more text than will physically fit on a single line, place a backslash at the end of the line to tell make that the line continues on the next physical line in the make file. The make program removes the new line characters between the two lines and continues processing.