High Availability and Scalability - MariaDB - Databases - Software - Computers
| High Availability and Scalability | ||
|---|---|---|
| Prev | Next | |
High Availability and Scalability
Table of Contents
- Oracle VM Template for MariaDB Enterprise Edition
- Using MariaDB with DRBD
- Using Linux HA Heartbeat
- Using MariaDB within an Amazon EC2 Instance
- Using ZFS Replication
- Using MariaDB with memcached
- MySQL Proxy
MySQL is deployed into many applications demanding availability and scalability.
Availability refers to the ability to cope with, and if necessary recover from, failures on the host, including failures of MySQL, the operating system, or the hardware and maintenance activity that may otherwise cause downtime. Scalability refers to the ability to spread both the database and the load of your application queries across multiple MariaDB servers.
Because each application has different operational and availability requirements, MariaDB offers a range of certified and supported solutions, delivering the appropriate levels of High Availability (HA) and scalability to meet service level requirements. Such solutions extend from replication, through virtualization and geographically redundant, multi-data center solutions delivering 99.999% uptime.
Selecting the right high availability solution for an application largely depends on:
- The level of availability required.
- The type of application being deployed.
- Accepted best practices within your own environment.
The primary solutions supported by MariaDB include:
- MySQL Replication. Learn more: Replication
- MySQL Cluster. Learn more: MySQL Cluster NDB 7.2
- Oracle VM Template for MySQL. Learn more: , "Oracle VM Template for MariaDB Enterprise Edition".
Further options are available using third-party solutions such as DRBD (Distributed Replicated Block Device) and Heartbeat, and more complex scenarios can be solved through a combination of these technologies.
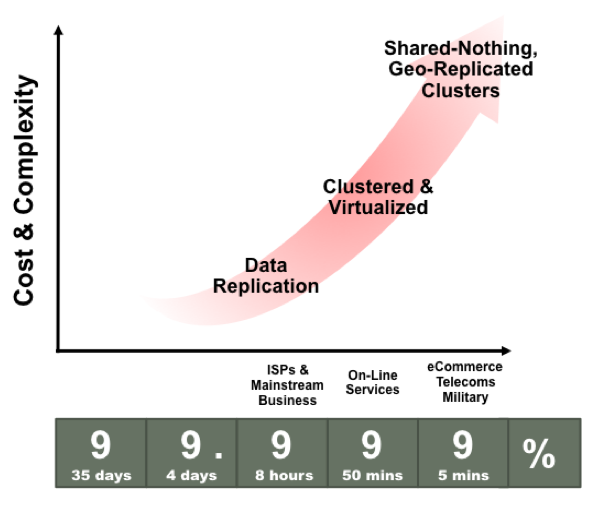
Each architecture used to achieve highly available database services is differentiated by the levels of uptime it offers. These architectures can be grouped into three main categories:
- Data Replication.
- Clustered & Virtualized Systems.
- Shared-Nothing, Geographically-Replicated Clusters.
As illustrated in the following figure, each of these architectures offers progressively higher levels of uptime, which must be balanced against potentially greater levels of cost and complexity that each can incur. Simply deploying a high availability architecture is not a guarantee of actually delivering HA. In fact, a poorly implemented and maintained shared-nothing cluster could easily deliver lower levels of availability than a simple data replication solution.
Figure 14.1. Tradeoffs: Cost and Complexity versus Availability
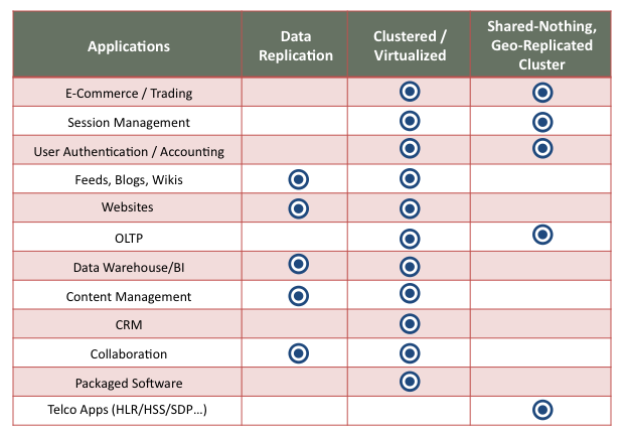
The following figure maps common application types to architectures, based on best practices observed from the MariaDB user base. It serves as a reference point to investigate which HA architectures can best serve your requirements.
Figure 14.2. High Availability Architectures for Common Application Types
The following table compares the HA and Scalability capabilities of the various MariaDB solutions:
| Requirement | MySQL Replication | MySQL Replication + Linux Heartbeat | Heartbeat + DRBD | Oracle VM Template | MySQL Cluster |
|---|---|---|---|---|---|
| Availability | |||||
| Platform Support | All Supported by MariaDB Server | Linux | Linux | Oracle Linux | All Supported by MariaDB Cluster |
| Automated IP Failover | No | Yes | Yes | Yes | Depends on Connector and Configuration |
| Automated Database Failover | No | No | Yes | Yes | Yes |
| Automatic Data Resynchronization | No | No | Yes | N/A - Shared Storage | Yes |
| Typical Failover Time | User / Script Dependent | Configuration Dependent, 60 seconds and Above | Configuration Dependent, 60 seconds and Above | Configuration Dependent, 60 seconds and Above | 1 Second and Less |
| Synchronous Replication | No, Asynchronous and Semisynchronous | No, Asynchronous and Semisynchronous | Yes | N/A - Shared Storage | Yes |
| Shared Storage | No, Distributed | No, Distributed | No, Distributed | Yes | No, Distributed |
| Geographic redundancy support | Yes | Yes | Yes, via MariaDB Replication | Yes, via MariaDB Replication | Yes, via MariaDB Replication |
| Update Schema On-Line | No | No | No | No | Yes |
| Scalability | |||||
| Number of Nodes | One Master, Multiple Slaves | One Master, Multiple Slaves | One Active (primary), one Passive (secondary) Node | One Active (primary), one Passive (secondary) Node | 255 |
| Built-in Load Balancing | Reads, via MariaDB Replication | Reads, via MariaDB Replication | Reads, via MariaDB Replication | Reads, via MariaDB Replication & During Failover | Yes, Reads and Writes |
| Supports Read-Intensive Workloads | Yes | Yes | Yes | Yes | Yes |
| Supports Write-Intensive Workloads | Yes, via Application-Level Sharding | Yes, via Application-Level Sharding | Yes, via Application-Level Sharding to Multiple Active/Passive Pairs | Yes, via Application-Level Sharding to Multiple Active/Passive Pairs | Yes, via Auto-Sharding |
| Scale On-Line (add nodes, repartition, etc.) | No | No | No | No | Yes |
Oracle VM Template for MariaDB Enterprise Edition
Virtualization is a key technology to enable data center efficiency and high availability while providing the foundation for cloud computing. Integrating MariaDB Enterprise Edition with Oracle Linux, the Oracle VM Template is the fastest, easiest, and most reliable way to provision virtualized MariaDB instances, enabling users to meet the explosive demand for highly available services.
The Oracle VM Template enables rapid deployment and eliminates manual configuration efforts. It provides a pre-installed and pre-configured virtualized MariaDB 5.5 Enterprise Edition software image running on Oracle Linux and Oracle VM, certified for production use. The MariaDB software image has undergone extensive integration and quality assurance testing as part of the development process.
In addition to rapid provisioning, MariaDB users also benefit from the integrated high availability features of Oracle VM which are designed to enable organizations to meet stringent SLA (Service Level Agreement) demands through a combination of:
- Automatic recovery from failures, with Oracle VM automatically restarting failed instances on available servers in the server pool after outages of the physical server, VM or MariaDB database.
- Live Migration, enabling operations staff to move running instances of MariaDB to alternative hosts within a server pool during maintenance operations.
Instructions for the creation, deployment and use of the Oracle VM Template for MariaDB Enterprise Edition are available from:
- The Oracle VM Template for MariaDB Enterprise Edition whitepaper: http://www.mysql.com/why-mysql/white-papers/mysql_wp_oracle-vm-template-for-mee.php.
- The README file accompanying the download of the Template.
To download the Oracle VM Template for MariaDB Enterprise, go to http://edelivery.oracle.com/oraclevm and follow these instructions:
- Complete your registration information (Name, Company Name, Email Address and Country) and click on the download agreement.
- Select 'Oracle VM Templates' from the 'Select a Product Pack' pull-down menu and click 'Go'.
- Select MariaDB Enterprise from the list of Oracle VM Templates.
- Download and unzip the files and refer to the README for further instructions.
Using MariaDB with DRBD
- Configuring the DRBD Environment
- Configuring MariaDB for DRBD
- Optimizing Performance and Reliability
- Configuring MariaDB for DRBD
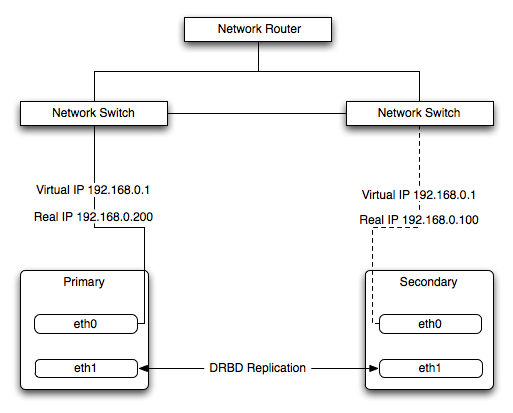
The Distributed Replicated Block Device (DRBD) is a Linux Kernel module that constitutes a distributed storage system. You can use DRBD to share block devices between Linux servers and, in turn, share file systems and data.
DRBD implements a block device which can be used for storage and which is replicated from a primary server to one or more secondary servers. The distributed block device is handled by the DRBD service. Writes to the DRBD block device are distributed among the servers. Each DRBD service writes the information from the DRBD block device to a local physical block device (hard disk).
On the primary data writes are written both to the underlying physical block device and distributed to the secondary DRBD services. On the secondary, the writes received through DRBD and written to the local physical block device. On both the primary and the secondary, reads from the DRBD block device are handled by the underlying physical block device. The information is shared between the primary DRBD server and the secondary DRBD server synchronously and at a block level, and this means that DRBD can be used in high-availability solutions where you need failover support.
Figure 14.3. DRBD Architecture Overview
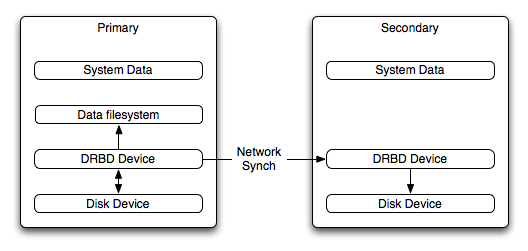
When used with MySQL, DRBD can be used to ensure availability in the event of a failure. MariaDB is configured to store information on the DRBD block device, with one server acting as the primary and a second machine available to operate as an immediate replacement in the event of a failure.
For automatic failover support, you can combine DRBD with the Linux Heartbeat project, which manages the interfaces on the two servers and automatically configures the secondary (passive) server to replace the primary (active) server in the event of a failure. You can also combine DRBD with MariaDB Replication to provide both failover and scalability within your MariaDB environment.
For information on how to configure DRBD and MySQL, including Heartbeat support, see , "Configuring the DRBD Environment".
For FAQs about using DRBD and MySQL, see "MySQL 5.6 FAQ: MySQL, DRBD, and Heartbeat".Note
Because DRBD is a Linux Kernel module, it is currently not supported on platforms other than Linux.
Configuring the DRBD Environment
- Setting Up Your Operating System for DRBD
- Installing and Configuring DRBD
- Setting Up a DRBD Primary Node
- Setting Up a DRBD Secondary Node
- Monitoring a DRBD Device
- Managing a DRBD Installation
- Additional DRBD Configuration Options
- Installing and Configuring DRBD
To set up DRBD, MySQL, and Heartbeat, you follow a number of steps that affect the operating system, DRBD and your MariaDB installation.
Before starting the installation process, be aware of the following information, terms and requirements on using DRBD:
- DRBD works through two (or more) servers, each called a node.
- Ensure that your DRBD nodes are as identically configured as possible, so that the secondary machine can act as a direct replacement for the primary machine in the event of system failure.
- The node that contains the primary data, has read/write access to the data, and in an HA environment is the currently active node is called the primary.
- The server to which the data is replicated is called the secondary.
- A collection of nodes that are sharing information is referred to as a DRBD cluster.
- For DRBD to operate, you must have a block device on which the information can be stored on each DRBD node. The lower-level block device can be a physical disk partition, a partition from a volume group or RAID device or any other block device.
Typically, you use a spare partition on which the physical data is stored. On the primary node, this disk holds the raw data that you want replicated. On the secondary nodes, the disk holds the data replicated to the secondary server by the DRBD service. Ideally, the size of the partition on the two DRBD servers should be identical, but this is not necessary as long as there is enough space to hold the data that you want distributed between the two servers.
- For the distribution of data to work, DRBD is used to create a logical block device that uses the lower level block device for the actual storage of information. To store information on the distributed device, a file system is created on the DRBD logical block device.
- When used with MySQL, once the file system has been created, you move the MariaDB data directory (including InnoDB data files and binary logs) to the new file system.
- When you set up the secondary DRBD server, you set up the physical block device and the DRBD logical block device that stores the data. The block device data is then copied from the primary to the secondary server.
The overview for the installation and configuration sequence is as follows:
- First, set up your operating system and environment. This includes setting the correct host name, updating the system and preparing the available packages and software required by DRBD, and configuring a physical block device to be used with the DRBD block device. See , "Setting Up Your Operating System for DRBD".
- Installing DRBD requires installing or compiling the DRBD source code and then configuring the DRBD service to set up the block devices to be shared. See , "Installing and Configuring DRBD".
- After configuring DRBD, alter the configuration and storage location of the MariaDB data, as explained in , "Configuring MariaDB for DRBD".
Optionally, configure high availability using the Linux Heartbeat service. See , "Using Linux HA Heartbeat", for more information.
Setting Up Your Operating System for DRBD
To set your Linux environment for using DRBD, follow these system configuration steps:
- Make sure that the primary and secondary DRBD servers have the correct host name, and that the host names are unique. You can verify this by using the uname command:
shell> uname -n drbd-one
If the host name is not set correctly, edit the appropriate file (usually
/etc/sysconfig/network,/etc/hostname, or/etc/conf.d/hostname) and set the name correctly. - Each DRBD node must have a unique IP address. Make sure that the IP address information is set correctly within the network configuration and that the host name and IP address has been set correctly within the
/etc/hostsfile. - Although you can rely on the DNS or NIS system for host resolving, in the event of a major network failure these services may not be available. If possible, add the IP address and host name of each DRBD node into the
/etc/hostsfile for each machine. This ensures that the node information can always be determined even if the DNS/NIS servers are unavailable. - As a general rule, the faster your network connection the better. Because the block device data is exchanged over the network, everything that is written to the local disk on the DRBD primary is also written to the network for distribution to the DRBD secondary.
For tips on configuring a faster network connection, see , "Optimizing Performance and Reliability".
- You devote a spare disk, or a partition on an existing disk, as the physical storage location for the DRBD data that is replicated.
If the disk is unpartitioned, partition the disk using fdisk, cfdisk or other partitioning solution. Do not create a file system on the new partition.
You must have a physical disk available for the storage of the replicated information on each DRBD node. Ensure that the physical partition on the DRBD secondary is at least as big as the partitions on the DRBD primary node. If possible, use identical sizes for the partitions on each node.
- If possible, upgrade your system to the latest available Linux kernel for your distribution. Once the kernel has been installed, you must reboot to make the kernel active. To use DRBD, you must also install the relevant kernel development and header files that are required for building kernel modules. Platform specification information for this is available later in this section.
Before you compile or install DRBD, make sure the following tools and files are in place:
- Kernel header files.
- Kernel source files.
- GCC Compiler.
glib 2library.- flex command.
Here are some operating system specific tips for setting up your installation:
- Tips for Red Hat (including CentOS and Fedora):
Use up2date or yum to update and install the latest kernel and kernel header files:
root-shell> up2date kernel-smp-devel kernel-smp
Reboot. If you are going to build DRBD from source, then update your system with the required development packages:
root-shell> up2date glib-devel openssl-devel libgcrypt-devel glib2-devel \
pkgconfig ncurses-devel rpm-build rpm-devel redhat-rpm-config gcc \
gcc-c++ bison flex gnutls-devel lm_sensors-devel net-snmp-devel \
python-devel bzip2-devel libselinux-devel perl-DBI
If you are going to use the pre-built DRBD RPMs:
root-shell> up2date gnutls lm_sensors net-snmp ncurses libgcrypt glib2 openssl glib
- Tips for Debian, Ubuntu, Kubuntu:
Use apt-get to install the kernel packages
root-shell> apt-get install linux-headers linux-image-server
If you are going to use the pre-built Debian packages for DRBD, you do not need any additional packages.
To build DRBD from source, use the following command to install the required components:
root-shell> apt-get install devscripts flex bison build-essential \
dpkg-dev kernel-package debconf-utils dpatch debhelper \
libnet1-dev e2fslibs-dev libglib2.0-dev automake1.9 \
libgnutls-dev libtool libltdl3 libltdl3-dev
- Tips for Gentoo:
Gentoo is a source based Linux distribution and therefore many of the source files and components that you need are either already installed or are installed automatically by emerge.
To install DRBD 0.8.x, you must unmask the
sys-cluster/drbdbuild by adding the following line to/etc/portage/package.keywords:sys-cluster/drbd ~x86 sys-cluster/drbd-kernel ~x86
To enable the DRBD kernel module, you must rebuild your kernel, although the method depends on the kernel version you are using. Determine your current kernel version using uname -a.
- For Linux kernels lower than 2.6.33, enable the userspace kernelspace linker to build and load the DRBD kernel driver. To enable the kernelspace linker, rebuild the kernel with this option. The best way to do this is to use genkernel with the
--menuconfigoption to select the option and then rebuild the kernel. For example, at the command line asroot:
root-shell> genkernel --menuconfig all
Then through the menu options, select Device Drivers, Connector - unified userspace <-> kernelspace linker and finally press 'y' or 'space' to select the Connector - unified userspace <-> kernelspace linker option. After you exit the menu configuration, the kernel is rebuilt and installed. If this is a new kernel, update your bootloader to point to the kernel if the kernel version is different than your current kernel version. Now reboot to enable the new kernel.
- For Linux Kernel 2.6.33 and later, DRBD is included within the kernel sources. To enable the DRBD module you must rebuild your kernel. The best way to do this is to use genkernel with the
--menuconfigoption to select the option and then rebuild the kernel. For example, at the command line asroot:
root-shell> genkernel --menuconfig all
Then through the menu options, select Device Drivers, Block Devices, and then DRBD Distributed Replicated Block Device support. After you exit the menu configuration, the kernel is rebuilt and installed. If this is a new kernel, update your bootloader to point to the kernel if the kernel version is different than your current kernel version. Now reboot to enable the new kernel.
- For Linux kernels lower than 2.6.33, enable the userspace kernelspace linker to build and load the DRBD kernel driver. To enable the kernelspace linker, rebuild the kernel with this option. The best way to do this is to use genkernel with the
Installing and Configuring DRBD
To install DRBD, you can choose either the pre-built binary installation packages, or you can use the source packages and build from source. To build from source, you must have installed the source and development packages.
To install using a binary distribution, ensure that the kernel version number of the binary package matches your currently active kernel. You can use uname to find out this information:
shell> uname -r
2.6.20-gentoo-r6
Once DRBD has been built and installed, edit the /etc/drbd.conf file and then run a number of commands to build the block device and set up the replication.
Although the steps below are split into those for the primary node and the secondary node, the configuration files for all nodes should be identical, and many of the same steps have to be repeated on each node to enable the DRBD block device.
Building from source:
To download and install from the source code:
- Download the source code.
- Unpack the package:
shell> tar zxf
drbd-8.3.0.tar.gz - Change to the extracted directory, and then run make to build the DRBD driver:
shell> cd drbd-8.3.0
shell> make
- Install the kernel driver and commands:
shell> make install
Binary Installation:
- SUSE Linux Enterprise Server (SLES)
For SUSE, use yast:
shell> yast -i drbd
Alternatively:
shell> rug install drbd
- Debian
Use apt-get to install the modules. You do not need to install any other components.
shell> apt-get install drbd8-utils drbd8-module
- Debian 3.1 and 4.0
You must install the
module-assistantto build the DRBD kernel module, in addition to the DRBD components.shell> apt-get install drbd0.7-utils drbd0.7-module-source \ build-essential module-assistant shell> module-assistant auto-install drbd0.7
- CentOS
DRBD can be installed using
yum:shell> yum install drbd kmod-drbd
- Ubuntu
Enable the universe component for your preferred Ubuntu mirror in
/etc/apt/sources.list, then issue these commands:shell> apt-get update shell> apt-get install drbd8-utils drbd8-module-source \ build-essential module-assistant shell> module-assistant auto-install drbd8
- Gentoo
You can now emerge DRBD 0.8.x into your Gentoo installation:
root-shell> emerge drbd
Once
drbdis downloaded and installed, decompress and copy the default configuration file from/usr/share/doc/drbd-8.0.7/drbd.conf.bz2into/etc/drbd.conf.
Setting Up a DRBD Primary Node
To set up a DRBD primary node, configure the DRBD service, create the first DRBD block device, and then create a file system on the device so that you can store files and data.
The DRBD configuration file /etc/drbd.conf defines a number of parameters for your DRBD configuration, including the frequency of updates and block sizes, security information and the definition of the DRBD devices that you want to create.
The key elements to configure are the on sections which specify the configuration of each node.
To follow the configuration, the sequence below shows only the changes from the default drbd.conf file. Configurations within the file can be both global or tied to specific resource.
- Set the synchronization rate between the two nodes. This is the rate at which devices are synchronized in the background after a disk failure, device replacement or during the initial setup. Keep this in check compared to the speed of your network connection. Gigabit Ethernet can support up to 125 MB/second, 100Mbps Ethernet slightly less than a tenth of that (12MBps). If you are using a shared network connection, rather than a dedicated, then gauge accordingly.
To set the synchronization rate, edit the
ratesetting within thesyncerblock:syncer { rate 10M; }You may additionally want to set the
al-extentsparameter. The default for this parameter is 257.For more detailed information on synchronization, the effects of the synchronization rate and the effects on network performance, see , "Optimizing the Synchronization Rate".
- Set up some basic authentication. DRBD supports a simple password hash exchange mechanism. This helps to ensure that only those hosts with the same shared secret are able to join the DRBD node group.
cram-hmac-alg "sha1"; shared-secret '
shared-string'; - Now you must configure the host information. You must have the node information for the primary and secondary nodes in the
drbd.conffile on each host. Configure the following information for each node:
device: The path of the logical block device that is created by DRBD.disk: The block device that stores the data.address: The IP address and port number of the host that holds this DRBD device.meta-disk: The location where the metadata about the DRBD device is stored. If you set this tointernal, DRBD uses the physical block device to store the information, by recording the metadata within the last sections of the disk. The exact size depends on the size of the logical block device you have created, but it may involve up to 128MB.
A sample configuration for our primary server might look like this:
on drbd-one {
device /dev/drbd0;
disk /dev/hdd1;
address 192.168.0.240:8888;
meta-disk internal;
}
The
onconfiguration block should be repeated for the secondary node (and any further) nodes:on drbd-two { device /dev/drbd0; disk /dev/hdd1; address 192.168.0.241:8888; meta-disk internal; }The IP address of each
onblock must match the IP address of the corresponding host. Do not set this value to the IP address of the corresponding primary or secondary in each case. - Before starting the primary node, create the metadata for the devices:
root-shell> drbdadm create-md all
- You are now ready to start DRBD:
root-shell> /etc/init.d/drbd start
DRBD should now start and initialize, creating the DRBD devices that you have configured.
- DRBD creates a standard block device - to make it usable, you must create a file system on the block device just as you would with any standard disk partition. Before you can create the file system, you must mark the new device as the primary device (that is, where the data is written and stored), and initialize the device. Because this is a destructive operation, you must specify the command line option to overwrite the raw data:
root-shell> drbdadm -- --overwrite-data-of-peer primary all
If you are using a version of DRBD 0.7.x or earlier, then use a different command-line option:
root-shell> drbdadm -- --do-what-I-say primary all
Now create a file system using your chosen file system type:
root-shell> mkfs.ext3 /dev/drbd0
- You can now mount the file system and if necessary copy files to the mount point:
root-shell> mkdir /mnt/drbd root-shell> mount /dev/drbd0 /mnt/drbd root-shell> echo 'DRBD Device' >/mnt/drbd/samplefile
Your primary node is now ready to use. Next, configure your secondary node or nodes.
Setting Up a DRBD Secondary Node
The configuration process for setting up a secondary node is the same as for the primary node, except that you do not have to create the file system on the secondary node device, as this information is automatically transferred from the primary node.
To set up a secondary node:
- Copy the
/etc/drbd.conffile from your primary node to your secondary node. It should already contain all the information and configuration that you need, since you had to specify the secondary node IP address and other information for the primary node configuration. - Create the DRBD metadata on the underlying disk device:
root-shell> drbdadm create-md all
- Start DRBD:
root-shell> /etc/init.d/drbd start
Once DRBD has started, it starts to copy the data from the primary node to the secondary node. Even with an empty file system this takes some time, since DRBD is copying the block information from a block device, not simply copying the file system data.
You can monitor the progress of the copy between the primary and secondary nodes by viewing the output of /proc/drbd:
root-shell> cat /proc/drbd version: 8.0.4 (api:86/proto:86)
SVN Revision: 2947 build by root@drbd-one, 2007-07-30 16:43:05
 0: cs:SyncSource st:Primary/Secondary ds:UpToDate/Inconsistent C r---
 ns:252284 nr:0 dw:0 dr:257280 al:0 bm:15 lo:0 pe:7 ua:157 ap:0
 [==>.................] sync'ed: 12.3% (1845088/2097152)K
 finish: 0:06:06 speed: 4,972 (4,580) K/sec
 resync: used:1/31 hits:15901 misses:16 starving:0 dirty:0 changed:16
 act_log: used:0/257 hits:0 misses:0 starving:0 dirty:0 changed:0
You can monitor the synchronization process by using the watch command to run the command at specific intervals:
root-shell> watch -n 10 'cat /proc/drbd'
Monitoring a DRBD Device
Once the primary and secondary machines are configured and synchronized, you can get the status information about your DRBD device by viewing the output from /proc/drbd:
root-shell> cat /proc/drbd version: 8.0.4 (api:86/proto:86)
SVN Revision: 2947 build by root@drbd-one, 2007-07-30 16:43:05
 0: cs:Connected st:Primary/Secondary ds:UpToDate/UpToDate C r---
 ns:2175704 nr:0 dw:99192 dr:2076641 al:33 bm:128 lo:0 pe:0 ua:0 ap:0
 resync: used:0/31 hits:134841 misses:135 starving:0 dirty:0 changed:135
 act_log: used:0/257 hits:24765 misses:33 starving:0 dirty:0 changed:33
The first line provides the version/revision and build information.
The second line starts the detailed status information for an individual resource. The individual field headings are as follows:
- cs: connection state
- st: node state (local/remote)
- ld: local data consistency
- ds: data consistency
- ns: network send
- nr: network receive
- dw: disk write
- dr: disk read
- pe: pending (waiting for ack)
- ua: unack'd (still need to send ack)
- al: access log write count
In the previous example, the information shown indicates that the nodes are connected, the local node is the primary (because it is listed first), and the local and remote data is up to date with each other. The remainder of the information is statistical data about the device, and the data exchanged that kept the information up to date.
You can also get the status information for DRBD by using the startup script with the status option:
root-shell> /etc/init.d/drbd status
 * status: started
 * drbd driver loaded OK; device status: ... [ ok ]
version: 8.3.0 (api:88/proto:86-89)
GIT-hash: 9ba8b93e24d842f0dd3fb1f9b90e8348ddb95829 build by root@gentoo1.vmbear, 2009-03-14 23:00:06
 0: cs:Connected ro:Secondary/Secondary ds:UpToDate/UpToDate C r---
 ns:0 nr:0 dw:0 dr:8385604 al:0 bm:0 lo:0 pe:0 ua:0 ap:0 ep:1 wo:b oos:0
The information and statistics are the same.
Managing a DRBD Installation
For administration, the main command is drbdadm. There are a number of commands supported by this tool that control the connectivity and status of the DRBD devices.Note
For convenience, a bash completion script provides tab completion for options to drbdadm. The file drbdadm.bash_completion can be found within the standard DRBD source package within the scripts directory. To enable, copy the file to /etc/bash_completion.d/drbdadm. You can load it manually by using:
shell> source /etc/bash_completion.d/drbdadm
The most common commands are those to set the primary/secondary status of the local device. You can manually set this information for a number of reasons, including to check the physical status of the secondary device (since you cannot mount a DRBD device in primary mode), or when you are temporarily moving the responsibility of keeping the data in check to a different machine (for example, during an upgrade or physical move of the normal primary node). You can set state of all local device to be the primary using this command:
root-shell> drbdadm primary all
Or switch the local device to be the secondary using:
root-shell> drbdadm secondary all
To change only a single DRBD resource, specify the resource name instead of all.
You can temporarily disconnect the DRBD nodes:
root-shell> drbdadm disconnect all
Reconnect them using connect:
root-shell> drbdadm connect all
For other commands and help with drbdadm see the DRBD documentation.
Additional DRBD Configuration Options
Additional options you can configure:
protocol: Specifies the level of consistency to be used when information is written to the block device. The option is similar in principle to theinnodb_flush_log_at_trx_commitoption within MySQL. Three levels are supported:
A: Data is considered written when the information reaches the TCP send buffer and the local physical disk. There is no guarantee that the data has been written to the remote server or the remote physical disk.B: Data is considered written when the data has reached the local disk and the remote node's network buffer. The data has reached the remote server, but there is no guarantee it has reached the remote server's physical disk.C: Data is considered written when the data has reached the local disk and the remote node's physical disk.
The preferred and recommended protocol is C, as it is the only protocol which ensures the consistency of the local and remote physical storage.
size: To use less than the entire partition space with your DRBD block device, specify the size of the DRBD device to be created. The size specification can include a quantifier. For example, to set the maximum size of the DRBD partition to 1GB, you would use:
size 1G;
With the configuration file suitably configured and ready to use, now populate the lower-level device with the metadata information, and then start the DRBD service.
Configuring MariaDB for DRBD
Once you have configured DRBD and have an active DRBD device and file system, you can configure MariaDB to use the chosen device to store the MariaDB data.
When performing a new installation of MySQL, you can either select to install MariaDB entirely onto the DRBD device, or just configure the data directory to be located on the new file system.
In either case, the files and installation must take place on the primary node, because that is the only DRBD node on which you can mount the DRBD device file system as read/write.
Store the following files and information on your DRBD device:
- MySQL data files, including the binary log, and InnoDB data files.
- MySQL configuration file (
my.cnf).
To set up MariaDB to use your new DRBD device and file system:
- If you are migrating an existing MariaDB installation, stop MySQL:
shell> mysqladmin shutdown
- Copy the
my.cnfonto the DRBD device. If you are not already using a configuration file, copy one of the sample configuration files from the MariaDB distribution.
root-shell> mkdir /mnt/drbd/mysql root-shell> cp /etc/my.cnf /mnt/drbd/mysql
- Copy your MariaDB data directory to the DRBD device and mounted file system.
root-shell> cp -R /var/lib/mysql /drbd/mysql/data
- Edit the configuration file to reflect the change of directory by setting the value of the
datadiroption. If you have not already enabled the binary log, also set the value of thelog-binoption.
datadir = /drbd/mysql/data
 log-bin = mysql-bin
- Create a symbolic link from
/etc/my.cnfto the new configuration file on the DRBD device file system.
root-shell> ln -s /drbd/mysql/my.cnf /etc/my.cnf
- Now start MariaDB and check that the data that you copied to the DRBD device file system is present.
root-shell> /etc/init.d/mysql start
Your MariaDB data should now be located on the file system running on your DRBD device. The data is physically stored on the underlying device that you configured for the DRBD device. Meanwhile, the content of your MariaDB databases is copied to the secondary DRBD node.
Note that you cannot access the information on your secondary node, as a DRBD device working in secondary mode is not available for use.
Optimizing Performance and Reliability
Because of the nature of the DRBD system, the critical requirements are for a very fast exchange of the information between the two hosts. To ensure that your DRBD setup is available to switch over in the event of a failure as quickly as possible, you must transfer the information between the two hosts using the fastest method available.
Typically, a dedicated network circuit should be used for exchanging DRBD data between the two hosts. Use a separate, additional, network interface for your standard network connection. For an example of this layout, see Figure 14.4, "DRBD Architecture Using Separate Network Interfaces".
Figure 14.4. DRBD Architecture Using Separate Network Interfaces
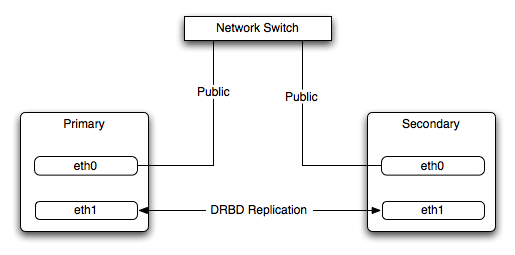
The dedicated DRBD network interfaces should be configured to use a nonrouted TCP/IP network configuration. For example, you might set the primary to use 192.168.0.1 and the secondary 192.168.0.2. These networks and IP addresses should not be part of the normal network subnet.Note
The preferred setup, whenever possible, is to use a direct cable connection (using a crossover cable with Ethernet, for example) between the two machines. This eliminates the risk of loss of connectivity due to switch failures.
Using Bonded Ethernet Network Interfaces
For a set-up where there is a high-throughput of information being written, consider using bonded network interfaces. This is where you combine the connectivity of more than one network port, increasing the throughput linearly according to the number of bonded connections.
Bonding also provides an additional benefit in that with multiple network interfaces effectively supporting the same communications channel, a fault within a single network interface in a bonded group does not stop communication. For example, imagine you have a bonded setup with four network interfaces providing a single interface channel between two DRBD servers. If one network interface fails, communication can continue on the other three without interruption, although at a lower speed.
To enable bonded connections you must enable bonding within the kernel. Then configure the module to specify the bonded devices and then configure each new bonded device just as you would a standard network device:
- To configure the bonded devices, edit the
/etc/modprobe.conffile (Red Hat) or add a file to the/etc/modprobe.ddirectory. In each case, you define the parameters for the kernel module. First, specify each bonding device:
alias bond0 bonding
You can then configure additional parameters for the kernel module. Typical parameters are the
modeoption and themiimonoption.The
modeoption specifies how the network interfaces are used. The default setting is 0, which means that each network interface is used in a round-robin fashion (this supports aggregation and fault tolerance). Using setting 1 sets the bonding mode to active-backup. This means that only one network interface is used as a time, but that the link automatically fails over to a new interface if the primary interface fails. This settings only supports fault-tolerance.The
miimonoption enables the MII link monitoring. A positive value greater than zero indicates the monitoring frequency in milliseconds for checking each slave network interface that is configured as part of the bonded interface. A typical value is 100.You set th options within the module parameter file, and you must set the options for each bonded device individually:
options bond0 miimon=100 mode=1
- Reboot your server to enable the bonded devices.
- Configure the network device parameters. This is a two-part process: set up the bonded device configuration, then configure the original network interfaces as 'slaves' of the new bonded interface.
- For Red Hat Linux:
Edit the configuration file for the bonded device. For device
bond0, this would be/etc/sysconfig/network-scripts/ifcfg-bond0:DEVICE=bond0 BOOTPROTO=none ONBOOT=yes GATEWAY=192.168.0.254 NETWORK=192.168.0.0 NETMASK=255.255.255.0 IPADDR=192.168.0.1 USERCTL=no
Then for each network interface to be part of the bonded device, configure the interface as a slave to the 'master' bond. For example, the configuration of
eth0in/etc/sysconfig/network-scripts/ifcfg-eth0might look like this::DEVICE=eth0 BOOTPROTO=none HWADDR=00:11:22:33:44:55 ONBOOT=yes TYPE=Ethernet MASTER=bond0 SLAVE=yes
- For Debian Linux:
Edit the
/etc/iftabfile and configure the logical name and MAC address for each devices. For example:eth0 mac 00:11:22:33:44:55
Now set the configuration of the devices in
/etc/network/interfaces:auto bond0 iface bond0 inet static address 192.168.0.1 netmask 255.255.255.0 network 192.168.0.0 gateway 192.168.0.254 up /sbin/ifenslave bond0 eth0 up /sbin/ifenslave bond0 eth1
- For Gentoo:
Use emerge to add the
net-misc/ifenslavepackage to your system.Edit the
/etc/conf.d/netfile and specify the network interface slaves in a bond, the dependencies and then the configuration for the bond itself. A sample configuration might look like this:slaves_bond0='eth0 eth1 eth2' config_bond0=( '192.168.0.1 netmask 255.255.255.0' ) depend_bond0() { need net.eth0 net.eth1 net.eth2 }Then make sure that you add the new network interface to list of interfaces configured during boot:
root-shell> rc-update add default net.bond0
- For Red Hat Linux:
Once the bonded devices are configured, reboot your systems.
You can monitor the status of a bonded connection using the /proc file system:
root-shell> cat /proc/net/bonding/bond0
Bonding Mode: fault-tolerance (active-backup)
Primary Slave: None Currently Active Slave: eth1
MII Status: up MII Polling Interval (ms): 100
Up Delay (ms): 200
Down Delay (ms): 200
Slave Interface: eth1
MII Status: up Link Failure Count: 0
Permanent HW addr: 00:11:22:33:44:55
Slave Interface: eth2
MII Status: up Link Failure Count: 0
Permanent HW addr: 00:11:22:33:44:56
Optimizing the Synchronization Rate
The syncer rate configuration parameter should be configured with care as the synchronization rate can have a significant effect on the performance of the DRBD setup in the event of a node or disk failure where the information is being synchronized from the Primary to the Secondary node.
In DRBD, there are two distinct ways of data being transferred between peer nodes:
- Replication refers to the transfer of modified blocks being transferred from the primary to the secondary node. This happens automatically when the block is modified on the primary node, and the replication process uses whatever bandwidth is available over the replication link. The replication process cannot be throttled, because you want to transfer of the block information to happen as quickly as possible during normal operation.
- Synchronization refers to the process of bringing peers back in sync after some sort of outage, due to manual intervention, node failure, disk swap, or the initial setup. Synchronization is limited to the
syncer rateconfigured for the DRBD device.
Both replication and synchronization can take place at the same time. For example, the block devices can be synchronized while they are actively being used by the primary node. Any I/O that updates on the primary node automatically triggers replication of the modified block. In the event of a failure within an HA environment, it is highly likely that synchronization and replication will take place at the same time.
Unfortunately, if the synchronization rate is set too high, then the synchronization process uses up all the available network bandwidth between the primary and secondary nodes. In turn, the bandwidth available for replication of changed blocks is zero, which stalls replication and blocks I/O, and ultimately the application fails or degrades.
To avoid enabling the syncer rate to consume the available network bandwidth and prevent the replication of changed blocks, set the syncer rate to less than the maximum network bandwidth.
Avoid setting the sync rate to more than 30% of the maximum bandwidth available to your device and network bandwidth. For example, if your network bandwidth is based on Gigabit ethernet, you should achieve 110MB/s. Assuming your disk interface is capable of handling data at 110MB/s or more, then the sync rate should be configured as 33M (33MB/s). If your disk system works at a rate lower than your network interface, use 30% of your disk interface speed.
Depending on the application, you might limit the synchronization rate. For example, on a busy server you could configure a significantly slower synchronization rate to ensure the replication rate is not affected.
The al-extents parameter controls the number of 4MB blocks of the underlying disk that can be written to at the same time. Increasing this parameter lowers the frequency of the metadata transactions required to log the changes to the DRBD device, which in turn lowers the number of interruptions in your I/O stream when synchronizing changes. This can lower the latency of changes to the DRBD device. However, if a crash occurs on your primary, then all of the blocks in the activity log (that is, the number of al-extents blocks) must be completely resynchronized before replication can continue.
Using Linux HA Heartbeat
- Heartbeat Configuration
- Using Heartbeat with MariaDB and DRBD
- Using Heartbeat with DRBD and dopd
- Dealing with System Level Errors in a Heartbeat Cluster
- Using Heartbeat with MariaDB and DRBD
The Heartbeat program provides a basis for verifying the availability of resources on one or more systems within a cluster. In this context a resource includes MySQL, the file systems on which the MariaDB data is being stored and, if you are using DRBD, the DRBD device being used for the file system. Heartbeat also manages a virtual IP address; use this virtual IP address for all communication to the MariaDB instance.
A cluster within the context of Heartbeat is defined as two computers notionally providing the same service. By definition, each computer in the cluster is physically capable of providing the same services as all the others in the cluster. However, because the cluster is designed for high-availability, only one of the servers is actively providing the service at any one time. Each additional server within the cluster is a "hot-spare" that can be brought into service in the event of a failure of the master, its next connectivity or the connectivity of the network in general.
The basics of Heartbeat are very simple. Within the Heartbeat cluster (see Figure 14.5, "Heartbeat Architecture", each machine sends a 'heartbeat' signal to the other hosts in the cluster. The other cluster nodes monitor this heartbeat. The heartbeat can be transmitted over many different systems, including shared network devices, dedicated network interfaces and serial connections. Failure to get a heartbeat from a node is treated as failure of the node. Although we do not know the reason for the failure (it could be an OS failure, a hardware failure in the server, or a failure in the network switch), it is safe to assume that if no heartbeat is produced there is a fault.
Figure 14.5. Heartbeat Architecture
In addition to checking the heartbeat from the server, the system can also check the connectivity (using ping) to another host on the network, such as the network router. This enables Heartbeat to detect a failure of communication between a server and the router (and therefore failure of the server, since it is no longer capable of providing the necessary service), even if the heartbeat between the servers in the clusters is working fine.
In the event of a failure, the resources on the failed host are disabled, and the resources on one of the replacement hosts is enabled instead. In addition, the Virtual IP address for the cluster is redirected to the new host in place of the failed device.
When used with MariaDB and DRBD, the MariaDB data is replicated from the master to the slave using the DRBD device, but MariaDB is only running on the master. When the master fails, the slave switches the DRBD devices to be primary, the file systems on those devices are mounted, and MariaDB is started. The original master (if still available) has its resources disabled, which means shutting down MariaDB and unmounting the file systems and switching the DRBD device to secondary.
Heartbeat Configuration
Heartbeat configuration requires three files located in /etc/ha.d. The ha.cf contains the main heartbeat configuration, including the list of the nodes and times for identifying failures. haresources contains the list of resources to be managed within the cluster. The authkeys file contains the security information for the cluster.
The contents of these files should be identical on each host within the Heartbeat cluster. It is important that you keep these files in sync across all the hosts. Any changes in the information on one host should be copied to the all the others.
For these examples n example of the ha.cf file is shown below:
logfacility local0
keepalive 500ms deadtime 10
warntime 5
initdead 30
mcast bond0 225.0.0.1 694 2 0
mcast bond1 225.0.0.2 694 1 0
auto_failback off node drbd1
node drbd2
The individual lines in the file can be identified as follows:
logfacility: Sets the logging, in this case setting the logging to use syslog.keepalive: Defines how frequently the heartbeat signal is sent to the other hosts.deadtime- the delay in seconds before other hosts in the cluster are considered 'dead' (failed).warntime: The delay in seconds before a warning is written to the log that a node cannot be contacted.initdead: The period in seconds to wait during system startup before the other host is considered to be down.mcast: Defines a method for sending a heartbeat signal. In the above example, a multicast network address is being used over a bonded network device. If you have multiple clusters then the multicast address for each cluster should be unique on your network. Other choices for the heartbeat exchange exist, including a serial connection.
If you are using multiple network interfaces (for example, one interface for your server connectivity and a secondary or bonded interface for your DRBD data exchange), use both interfaces for your heartbeat connection. This decreases the chance of a transient failure causing a invalid failure event.
auto_failback: Sets whether the original (preferred) server should be enabled again if it becomes available. Switching this toonmay cause problems if the preferred went offline and then comes back on line again. If the DRBD device has not been synced properly, or if the problem with the original server happens again you may end up with two different datasets on the two servers, or with a continually changing environment where the two servers flip-flop as the preferred server reboots and then starts again.node: Sets the nodes within the Heartbeat cluster group. There should be onenodefor each server.
An optional additional set of information provides the configuration for a ping test that checks the connectivity to another host. Use this to ensure that you have connectivity on the public interface for your servers, so the ping test should be to a reliable host such as a router or switch. The additional lines specify the destination machine for the ping, which should be specified as an IP address, rather than a host name; the command to run when a failure occurs, the authority for the failure and the timeout before an nonresponse triggers a failure. A sample configure is shown below:
ping 10.0.0.1
respawn hacluster /usr/lib64/heartbeat/ipfail apiauth ipfail gid=haclient uid=hacluster deadping 5
In the above example, the ipfail command, which is part of the Heartbeat solution, is called on a failure and 'fakes' a fault on the currently active server. Configure the user and group ID under which the command is executed (using the apiauth). The failure is triggered after 5 seconds.Note
The deadping value must be less than the deadtime value.
The authkeys file holds the authorization information for the Heartbeat cluster. The authorization relies on a single unique 'key' that is used to verify the two machines in the Heartbeat cluster. The file is used only to confirm that the two machines are in the same cluster and is used to ensure that the multiple clusters can co-exist within the same network.
Using Heartbeat with MariaDB and DRBD
To use Heartbeat in combination with MySQL, use DRBD (see , "Using MariaDB with DRBD") or another solution that enables sharing the MariaDB database files in event of a system failure. In these examples, DRBD is used as the data sharing solution.
Heartbeat manages the configuration of different resources to manage the switching between two servers in the event of a failure. The resource configuration defines the individual services that should be brought up (or taken down) in the event of a failure.
The haresources file within /etc/ha.d defines the resources that should be managed, and the individual resource mentioned in this file in turn relates to scripts located within /etc/ha.d/resource.d. The resource definition is defined all on one line:
drbd1 drbddisk Filesystem::/dev/drbd0::/drbd::ext3 mysql 10.0.0.100
The line is notionally split by whitespace. The first entry (drbd1) is the name of the preferred host; that is the server that is normally responsible for handling the service. The last field is virtual IP address or name that should be used to share the service. This is the IP address that should be used to connect to the MariaDB server. It is automatically allocated to the server that is active when Heartbeat starts.
The remaining fields between these two fields define the resources that should be managed. Each Field should contain the name of the resource (and each name should refer to a script within /etc/ha.d/resource.d). In the event of a failure, these resources are started on the backup server by calling the corresponding script (with a single argument, start), in order from left to right. If there are additional arguments to the script, you can use a double colon to separate each additional argument.
In the above example, we manage the following resources:
drbddisk: The DRBD resource script, this switches the DRBD disk on the secondary host into primary mode, making the device read/write.Filesystem: Manages the Filesystem resource. In this case we have supplied additional arguments to specify the DRBD device, mount point and file system type. When executed this should mount the specified file system.MariaDB: Manages the MariaDB instances and starts the MariaDB server. Copy themysql.resourcefile from thesupport-filesdirectory from any MariaDB release into the/etc/ha.d/resources.ddirectory.
If this file is not available in your distribution, you can use the following as the contents of the
/etc/ha.d/resource.d/mysql.resourcefile:#!/bin/bash # # This script is intended to be used as resource script by heartbeat # # Mar 2006 by Monty Taylor # ### . /etc/ha.d/shellfuncs case '$1' in start) res=`/etc/init.d/mysql start` ret=$? ha_log $res exit $ret ;; stop) res=`/etc/init.d/mysql stop` ret=$? ha_log $res exit $ret ;; status) if [[ `ps -ef | grep '[m]ysqld'` > 1 ]] ; then echo 'running' else echo 'stopped' fi ;; *) echo 'Usage: mysql {start|stop|status}' exit 1 ;; esac exit 0
To be notified of the failure by email, add another line to the haresources file with the address for warnings and the warning text:
MailTo::youremail@address.com::DRBDFailure
With the Heartbeat configuration in place, copy the haresources, authkeys and ha.cf files from your primary and secondary servers to make sure that the configuration is identical. Then start the Heartbeat service, either by calling /etc/init.d/heartbeat start or by rebooting both primary and secondary servers.
You can test the configuration by running a manual failover, connect to the primary node and run:
root-shell> /usr/lib64/heartbeat/hb_standby
This causes the current node to relinquish its resources cleanly to the other node.
Using Heartbeat with DRBD and dopd
As a further extension to using DRBD and Heartbeat together, you can enable dopd. The dopd daemon handles the situation where a DRBD node is out of date compared to the master and prevents the slave from being promoted to master in the event of a failure. This stops a situation where you have two machines that have been masters ending up different data on the underlying device.
For example, imagine that you have a two server DRBD setup, master and slave. If the DRBD connectivity between master and slave fails, then the slave is out of the sync with the master. If Heartbeat identifies a connectivity issue for master and then switches over to the slave, the slave DRBD device is promoted to the primary device, even though the data on the slave and the master is not in synchronization.
In this situation, with dopd enabled, the connectivity failure between the master and slave would be identified and the metadata on the slave would be set to Outdated. Heartbeat refuses to switch over to the slave even if the master failed. In a dual-host solution this would effectively render the cluster out of action, as there is no additional fail over server. In an HA cluster with three or more servers, control would be passed to the slave that has an up to date version of the DRBD device data.
To enable dopd, modify the Heartbeat configuration and specify dopd as part of the commands executed during the monitoring process. Add the following lines to your ha.cf file:
respawn hacluster /usr/lib/heartbeat/dopd apiauth dopd gid=haclient uid=hacluster
Make sure you make the same modification on both your primary and secondary nodes.
Reload the Heartbeat configuration:
root-shell> /etc/init.d/heartbeat reload
Modify your DRBD configuration by configuration the outdate-peer option. Add the configuration line into the common section of /etc/drbd.conf on both hosts. An example of the full block is shown below:
common {
 handlers {
 outdate-peer '/usr/lib/heartbeat/drbd-peer-outdater';
 }
}
Finally, set the fencing option on your DRBD configured resources:
resource my-resource {
 disk {
 fencing resource-only;
 }
}
Now reload your DRBD configuration:
root-shell> drbdadmin adjust all
You can test the system by unplugging your DRBD link and monitoring the output from /proc/drbd.
Dealing with System Level Errors in a Heartbeat Cluster
Because a kernel panic or oops may indicate potential problem with your server, configure your server to remove itself from the cluster in the event of a problem. Typically on a kernel panic, your system automatically triggers a hard reboot. For a kernel oops, a reboot may not happen automatically, but the issue that caused that oops may still lead to potential problems.
You can force a reboot by setting the kernel.panic and kernel.panic_on_oops parameters of the kernel control file /etc/sysctl.conf. For example:
 kernel.panic_on_oops = 1
 kernel.panic = 1
You can also set these parameters during runtime by using the sysctl command. You can either specify the parameters on the command line:
shell> sysctl -w kernel.panic=1
Or you can edit your sysctl.conf file and then reload the configuration information:
shell> sysctl -p
Setting both these parameters to a positive value (representing the number of seconds to wait before rebooting), causes the system to reboot. Your second heartbeat node should then detect that the server is down and then switch over to the failover host.
Using MariaDB within an Amazon EC2 Instance
The Amazon Elastic Compute Cloud (EC2) service provides virtual servers that you can build and deploy to run a variety of different applications and services, including MySQL. The EC2 service is based around the Xen framework, supporting x86, Linux based, platforms with individual instances of a virtual machine referred to as an Amazon Machine Image (AMI). You have complete (root) access to the AMI instance that you create, enabling you to configure and install your AMI in any way you choose.
To use EC2, you create an AMI based on the configuration and applications that you intend to use, and upload the AMI to the Amazon Simple Storage Service (S3). From the S3 resource, you can deploy one or more copies of the AMI to run as an instance within the EC2 environment. The EC2 environment provides management and control of the instance and contextual information about the instance while it is running.
Because you can create and control the AMI, the configuration, and the applications, you can deploy and create any environment you choose. This includes a basic MariaDB server in addition to more extensive replication, HA and scalability scenarios that enable you to take advantage of the EC2 environment, and the ability to deploy additional instances as the demand for your MariaDB services and applications grow.
To aid the deployment and distribution of work, three different Amazon EC2 instances are available, small (identified as m1.small), large (m1.large) and extra large (m1.xlarge). The different types provide different levels of computing power measured in EC2 computer units (ECU). A summary of the different instance configurations is shown here.
| Small | Large | Extra Large | |
|---|---|---|---|
| Platform | 32-bit | 64-bit | 64-bit |
| CPU cores | 1 | 2 | 4 |
| ECUs | 1 | 4 | 8 |
| RAM | 1.7GB | 7.5GB | 15GB |
| Storage | 150GB | 840GB | 1680GB |
| I/O Performance | Medium | High | High |
The typical model for deploying and using MariaDB within the EC2 environment is to create a basic AMI that you can use to hold your database data and application. Once the basic environment for your database and application has been created you can then choose to deploy the AMI to a suitable instance. Here the flexibility of having an AMI that can be re-deployed from the small to the large or extra large EC2 instance makes it easy to upgrade the hardware environment without rebuilding your application or database stack.
To get started with MariaDB on EC2, including information on how to set up and install MariaDB within an EC2 installation and how to port and migrate your data to the running instance, see , "Setting Up MariaDB on an EC2 AMI".
For tips and advice on how to create a scalable EC2 environment using MySQL, including guides on setting up replication, see , "Deploying a MariaDB Database Using EC2".
Setting Up MariaDB on an EC2 AMI
There are many different ways of setting up an EC2 AMI with MySQL, including using any of the pre-configured AMIs supplied by Amazon.
The default Getting Started AMI provided by Amazon uses Fedora Core 4, and you can install MariaDB by using yum:
shell> yum install mysql
This installs both the MariaDB server and the Perl DBD::mysql driver for the Perl DBI API.
Alternatively, you can use one of the AMIs that include MariaDB within the standard installation.
Finally, you can also install a standard version of MariaDB downloaded from the MariaDB Web site. The installation process and instructions are identical to any other installation of MariaDB on Linux. See , Installing and Upgrading MySQL.
The standard configuration for MariaDB places the data files in the default location, /var/lib/mysql. The default data directory on an EC2 instance is /mnt (although on the large and extra large instance you can alter this configuration). You must edit /etc/my.cnf to set the datadir option to point to the larger storage area.Important
The first time you use the main storage location within an EC2 instance it needs to be initialized. The initialization process starts automatically the first time you write to the device. You can start using the device right away, but the write performance of the new device is significantly lower on the initial writes until the initialization process has finished.
To avoid this problem when setting up a new instance, you should start the initialization process before populating your MariaDB database. One way to do this is to use dd to write to the file system:
root-shell> dd if=/dev/zero of=initialize bs=1024M count=50
The preceding creates a 50GB on the file system and starts the initialization process. Delete the file once the process has finished.
The initialization process can be time-consuming. On the small instance, initialization takes between two and three hours. For the large and extra large drives, the initialization can be 10 or 20 hours, respectively.
In addition to configuring the correct storage location for your MariaDB data files, also consider setting the following other settings in your instance before you save the instance configuration for deployment:
- Set the MariaDB server ID, so that when you use it for replication, the ID information is set correctly.
- Enabling binary logging, so that replication can be initialized without starting and stopping the server.
- Set the caching and memory parameters for your storage engines. There are no limitations or restrictions on what storage engines you use in your EC2 environment. Choose a configuration, possibly using one of the standard configurations provided with MariaDB appropriate for the instance on which you expect to deploy. The large and extra large instances have RAM that can be dedicated to caching. Be aware that if you choose to install memcached on the servers as part of your application stack you must ensure there is enough memory for both MariaDB and memcached.
Once you have configured your AMI with MariaDB and the rest of your application stack, save the AMI so that you can deploy and reuse the instance.
Once you have your application stack configured in an AMI, populating your MariaDB database with data should be performed by creating a dump of your database using mysqldump, transferring the dump to the EC2 instance, and then reloading the information into the EC2 instance database.
Before using your instance with your application in a production situation, be aware of the limitations of the EC2 instance environment. See , "EC2 Instance Limitations". To begin using your MariaDB AMI, consult the notes on deployment. See , "Deploying a MariaDB Database Using EC2".
EC2 Instance Limitations
Be aware of the following limitations of the EC2 instances before deploying your applications. Although these shouldn't affect your ability to deploy within the Amazon EC2 environment, they may alter the way you setup and configure your environment to support your application.
- Data stored within instances is not persistent. If you create an instance and populate the instance with data, then the data only remains in place while the machine is running, and does not survive a reboot. If you shut down the instance, any data it contained is lost.
To ensure that you do not lose information, take regular backups using mysqldump. If the data being stored is critical, consider using replication to keep a "live" backup of your data in the event of a failure. When creating a backup, write the data to the Amazon S3 service to avoid the transfer charges applied when copying data offsite.
- EC2 instances are not persistent. If the hardware on which an instance is running fails, the instance is shut down. This can lead to loss of data or service.
- To replicate your EC2 instances to a non-EC2 environment, be aware of the transfer costs to and from the EC2 service. Data transfer between different EC2 instances is free, so using replication within the EC2 environment does not incur additional charges.
- Certain HA features are either not directly supported, or have limiting factors or problems that could reduce their utility. For example, using DRBD or MariaDB Cluster might not work. The default storage configuration is also not redundant. You can use software-based RAID to improve redundancy, but this implies a further performance hit.
Deploying a MariaDB Database Using EC2
Because you cannot guarantee the uptime and availability of your EC2 instances, when deploying MariaDB within the EC2 environment, use an approach that enables you to easily distribute work among your EC2 instances. There are a number of ways of doing this. Using sharding techniques, where you split the application across multiple servers dedicating specific blocks of your dataset and users to different servers is an effective way of doing this. As a general rule, it is easier to create more EC2 instances to support more users than to upgrade the instance to a larger machine.
The EC2 architecture works best when you treat the EC2 instances as temporary, cache-based solutions, rather than as a long-term, high availability solution. In addition to using multiple machines, take advantage of other services, such as memcached to provide additional caching for your application to help reduce the load on the MariaDB server so that it can concentrate on writes. On the large and extra large instances within EC2, the RAM available can provide a large memory cache for data.
Most types of scale-out topology that you would use with your own hardware can be used and applied within the EC2 environment. However, use the limitations and advice already given to ensure that any potential failures do not lose you any data. Also, because the relative power of each EC2 instance is so low, be prepared to alter your application to use sharding and add further EC2 instances to improve the performance of your application.
For example, take the typical scale-out environment shown following, where a single master replicates to one or more slaves (three in this example), with a web server running on each replication slave.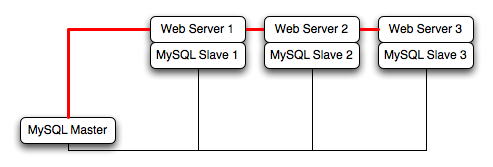
You can reproduce this structure completely within the EC2 environment, using an EC2 instance for the master, and one instance for each of the web and MariaDB slave servers.Note
Within the EC2 environment, internal (private) IP addresses used by the EC2 instances are constant. Always use these internal addresses and names when communicating between instances. Only use public IP addresses when communicating with the outside world - for example, when publicizing your application.
To ensure reliability of your database, add at least one replication slave dedicated to providing an active backup and storage to the Amazon S3 facility. You can see an example of this in the following topology.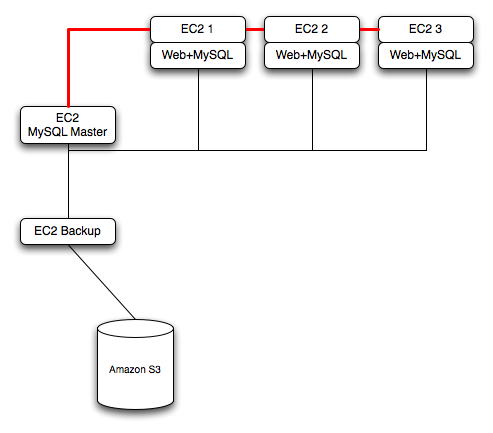
Using memcached within your EC2 instances should provide better performance. The large and extra large instances have a significant amount of RAM. To use memcached in your application, when loading information from the database, first check whether the item exists in the cache. If the data you are looking for exists in the cache, use it. If not, reload the data from the database and populate the cache.
Sharding divides up data in your entire database by allocating individual machines or machine groups to provide a unique set of data according to an appropriate group. For example, you might put all users with a surname ending in the letters A-D onto a single server. When a user connects to the application and their surname is known, queries can be redirected to the appropriate MariaDB server.
When using sharding with EC2, separate the web server and MariaDB server into separate EC2 instances, and then apply the sharding decision logic into your application. Once you know which MariaDB server you should be using for accessing the data you then distribute queries to the appropriate server. You can see a sample of this in the following illustration.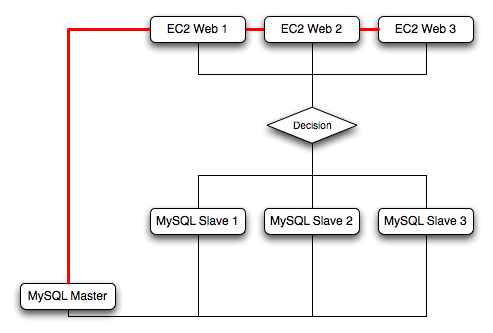 Warning
With sharding and EC2, be careful that the potential for failure of an instance does not affect your application. If the EC2 instance that provides the MariaDB server for a particular shard fails, then all of the data on that shard becomes unavailable.
Using ZFS Replication
- Using ZFS for File System Replication
- Configuring MariaDB for ZFS Replication
- Handling MariaDB Recovery with ZFS
- Configuring MariaDB for ZFS Replication
To support high availability environments, providing an instant copy of the information on both the currently active machine and the hot backup is a critical part of the HA solution. There are many solutions to this problem, including , Replication and , "Using MariaDB with DRBD".
The ZFS file system provides functionality to create a snapshot of the file system contents, transfer the snapshot to another machine, and extract the snapshot to recreate the file system. You can create a snapshot at any time, and you can create as many snapshots as you like. By continually creating, transferring, and restoring snapshots, you can provide synchronization between one or more machines in a fashion similar to DRBD.
The following example shows a simple Solaris system running with a single ZFS pool, mounted at /scratchpool:
Filesystem size used avail capacity Mounted on
/dev/dsk/c0d0s0 4.6G 3.7G 886M 82% /
/devices 0K 0K 0K 0% /devices ctfs 0K 0K 0K 0% /system/contract proc 0K 0K 0K 0% /proc mnttab 0K 0K 0K 0% /etc/mnttab swap 1.4G 892K 1.4G 1% /etc/svc/volatile objfs 0K 0K 0K 0% /system/object
/usr/lib/libc/libc_hwcap1.so.1
 4.6G 3.7G 886M 82% /lib/libc.so.1
fd 0K 0K 0K 0% /dev/fd swap 1.4G 40K 1.4G 1% /tmp swap 1.4G 28K 1.4G 1% /var/run
/dev/dsk/c0d0s7 26G 913M 25G 4% /export/home scratchpool 16G 24K 16G 1% /scratchpool
The MariaDB data is stored in a directory on /scratchpool. To help demonstrate some of the basic replication functionality, there are also other items stored in /scratchpool as well:
total 17
drwxr-xr-x 31 root bin 50 Jul 21 07:32 DTT/
drwxr-xr-x 4 root bin 5 Jul 21 07:32 SUNWmlib/
drwxr-xr-x 14 root sys 16 Nov 5 09:56 SUNWspro/
drwxrwxrwx 19 1000 1000 40 Nov 6 19:16 emacs-22.1/
To create a snapshot of the file system, you use zfs snapshot, specifying the pool and the snapshot name:
root-shell> zfs snapshot scratchpool@snap1
To list the snapshots already taken:
root-shell> zfs list -t snapshot NAME USED AVAIL REFER MOUNTPOINT scratchpool@snap1 0 - 24.5K -
scratchpool@snap2 0 - 24.5K -
The snapshots themselves are stored within the file system metadata, and the space required to keep them varies as time goes on because of the way the snapshots are created. The initial creation of a snapshot is very quick, because instead of taking an entire copy of the data and metadata required to hold the entire snapshot, ZFS records only the point in time and metadata of when the snapshot was created.
As more changes to the original file system are made, the size of the snapshot increases because more space is required to keep the record of the old blocks. If you create lots of snapshots, say one per day, and then delete the snapshots from earlier in the week, the size of the newer snapshots might also increase, as the changes that make up the newer state have to be included in the more recent snapshots, rather than being spread over the seven snapshots that make up the week.
You cannot directly back up the snapshots because they exist within the file system metadata rather than as regular files. To get the snapshot into a format that you can copy to another file system, tape, and so on, you use the zfs send command to create a stream version of the snapshot.
For example, to write the snapshot out to a file:
root-shell> zfs send scratchpool@snap1 >/backup/scratchpool-snap1
Or tape:
root-shell> zfs send scratchpool@snap1 >/dev/rmt/0
You can also write out the incremental changes between two snapshots using zfs send:
root-shell> zfs send scratchpool@snap1 scratchpool@snap2 >/backup/scratchpool-changes
To recover a snapshot, you use zfs recv, which applies the snapshot information either to a new file system, or to an existing one.
Using ZFS for File System Replication
Because zfs send and zfs recv use streams to exchange data, you can use them to replicate information from one system to another by combining zfs send, ssh, and zfs recv.
For example, to copy a snapshot of the scratchpool file system to a new file system called slavepool on a new server, you would use the following command. This sequence combines the snapshot of scratchpool, the transmission to the slave machine (using ssh with login credentials), and the recovery of the snapshot on the slave using zfs recv:
root-shell> zfs send scratchpool@snap1 |sshid@hostpfexec zfs recv -F slavepool
The first part of the pipeline, zfs send scratchpool@snap1, streams the snapshot. The ssh command, and the command that it executes on the other server, pfexec zfs recv -F slavepool, receives the streamed snapshot data and writes it to slavepool. In this instance, I've specified the -F option which forces the snapshot data to be applied, and is therefore destructive. This is fine, as I'm creating the first version of my replicated file system.
On the slave machine, the replicated file system contains the exact same content:
root-shell> ls -al /slavepool/
total 23
drwxr-xr-x 6 root root 7 Nov 8 09:13 ./
drwxr-xr-x 29 root root 34 Nov 9 07:06 ../
drwxr-xr-x 31 root bin 50 Jul 21 07:32 DTT/
drwxr-xr-x 4 root bin 5 Jul 21 07:32 SUNWmlib/
drwxr-xr-x 14 root sys 16 Nov 5 09:56 SUNWspro/
drwxrwxrwx 19 1000 1000 40 Nov 6 19:16 emacs-22.1/
Once a snapshot has been created, to synchronize the file system again, you create a new snapshot and then use the incremental snapshot feature of zfs send to send the changes between the two snapshots to the slave machine again:
root-shell> zfs send -i scratchpool@snapshot1 scratchpool@snapshot2 |sshid@hostpfexec zfs recv slavepool
This operation only succeeds if the file system on the slave machine has not been modified at all. You cannot apply the incremental changes to a destination file system that has changed. In the example above, the ls command would cause problems by changing the metadata, such as the last access time for files or directories.
To prevent changes on the slave file system, set the file system on the slave to be read-only:
root-shell> zfs set readonly=on slavepool
Setting readonly means that you cannot change the file system on the slave by normal means, including the file system metadata. Operations that would normally update metadata (like our ls) silently perform their function without attempting to update the file system state.
In essence, the slave file system is nothing but a static copy of the original file system. However, even when configured to to be read-only, a file system can have snapshots applied to it. With the file system set to read only, re-run the initial copy:
root-shell> zfs send scratchpool@snap1 |sshid@hostpfexec zfs recv -F slavepool
Now you can make changes to the original file system and replicate them to the slave.
Configuring MariaDB for ZFS Replication
Configuring MariaDB on the source file system is a case of creating the data on the file system that you intend to replicate. The configuration file in the example below has been updated to use /scratchpool/mysql-data as the data directory, and now you can initialize the tables:
root-shell> mysql_install_db --defaults-file=/etc/mysql/5.5/my.cnf --user=mysql
To synchronize the initial information, perform a new snapshot and then send an incremental snapshot to the slave using zfs send:
root-shell> zfs snapshot scratchpool@snap2 root-shell> zfs send -i scratchpool@snap1 scratchpool@snap2|sshid@hostpfexec zfs recv slavepool
Doublecheck that the slave has the data by looking at the MariaDB data directory on the slavepool:
root-shell> ls -al /slavepool/mysql-data/
Now you can start up MySQL, create some data, and then replicate the changes using zfs send/ zfs recv to the slave to synchronize the changes.
The rate at which you perform the synchronization depends on your application and environment. The limitation is the speed required to perform the snapshot and then to send the changes over the network.
To automate the process, create a script that performs the snapshot, send, and receive operation, and use cron to synchronize the changes at set times or intervals. For automated operations, see Tim Foster's zfs replication tool.
Handling MariaDB Recovery with ZFS
When using ZFS replication to provide a constant copy of your data, ensure that you can recover your tables, either manually or automatically, in the event of a failure of the original system.
In the event of a failure, follow this sequence:
- Stop the script on the master, if it is still up and running.
- Set the slave file system to be read/write:
root-shell> zfs set readonly=off slavepool
- Start up mysqld on the slave. If you are using
InnoDB, you get auto-recovery, if it is needed, to make sure the table data is correct, as shown here when I started up from our mid-INSERT snapshot:
InnoDB: The log sequence number in ibdata files does not match InnoDB: the log sequence number in the ib_logfiles!
081109 15:59:59 InnoDB: Database was not shut down normally!
InnoDB: Starting crash recovery.
InnoDB: Reading tablespace information from the .ibd files...
InnoDB: Restoring possible half-written data pages from the doublewrite InnoDB: buffer...
081109 16:00:03 InnoDB: Started; log sequence number 0 1142807951
081109 16:00:03 [Note] /slavepool/mysql-5.0.67-solaris10-i386/bin/mysqld: ready for connections.
Version: '5.0.67' socket: '/tmp/mysql.sock' port: 3306 MariaDB Community Server (GPL)
Use InnoDB tables and a regular synchronization schedule to reduce the risk for significant data loss. On MyISAM tables, you might need to run REPAIR TABLE, and you might even have lost some information.
Using MariaDB with memcached
- Installing memcached
- Using memcached
- Developing a memcached Application
- Getting memcached Statistics
- memcached FAQ
- Using memcached
memcached is a simple, highly scalable key-based cache that stores data and objects wherever dedicated or spare RAM is available for quick access by applications, without going through layers of parsing or disk I/O. To use, you run the memcached command on one or more hosts and then use the shared cache to store objects. For more usage instructions, see , "Using memcached"
Benefits of using memcached include:
- Because all information is stored in RAM, the access speed is faster than loading the information each time from disk.
- Because the "value" portion of the key-value pair does not have any data type restrictions, you can cache data such as complex structures, documents, images, or a mixture of such things.
- If you use the in-memory cache to hold transient information, or as a read-only cache for information also stored in a database, the failure of any memcached server is not critical. For persistent data, you can fall back to an alternative lookup method using database queries, and reload the data into RAM on a different server.
The typical usage environment is to modify your application so that information is read from the cache provided by memcached. If the information is not in memcached, then the data is loaded from the MariaDB database and written into the cache so that future requests for the same object benefit from the cached data.
For a typical deployment layout, see Figure 14.6, "memcached Architecture Overview".
Figure 14.6. memcached Architecture Overview
In the example structure, any of the clients can contact one of the memcached servers to request a given key. Each client is configured to talk to all of the servers shown in the illustration. Within the client, when the request is made to store the information, the key used to reference the data is hashed and this hash is then used to select one of the memcached servers. The selection of the memcached server takes place on the client before the server is contacted, keeping the process lightweight.
The same algorithm is used again when a client requests the same key. The same key generates the same hash, and the same memcached server is selected as the source for the data. Using this method, the cached data is spread among all of the memcached servers, and the cached information is accessible from any client. The result is a distributed, memory-based, cache that can return information, particularly complex data and structures, much faster than natively reading the information from the database.
The data held within a traditional memcached server is never stored on disk (only in RAM, which means there is no persistence of data), and the RAM cache is always populated from the backing store (a MariaDB database). If a memcached server fails, the data can always be recovered from the MariaDB database.
memcached Integration with MariaDB Storage Engines
In April 2011, MariaDB announced the preview of a new memcached interface for the InnoDB and MariaDB Cluster storage engines.
Using the memcached API, web services can directly access the InnoDB and MariaDB Cluster storage engines without transformations to SQL, ensuring low latency and high throughput for read/write queries. Operations such as SQL parsing are eliminated and more of the server's hardware resources (CPU, memory and I/O) are dedicated to servicing the query within the storage engine itself. The memcached data can be persisted to disk while still cached in memory for fast retrieval.
These are targeted to be incorporated into future MariaDB 5.6 Milestone and MariaDB Cluster Development Releases.
You can learn more about these interfaces from this Dev Zone article: http://dev.mysql.com/tech-resources/articles/nosql-to-mysql-with-memcached.html.
Installing memcached
You can build and install memcached from the source code directly, or you can use an existing operating system package or installation.
Installing memcached from a Binary Distribution
To install memcached on a Red Hat, or Fedora host, use yum:
root-shell> yum install memcachedNote
On CentOS, you may be able to obtain a suitable RPM from another source, or use the source tarball.
To install memcached on a Debian or Ubuntu host, use apt-get:
root-shell> apt-get install memcached
To install memcached on a Gentoo host, use emerge:
root-shell> emerge install memcached
Building memcached from Source
On other Unix-based platforms, including Solaris, AIX, HP-UX and Mac OS X, and Linux distributions not mentioned already, you must install from source. For Linux, make sure you have a 2.6-based kernel, which includes the improved epoll interface. For all platforms, ensure that you have libevent 1.1 or higher installed. You can obtain libevent from libevent web page.
You can obtain the source for memcached from memcached Web site.
To build memcached, follow these steps:
- Extract the memcached source package:
shell> gunzip -c memcached-
1.2.5.tar.gz | tar xf - - Change to the memcached-
1.2.5directory:
shell> cd memcached-
1.2.5 - Run configure
shell> ./configure
Some additional options you might specify to the configure:
--prefix
To specify a different installation directory, use the
--prefixoption:shell> ./configure --prefix=/opt
The default is to use the
/usr/localdirectory.--with-libevent
If you have installed
libeventand configure cannot find the library, use the--with-libeventoption to specify the location of the installed library.--enable-64bit
To build a 64-bit version of memcached (which enables you to use a single instance with a large RAM allocation), use
--enable-64bit.--enable-threads
To enable multi-threading support in memcached, which improves the response times on servers with a heavy load, use
--enable-threads. You must have support for the POSIX threads within your operating system to enable thread support. For more information on the threading support, see , "memcached Thread Support".--enable-dtrace
memcached includes a range of DTrace threads that can be used to monitor and benchmark a memcached instance. For more information, see , "Using memcached and DTrace".
- Run make to build memcached:
shell> make
- Run make install to install memcached:
shell> make install
Using memcached
- memcached Deployment
- Using Namespaces
- Data Expiry
- memcached Hashing/Distribution Types
- Using memcached and DTrace
- Memory Allocation within memcached
- memcached Thread Support
- memcached Logs
- Using Namespaces
To start using memcached, start the memcached service on one or more servers. Running memcached sets up the server, allocates the memory and starts listening for connections from clients.Note
You do not need to be a privileged user (root) to run memcached except to listen on one of the privileged TCP/IP ports (below 1024). You must, however, use a user that has not had their memory limits restricted using setrlimit or similar.
To start the server, run memcached as a nonprivileged (that is, non-root) user:
shell> memcached
By default, memcached uses the following settings:
- Memory allocation of 64MB
- Listens for connections on all network interfaces, using port 11211
- Supports a maximum of 1024 simultaneous connections
Typically, you would specify the full combination of options that you want when starting memcached, and normally provide a startup script to handle the initialization of memcached. For example, the following line starts memcached with a maximum of 1024MB RAM for the cache, listening on port 11211 on the IP address 192.168.0.110, running has a background daemon:
shell> memcached -d -m 1024 -p 11211 -l 192.168.0.110
To ensure that memcached is started up on boot, check the init script and configuration parameters.
memcached supports the following options:
-u user
If you start memcached as
root, use the-uoption to specify the user for executing memcached:shell> memcached -u memcache
-m memory
Set the amount of memory allocated to memcached for object storage. Default is 64MB.
To increase the amount of memory allocated for the cache, use the
-moption to specify the amount of RAM to be allocated (in megabytes). The more RAM you allocate, the more data you can store and therefore the more effective your cache is.WarningDo not specify a memory allocation larger than your available RAM. If you specify too large a value, then some RAM allocated for memcached uses swap space, and not physical RAM. This may lead to delays when storing and retrieving values, because data is swapped to disk, instead of storing the data directly in RAM.
You can use the output of the vmstat command to get the free memory, as shown in
freecolumn:shell> vmstat kthr memory page disk faults cpu r b w swap free re mf pi po fr de sr s1 s2 -- -- in sy cs us sy id 0 0 0 5170504 3450392 2 7 2 0 0 0 4 0 0 0 0 296 54 199 0 0 100
For example, to allocate 3GB of RAM:
shell> memcached -m 3072
On 32-bit x86 systems where you are using PAE to access memory above the 4GB limit, you cannot allocate RAM beyond the maximum process size. You can get around this by running multiple instances of memcached, each listening on a different port:
shell> memcached -m 1024 -p11211
shell> memcached -m 1024 -p11212
shell> memcached -m 1024 -p11213
NoteOn all systems, particularly 32-bit, ensure that you leave enough room for both memcached application in addition to the memory setting. For example, if you have a dedicated memcached host with 4GB of RAM, do not set the memory size above 3500MB. Failure to do this may cause either a crash or severe performance issues.
-l interface
Specify a network interface/address to listen for connections. The default is to listen on all available address (
INADDR_ANY).shell> memcached -l 192.168.0.110
Support for IPv6 address support was added in memcached 1.2.5.
-p port
Specify the TCP port to use for connections. Default is 18080.
shell> memcached -p 18080
-U port
Specify the UDP port to use for connections. Default is 11211, 0 switches UDP off.
shell> memcached -U 18080
-s socket
Specify a Unix socket to listen on.
If you are running memcached on the same server as the clients, you can disable the network interface and use a local UNIX socket using the
-soption:shell> memcached -s /tmp/memcached
Using a UNIX socket automatically disables network support, and saves network ports (allowing more ports to be used by your web server or other process).
-a mask
Specify the access mask to be used for the Unix socket, in octal. Default is 0700.
-c connections
Specify the maximum number of simultaneous connections to the memcached service. The default is 1024.
shell> memcached -c 2048
Use this option, either to reduce the number of connections (to prevent overloading memcached service) or to increase the number to make more effective use of the server running memcached server.
-t threads
Specify the number of threads to use when processing incoming requests.
By default, memcached is configured to use 4 concurrent threads. The threading improves the performance of storing and retrieving data in the cache, using a locking system to prevent different threads overwriting or updating the same values. To increase or decrease the number of threads, use the
-toption:shell> memcached -t 8
-d
Run memcached as a daemon (background) process:
shell> memcached -d
-r
Maximize the size of the core file limit. In the event of a failure, this attempts to dump the entire memory space to disk as a core file, up to any limits imposed by setrlimit.
-M
Return an error to the client when the memory has been exhausted. This replaces the normal behavior of removing older items from the cache to make way for new items.
-k
Lock down all paged memory. This reserves the memory before use, instead of allocating new slabs of memory as new items are stored in the cache.Note
There is a user-level limit on how much memory you can lock. Trying to allocate more than the available memory fails. You can set the limit for the user you started the daemon with (not for the
-u useruser) within the shell by using ulimit -S -l NUM_KB-v
Verbose mode. Prints errors and warnings while executing the main event loop.
-vv
Very verbose mode. In addition to information printed by
-v, also prints each client command and the response.-vvv
Extremely verbose mode. In addition to information printed by
-vv, also show the internal state transitions.-h
Print the help message and exit.
-i
Print the memcached and
libeventlicense.-I mem
Specify the maximum size permitted for storing an object within the memcached instance. The size supports a unit postfix (
kfor kilobytes,mfor megabytes). For example, to increase the maximum supported object size to 32MB:shell> memcached -I 32m
The maximum object size you can specify is 128MB, the default remains at 1MB.
This option was added in 1.4.2.
-b
Set the backlog queue limit. The backlog queue configures how many network connections can be waiting to be processed by memcached. Increasing this limit may reduce errors received by the client that it is not able to connect to the memcached instance, but does not improve the performance of the server. The default is 1024.
-P pidfile
Save the process ID of the memcached instance into
file.-f
Set the chunk size growth factor. When allocating new memory chunks, the allocated size of new chunks is determined by multiplying the default slab size by this factor.
To see the effects of this option without extensive testing, use the
-vvcommand-line option to show the calculated slab sizes. For more information, see , "memcached Logs".-n bytes
The minimum space allocated for the key+value+flags information. The default is 48 bytes.
-L
On systems that support large memory pages, enables large memory page use. Using large memory pages enables memcached to allocate the item cache in one large chunk, which can improve the performance by reducing the number misses when accessing memory.
-C
Disable the use of compare and swap (CAS) operations.
This option was added in memcached 1.3.x.
-D char
Set the default character to be used as a delimiter between the key prefixes and IDs. This is used for the per-prefix statistics reporting (see , "Getting memcached Statistics"). The default is the colon (
:). If this option is used, statistics collection is turned on automatically. If not used, you can enable stats collection by sending thestats detail oncommand to the server.This option was added in memcached 1.3.x.
-R num
Sets the maximum number of requests per event process. The default is 20.
-B protocol
Set the binding protocol, that is, the default memcached protocol support for client connections. Options are
ascii,binaryorauto. Automatic (auto) is the default.This option was added in memcached 1.4.0.
memcached Deployment
When using memcached you can use a number of different potential deployment strategies and topologies. The exact strategy to use depends on your application and environment. When developing a system for deploying memcached within your system, keep in mind the following points:
- memcached is only a caching mechanism. It shouldn't be used to store information that you cannot otherwise afford to lose and then load from a different location.
- There is no security built into the memcached protocol. At a minimum, make sure that the servers running memcached are only accessible from inside your network, and that the network ports being used are blocked (using a firewall or similar). If the information on the memcached servers that is being stored is any sensitive, then encrypt the information before storing it in memcached.
- memcached does not provide any sort of failover. Because there is no communication between different memcached instances. If an instance fails, your application must capable of removing it from the list, reloading the data and then writing data to another memcached instance.
- Latency between the clients and the memcached can be a problem if you are using different physical machines for these tasks. If you find that the latency is a problem, move the memcached instances to be on the clients.
- Key length is determined by the memcached server. The default maximum key size is 250 bytes.
- Using a single memcached instance, especially for multiple clients, is generally a bad idea as it introduces a single point of failure. Instead provide at least two memcached instances so that a failure can be handled appropriately. If possible, you should create as many memcached nodes as possible. When adding and removing memcached instances from a pool, the hashing and distribution of key/value pairs may be affected. For information on how to avoid problems, see , "memcached Hashing/Distribution Types".
Using Namespaces
The memcached cache is a very simple massive key/value storage system, and as such there is no way of compartmentalizing data automatically into different sections. For example, if you are storing information by the unique ID returned from a MariaDB database, then storing the data from two different tables could run into issues because the same ID might be valid in both tables.
Some interfaces provide an automated mechanism for creating namespaces when storing information into the cache. In practice, these namespaces are merely a prefix before a given ID that is applied every time a value is stored or retrieve from the cache.
You can implement the same basic principle by using keys that describe the object and the unique identifier within the key that you supply when the object is stored. For example, when storing user data, prefix the ID of the user with user: or user-.Note
Using namespaces or prefixes only controls the keys stored/retrieved. There is no security within memcached, and therefore no way to enforce that a particular client only accesses keys with a particular namespace. Namespaces are only useful as a method of identifying data and preventing corruption of key/value pairs.
Data Expiry
There are two types of data expiry within a memcached instance. The first type is applied at the point when you store a new key/value pair into the memcached instance. If there is not enough space within a suitable slab to store the value, then an existing least recently used (LRU) object is removed (evicted) from the cache to make room for the new item.
The LRU algorithm ensures that the object that is removed is one that is either no longer in active use or that was used so long ago that its data is potentially out of date or of little value. However, in a system where the memory allocated to memcached is smaller than the number of regularly used objects required in the cache, a lot of expired items could be removed from the cache even though they are in active use. You use the statistics mechanism to get a better idea of the level of evictions (expired objects). For more information, see , "Getting memcached Statistics".
You can change this eviction behavior by setting the -M command-line option when starting memcached. This option forces an error to be returned when the memory has been exhausted, instead of automatically evicting older data.
The second type of expiry system is an explicit mechanism that you can set when a key/value pair is inserted into the cache, or when deleting an item from the cache. Using an expiration time can be a useful way of ensuring that the data in the cache is up to date and in line with your application needs and requirements.
A typical scenario for explicitly setting the expiry time might include caching session data for a user when accessing a Web site. memcached uses a lazy expiry mechanism where the explicit expiry time that has been set is compared with the current time when the object is requested. Only objects that have not expired are returned.
You can also set the expiry time when explicitly deleting an object from the cache. In this case, the expiry time is really a timeout and indicates the period when any attempts to set the value for a given key are rejected.
memcached Hashing/Distribution Types
The memcached client interface supports a number of different distribution algorithms that are used in multi-server configurations to determine which host should be used when setting or getting data from a given memcached instance. When you get or set a value, a hash is constructed from the supplied key and then used to select a host from the list of configured servers. Because the hashing mechanism uses the supplied key as the basis for the hash, the same server is selected during both set and get operations.
You can think of this process as follows. Given an array of servers (a, b, and c), the client uses a hashing algorithm that returns an integer based on the key being stored or retrieved. The resulting value is then used to select a server from the list of servers configured in the client. Most standard client hashing within memcache clients uses a simple modulus calculation on the value against the number of configured memcached servers. You can summarize the process in pseudocode as:
@memcservers = ['a.memc','b.memc','c.memc'];
$value = hash($key);
$chosen = $value % length(@memcservers);
Replacing the above with values:
@memcservers = ['a.memc','b.memc','c.memc'];
$value = hash('myid');
$chosen = 7009 % 3;
In the above example, the client hashing algorithm chooses the server at index 1 (% 3 = 1), and store or retrieve the key and value with that server.Note
This selection and hashing process is handled automatically by the memcached client you are using; you need only provide the list of memcached servers to use.
You can see a graphical representation of this below in Figure 14.7, "memcached Hash Selection".
Figure 14.7. memcached Hash Selection
The same hashing and selection process takes place during any operation on the specified key within the memcached client.
Using this method provides a number of advantages:
- The hashing and selection of the server to contact is handled entirely within the client. This eliminates the need to perform network communication to determine the right machine to contact.
- Because the determination of the memcached server occurs entirely within the client, the server can be selected automatically regardless of the operation being executed (set, get, increment, etc.).
- Because the determination is handled within the client, the hashing algorithm returns the same value for a given key; values are not affected or reset by differences in the server environment.
- Selection is very fast. The hashing algorithm on the key value is quick and the resulting selection of the server is from a simple array of available machines.
- Using client-side hashing simplifies the distribution of data over each memcached server. Natural distribution of the values returned by the hashing algorithm means that keys are automatically spread over the available servers.
Providing that the list of servers configured within the client remains the same, the same stored key returns the same value, and therefore selects the same server.
However, if you do not use the same hashing mechanism then the same data may be recorded on different servers by different interfaces, both wasting space on your memcached and leading to potential differences in the information.Note
One way to use a multi-interface compatible hashing mechanism is to use the libmemcached library and the associated interfaces. Because the interfaces for the different languages (including C, Ruby, Perl and Python) use the same client library interface, they always generate the same hash code from the ID.
The problem with client-side selection of the server is that the list of the servers (including their sequential order) must remain consistent on each client using the memcached servers, and the servers must be available. If you try to perform an operation on a key when:
- A new memcached instance has been added to the list of available instances
- A memcached instance has been removed from the list of available instances
- The order of the memcached instances has changed
When the hashing algorithm is used on the given key, but with a different list of servers, the hash calculation may choose a different server from the list.
If a new memcached instance is added into the list of servers, as new.memc is in the example below, then a GET operation using the same key, myid, can result in a cache-miss. This is because the same value is computed from the key, which selects the same index from the array of servers, but index 2 now points to the new server, not the server c.memc where the data was originally stored. This would result in a cache miss, even though the key exists within the cache on another memcached instance.
Figure 14.8. memcached Hash Selection with New memcached instance
This means that servers c.memc and new.memc both contain the information for key myid, but the information stored against the key in eachs server may be different in each instance. A more significant problem is a much higher number of cache-misses when retrieving data, as the addition of a new server changes the distribution of keys, and this in turn requires rebuilding the cached data on the memcached instances, causing an increase in database reads.
The same effect can occur if you actively manage the list of servers configured in your clients, adding and removing the configured memcached instances as each instance is identified as being available. For example, removing a memcached instance when the client notices that the instance can no longer be contacted can cause the server selection to fail as described here.
To prevent this causing significant problems and invalidating your cache, you can select the hashing algorithm used to select the server. There are two common types of hashing algorithm, consistent and modula.
With consistent hashing algorithms, the same key when applied to a list of servers always uses the same server to store or retrieve the keys, even if the list of configured servers changes. This means that you can add and remove servers from the configure list and always use the same server for a given key. There are two types of consistent hashing algorithms available, Ketama and Wheel. Both types are supported by libmemcached, and implementations are available for PHP and Java.
Any consistent hashing algorithm has some limitations. When you add servers to an existing list of configured servers, keys are distributed to the new servers as part of the normal distribution. When you remove servers from the list, the keys are re-allocated to another server within the list, meaning that the cache needs to be re-populated with the information. Also, a consistent hashing algorithm does not resolve the issue where you want consistent selection of a server across multiple clients, but where each client contains a different list of servers. The consistency is enforced only within a single client.
With a modula hashing algorithm, the client selects a server by first computing the hash and then choosing a server from the list of configured servers. As the list of servers changes, so the server selected when using a modula hashing algorithm also changes. The result is the behavior described above; changes to the list of servers mean that different servers are selected when retrieving data, leading to cache misses and increase in database load as the cache is re-seeded with information.
If you use only a single memcached instance for each client, or your list of memcached servers configured for a client never changes, then the selection of a hashing algorithm is irrelevant, as it has no noticeable effect.
If you change your servers regularly, or you use a common set of servers that are shared among a large number of clients, then using a consistent hashing algorithm should help to ensure that your cache data is not duplicated and the data is evenly distributed.
Using memcached and DTrace
memcached includes a number of different DTrace probes that can be used to monitor the operation of the server. The probes included can monitor individual connections, slab allocations, and modifications to the hash table when a key/value pair is added, updated, or removed.
For more information on DTrace and writing DTrace scripts, read the DTrace User Guide.
Support for DTrace probes was added to memcached 1.2.6 includes a number of DTrace probes that can be used to help monitor your application. DTrace is supported on Solaris 10, OpenSolaris, Mac OS X 10.5 and FreeBSD. To enable the DTrace probes in memcached, build from source and use the --enable-dtrace option. For more information, see , "Installing memcached".
The probes supported by memcached are:
conn-allocate(connid)
Fired when a connection object is allocated from the connection pool.
connid: The connection ID.
conn-release(connid)
Fired when a connection object is released back to the connection pool.
Arguments:
connid: The connection ID.
conn-create(ptr)
Fired when a new connection object is being created (that is, there are no free connection objects in the connection pool).
Arguments:
ptr: A pointer to the connection. object
conn-destroy(ptr)
Fired when a connection object is being destroyed.
Arguments:
ptr: A pointer to the connection object.
conn-dispatch(connid, threadid)
Fired when a connection is dispatched from the main or connection-management thread to a worker thread.
Arguments:
connid: The connection ID.threadid: The thread ID.
slabs-allocate(size, slabclass, slabsize, ptr)
Allocate memory from the slab allocator.
Arguments:
size: The requested size.slabclass: The allocation is fulfilled in this class.slabsize: The size of each item in this class.ptr: A pointer to allocated memory.
slabs-allocate-failed(size, slabclass)
Failed to allocate memory (out of memory).
Arguments:
size: The requested size.slabclass: The class that failed to fulfill the request.
slabs-slabclass-allocate(slabclass)
Fired when a slab class needs more space.
Arguments:
slabclass: The class that needs more memory.
slabs-slabclass-allocate-failed(slabclass)
Failed to allocate memory (out of memory).
Arguments:
slabclass: The class that failed to grab more memory.
slabs-free(size, slabclass, ptr)
Release memory.
Arguments:
size: The amount of memory to release, in bytes.slabclass: The class the memory belongs to.ptr: A pointer to the memory to release.
assoc-find(key, depth)
Fired when we have searched the hash table for a named key. These two elements provide an insight into how well the hash function operates. Traversals are a sign of a less optimal function, wasting CPU capacity.
Arguments:
key: The key searched for.depth: The depth in the list of hash table.
assoc-insert(key, nokeys)
Fired when a new item has been inserted.
Arguments:
key: The key just inserted.nokeys: The total number of keys currently being stored, including the key for which insert was called.
assoc-delete(key, nokeys)
Fired when a new item has been removed.
Arguments:
key: The key just deleted.nokeys: The total number of keys currently being stored, excluding the key for which delete was called.
item-link(key, size)
Fired when an item is being linked in the cache.
Arguments:
key: The items key.size: The size of the data.
item-unlink(key, size)
Fired when an item is being deleted.
Arguments:
key: The items key.size: The size of the data.
item-remove(key, size)
Fired when the refcount for an item is reduced.
Arguments:
key: The item's key.size: The size of the data.
item-update(key, size)
Fired when the 'last referenced' time is updated.
Arguments:
key: The item's key.size: The size of the data.
item-replace(oldkey, oldsize, newkey, newsize)
Fired when an item is being replaced with another item.
Arguments:
oldkey: The key of the item to replace.oldsize: The size of the old item.newkey: The key of the new item.newsize: The size of the new item.
process-command-start(connid, request, size)
Fired when the processing of a command starts.
Arguments:
connid: The connection ID.request: The incoming request.size: The size of the request.
process-command-end(connid, response, size)
Fired when the processing of a command is done.
Arguments:
connid: The connection ID.response: The response to send back to the client.size: The size of the response.
command-get(connid, key, size)
Fired for a
getcommand.Arguments:
connid: The connection ID.key: The requested key.size: The size of the key's data (or -1 if not found).
command-gets(connid, key, size, casid)
Fired for a
getscommand.Arguments:
connid: The connection ID.key: The requested key.size: The size of the key's data (or -1 if not found).casid: The casid for the item.
command-add(connid, key, size)
Fired for a
addcommand.Arguments:
connid: The connection ID.key: The requested key.size: The new size of the key's data (or -1 if not found).
command-set(connid, key, size)
Fired for a
setcommand.Arguments:
connid: The connection ID.key: The requested key.size: The new size of the key's data (or -1 if not found).
command-replace(connid, key, size)
Fired for a
replacecommand.Arguments:
connid: The connection ID.key: The requested key.size: The new size of the key's data (or -1 if not found).
command-prepend(connid, key, size)
Fired for a
prependcommand.Arguments:
connid: The connection ID.key: The requested key.size: The new size of the key's data (or -1 if not found).
command-append(connid, key, size)
Fired for a
appendcommand.Arguments:
connid: The connection ID.key: The requested key.size: The new size of the key's data (or -1 if not found).
command-cas(connid, key, size, casid)
Fired for a
cascommand.Arguments:
connid: The connection ID.key: The requested key.size: The size of the key's data (or -1 if not found).casid: The cas ID requested.
command-incr(connid, key, val)
Fired for
incrcommand.Arguments:
connid: The connection ID.key: The requested key.val: The new value.
command-decr(connid, key, val)
Fired for
decrcommand.Arguments:
connid: The connection ID.key: The requested key.val: The new value.
command-delete(connid, key, exptime)
Fired for a
deletecommand.Arguments:
connid: The connection ID.key: The requested key.exptime: The expiry time.
Memory Allocation within memcached
When you first start memcached, the memory that you have configured is not automatically allocated. Instead, memcached only starts allocating and reserving physical memory once you start saving information into the cache.
When you start to store data into the cache, memcached does not allocate the memory for the data on an item by item basis. Instead, a slab allocation is used to optimize memory usage and prevent memory fragmentation when information expires from the cache.
With slab allocation, memory is reserved in blocks of 1MB. The slab is divided up into a number of blocks of equal size. When you try to store a value into the cache, memcached checks the size of the value that you are adding to the cache and determines which slab contains the right size allocation for the item. If a slab with the item size already exists, the item is written to the block within the slab.
If the new item is bigger than the size of any existing blocks, then a new slab is created, divided up into blocks of a suitable size. If an existing slab with the right block size already exists, but there are no free blocks, a new slab is created. If you update an existing item with data that is larger than the existing block allocation for that key, then the key is re-allocated into a suitable slab.
For example, the default size for the smallest block is 88 bytes (40 bytes of value, and the default 48 bytes for the key and flag data). If the size of the first item you store into the cache is less than 40 bytes, then a slab with a block size of 88 bytes is created and the value stored.
If the size of the data that you intend to store is larger than this value, then the block size is increased by the chunk size factor until a block size large enough to hold the value is determined. The block size is always a function of the scale factor, rounded up to a block size which is exactly divisible into the chunk size.
For a sample of the structure, see Figure 14.9, "Memory Allocation in memcached".
Figure 14.9. Memory Allocation in memcached
The result is that you have multiple pages allocated within the range of memory allocated to memcached. Each page is 1MB in size (by default), and is split into a different number of chunks, according to the chunk size required to store the key/value pairs. Each instance has multiple pages allocated, and a page is always created when a new item needs to be created requiring a chunk of a particular size. A slab may consist of multiple pages, and each page within a slab contains an equal number of chunks.
The chunk size of a new slab is determined by the base chunk size combined with the chunk size growth factor. For example, if the initial chunks are 104 bytes in size, and the default chunk size growth factor is used (1.25), then the next chunk size allocated would be the best power of 2 fit for 104*1.25, or 136 bytes.
Allocating the pages in this way ensures that memory does not get fragmented. However, depending on the distribution of the objects that you store, it may lead to an inefficient distribution of the slabs and chunks if you have significantly different sized items. For example, having a relatively small number of items within each chunk size may waste a lot of memory with just few chunks in each allocated page.
You can tune the growth factor to reduce this effect by using the -f command line option, which adapts the growth factor applied to make more effective use of the chunks and slabs allocated. For information on how to determine the current slab allocation statistics, see , "memcached Slabs Statistics".
If your operating system supports it, you can also start memcached with the -L command line option. This option preallocates all the memory during startup using large memory pages. This can improve performance by reducing the number of misses in the CPU memory cache.
memcached Thread Support
If you enable the thread implementation within when building memcached from source, then memcached uses multiple threads in addition to the libevent system to handle requests.
When enabled, the threading implementation operates as follows:
- Threading is handled by wrapping functions within the code to provide basic protection from updating the same global structures at the same time.
- Each thread uses its own instance of the
libeventto help improve performance. - TCP/IP connections are handled with a single thread listening on the TCP/IP socket. Each connection is then distribution to one of the active threads on a simple round-robin basis. Each connection then operates solely within this thread while the connection remains open.
- For UDP connections, all the threads listen to a single UDP socket for incoming requests. Threads that are not currently dealing with another request ignore the incoming packet. One of the remaining, nonbusy, threads reads the request and sends the response. This implementation can lead to increased CPU load as threads wake from sleep to potentially process the request.
Using threads can increase the performance on servers that have multiple CPU cores available, as the requests to update the hash table can be spread between the individual threads. To minimize overhead from the locking mechanism employed, experiment with different thread values to achieve the best performance based on the number and type of requests within your given workload.
memcached Logs
If you enable verbose mode, using the -v, -vv, or -vvv options, then the information output by memcached includes details of the operations being performed.
Without the verbose options, memcached normally produces no output during normal operating.
- Output when using
-v
The lowest verbosity level shows you:
- Errors and warnings
- Transient errors
- Protocol and socket errors, including exhausting available connections
- Each registered client connection, including the socket descriptor number and the protocol used.
For example:
32: Client using the ascii protocol
33: Client using the ascii protocol
Note that the socket descriptor is only valid while the client remains connected. Non-persistent connections may not be effectively represented.
Examples of the error messages output at this level include:
<%d send buffer was %d, now %d Can't listen for events on fd %d Can't read from libevent pipe Catastrophic: event fd doesn't match conn fd!
Couldn't build response Couldn't realloc input buffer Couldn't update event Failed to build UDP headers Failed to read, and not due to blocking Too many open connections Unexpected state %d
- Output when using
-vv
When using the second level of verbosity, you get more detailed information about protocol operations, keys updated, chunk and network operatings and details.
During the initial start-up of memcached with this level of verbosity, you are shown the sizes of the individual slab classes, the chunk sizes, and the number of entries per slab. These do not show the allocation of the slabs, just the slabs that would be created when data is added. You are also given information about the listen queues and buffers used to send information. A sample of the output generated for a TCP/IP based system with the default memory and growth factors is given below:
shell> memcached -vv slab class 1: chunk size 80 perslab 13107
slab class 2: chunk size 104 perslab 10082
slab class 3: chunk size 136 perslab 7710
slab class 4: chunk size 176 perslab 5957
slab class 5: chunk size 224 perslab 4681
slab class 6: chunk size 280 perslab 3744
slab class 7: chunk size 352 perslab 2978
slab class 8: chunk size 440 perslab 2383
slab class 9: chunk size 552 perslab 1899
slab class 10: chunk size 696 perslab 1506
slab class 11: chunk size 872 perslab 1202
slab class 12: chunk size 1096 perslab 956
slab class 13: chunk size 1376 perslab 762
slab class 14: chunk size 1720 perslab 609
slab class 15: chunk size 2152 perslab 487
slab class 16: chunk size 2696 perslab 388
slab class 17: chunk size 3376 perslab 310
slab class 18: chunk size 4224 perslab 248
slab class 19: chunk size 5280 perslab 198
slab class 20: chunk size 6600 perslab 158
slab class 21: chunk size 8256 perslab 127
slab class 22: chunk size 10320 perslab 101
slab class 23: chunk size 12904 perslab 81
slab class 24: chunk size 16136 perslab 64
slab class 25: chunk size 20176 perslab 51
slab class 26: chunk size 25224 perslab 41
slab class 27: chunk size 31536 perslab 33
slab class 28: chunk size 39424 perslab 26
slab class 29: chunk size 49280 perslab 21
slab class 30: chunk size 61600 perslab 17
slab class 31: chunk size 77000 perslab 13
slab class 32: chunk size 96256 perslab 10
slab class 33: chunk size 120320 perslab 8
slab class 34: chunk size 150400 perslab 6
slab class 35: chunk size 188000 perslab 5
slab class 36: chunk size 235000 perslab 4
slab class 37: chunk size 293752 perslab 3
slab class 38: chunk size 367192 perslab 2
slab class 39: chunk size 458992 perslab 2
<26 server listening (auto-negotiate)
<29 server listening (auto-negotiate)
<30 send buffer was 57344, now 2097152
<31 send buffer was 57344, now 2097152
<30 server listening (udp)
<30 server listening (udp)
<31 server listening (udp)
<30 server listening (udp)
<30 server listening (udp)
<31 server listening (udp)
<31 server listening (udp)
<31 server listening (udp)
Using this verbosity level can be a useful way to check the effects of the growth factor used on slabs with different memory allocations, which in turn can be used to better tune the growth factor to suit the data you are storing in the cache. For example, if you set the growth factor to 4 (quadrupling the size of each slab):
shell> memcached -f 4 -m 1g -vv slab class 1: chunk size 80 perslab 13107
slab class 2: chunk size 320 perslab 3276
slab class 3: chunk size 1280 perslab 819
slab class 4: chunk size 5120 perslab 204
slab class 5: chunk size 20480 perslab 51
slab class 6: chunk size 81920 perslab 12
slab class 7: chunk size 327680 perslab 3
...
During use of the cache, this verbosity level also prints out detailed information on the storage and recovery of keys and other information. An example of the output during a typical set/get and increment/decrement operation is shown below.
32: Client using the ascii protocol
<32 set my_key 0 0 10
>32 STORED
<32 set object_key 1 0 36
>32 STORED
<32 get my_key
>32 sending key my_key
>32 END
<32 get object_key
>32 sending key object_key
>32 END
<32 set key 0 0 6
>32 STORED
<32 incr key 1
>32 789544
<32 decr key 1
>32 789543
<32 incr key 2
>32 789545
<32 set my_key 0 0 10
>32 STORED
<32 set object_key 1 0 36
>32 STORED
<32 get my_key
>32 sending key my_key
>32 END
<32 get object_key
>32 sending key object_key1 1 36
>32 END
<32 set key 0 0 6
>32 STORED
<32 incr key 1
>32 789544
<32 decr key 1
>32 789543
<32 incr key 2
>32 789545
During client communication, for each line, the initial character shows the direction of flow of the information. The < for communication from the client to the memcached server and > for communication back to the client. The number is the numeric socket descriptor for the connection.
- Output when using
-vvv
This level of verbosity includes the transitions of connections between different states in the event library while reading and writing content to/from the clients. It should be used to diagnose and identify issues in client communication. For example, you can use this information to determine if memcached is taking a long time to return information to the client, during the read of the client operation or before returning and completing the operation. An example of the typical sequence for a set operation is provided below:
<32 new auto-negotiating client connection
32: going from conn_new_cmd to conn_waiting
32: going from conn_waiting to conn_read
32: going from conn_read to conn_parse_cmd
32: Client using the ascii protocol
<32 set my_key 0 0 10
32: going from conn_parse_cmd to conn_nread
> NOT FOUND my_key
>32 STORED
32: going from conn_nread to conn_write
32: going from conn_write to conn_new_cmd
32: going from conn_new_cmd to conn_waiting
32: going from conn_waiting to conn_read
32: going from conn_read to conn_closing
<32 connection closed.
All of the verbosity levels in memcached are designed to be used during debugging or examination of issues. The quantity of information generated, particularly when using -vvv, is significant, particularly on a busy server. Also be aware that writing the error information out, especially to disk, may negate some of the performance gains you achieve by using memcached. Therefore, use in production or deployment environments is not recommended.
Developing a memcached Application
- Basic memcached Operations
- Using memcached as a MariaDB Caching Layer
- Using
libmemcachedwith C and C++- Using MariaDB and memcached with Perl
- Using MariaDB and memcached with Python
- Using MariaDB and memcached with PHP
- Using MariaDB and memcached with Ruby
- Using MariaDB and memcached with Java
- Using the MariaDB memcached User-Defined Functions
- memcached Protocol
- Using memcached as a MariaDB Caching Layer
A number of language interfaces let applications store and retrieve information with memcached servers. You can write memcached applications in popular languages such as Perl, PHP, Python, Ruby, C, and Java.
Data stored into a memcached server is referred to by a single string (the key), with storage into the cache and retrieval from the cache using the key as the reference. The cache therefore operates like a large associative array or hash table. It is not possible to structure or otherwise organize the information stored in the cache. To emulate database notions such as multiple tables or composite key values, you must use encode the extra information into the strings used as keys. For example, to store or look up the address corresponding to a specific latitude and longitude, you might turn those two numeric values into a single comma-separated string to use as a key.
Basic memcached Operations
The interface to memcached supports the following methods for storing and retrieving information in the cache, and these are consistent across all the different APIs, although the language specific mechanics might be different:
get(: Retrieves information from the cache. Returns the value associated with the key if the specified key exists. Returnskey)NULL,nil,undefined, or the closest equivalent in the corresponding language, if the specified key does not exist.set(: Sets the item associated with a key in the cache to the specified value. Note that this either updates an existing item if the key already exists, or adds a new key/value pair if the key doesn't exist. If the expiry time is specified, then the item expires (and is deleted) when the expiry time is reached. The time is specified in seconds, and is taken as a relative time if the value is less than 30 days (30*24*60*60), or an absolute time (epoch) if larger than this value.key, ,value, [,expiry])add(: Adds the key and associated value to the cache, if the specified key does not already exist.key, ,value, [,expiry])replace(: Replaces the item associated with the specifiedkey, ,value, [,expiry])key, only if the key already exists. The new value is given by thevalueparameter.delete(: Deletes thekey, [,time])keyand its associated item from the cache. If you supply atime, then adding another item with the specifiedkeyis blocked for the specified period.incr(: Increments the item associated with thekey, [,value])keyby one or the optionalvalue.decr(: Decrements the item associated with thekey, [,value])keyby one or the optionalvalue.flush_all: Invalidates (or expires) all the current items in the cache. Technically they still exist (they are not deleted), but they are silently destroyed the next time you try to access them.
In all implementations, most or all of these functions are duplicated through the corresponding native language interface.
When practical, use memcached to store full items, rather than caching a single column value from the database. For example, when displaying a record about an object (invoice, user history, or blog post), load all the data for the associated entry from the database, and compile it into the internal structure that would normally be required by the application. Save the complete object in the cache.
Complex data structures cannot be stored directly. Most interfaces serialize the data for you, that is, put it in a textual form that can reconstruct the original pointers and nesting. Perl uses Storable, PHP uses serialize, Python uses cPickle (or Pickle) and Java uses the Serializable interface. In most cases, the serialization interface used is customizable. To share data stored in memcached instances between different language interfaces, consider using a common serialization solution such as JSON (Javascript Object Notation).
Using memcached as a MariaDB Caching Layer
When using memcached to cache MariaDB data, your application must retrieve data from the database and load the appropriate key-value pairs into the cache. Then, subsequent lookups can be done directly from the cache.
Because MariaDB has its own in-memory caching mechanisms for queried data, such as the InnoDB buffer pool and the MariaDB query cache, look for opportunities beyond loading individual column values or rows into the cache. Prefer to cache composite values, such as those retrieved from multiple tables through a join query, or result sets assembled from multiple rows.Caution
Limit the information in the cache to non-sensitive data, because there is no security required to access or update the information within a memcached instance. Anybody with access to the machine has the ability to read, view and potentially update the information. To keep the data secure, encrypt the information before caching it. To restrict the users capable of connecting to the server, either disable network access, or use IPTables or similar techniques to restrict access to the memcached ports to a select set of hosts.
You can introduce memcached to an existing application, even if caching was not part of the original design. In many languages and environments the changes to the application will be just a few lines, first to attempt to read from the cache when loading data, fall back to the old method if the information is not cached, and to update the cache with information once the data has been read.
The general sequence for using memcached in any language as a caching solution for MariaDB is as follows:
- Request the item from the cache.
- If the item exists, use the item data.
- If the item does not exist, load the data from MySQL, and store the value into the cache. This means the value is available to the next client that requests it from the cache.
For a flow diagram of this sequence, see Figure 14.10, "Typical memcached Application Flowchart".
Figure 14.10. Typical memcached Application Flowchart
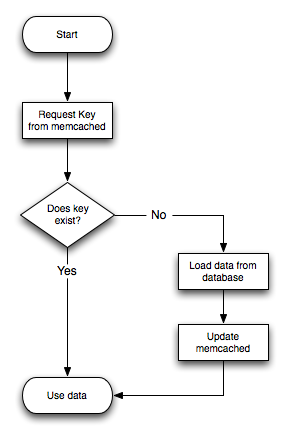
Adapting Database Best Practices to memcached Applications
The most direct way to cache MariaDB data is to use a 2-column table, where the first column is a primary key. Because of the uniqueness requirements for memcached keys, make sure your database schema makes appropriate use of primary keys and unique constraints.
If you combine multiple column values into a single memcached item value, choose data types to make it easy to parse the value back into its components, for example by using a separator character between numeric values.
The queries that map most easily to memcached lookups are those with a single WHERE clause, using an = or IN operator. For complicated WHERE clauses, or those using operators such as <, >, BETWEEN, or LIKE, memcached does not provide a simple or efficient way to scan through or filter the keys or associated values, so typically you perform those operations as SQL queries on the underlying database.
Using libmemcached with C and C++
libmemcachedBase FunctionslibmemcachedServer FunctionslibmemcachedSet FunctionslibmemcachedGet Functions- Controlling
libmemcachedBehaviors- libmemcached Command-Line Utilities
The libmemcached library provides both C and C++ interfaces to memcached and is also the basis for a number of different additional API implementations, including Perl, Python and Ruby. Understanding the core libmemcached functions can help when using these other interfaces.
The C library is the most comprehensive interface library for memcached and provides functions and operational systems not always exposed in interfaces not based on the libmemcached library.
The different functions can be divided up according to their basic operation. In addition to functions that interface to the core API, a number of utility functions provide extended functionality, such as appending and prepending data.
To build and install libmemcached, download the libmemcached package, run configure, and then build and install:
shell> tar xjf libmemcached-0.21.tar.gz shell> cd libmemcached-0.21
shell> ./configure shell> make shell> make install
On many Linux operating systems, you can install the corresponding libmemcached package through the usual yum, apt-get, or similar commands.
To build an application that uses the library, first set the list of servers. Either directly manipulate the servers configured within the main memcached_st structure, or separately populate a list of servers, and then add this list to the memcached_st structure. The latter method is used in the following example. Once the server list has been set, you can call the functions to store or retrieve data. A simple application for setting a preset value to localhost is provided here:
#include <stdio.h>
#include <string.h>
#include <unistd.h>
#include <libmemcached/memcached.h>
int main(int argc, char *argv[])
{
 memcached_server_st *servers = NULL;
 memcached_st *memc;
 memcached_return rc;
 char *key= 'keystring';
 char *value= 'keyvalue';
 memcached_server_st *memcached_servers_parse (char *server_strings);
 memc= memcached_create(NULL);
 servers= memcached_server_list_append(servers, 'localhost', 11211, &rc);
 rc= memcached_server_push(memc, servers);
 if (rc == MEMCACHED_SUCCESS)
 fprintf(stderr,'Added server successfully\n');
 else
 fprintf(stderr,'Couldn't add server: %s\n',memcached_strerror(memc, rc));
 rc= memcached_set(memc, key, strlen(key), value, strlen(value), (time_t)0, (uint32_t)0);
 if (rc == MEMCACHED_SUCCESS)
 fprintf(stderr,'Key stored successfully\n');
 else
 fprintf(stderr,'Couldn't store key: %s\n',memcached_strerror(memc, rc));
 return 0;
}
To test the success of an operation, use the return value, or populated result code, for a given function. The value is always set to MEMCACHED_SUCCESS if the operation succeeded. In the event of a failure, use the memcached_strerror() function to translate the result code into a printable string.
To build the application, specify the memcached library:
shell> gcc -o memc_basic memc_basic.c -lmemcached
Running the above sample application, after starting a memcached server, should return a success message:
shell> memc_basic Added server successfully Key stored successfully
libmemcached Base Functions
The base libmemcached functions let you create, destroy and clone the main memcached_st structure that is used to interface with the memcached servers. The main functions are defined below:
memcached_st *memcached_create (memcached_st *ptr);
Creates a new memcached_st structure for use with the other libmemcached API functions. You can supply an existing, static, memcached_st structure, or NULL to have a new structured allocated. Returns a pointer to the created structure, or NULL on failure.
void memcached_free (memcached_st *ptr);
Frees the structure and memory allocated to a previously created memcached_st structure.
memcached_st *memcached_clone(memcached_st *clone, memcached_st *source);
Clones an existing memcached structure from the specified source, copying the defaults and list of servers defined in the structure.
libmemcached Server Functions
The libmemcached API uses a list of servers, stored within the memcached_server_st structure, to act as the list of servers used by the rest of the functions. To use memcached, you first create the server list, and then apply the list of servers to a valid libmemcached object.
Because the list of servers, and the list of servers within an active libmemcached object can be manipulated separately, you can update and manage server lists while an active libmemcached interface is running.
The functions for manipulating the list of servers within a memcached_st structure are:
memcached_return
 memcached_server_add (memcached_st *ptr,
 char *hostname,
 unsigned int port);
Adds a server, using the given hostname and port into the memcached_st structure given in ptr.
memcached_return
 memcached_server_add_unix_socket (memcached_st *ptr,
 char *socket);
Adds a Unix socket to the list of servers configured in the memcached_st structure.
unsigned int memcached_server_count (memcached_st *ptr);
Returns a count of the number of configured servers within the memcached_st structure.
memcached_server_st *
 memcached_server_list (memcached_st *ptr);
Returns an array of all the defined hosts within a memcached_st structure.
memcached_return
 memcached_server_push (memcached_st *ptr,
 memcached_server_st *list);
Pushes an existing list of servers onto list of servers configured for a current memcached_st structure. This adds servers to the end of the existing list, and duplicates are not checked.
The memcached_server_st structure can be used to create a list of memcached servers which can then be applied individually to memcached_st structures.
memcached_server_st *
 memcached_server_list_append (memcached_server_st *ptr,
 char *hostname,
 unsigned int port,
 memcached_return *error);
Adds a server, with hostname and port, to the server list in ptr. The result code is handled by the error argument, which should point to an existing memcached_return variable. The function returns a pointer to the returned list.
unsigned int memcached_server_list_count (memcached_server_st *ptr);
Returns the number of the servers in the server list.
void memcached_server_list_free (memcached_server_st *ptr);
Frees the memory associated with a server list.
memcached_server_st *memcached_servers_parse (char *server_strings);
Parses a string containing a list of servers, where individual servers are separated by a comma, space, or both, and where individual servers are of the form server[:port]
libmemcached Set Functions
The set-related functions within libmemcached provide the same functionality as the core functions supported by the memcached protocol. The full definition for the different functions is the same for all the base functions (add, replace, prepend, append). For example, the function definition for memcached_set() is:
memcached_return
 memcached_set (memcached_st *ptr,
 const char *key,
 size_t key_length,
 const char *value,
 size_t value_length,
 time_t expiration,
 uint32_t flags);
The ptr is the memcached_st structure. The key and key_length define the key name and length, and value and value_length the corresponding value and length. You can also set the expiration and optional flags. For more information, see , "Controlling libmemcached Behaviors".
The following table outlines the remainder of the set-related functions.
libmemcached Function
| Equivalent to |
|---|---|
memcached_set(memc, key, key_length, value, value_length, expiration, flags)
| Generic set() operation.
|
memcached_add(memc, key, key_length, value, value_length, expiration, flags)
| Generic add() function.
|
memcached_replace(memc, key, key_length, value, value_length, expiration, flags)
| Generic replace().
|
memcached_prepend(memc, key, key_length, value, value_length, expiration, flags)
| Prepends the specified value before the current value of the specified key.
|
memcached_append(memc, key, key_length, value, value_length, expiration, flags)
| Appends the specified value after the current value of the specified key.
|
memcached_cas(memc, key, key_length, value, value_length, expiration, flags, cas)
| Overwrites the data for a given key as long as the corresponding cas value is still the same within the server.
|
memcached_set_by_key(memc, master_key, master_key_length, key, key_length, value, value_length, expiration, flags)
| Similar to the generic set(), but has the option of an additional master key that can be used to identify an individual server.
|
memcached_add_by_key(memc, master_key, master_key_length, key, key_length, value, value_length, expiration, flags)
| Similar to the generic add(), but has the option of an additional master key that can be used to identify an individual server.
|
memcached_replace_by_key(memc, master_key, master_key_length, key, key_length, value, value_length, expiration, flags)
| Similar to the generic replace(), but has the option of an additional master key that can be used to identify an individual server.
|
memcached_prepend_by_key(memc, master_key, master_key_length, key, key_length, value, value_length, expiration, flags)
| Similar to the memcached_prepend(), but has the option of an additional master key that can be used to identify an individual server.
|
memcached_append_by_key(memc, master_key, master_key_length, key, key_length, value, value_length, expiration, flags)
| Similar to the memcached_append(), but has the option of an additional master key that can be used to identify an individual server.
|
memcached_cas_by_key(memc, master_key, master_key_length, key, key_length, value, value_length, expiration, flags)
| Similar to the memcached_cas(), but has the option of an additional master key that can be used to identify an individual server. |
The by_key methods add two further arguments that define the master key, to be used and applied during the hashing stage for selecting the servers. You can see this in the following definition:
memcached_return
 memcached_set_by_key(memcached_st *ptr,
 const char *master_key,
 size_t master_key_length,
 const char *key,
 size_t key_length,
 const char *value,
 size_t value_length,
 time_t expiration,
 uint32_t flags);
All the functions return a value of type memcached_return, which you can compare against the MEMCACHED_SUCCESS constant.
libmemcached Get Functions
The libmemcached functions provide both direct access to a single item, and a multiple-key request mechanism that provides much faster responses when fetching a large number of keys simultaneously.
The main get-style function, which is equivalent to the generic get() is memcached_get(). This function returns a string pointer, pointing to the value associated with the specified key.
char *memcached_get (memcached_st *ptr,
 const char *key, size_t key_length,
 size_t *value_length,
 uint32_t *flags,
 memcached_return *error);
A multi-key get, memcached_mget(), is also available. Using a multiple key get operation is much quicker to do in one block than retrieving the key values with individual calls to memcached_get(). To start the multi-key get, call memcached_mget():
memcached_return
 memcached_mget (memcached_st *ptr,
 char **keys, size_t *key_length,
 unsigned int number_of_keys);
The return value is the success of the operation. The keys parameter should be an array of strings containing the keys, and key_length an array containing the length of each corresponding key. number_of_keys is the number of keys supplied in the array.
To fetch the individual values, use memcached_fetch() to get each corresponding value.
char *memcached_fetch (memcached_st *ptr,
 const char *key, size_t *key_length,
 size_t *value_length,
 uint32_t *flags,
 memcached_return *error);
The function returns the key value, with the key, key_length and value_length parameters being populated with the corresponding key and length information. The function returns NULL when there are no more values to be returned. A full example, including the populating of the key data and the return of the information is provided here.
#include <stdio.h>
#include <sstring.h>
#include <unistd.h>
#include <libmemcached/memcached.h>
int main(int argc, char *argv[])
{
 memcached_server_st *servers = NULL;
 memcached_st *memc;
 memcached_return rc;
 char *keys[]= {'huey', 'dewey', 'louie'};
 size_t key_length[3];
 char *values[]= {'red', 'blue', 'green'};
 size_t value_length[3];
 unsigned int x;
 uint32_t flags;
 char return_key[MEMCACHED_MAX_KEY];
 size_t return_key_length;
 char *return_value;
 size_t return_value_length;
 memc= memcached_create(NULL);
 servers= memcached_server_list_append(servers, 'localhost', 11211, &rc);
 rc= memcached_server_push(memc, servers);
 if (rc == MEMCACHED_SUCCESS)
 fprintf(stderr,'Added server successfully\n');
 else
 fprintf(stderr,'Couldn't add server: %s\n',memcached_strerror(memc, rc));
 for(x= 0; x < 3; x++)
 {
 key_length[x] = strlen(keys[x]);
 value_length[x] = strlen(values[x]);
 rc= memcached_set(memc, keys[x], key_length[x], values[x],
 value_length[x], (time_t)0, (uint32_t)0);
 if (rc == MEMCACHED_SUCCESS)
 fprintf(stderr,'Key %s stored successfully\n',keys[x]);
 else
 fprintf(stderr,'Couldn't store key: %s\n',memcached_strerror(memc, rc));
 }
 rc= memcached_mget(memc, keys, key_length, 3);
 if (rc == MEMCACHED_SUCCESS)
 {
 while ((return_value= memcached_fetch(memc, return_key, &return_key_length,
 &return_value_length, &flags, &rc)) != NULL)
 {
 if (rc == MEMCACHED_SUCCESS)
 {
 fprintf(stderr,'Key %s returned %s\n',return_key, return_value);
 }
 }
 }
 return 0;
}
Running the above application produces the following output:
shell> memc_multi_fetch Added server successfully Key huey stored successfully Key dewey stored successfully Key louie stored successfully Key huey returned red Key dewey returned blue Key louie returned green
Controlling libmemcached Behaviors
The behavior of libmemcached can be modified by setting one or more behavior flags. These can either be set globally, or they can be applied during the call to individual functions. Some behaviors also accept an additional setting, such as the hashing mechanism used when selecting servers.
To set global behaviors:
memcached_return
 memcached_behavior_set (memcached_st *ptr,
 memcached_behavior flag,
 uint64_t data);
To get the current behavior setting:
uint64_t
 memcached_behavior_get (memcached_st *ptr,
 memcached_behavior flag);
| Behavior | Description |
|---|---|
MEMCACHED_BEHAVIOR_NO_BLOCK
| Caused libmemcached to use asynchronous I/O.
|
MEMCACHED_BEHAVIOR_TCP_NODELAY
| Turns on no-delay for network sockets. |
MEMCACHED_BEHAVIOR_HASH
| Without a value, sets the default hashing algorithm for keys to use MD5. Other valid values include MEMCACHED_HASH_DEFAULT, MEMCACHED_HASH_MD5, MEMCACHED_HASH_CRC, MEMCACHED_HASH_FNV1_64, MEMCACHED_HASH_FNV1A_64, MEMCACHED_HASH_FNV1_32, and MEMCACHED_HASH_FNV1A_32.
|
MEMCACHED_BEHAVIOR_DISTRIBUTION
| Changes the method of selecting the server used to store a given value. The default method is MEMCACHED_DISTRIBUTION_MODULA. You can enable consistent hashing by setting MEMCACHED_DISTRIBUTION_CONSISTENT. MEMCACHED_DISTRIBUTION_CONSISTENT is an alias for the value MEMCACHED_DISTRIBUTION_CONSISTENT_KETAMA.
|
MEMCACHED_BEHAVIOR_CACHE_LOOKUPS
| Cache the lookups made to the DNS service. This can improve the performance if you are using names instead of IP addresses for individual hosts. |
MEMCACHED_BEHAVIOR_SUPPORT_CAS
| Support CAS operations. By default, this is disabled because it imposes a performance penalty. |
MEMCACHED_BEHAVIOR_KETAMA
| Sets the default distribution to MEMCACHED_DISTRIBUTION_CONSISTENT_KETAMA and the hash to MEMCACHED_HASH_MD5.
|
MEMCACHED_BEHAVIOR_POLL_TIMEOUT
| Modify the timeout value used by poll(). Supply a signed int pointer for the timeout value.
|
MEMCACHED_BEHAVIOR_BUFFER_REQUESTS
| Buffers IO requests instead of them being sent. A get operation, or closing the connection causes the data to be flushed. |
MEMCACHED_BEHAVIOR_VERIFY_KEY
| Forces libmemcached to verify that a specified key is valid.
|
MEMCACHED_BEHAVIOR_SORT_HOSTS
| If set, hosts added to the list of configured hosts for a memcached_st structure are placed into the host list in sorted order. This breaks consistent hashing if that behavior has been enabled.
|
MEMCACHED_BEHAVIOR_CONNECT_TIMEOUT
| In nonblocking mode this changes the value of the timeout during socket connection. |
libmemcached Command-Line Utilities
In addition to the main C library interface, libmemcached also includes a number of command-line utilities that can be useful when working with and debugging memcached applications.
All of the command-line tools accept a number of arguments, the most critical of which is servers, which specifies the list of servers to connect to when returning information.
The main tools are:
- memcat: Display the value for each ID given on the command line:
shell> memcat --servers=localhost hwkey Hello world
- memcp: Copy the contents of a file into the cache, using the file name as the key:
shell> echo 'Hello World' > hwkey shell> memcp --servers=localhost hwkey shell> memcat --servers=localhost hwkey Hello world
- memrm: Remove an item from the cache:
shell> memcat --servers=localhost hwkey Hello world shell> memrm --servers=localhost hwkey shell> memcat --servers=localhost hwkey
- memslap: Test the load on one or more memcached servers, simulating get/set and multiple client operations. For example, you can simulate the load of 100 clients performing get operations:
shell> memslap --servers=localhost --concurrency=100 --flush --test=get memslap --servers=localhost --concurrency=100 --flush --test=get Threads connecting to servers 100
 Took 13.571 seconds to read data
- memflush: Flush (empty) the contents of the memcached cache.
shell> memflush --servers=localhost
Using MariaDB and memcached with Perl
The Cache::Memcached module provides a native interface to the Memcache protocol, and provides support for the core functions offered by memcached. Install the module using your operating system's package management system, or using CPAN:
root-shell> perl -MCPAN -e 'install Cache::Memcached'
To use memcached from Perl through the Cache::Memcached module, first create a new Cache::Memcached object that defines the list of servers and other parameters for the connection. The only argument is a hash containing the options for the cache interface. For example, to create a new instance that uses three memcached servers:
use Cache::Memcached;
my $cache = new Cache::Memcached {
 'servers' => [
 '192.168.0.100:11211',
 '192.168.0.101:11211',
 '192.168.0.102:11211',
 ],
};
Note
When using the Cache::Memcached interface with multiple servers, the API automatically performs certain operations across all the servers in the group. For example, getting statistical information through Cache::Memcached returns a hash that contains data on a host-by-host basis, as well as generalized statistics for all the servers in the group.
You can set additional properties on the cache object instance when it is created by specifying the option as part of the option hash. Alternatively, you can use a corresponding method on the instance:
serversor methodset_servers(): Specifies the list of the servers to be used. The servers list should be a reference to an array of servers, with each element as the address and port number combination (separated by a colon). You can also specify a local connection through a UNIX socket (for example/tmp/sock/memcached). To specify the server with a weight (indicating how much more frequently the server should be used during hashing), specify an array reference with the memcached server instance and a weight number. Higher numbers give higher priority.compress_thresholdor methodset_compress_threshold(): Specifies the threshold when values are compressed. Values larger than the specified number are automatically compressed (usingzlib) during storage and retrieval.no_rehashor methodset_norehash(): Disables finding a new server if the original choice is unavailable.readonlyor methodset_readonly(): Disables writes to the memcached servers.
Once the Cache::Memcached object instance has been configured, you can use the set() and get() methods to store and retrieve information from the memcached servers. Objects stored in the cache are automatically serialized and deserialized using the Storable module.
The Cache::Memcached interface supports the following methods for storing/retrieving data, and relate to the generic methods as shown in the table.
Cache::Memcached Function
| Equivalent to |
|---|---|
get()
| Generic get().
|
get_multi(keys)
| Gets multiple keys from memcache using just one query. Returns a hash reference of key/value pairs.
|
set()
| Generic set().
|
add()
| Generic add().
|
replace()
| Generic replace().
|
delete()
| Generic delete().
|
incr()
| Generic incr().
|
decr()
| Generic decr(). |
Below is a complete example for using memcached with Perl and the Cache::Memcached module:
#!/usr/bin/perl use Cache::Memcached;
use DBI;
use Data::Dumper;
# Configure the memcached server my $cache = new Cache::Memcached {
 'servers' => [
 'localhost:11211',
 ],
 };
# Get the film name from the command line
# memcached keys must not contain spaces, so create
# a key name by replacing spaces with underscores my $filmname = shift or die 'Must specify the film name\n';
my $filmkey = $filmname;
$filmkey =~ s/ /_/;
# Load the data from the cache my $filmdata = $cache->get($filmkey);
# If the data wasn't in the cache, then we load it from the database if (!defined($filmdata))
{
 $filmdata = load_filmdata($filmname);
 if (defined($filmdata))
 {
# Set the data into the cache, using the key
 if ($cache->set($filmkey,$filmdata))
 {
 print STDERR 'Film data loaded from database and cached\n';
 }
 else
 {
 print STDERR 'Couldn't store to cache\n';
 }
 }
 else
 {
 die 'Couldn't find $filmname\n';
 }
}
else
{
 print STDERR 'Film data loaded from Memcached\n';
}
sub load_filmdata
{
 my ($filmname) = @_;
 my $dsn = 'DBI:mysql:database=sakila;host=localhost;port=3306';
 $dbh = DBI->connect($dsn, 'sakila','password');
 my ($filmbase) = $dbh->selectrow_hashref(sprintf('select * from film where title = %s',
 $dbh->quote($filmname)));
 if (!defined($filmname))
 {
 return (undef);
 }
 $filmbase->{stars} =
 $dbh->selectall_arrayref(sprintf('select concat(first_name,' ',last_name) ' .
 'from film_actor left join (actor) ' .
 'on (film_actor.actor_id = actor.actor_id) ' .
 ' where film_id=%s',
 $dbh->quote($filmbase->{film_id})));
 return($filmbase);
}
The example uses the Sakila database, obtaining film data from the database and writing a composite record of the film and actors to memcached. When calling it for a film does not exist, you get this result:
shell> memcached-sakila.pl 'ROCK INSTINCT'
Film data loaded from database and cached
When accessing a film that has already been added to the cache:
shell> memcached-sakila.pl 'ROCK INSTINCT'
Film data loaded from Memcached
Using MariaDB and memcached with Python
The Python memcache module interfaces to memcached servers, and is written in pure Python (that is, without using one of the C APIs). You can download and install a copy from Python Memcached.
To install, download the package and then run the Python installer:
python setup.py install running install running bdist_egg running egg_info creating python_memcached.egg-info
...
removing 'build/bdist.linux-x86_64/egg' (and everything under it)
Processing python_memcached-1.43-py2.4.egg creating /usr/lib64/python2.4/site-packages/python_memcached-1.43-py2.4.egg Extracting python_memcached-1.43-py2.4.egg to /usr/lib64/python2.4/site-packages Adding python-memcached 1.43 to easy-install.pth file Installed /usr/lib64/python2.4/site-packages/python_memcached-1.43-py2.4.egg Processing dependencies for python-memcached==1.43
Finished processing dependencies for python-memcached==1.43
Once installed, the memcache module provides a class-based interface to your memcached servers. Serialization of Python structures is handled by using the Python cPickle or pickle modules.
To create a new memcache interface, import the memcache module and create a new instance of the memcache.Client class:
import memcache memc = memcache.Client(['127.0.0.1:11211'])
The first argument should be an array of strings containing the server and port number for each memcached instance to use. You can enable debugging by setting the optional debug parameter to 1.
By default, the hashing mechanism used is crc32. This provides a basic module hashing algorithm for selecting among multiple servers. You can change the function used by setting the value of memcache.serverHashFunction to the alternate function to use. For example:
from zlib import adler32
memcache.serverHashFunction = adler32
Once you have defined the servers to use within the memcache instance, the core functions provide the same functionality as in the generic interface specification. A summary of the supported functions is provided in the following table.
Python memcache Function
| Equivalent to |
|---|---|
get()
| Generic get().
|
get_multi(keys)
| Gets multiple values from the supplied array of keys. Returns a hash reference of key/value pairs.
|
set()
| Generic set().
|
set_multi(dict [, expiry [, key_prefix]])
| Sets multiple key/value pairs from the supplied dict.
|
add()
| Generic add().
|
replace()
| Generic replace().
|
prepend(key, value [, expiry])
| Prepends the supplied value to the value of the existing key.
|
append(key, value [, expiry[)
| Appends the supplied value to the value of the existing key.
|
delete()
| Generic delete().
|
delete_multi(keys [, expiry [, key_prefix]] )
| Deletes all the keys from the hash matching each string in the array keys.
|
incr()
| Generic incr().
|
decr()
| Generic decr(). |
Within the Python memcache module, all the *_multi()functions support an optional key_prefix parameter. If supplied, then the string is used as a prefix to all key lookups. For example, if you call:
memc.get_multi(['a','b'], key_prefix='users:')
The function retrieves the keys users:a and users:b from the servers.
Here is an example showing the storage and retrieval of information to a memcache instance, loading the raw data from MySQL:
import sys import MySQLdb import memcache memc = memcache.Client(['127.0.0.1:11211'], debug=1);
try:
 conn = MySQLdb.connect (host = 'localhost',
 user = 'sakila',
 passwd = 'password',
 db = 'sakila')
except MySQLdb.Error, e:
 print 'Error %d: %s' % (e.args[0], e.args[1])
 sys.exit (1)
popularfilms = memc.get('top5films')
if not popularfilms:
 cursor = conn.cursor()
 cursor.execute('select film_id,title from film order by rental_rate desc limit 5')
 rows = cursor.fetchall()
 memc.set('top5films',rows,60)
 print 'Updated memcached with MariaDB data'
else:
 print 'Loaded data from memcached'
 for row in popularfilms:
 print '%s, %s' % (row[0], row[1])
When executed for the first time, the data is loaded from the MariaDB database and stored to the memcached server.
shell> python memc_python.py Updated memcached with MariaDB data
Because the data is automatically serialized using cPickle/pickle, when you load the data back from memcached, you can use the object directly. In the example above, the information stored to memcached is in the form of rows from a Python DB cursor. When accessing the information (within the 60 second expiry time), the data is loaded from memcached and dumped:
shell> python memc_python.py Loaded data from memcached
2, ACE GOLDFINGER
7, AIRPLANE SIERRA
8, AIRPORT POLLOCK
10, ALADDIN CALENDAR
13, ALI FOREVER
The serialization and deserialization happens automatically, but be aware that serialization of Python data may be incompatible with other interfaces and languages. You can change the serialization module used during initialization, for example to use JSON, which is more easily exchanged.
Using MariaDB and memcached with PHP
PHP provides support for the Memcache functions through a PECL extension. To enable the PHP memcache extensions, build PHP using the --enable-memcache option to configure when building from source.
If you are installing on a Red Hat-based server, you can install the php-pecl-memcache RPM:
root-shell> yum --install php-pecl-memcache
On Debian-based distributions, use the php-memcache package.
To set global runtime configuration options, specify the values in the following table within your php.ini file:
| Configuration option | Default | Description |
|---|---|---|
memcache.allow_failover
| 1 | Specifies whether another server in the list should be queried if the first server selected fails. |
memcache.max_failover_attempts
| 20 | Specifies the number of servers to try before returning a failure. |
memcache.chunk_size
| 8192 | Defines the size of network chunks used to exchange data with the memcached server. |
memcache.default_port
| 11211 | Defines the default port to use when communicating with the memcached servers. |
memcache.hash_strategy
| standard | Specifies which hash strategy to use. Set to consistent to enable servers to be added or removed from the pool without causing the keys to be remapped to other servers. When set to standard, an older (modula) strategy is used that potentially uses different servers for storage.
|
memcache.hash_function
| crc32 | Specifies which function to use when mapping keys to servers. crc32 uses the standard CRC32 hash. fnv uses the FNV-1a hashing algorithm. |
To create a connection to a memcached server, create a new Memcache object and then specify the connection options. For example:
<?php
$cache = new Memcache;
$cache->connect('localhost',11211);
?>
This opens an immediate connection to the specified server.
To use multiple memcached servers, you need to add servers to the memcache object using addServer():
bool Memcache::addServer ( string $host [, int $port [, bool $persistent
 [, int $weight [, int $timeout [, int $retry_interval
 [, bool $status [, callback $failure_callback
 ]]]]]]] )
The server management mechanism within the php-memcache module is a critical part of the interface as it controls the main interface to the memcached instances and how the different instances are selected through the hashing mechanism.
To create a simple connection to two memcached instances:
<?php
$cache = new Memcache;
$cache->addServer('192.168.0.100',11211);
$cache->addServer('192.168.0.101',11211);
?>
In this scenario, the instance connection is not explicitly opened, but only opened when you try to store or retrieve a value. To enable persistent connections to memcached instances, set the $persistent argument to true. This is the default setting, and causes the connections to remain open.
To help control the distribution of keys to different instances, use the global memcache.hash_strategy setting. This sets the hashing mechanism used to select. You can also add another weight to each server, which effectively increases the number of times the instance entry appears in the instance list, therefore increasing the likelihood of the instance being chosen over other instances. To set the weight, set the value of the $weight argument to more than one.
The functions for setting and retrieving information are identical to the generic functional interface offered by memcached, as shown in this table:
PECL memcache Function
| Equivalent to |
|---|---|
get()
| Generic get().
|
set()
| Generic set().
|
add()
| Generic add().
|
replace()
| Generic replace().
|
delete()
| Generic delete().
|
increment()
| Generic incr().
|
decrement()
| Generic decr(). |
A full example of the PECL memcache interface is provided below. The code loads film data from the Sakila database when the user provides a film name. The data stored into the memcached instance is recorded as a mysqli result row, and the API automatically serializes the information for you.
<?php
$memc = new Memcache;
$memc->addServer('localhost','11211');
?>
<html xmlns='http://www.w3.org/1999/xhtml' xml:lang='en' lang='en'>
<head>
 <meta http-equiv='Content-Type' content='text/html; charset=utf-8' />
 <title>Simple Memcache Lookup</title>
</head>
<body>
<form method='post'>
 <p><b>Film</b>: <input type='text' size='20' name='film'></p>
<input type='submit'>
</form>
<hr/>
<?php
 echo 'Loading data...\n';
$value = $memc->get($_REQUEST['film']);
if ($value)
 {
 printf('<p>Film data for %s loaded from memcache</p>',$value['title']);
 foreach (array_keys($value) as $key)
 {
 printf('<p><b>%s</b>: %s</p>',$key, $value[$key]);
 }
 }
 else
 {
 $con = new mysqli('localhost','sakila','password','sakila') or
 die ('<h1>Database problem</h1>' . mysqli_connect_error());
 $result = $con->query(sprintf('select * from film where title ='%s'',$_REQUEST['film']));
 $row = $result->fetch_array(MYSQLI_ASSOC);
 $memc->set($row['title'],$row);
 printf('<p>Loaded %s from MySQL</p>',$row['title']);
 }
?>
With PHP, the connections to the memcached instances are kept open as long as the PHP and associated Apache instance remain running. When adding or removing servers from the list in a running instance (for example, when starting another script that mentions additional servers), the connections are shared, but the script only selects among the instances explicitly configured within the script.
To ensure that changes to the server list within a script do not cause problems, make sure to use the consistent hashing mechanism.
Using MariaDB and memcached with Ruby
There are a number of different modules for interfacing to memcached within Ruby. The Ruby-MemCache client library provides a native interface to memcached that does not require any external libraries, such as libmemcached. You can obtain the installer package from http://www.deveiate.org/projects/RMemCache.
To install, extract the package and then run install.rb:
shell> install.rb
If you have RubyGems, you can install the Ruby-MemCache gem:
shell> gem install Ruby-MemCache Bulk updating Gem source index for: http://gems.rubyforge.org Install required dependency io-reactor? [Yn] y Successfully installed Ruby-MemCache-0.0.1
Successfully installed io-reactor-0.05
Installing ri documentation for io-reactor-0.05...
Installing RDoc documentation for io-reactor-0.05...
To use a memcached instance from within Ruby, create a new instance of the MemCache object.
require 'memcache'
memc = MemCache::new '192.168.0.100:11211'
You can add a weight to each server to increase the likelihood of the server being selected during hashing by appending the weight count to the server host name/port string:
require 'memcache'
memc = MemCache::new '192.168.0.100:11211:3'
To add servers to an existing list, you can append them directly to the MemCache object:
memc += ['192.168.0.101:11211']
To set data into the cache, you can just assign a value to a key within the new cache object, which works just like a standard Ruby hash object:
memc['key'] = 'value'
Or to retrieve the value:
print memc['key']
For more explicit actions, you can use the method interface, which mimics the main memcached API functions, as summarized in the following table:
Ruby MemCache Method
| Equivalent to |
|---|---|
get()
| Generic get().
|
get_hash(keys)
| Get the values of multiple keys, returning the information as a hash of the keys and their values.
|
set()
| Generic set().
|
set_many(pairs)
| Set the values of the keys and values in the hash pairs.
|
add()
| Generic add().
|
replace()
| Generic replace().
|
delete()
| Generic delete().
|
incr()
| Generic incr().
|
decr()
| Generic decr(). |
Using MariaDB and memcached with Java
The com.danga.MemCached class within Java provides a native interface to memcached instances. You can obtain the client from http://whalin.com/memcached/. The Java class uses hashes that are compatible with libmemcached, so you can mix and match Java and libmemcached applications accessing the same memcached instances. The serialization between Java and other interfaces are not compatible. If this is a problem, use JSON or a similar nonbinary serialization format.
On most systems, you can download the package and use the jar directly.
To use the com.danga.MemCached interface, you create a MemCachedClient instance and then configure the list of servers by configuring the SockIOPool. Through the pool specification you set up the server list, weighting, and the connection parameters to optimized the connections between your client and the memcached instances that you configure.
Generally, you can configure the memcached interface once within a single class, then use this interface throughout the rest of your application.
For example, to create a basic interface, first configure the MemCachedClient and base SockIOPool settings:
public class MyClass {
 protected static MemCachedClient mcc = new MemCachedClient();
 static {
 String[] servers =
 {
 'localhost:11211',
 };
 Integer[] weights = { 1 };
 SockIOPool pool = SockIOPool.getInstance();
 pool.setServers( servers );
 pool.setWeights( weights );
In the above sample, the list of servers is configured by creating an array of the memcached instances to use. You can then configure individual weights for each server.
The remainder of the properties for the connection are optional, but you can set the connection numbers (initial connections, minimum connections, maximum connections, and the idle timeout) by setting the pool parameters:
pool.setInitConn( 5 );
pool.setMinConn( 5 );
pool.setMaxConn( 250 );
pool.setMaxIdle( 1000 * 60 * 60 * 6
Once the parameters have been configured, initialize the connection pool:
pool.initialize();
The pool, and the connection to your memcached instances should now be ready to use.
To set the hashing algorithm used to select the server used when storing a given key, use pool.setHashingAlg():
pool.setHashingAlg( SockIOPool.NEW_COMPAT_HASH );
Valid values are NEW_COMPAT_HASH, OLD_COMPAT_HASH and NATIVE_HASH are also basic modula hashing algorithms. For a consistent hashing algorithm, use CONSISTENT_HASH. These constants are equivalent to the corresponding hash settings within libmemcached.
Java com.danga.MemCached Method
| Equivalent to |
|---|---|
get()
| Generic get().
|
getMulti(keys)
| Get the values of multiple keys, returning the information as Hash map using java.lang.String for the keys and java.lang.Object for the corresponding values.
|
set()
| Generic set().
|
add()
| Generic add().
|
replace()
| Generic replace().
|
delete()
| Generic delete().
|
incr()
| Generic incr().
|
decr()
| Generic decr(). |
Using the MariaDB memcached User-Defined Functions
The memcached MariaDB User-Defined Functions (UDFs) enable you to set and retrieve objects through a SQL interface, in MariaDB 5.0 or greater. This technique has the following benefits:
- You can update and retrieve cached items directly from within SQL scripts, stored procedures, and triggers. For example, you might already have triggers in place to increment counters and set status flags based on general database activity.
- You can pass information back and forth with other applications that use memcached, without adding database connection and query code to them.
- You can avoid installing and configuring a memcached client on every combination of language and server that you use for your MariaDB applications. The applications can relay memcached requests through the database server they connect to.
- You can access memcached servers from languages that do not have a memcached client.
To install the MariaDB memcached UDFs, download the UDF package from https://launchpad.net/memcached-udfs. Unpack the package and run configure to configure the build process. When running configure, use the --with-mysql option and specify the location of the mysql_config command.
shell>tar zxf memcached_functions_mysql-1.1.tar.gzshell>cd memcached_functions_mysql-1.1shell> # If memcached library is not found, set LDFLAGS=-Llibrary_directorybefore next command. shell>./configure --with-mysql=/usr/local/mysql/bin/mysql_config
Now build and install the functions:
shell>makeshell>make install
Copy the MariaDB memcached UDFs into your MariaDB plugins directory:
shell> cp /usr/local/lib/libmemcached_functions_mysql* /usr/local/mysql/lib/mysql/plugins/
The plugin directory is given by the value of the plugin-dir system variable. For more information, see , "Compiling and Installing User-Defined Functions".
Once installed, you must initialize the function within MariaDB using CREATE and specifying the return value and library. For example, to add the memc_get() function:
mysql> CREATE FUNCTION memc_get RETURNS STRING SONAME 'libmemcached_functions_mysql.so';
Repeat this process for each function to provide access to within MySQL. Once you have created the association, the information is retained, even over restarts of the MariaDB server. To simplify the process, use the SQL script provided in the memcached UDFs package:
shell> mysql <sql/install_functions.sql
Alternatively, if you have Perl installed, then you can use the supplied Perl script, which checks for the existence of each function and creates the function/library association if it is not already defined:
shell> utils/install.pl --silent
The --silent option installs everything automatically. Without this option, the script asks whether to install each of the available functions.
The interface remains consistent with the other APIs and interfaces. To set up a list of servers, use the memc_servers_set() function, which accepts a single string containing and comma-separated list of servers:
mysql> SELECT memc_servers_set('192.168.0.1:11211,192.168.0.2:11211');
Note
The list of servers used by the memcached UDFs is not persistent over restarts of the MariaDB server. If the MariaDB server fails, then you must re-set the list of memcached servers.
To set a value, use memc_set:
mysql> SELECT memc_set('myid', 'myvalue');
To retrieve a stored value:
mysql> SELECT memc_get('myid');
The list of functions supported by the UDFs, in relation to the standard protocol functions, is shown in the following table:
MySQL memcached UDF Function
| Equivalent to |
|---|---|
memc_get()
| Generic get().
|
memc_get_by_key(master_key, key, value)
| Like the generic get(), but uses the supplied master key to select the server to use.
|
memc_set()
| Generic set().
|
memc_set_by_key(master_key, key, value)
| Like the generic set(), but uses the supplied master key to select the server to use.
|
memc_add()
| Generic add().
|
memc_add_by_key(master_key, key, value)
| Like the generic add(), but uses the supplied master key to select the server to use.
|
memc_replace()
| Generic replace().
|
memc_replace_by_key(master_key, key, value)
| Like the generic replace(), but uses the supplied master key to select the server to use.
|
memc_prepend(key, value)
| Prepend the specified value to the current value of the specified key.
|
memc_prepend_by_key(master_key, key, value)
| Prepend the specified value to the current value of the specified key, but uses the supplied master key to select the server to use.
|
memc_append(key, value)
| Append the specified value to the current value of the specified key.
|
memc_append_by_key(master_key, key, value)
| Append the specified value to the current value of the specified key, but uses the supplied master key to select the server to use.
|
memc_delete()
| Generic delete().
|
memc_delete_by_key(master_key, key, value)
| Like the generic delete(), but uses the supplied master key to select the server to use.
|
memc_increment()
| Generic incr().
|
memc_decrement()
| Generic decr(). |
The respective *_by_key() functions are useful to store a specific value into a specific memcached server, possibly based on a differently calculated or constructed key.
The memcached UDFs include some additional functions:
memc_server_count()
Returns a count of the number of servers in the list of registered servers.
memc_servers_set_behavior(behavior_type, value),memc_set_behavior(behavior_type, value)
Sets behaviors for the list of servers. These behaviors are identical to those provided by the
libmemcachedlibrary. For more information onlibmemcachedbehaviors, see , "Usinglibmemcachedwith C and C++".You can use the behavior name as the
behavior_type:mysql> SELECT memc_servers_behavior_set('MEMCACHED_BEHAVIOR_KETAMA',1);memc_servers_behavior_get(behavior_type),memc_get_behavior(behavior_type, value)
Returns the value for a given behavior.
memc_list_behaviors()
Returns a list of the known behaviors.
memc_list_hash_types()
Returns a list of the supported key-hashing algorithms.
memc_list_distribution_types()
Returns a list of the supported distribution types to be used when selecting a server to use when storing a particular key.
memc_libmemcached_version()
Returns the version of the
libmemcachedlibrary.memc_stats()
Returns the general statistics information from the server.
memcached Protocol
Communicating with a memcached server can be achieved through either the TCP or UDP protocols. When using the TCP protocol, you can use a simple text based interface for the exchange of information.
Using the TCP Text Protocol
When communicating with memcached, you can connect to the server using the port configured for the server. You can open a connection with the server without requiring authorization or login. As soon as you have connected, you can start to send commands to the server. When you have finished, you can terminate the connection without sending any specific disconnection command. Clients are encouraged to keep their connections open to decrease latency and improve performance.
Data is sent to the memcached server in two forms:
- Text lines, which are used to send commands to the server, and receive responses from the server.
- Unstructured data, which is used to receive or send the value information for a given key. Data is returned to the client in exactly the format it was provided.
Both text lines (commands and responses) and unstructured data are always terminated with the string \r\n. Because the data being stored may contain this sequence, the length of the data (returned by the client before the unstructured data is transmitted should be used to determine the end of the data.
Commands to the server are structured according to their operation:
- Storage commands:
set,add,replace,append,prepend,cas
Storage commands to the server take the form:
command key [flags] [exptime] length [noreply]
Or when using compare and swap (cas):
cas key [flags] [exptime] length [casunique] [noreply]
Where:
command: The command name.
set: Store value against keyadd: Store this value against key if the key does not already existreplace: Store this value against key if the key already existsappend: Append the supplied value to the end of the value for the specified key. Theflagsandexptimearguments should not be used.prepend: Append value currently in the cache to the end of the supplied value for the specified key. Theflagsandexptimearguments should not be used.cas: Set the specified key to the supplied value, only if the suppliedcasuniquematches. This is effectively the equivalent of change the information if nobody has updated it since I last fetched it.
key: The key. All data is stored using a the specific key. The key cannot contain control characters or whitespace, and can be up to 250 characters in size.flags: The flags for the operation (as an integer). Flags in memcached are transparent. The memcached server ignores the contents of the flags. They can be used by the client to indicate any type of information. In memcached 1.2.0 and lower the value is a 16-bit integer value. In memcached 1.2.1 and higher the value is a 32-bit integer.exptime: The expiry time, or zero for no expiry.length: The length of the supplied value block in bytes, excluding the terminating\r\ncharacters.casunique: A unique 64-bit value of an existing entry. This is used to compare against the existing value. Use the value returned by thegetscommand when issuingcasupdates.noreply: Tells the server not to reply to the command.
For example, to store the value
abcdefinto the keyxyzkey, you would use:set xyzkey 0 0 6\r\nabcdef\r\n
The return value from the server is one line, specifying the status or error information. For more information, see Table 14.2, "memcached Protocol Responses".
- Retrieval commands:
get,gets
Retrieval commands take the form:
get key1 [key2 .... keyn]
gets key1 [key2 ... keyn]
You can supply multiple keys to the commands, with each requested key separated by whitespace.
The server responds with an information line of the form:
VALUE key flags bytes [casunique]
Where:
key: The key name.flags: The value of the flag integer supplied to the memcached server when the value was stored.bytes: The size (excluding the terminating\r\ncharacter sequence) of the stored value.casunique: The unique 64-bit integer that identifies the item.
The information line is immediately followed by the value data block. For example:
get xyzkey\r\n VALUE xyzkey 0 6\r\n abcdef\r\n
If you have requested multiple keys, an information line and data block is returned for each key found. If a requested key does not exist in the cache, no information is returned.
- Delete commands:
delete
Deletion commands take the form:
delete key [time] [noreply]
Where:
key: The key name.time: The time in seconds (or a specific Unix time) for which the client wishes the server to refuseaddorreplacecommands on this key. Alladd,replace,get, andgetscommands fail during this period.setoperations succeed. After this period, the key is deleted permanently and all commands are accepted.
If not supplied, the value is assumed to be zero (delete immediately).
noreply: Tells the server not to reply to the command.
Responses to the command are either
DELETEDto indicate that the key was successfully removed, orNOT_FOUNDto indicate that the specified key could not be found. - Increment/Decrement:
incr,decr
The increment and decrement commands change the value of a key within the server without performing a separate get/set sequence. The operations assume that the currently stored value is a 64-bit integer. If the stored value is not a 64-bit integer, then the value is assumed to be zero before the increment or decrement operation is applied.
Increment and decrement commands take the form:
incr key value [noreply]
decr key value [noreply]
Where:
key: The key name.value: An integer to be used as the increment or decrement value.noreply: Tells the server not to reply to the command.
The response is:
NOT_FOUND: The specified key could not be located.value: The new value associated with the specified key.
Values are assumed to be unsigned. For
decroperations, the value is never decremented below 0. Forincroperations, the value wraps around the 64-bit maximum. - Statistics commands:
stats
The
statscommand provides detailed statistical information about the current status of the memcached instance and the data it is storing.Statistics commands take the form:
STAT [name] [value]
Where:
name: The optional name of the statistics to return. If not specified, the general statistics are returned.value: A specific value to be used when performing certain statistics operations.
The return value is a list of statistics data, formatted as follows:
STAT name value
The statistics are terminated with a single line,
END.For more information, see , "Getting memcached Statistics".
For reference, a list of the different commands supported and their formats is provided below.
Table 14.1. memcached Command Reference
| Command | Command Formats |
|---|---|
set
| set key flags exptime length, set key flags exptime length noreply
|
add
| add key flags exptime length, add key flags exptime length noreply
|
replace
| replace key flags exptime length, replace key flags exptime length noreply
|
append
| append key length, append key length noreply
|
prepend
| prepend key length, prepend key length noreply
|
cas
| cas key flags exptime length casunique, cas key flags exptime length casunique noreply
|
get
| get key1 [key2 ... keyn]
|
gets
| |
delete
| delete key, delete key noreply, delete key expiry, delete key expiry noreply
|
incr
| incr key, incr key noreply, incr key value, incr key value noreply
|
decr
| decr key, decr key noreply, decr key value, decr key value noreply
|
stat
| stat, stat name, stat name value |
When sending a command to the server, the response from the server is one of the settings in the following table. All response values from the server are terminated by \r\n:
Table 14.2. memcached Protocol Responses
| String | Description |
|---|---|
STORED
| Value has successfully been stored. |
NOT_STORED
| The value was not stored, but not because of an error. For commands where you are adding a or updating a value if it exists (such as add and replace), or where the item has already been set to be deleted.
|
EXISTS
| When using a cas command, the item you are trying to store already exists and has been modified since you last checked it.
|
NOT_FOUND
| The item you are trying to store, update or delete does not exist or has already been deleted. |
ERROR
| You submitted a nonexistent command name. |
CLIENT_ERROR errorstring
| There was an error in the input line, the detail is contained in errorstring.
|
SERVER_ERROR errorstring
| There was an error in the server that prevents it from returning the information. In extreme conditions, the server may disconnect the client after this error occurs. |
VALUE keys flags length
| The requested key has been found, and the stored key, flags and data block are returned, of the specified length.
|
DELETED
| The requested key was deleted from the server. |
STAT name value
| A line of statistics data. |
END
| The end of the statistics data. |
Getting memcached Statistics
- memcached General Statistics
- memcached Slabs Statistics
- memcached Item Statistics
- memcached Size Statistics
memcachedDetail Statistics- Using memcached-tool
- memcached Slabs Statistics
The memcached system has a built-in statistics system that collects information about the data being stored into the cache, cache hit ratios, and detailed information on the memory usage and distribution of information through the slab allocation used to store individual items. Statistics are provided at both a basic level that provide the core statistics, and more specific statistics for specific areas of the memcached server.
This information can be useful to ensure that you are getting the correct level of cache and memory usage, and that your slab allocation and configuration properties are set at an optimal level.
The stats interface is available through the standard memcached protocol, so the reports can be accessed by using telnet to connect to the memcached. The supplied memcached-tool includes support for obtaining the , "memcached Slabs Statistics" and , "memcached General Statistics" information. For more information, see , "Using memcached-tool".
Alternatively, most of the language API interfaces provide a function for obtaining the statistics from the server.
For example, to get the basic stats using telnet:
shell> telnet localhost 11211
Trying ::1...
Connected to localhost.
Escape character is '^]'.
stats STAT pid 23599
STAT uptime 675
STAT time 1211439587
STAT version 1.2.5
STAT pointer_size 32
STAT rusage_user 1.404992
STAT rusage_system 4.694685
STAT curr_items 32
STAT total_items 56361
STAT bytes 2642
STAT curr_connections 53
STAT total_connections 438
STAT connection_structures 55
STAT cmd_get 113482
STAT cmd_set 80519
STAT get_hits 78926
STAT get_misses 34556
STAT evictions 0
STAT bytes_read 6379783
STAT bytes_written 4860179
STAT limit_maxbytes 67108864
STAT threads 1
END
When using Perl and the Cache::Memcached module, the stats() function returns information about all the servers currently configured in the connection object, and total statistics for all the memcached servers as a whole.
For example, the following Perl script obtains the stats and dumps the hash reference that is returned:
use Cache::Memcached;
use Data::Dumper;
my $memc = new Cache::Memcached;
$memc->set_servers(\@ARGV);
print Dumper($memc->stats());
When executed on the same memcached as used in the Telnet example above we get a hash reference with the host by host and total statistics:
$VAR1 = {
 'hosts' => {
 'localhost:11211' => {
 'misc' => {
 'bytes' => '2421',
 'curr_connections' => '3',
 'connection_structures' => '56',
 'pointer_size' => '32',
 'time' => '1211440166',
 'total_items' => '410956',
 'cmd_set' => '588167',
 'bytes_written' => '35715151',
 'evictions' => '0',
 'curr_items' => '31',
 'pid' => '23599',
 'limit_maxbytes' => '67108864',
 'uptime' => '1254',
 'rusage_user' => '9.857805',
 'cmd_get' => '838451',
 'rusage_system' => '34.096988',
 'version' => '1.2.5',
 'get_hits' => '581511',
 'bytes_read' => '46665716',
 'threads' => '1',
 'total_connections' => '3104',
 'get_misses' => '256940'
 },
 'sizes' => {
 '128' => '16',
 '64' => '15'
 }
 }
 },
 'self' => {},
 'total' => {
 'cmd_get' => 838451,
 'bytes' => 2421,
 'get_hits' => 581511,
 'connection_structures' => 56,
 'bytes_read' => 46665716,
 'total_items' => 410956,
 'total_connections' => 3104,
 'cmd_set' => 588167,
 'bytes_written' => 35715151,
 'curr_items' => 31,
 'get_misses' => 256940
 }
 };
The statistics are divided up into a number of distinct sections, and then can be requested by adding the type to the stats command. Each statistics output is covered in more detail in the following sections.
- General statistics, see , "memcached General Statistics".
- Slab statistics (
slabs), see , "memcached Slabs Statistics". - Item statistics (
items), see , "memcached Item Statistics". - Size statistics (
sizes), see , "memcached Size Statistics". - Detailed status (
detail), see , "memcachedDetail Statistics".
memcached General Statistics
The output of the general statistics provides an overview of the performance and use of the memcached instance. The statistics returned by the command and their meaning is shown in the following table.
The following terms are used to define the value type for each statistics value:
32u: 32-bit unsigned integer64u: 64-bit unsigned integer32u:32u: Two 32-bit unsigned integers separated by a colonString: Character string
| Statistic | Data type | Description | Version |
|---|---|---|---|
pid
| 32u | Process ID of the memcached instance. | |
uptime
| 32u | Uptime (in seconds) for this memcached instance. | |
time
| 32u | Current time (as epoch). | |
version
| string | Version string of this instance. | |
pointer_size
| string | Size of pointers for this host specified in bits (32 or 64). | |
rusage_user
| 32u:32u | Total user time for this instance (seconds:microseconds). | |
rusage_system
| 32u:32u | Total system time for this instance (seconds:microseconds). | |
curr_items
| 32u | Current number of items stored by this instance. | |
total_items
| 32u | Total number of items stored during the life of this instance. | |
bytes
| 64u | Current number of bytes used by this server to store items. | |
curr_connections
| 32u | Current number of open connections. | |
total_connections
| 32u | Total number of connections opened since the server started running. | |
connection_structures
| 32u | Number of connection structures allocated by the server. | |
cmd_get
| 64u | Total number of retrieval requests (get operations).
| |
cmd_set
| 64u | Total number of storage requests (set operations).
| |
get_hits
| 64u | Number of keys that have been requested and found present. | |
get_misses
| 64u | Number of items that have been requested and not found. | |
delete_hits
| 64u | Number of keys that have been deleted and found present. | 1.3.x |
delete_misses
| 64u | Number of items that have been delete and not found. | 1.3.x |
incr_hits
| 64u | Number of keys that have been incremented and found present. | 1.3.x |
incr_misses
| 64u | Number of items that have been incremented and not found. | 1.3.x |
decr_hits
| 64u | Number of keys that have been decremented and found present. | 1.3.x |
decr_misses
| 64u | Number of items that have been decremented and not found. | 1.3.x |
cas_hits
| 64u | Number of keys that have been compared and swapped and found present. | 1.3.x |
cas_misses
| 64u | Number of items that have been compared and swapped and not found. | 1.3.x |
cas_badvalue
| 64u | Number of keys that have been compared and swapped, but the comparison (original) value did not match the supplied value. | 1.3.x |
evictions
| 64u | Number of valid items removed from cache to free memory for new items. | |
bytes_read
| 64u | Total number of bytes read by this server from network. | |
bytes_written
| 64u | Total number of bytes sent by this server to network. | |
limit_maxbytes
| 32u | Number of bytes this server is permitted to use for storage. | |
threads
| 32u | Number of worker threads requested. | |
conn_yields
| 64u | Number of yields for connections (related to the -R option).
| 1.4.0 |
The most useful statistics from those given here are the number of cache hits, misses, and evictions.
A large number of get_misses may just be an indication that the cache is still being populated with information. The number should, over time, decrease in comparison to the number of cache get_hits. If, however, you have a large number of cache misses compared to cache hits after an extended period of execution, it may be an indication that the size of the cache is too small and you either need to increase the total memory size, or increase the number of the memcached instances to improve the hit ratio.
A large number of evictions from the cache, particularly in comparison to the number of items stored is a sign that your cache is too small to hold the amount of information that you regularly want to keep cached. Instead of items being retained in the cache, items are being evicted to make way for new items keeping the turnover of items in the cache high, reducing the efficiency of the cache.
memcached Slabs Statistics
To get the slabs statistics, use the stats slabs command, or the API equivalent.
The slab statistics provide you with information about the slabs that have created and allocated for storing information within the cache. You get information both on each individual slab-class and total statistics for the whole slab.
STAT 1:chunk_size 104
STAT 1:chunks_per_page 10082
STAT 1:total_pages 1
STAT 1:total_chunks 10082
STAT 1:used_chunks 10081
STAT 1:free_chunks 1
STAT 1:free_chunks_end 10079
STAT 9:chunk_size 696
STAT 9:chunks_per_page 1506
STAT 9:total_pages 63
STAT 9:total_chunks 94878
STAT 9:used_chunks 94878
STAT 9:free_chunks 0
STAT 9:free_chunks_end 0
STAT active_slabs 2
STAT total_malloced 67083616
END
Individual stats for each slab class are prefixed with the slab ID. A unique ID is given to each allocated slab from the smallest size up to the largest. The prefix number indicates the slab class number in relation to the calculated chunk from the specified growth factor. Hence in the example, 1 is the first chunk size and 9 is the 9th chunk allocated size.
The different parameters returned for each chunk size and the totals are shown in the following table.
| Statistic | Description | Version |
|---|---|---|
chunk_size
| Space allocated to each chunk within this slab class. | |
chunks_per_page
| Number of chunks within a single page for this slab class. | |
total_pages
| Number of pages allocated to this slab class. | |
total_chunks
| Number of chunks allocated to the slab class. | |
used_chunks
| Number of chunks allocated to an item.. | |
free_chunks
| Number of chunks not yet allocated to items. | |
free_chunks_end
| Number of free chunks at the end of the last allocated page. | |
get_hits
| Number of get hits to this chunk | 1.3.x |
cmd_set
| Number of set commands on this chunk | 1.3.x |
delete_hits
| Number of delete hits to this chunk | 1.3.x |
incr_hits
| Number of increment hits to this chunk | 1.3.x |
decr_hits
| Number of decrement hits to this chunk | 1.3.x |
cas_hits
| Number of CAS hits to this chunk | 1.3.x |
cas_badval
| Number of CAS hits on this chunk where the existing value did not match | 1.3.x |
mem_requested
| The true amount of memory of memory requested within this chunk | 1.4.1 |
The following additional statistics cover the information for the entire server, rather than on a chunk by chunk basis:
| Statistic | Description | Version |
|---|---|---|
active_slabs
| Total number of slab classes allocated. | |
total_malloced
| Total amount of memory allocated to slab pages. |
The key values in the slab statistics are the chunk_size, and the corresponding total_chunks and used_chunks parameters. These given an indication of the size usage of the chunks within the system. Remember that one key/value pair is placed into a chunk of a suitable size.
From these stats, you can get an idea of your size and chunk allocation and distribution. If you store many items with a number of largely different sizes, consider adjusting the chunk size growth factor to increase in larger steps to prevent chunk and memory wastage. A good indication of a bad growth factor is a high number of different slab classes, but with relatively few chunks actually in use within each slab. Increasing the growth factor creates fewer slab classes and therefore makes better use of the allocated pages.
memcached Item Statistics
To get the items statistics, use the stats items command, or the API equivalent.
The items statistics give information about the individual items allocated within a given slab class.
STAT items:2:number 1
STAT items:2:age 452
STAT items:2:evicted 0
STAT items:2:evicted_nonzero 0
STAT items:2:evicted_time 2
STAT items:2:outofmemory 0
STAT items:2:tailrepairs 0
...
STAT items:27:number 1
STAT items:27:age 452
STAT items:27:evicted 0
STAT items:27:evicted_nonzero 0
STAT items:27:evicted_time 2
STAT items:27:outofmemory 0
STAT items:27:tailrepairs 0
The prefix number against each statistics relates to the corresponding chunk size, as returned by the stats slabs statistics. The result is a display of the number of items stored within each chunk within each slab size, and specific statistics about their age, eviction counts, and out of memory counts. A summary of the statistics is given in the following table.
| Statistic | Description | |
|---|---|---|
number
| The number of items currently stored in this slab class. | |
age
| The age of the oldest item within the slab class, in seconds. | |
evicted
| The number of items evicted to make way for new entries. | |
evicted_time
| The time of the last evicted entry | |
evicted_nonzero
| The time of the last evicted non-zero entry | 1.4.0 |
outofmemory
| The number of items for this slab class that have triggered an out of memory error (only value when the -M command line option is in effect).
| |
tailrepairs
| Number of times the entries for a particular ID need repairing |
Item level statistics can be used to determine how many items are stored within a given slab and their freshness and recycle rate. You can use this to help identify whether there are certain slab classes that are triggering a much larger number of evictions that others.
memcached Size Statistics
To get size statistics, use the stats sizes command, or the API equivalent.
The size statistics provide information about the sizes and number of items of each size within the cache. The information is returned as two columns, the first column is the size of the item (rounded up to the nearest 32 byte boundary), and the second column is the count of the number of items of that size within the cache:
96 35
128 38
160 807
192 804
224 410
256 222
288 83
320 39
352 53
384 33
416 64
448 51
480 30
512 54
544 39
576 10065
Caution
Running this statistic locks up your cache as each item is read from the cache and its size calculated. On a large cache, this may take some time and prevent any set or get operations until the process completes.
The item size statistics are useful only to determine the sizes of the objects you are storing. Since the actual memory allocation is relevant only in terms of the chunk size and page size, the information is only useful during a careful debugging or diagnostic session.
memcached Detail Statistics
For memcached 1.3.x and higher, you can enable and obtain detailed statistics about the get, set, and del operations on theindividual keys stored in the cache, and determine whether the attempts hit (found) a particular key. These operations are only recorded while the detailed stats analysis is turned on.
To enable detailed statistics, you must send the stats detail on command to the memcached server:
$ telnet localhost 11211
Trying 127.0.0.1...
Connected to tiger.
Escape character is '^]'.stats detail on
OK
Individual statistics are recorded for every get, set and del operation on a key, including keys that are not currently stored in the server. For example, if an attempt is made to obtain the value of key abckey and it does not exist, the get operating on the specified key are recorded while detailed statistics are in effect, even if the key is not currently stored. The hits, that is, the number of get or del operations for a key that exists in the server are also counted.
To turn detailed statistics off, send the stats detail off command to the memcached server:
$ telnet localhost 11211
Trying 127.0.0.1...
Connected to tiger.
Escape character is '^]'.stats detail on
OK
To obtain the detailed statistics recorded during the process, send the stats detail dump command to the memcached server:
stats detail dump PREFIX hykkey get 0 hit 0 set 1 del 0
PREFIX xyzkey get 0 hit 0 set 1 del 0
PREFIX yukkey get 1 hit 0 set 0 del 0
PREFIX abckey get 3 hit 3 set 1 del 0
END
You can use the detailed statistics information to determine whether your memcached clients are using a large number of keys that do not exist in the server by comparing the hit and get or del counts. Because the information is recorded by key, you can also determine whether the failures or operations are clustered around specific keys.
Using memcached-tool
The memcached-tool, located within the scripts directory within the memcached source directory. The tool provides convenient access to some reports and statistics from any memcached instance.
The basic format of the command is:
shell> ./memcached-tool hostname:port [command]
The default output produces a list of the slab allocations and usage. For example:
shell> memcached-tool localhost:11211 display
 # Item_Size Max_age Pages Count Full? Evicted Evict_Time OOM
 1 80B 93s 1 20 no 0 0 0
 2 104B 93s 1 16 no 0 0 0
 3 136B 1335s 1 28 no 0 0 0
 4 176B 1335s 1 24 no 0 0 0
 5 224B 1335s 1 32 no 0 0 0
 6 280B 1335s 1 34 no 0 0 0
 7 352B 1335s 1 36 no 0 0 0
 8 440B 1335s 1 46 no 0 0 0
 9 552B 1335s 1 58 no 0 0 0
 10 696B 1335s 1 66 no 0 0 0
 11 872B 1335s 1 89 no 0 0 0
 12 1.1K 1335s 1 112 no 0 0 0
 13 1.3K 1335s 1 145 no 0 0 0
 14 1.7K 1335s 1 123 no 0 0 0
 15 2.1K 1335s 1 198 no 0 0 0
 16 2.6K 1335s 1 199 no 0 0 0
 17 3.3K 1335s 1 229 no 0 0 0
 18 4.1K 1335s 1 248 yes 36 2 0
 19 5.2K 1335s 2 328 no 0 0 0
 20 6.4K 1335s 2 316 yes 387 1 0
 21 8.1K 1335s 3 381 yes 492 1 0
 22 10.1K 1335s 3 303 yes 598 2 0
 23 12.6K 1335s 5 405 yes 605 1 0
 24 15.8K 1335s 6 384 yes 766 2 0
 25 19.7K 1335s 7 357 yes 908 170 0
 26 24.6K 1336s 7 287 yes 1012 1 0
 27 30.8K 1336s 7 231 yes 1193 169 0
 28 38.5K 1336s 4 104 yes 1323 169 0
 29 48.1K 1336s 1 21 yes 1287 1 0
 30 60.2K 1336s 1 17 yes 1093 169 0
 31 75.2K 1337s 1 13 yes 713 168 0
 32 94.0K 1337s 1 10 yes 278 168 0
 33 117.5K 1336s 1 3 no 0 0 0
This output is the same if you specify the command as display:
shell> memcached-tool localhost:11211 display
 # Item_Size Max_age Pages Count Full? Evicted Evict_Time OOM
 1 80B 93s 1 20 no 0 0 0
 2 104B 93s 1 16 no 0 0 0
...
The output shows a summarized version of the output from the slabs statistics. The columns provided in the output are shown below:
#: The slab numberItem_Size: The size of the slabMax_age: The age of the oldest item in the slabPages: The number of pages allocated to the slabCount: The number of items in this slabFull?: Whether the slab is fully populatedEvicted: The number of objects evicted from this slabEvict_Time: The time (in seconds) since the last evictionOOM: The number of items that have triggered an out of memory error
You can also obtain a dump of the general statistics for the server using the stats command:
shell> memcached-tool localhost:11211 stats
#localhost:11211 Field Value
 accepting_conns 1
 bytes 162
 bytes_read 485
 bytes_written 6820
 cas_badval 0
 cas_hits 0
 cas_misses 0
 cmd_flush 0
 cmd_get 4
 cmd_set 2
 conn_yields 0
 connection_structures 11
 curr_connections 10
 curr_items 2
 decr_hits 0
 decr_misses 1
 delete_hits 0
 delete_misses 0
 evictions 0
 get_hits 4
 get_misses 0
 incr_hits 0
 incr_misses 2
 limit_maxbytes 67108864
 listen_disabled_num 0
 pid 12981
 pointer_size 32
 rusage_system 0.013911
 rusage_user 0.011876
 threads 4
 time 1255518565
 total_connections 20
 total_items 2
 uptime 880
 version 1.4.2
memcached FAQ
Questions
- : Can MariaDB actually trigger/store the changed data to memcached?
- : Can memcached be run on a Windows environment?
- : What is the max size of an object you can store in memcached and is that configurable?
- : Is it true
memcachedwill be much more effective with db-read-intensive applications than with db-write-intensive applications? - : Is there any overhead in not using persistent connections? If persistent is always recommended, what are the downsides (for example, locking up)?
- : How does an event such as a crash of one of the memcached servers handled by the memcached client?
- : What's a recommended hardware config for a memcached server?
- : Is memcached more effective for video and audio as opposed to textual read/writes
- : Can memcached work with
ASPX? - : How expensive is it to establish a memcache connection? Should those connections be pooled?
- : How will the data will be handled when the memcached server is down?
- : How are auto-increment columns in the MariaDB database coordinated across multiple instances of memcached?
- : Is compression available?
- : Can we implement different types of memcached as different nodes in the same server - so can there be deterministic and non-deterministic in the same server?
- : What are best practices for testing an implementation, to ensure that it improves performance, and to measure the impact of memcached configuration changes? And would you recommend keeping the configuration very simple to start?
Questions and Answers
15.6.5.1: Can MariaDB actually trigger/store the changed data to memcached?
Yes. You can use the MariaDB UDFs for memcached and either write statements that directly set the values in the memcached server, or use triggers or stored procedures to do it for you. For more information, see , "Using the MariaDB memcached User-Defined Functions"
15.6.5.2: Can memcached be run on a Windows environment?
No. Currently memcached is available only on the Unix/Linux platform. There is an unofficial port available, see http://www.codeplex.com/memcachedproviders.
15.6.5.3: What is the max size of an object you can store in memcached and is that configurable?
The default maximum object size is 1MB. In memcached 1.4.2 and later you can change the maximum size of an object using the -I command line option.
For versions before this, to increase this size, you have to re-compile memcached. You can modify the value of the POWER_BLOCK within the slabs.c file within the source.
In memcached 1.4.2 and higher you can configure the maximum supported object size by using the -I command-line option. For example, to increase the maximum object size to 5MB:
$ memcached -I 5m
If an object is larger than the maximum object size, you must manually split it. memcached is very simple, you give it a key and some data, it tries to cache it in RAM. If you try to store more than the default maximum size, the value is just truncated for speed reasons.
15.6.5.4: Is it true memcached will be much more effective with db-read-intensive applications than with db-write-intensive applications?
Yes. memcached plays no role in database writes, it is a method of caching data already read from the database in RAM.
15.6.5.5: Is there any overhead in not using persistent connections? If persistent is always recommended, what are the downsides (for example, locking up)?
If you don't use persistent connections when communicating with memcached, there will be a small increase in the latency of opening the connection each time. The effect is comparable to use nonpersistent connections with MySQL.
In general, the chance of locking or other issues with persistent connections is minimal, because there is very little locking within memcached. If there is a problem, eventually your request will time out and return no result, so your application will need to load from MariaDB again.
15.6.5.6: How does an event such as a crash of one of the memcached servers handled by the memcached client?
There is no automatic handling of this. If your client fails to get a response from a server, it should fall back to loading the data from the MariaDB database.
The client APIs all provide the ability to add and remove memcached instances on the fly. If within your application you notice that memcached server is no longer responding, you can remove the server from the list of servers, and keys will automatically be redistributed to another memcached server in the list. If retaining the cache content on all your servers is important, make sure you use an API that supports a consistent hashing algorithm. For more information, see , "memcached Hashing/Distribution Types".
15.6.5.7: What's a recommended hardware config for a memcached server?
memcached has a very low processing overhead. All that is required is spare physical RAM capacity. The point is not that you should necessarily deploy a dedicated memcached server. If you have web, application, or database servers that have spare RAM capacity, then use them with memcached.
If you want to build and deploy a dedicated memcached servers, then you use a relatively low-power CPU, lots of RAM and one or more Gigabit Ethernet interfaces.
15.6.5.8: Is memcached more effective for video and audio as opposed to textual read/writes
memcached doesn't care what information you are storing. To memcached, any value you store is just a stream of data. Remember, though, that the maximum size of an object you can store in memcached is 1MB, but can be configured to be larger by using the -I option in memcached 1.4.2 and later, or by modifying the source in versions before 1.4.2. If you plan on using memcached with audio and video content, you will probably want to increase the maximum object size. Also remember that memcached is a solution for caching information for reading. It shouldn't be used for writes, except when updating the information in the cache.
15.6.5.9: Can memcached work with ASPX?
There are ports and interfaces for many languages and environments. ASPX relies on an underlying language such as C# or VisualBasic, and if you are using ASP.NET then there is a C# memcached library. For more information, see .
15.6.5.10: How expensive is it to establish a memcache connection? Should those connections be pooled?
Opening the connection is relatively inexpensive, because there is no security, authentication or other handshake taking place before you can start sending requests and getting results. Most APIs support a persistent connection to a memcached instance to reduce the latency. Connection pooling would depend on the API you are using, but if you are communicating directly over TCP/IP, then connection pooling would provide some small performance benefit.
15.6.5.11: How will the data will be handled when the memcached server is down?
The behavior is entirely application dependent. Most applications will fall back to loading the data from the database (just as if they were updating the memcached) information. If you are using multiple memcached servers, you may also want to remove a server from the list to prevent the missing server affecting performance. This is because the client will still attempt to communicate the memcached that corresponds to the key you are trying to load.
15.6.5.12: How are auto-increment columns in the MariaDB database coordinated across multiple instances of memcached?
They aren't. There is no relationship between MariaDB and memcached unless your application (or, if you are using the MariaDB UDFs for memcached, your database definition) creates one.
If you are storing information based on an auto-increment key into multiple instances of memcached then the information will only be stored on one of the memcached instances anyway. The client uses the key value to determine which memcached instance to store the information, it doesn't store the same information across all the instances, as that would be a waste of cache memory.
15.6.5.13: Is compression available?
Yes. Most of the client APIs support some sort of compression, and some even allow you to specify the threshold at which a value is deemed appropriate for compression during storage.
15.6.5.14: Can we implement different types of memcached as different nodes in the same server - so can there be deterministic and non-deterministic in the same server?
Yes. You can run multiple instances of memcached on a single server, and in your client configuration you choose the list of servers you want to use.
15.6.5.15: What are best practices for testing an implementation, to ensure that it improves performance, and to measure the impact of memcached configuration changes? And would you recommend keeping the configuration very simple to start?
The best way to test the performance is to start up a memcached instance. First, modify your application so that it stores the data just before the data is about to be used or displayed into memcached. Since the APIs handle the serialization of the data, it should just be a one-line modification to your code. Then, modify the start of the process that would normally load that information from MariaDB with the code that requests the data from memcached. If the data cannot be loaded from memcached, default to the MariaDB process.
All of the changes required will probably amount to just a few lines of code. To get the best benefit, make sure you cache entire objects (for example, all the components of a web page, blog post, discussion thread, etc.), rather than using memcached as a simple cache of individual rows of MariaDB tables.
Keeping the configuration simple at the start, or even over the long term, is easy with memcached. Once you have the basic structure up and running, the only change you may want to make is to add more servers into the list of servers used by your clients. You don't need to manage the memcached servers, and there is no complex configuration, just add more servers to the list and let the client API and the memcached servers make the decisions.
MySQL Proxy
- MySQL Proxy Supported Platforms
- Installing MariaDB Proxy
- MySQL Proxy Command Options
- MySQL Proxy Scripting
- Using MariaDB Proxy
- MySQL Proxy FAQ
- Installing MariaDB Proxy
The MariaDB Proxy is an application that communicates over the network using the MariaDB network protocol and provides communication between one or more MariaDB servers and one or more MariaDB clients. Because MariaDB Proxy uses the MariaDB network protocol, it can be used without modification with any MySQL-compatible client that uses the protocol. This includes the mysql command-line client, any clients that uses the MariaDB client libraries, and any connector that supports the MariaDB network protocol.
In the most basic configuration, MariaDB Proxy simply interposes itself between the server and clients, passing queries from the clients to the MariaDB Server and returning the responses from the MariaDB Server to the appropriate client. In more advanced configurations, the MariaDB Proxy can also monitor and alter the communication between the client and the server. Query interception enables you to add profiling, and interception of the exchanges is scriptable using the Lua scripting language.
By intercepting the queries from the client, the proxy can insert additional queries into the list of queries sent to the server, and remove the additional results when they are returned by the server. Using this functionality you can return the results from the original query to the client while adding informational statements to each query, for example, to monitor their execution time or progress, and separately log the results.
The proxy enables you to perform additional monitoring, filtering, or manipulation of queries without requiring you to make any modifications to the client and without the client even being aware that it is communicating with anything but a genuine MariaDB server.
This documentation covers MariaDB Proxy 0.8.2.Warning
MySQL Proxy is currently an Alpha release and should not be used within production environments.Important
MySQL Proxy is compatible with MariaDB 5.0 or later. Testing has not been performed with Version 4.1. Please provide feedback on your experiences using the MySQL Proxy Forum.
MySQL Proxy Supported Platforms
MySQL Proxy is currently available as a precompiled binary for the following platforms:
- Linux (including Red Hat, Fedora, Debian, SuSE) and derivatives
- Mac OS X
- FreeBSD
- IBM AIX
- Sun Solaris
- Microsoft Windows (including Microsoft Windows XP, Microsoft Windows Vista, Microsoft Windows Server 2003, Microsoft Windows Server 2008)
NoteYou must have the .NET Framework 1.1 or higher installed.
Other Unix/Linux platforms not listed should be compatible by using the source package and building MariaDB Proxy locally.
System requirements for the MariaDB Proxy application are the same as the main MariaDB server. Currently MariaDB Proxy is compatible only with MariaDB 5.0.1 and later. MariaDB Proxy is provided as a standalone, statically linked binary. You need not have MariaDB or Lua installed.
Installing MariaDB Proxy
- Installing MariaDB Proxy from a Binary Distribution
- Installing MariaDB Proxy from a Source Distribution
- Installing MariaDB Proxy from the Bazaar Repository
- Setting Up MariaDB Proxy as a Windows Service
- Installing MariaDB Proxy from a Source Distribution
You have three choices for installing MariaDB Proxy:
- Precompiled binaries are available for a number of different platforms. See , "Installing MariaDB Proxy from a Binary Distribution".
- You can install from the source code to build on an environment not supported by the binary distributions. See , "Installing MariaDB Proxy from a Source Distribution".
- The latest version of the MariaDB Proxy source code is available through a development repository is the best way to stay up to date with the latest fixes and revisions. See , "Installing MariaDB Proxy from the Bazaar Repository".
Installing MariaDB Proxy from a Binary Distribution
If you download a binary package, you must extract and copy the package contents to your desired installation directory. The package contains files required by MariaDB Proxy, including additional Lua scripts and other components required for execution.
To install, unpack the archive into the desired directory, then modify your PATH environment variable so that you can use the mysql-proxy command directly:
shell>cd /usr/localshell>tar zxf mysql-proxy-0.8.2-shell>platform.tar.gzPATH=$PATH:/usr/local/mysql-proxy-0.8.2-platform/sbin
To update the path globally on a system, you might need administrator privileges to modify the appropriate /etc/profile, /etc/bashrc, or other system configuration file.
On Windows, you can update the PATH environment variable using this procedure:
- On the Windows desktop, right-click the My Computer icon, and select Properties.
- Next select the Advanced tab from the System Properties menu that appears, and click the Environment Variables button.
- Under System Variables, select Path, then click the Edit button. The Edit System Variable dialogue should appear.
The Microsoft Visual C++ runtime libraries are a requirement for running MariaDB Proxy as of version 0.8.2. Users that do not have these libraries must download and install the Microsoft Visual C++ 2008 Service Pack 1 Redistributable Package MFC Security Update. Use the following link to obtain the package:
http://www.microsoft.com/download/en/details.aspx?displaylang=en&id=26368
Installing MariaDB Proxy from a Source Distribution
You can download a source package and compile the MariaDB Proxy yourself. To build from source, you must have the following prerequisite components installed:
libevent1.x or higher (1.3b or later is preferred).- lua 5.1.x or higher.
glib22.6.0 or higher.- pkg-config.
- libtool 1.5 or higher.
- MySQL 5.0.x or higher developer files.
On some operating systems, you might need to manually build the required components to get the latest version. If you have trouble compiling MariaDB Proxy, consider using a binary distributions instead.
After verifying that the prerequisite components are installed, configure and build MariaDB Proxy:
shell>tar zxf mysql-proxy-0.8.2.tar.gzshell>cd mysql-proxy-0.8.2shell>./configureshell>make
To test the build, use the check target to make:
shell> make check
The tests try to connect to localhost using the root user. To provide a password, set the MYSQL_PASSWORD environment variable:
shell> MYSQL_PASSWORD=root_pwd make check
You can install using the install target:
shell> make install
By default, mysql-proxy is installed into /usr/local/sbin/mysql-proxy. The Lua example scripts are installed into /usr/local/share.
Installing MariaDB Proxy from the Bazaar Repository
The MariaDB Proxy source is available through a public Bazaar repository and is the quickest way to get the latest releases and fixes.
A build from the Bazaar repository requires that the following prerequisite components be installed:
- Bazaar 1.10.0 or later.
libtool1.5 or higher.- autoconf 2.56 or higher.
- automake 1.10 or higher.
libevent1.x or higher (1.3b or later is preferred).- lua 5.1.x or higher.
glib22.4.0 or higher.- pkg-config.
- MySQL 5.0.x or higher developer files.
The mysql-proxy source is hosted on Launchpad. To check out a local copy of the Bazaar repository, use bzr:
shell> bzr branch lp:mysql-proxy
The preceding command downloads a complete version of the Bazaar repository for mysql-proxy. The main source files are located within the trunk subdirectory. The configuration scripts must be generated before you can configure and build mysql-proxy. The autogen.sh script generates the required configuration scripts for you:
shell> sh ./autogen.sh
The autogen.sh script creates the standard configure script, which you then use to configure and build with make:
shell>./configureshell>makeshell>make install
To create a standalone source distribution, identical to the source distribution available for download, use this command:
shell> make distcheck
The preceding command creates the file mysql-proxy-0.8.2.tar.gz (with the corresponding current version) within the current directory.
Setting Up MariaDB Proxy as a Windows Service
The MariaDB distribution on Windows includes the mysql-proxy-svc.exe command that enables a MariaDB Proxy instance to be managed by the Windows service control manager. You can control the service, including automatically starting and stopping it during boot, reboot and shutdown, without separately running the MariaDB Proxy application.
To set up a MariaDB Proxy service, use the sc command to create a new service using the MariaDB Proxy service command. Specify the MariaDB Proxy options on the sc command line, and identify the service with a unique name. For example, to configure a new MariaDB Proxy instance that will automatically start when your system boots, redirecting queries to the local MariaDB server:
C:\>Notesc create 'Proxy' DisplayName= 'MySQL Proxy' start= 'auto' »binPath= 'C:\Program Files\MySQL\mysql-proxy-0.8.2\bin\mysql-proxy-svc.exe »--proxy-backend-addresses=127.0.0.1:3306'
The space following the equal sign after each property is required; failure to include it results in an error.
The preceding command creates a new service called Proxy. You can start and stop the service using the net start|stop command with the service name. The service is not automatically started after it is created. To start the service:
C:\> net start proxy
The MariaDB Proxy service is starting.
The MariaDB Proxy service was started successfully.
You can specify additional command-line options to the sc command. You can also set up multiple MariaDB Proxy services on the same machine (providing they are configured to listen on different ports and/or IP addresses.
You can delete a service that you have created:
C:\> sc delete proxy
For more information on creating services using sc, see How to create a Windows service by using Sc.exe.
MySQL Proxy Command Options
To start MariaDB Proxy, you can run it directly from the command line:
shell> mysql-proxy
For most situations, you specify at least the host name or address and the port number of the backend MariaDB server to which the MariaDB Proxy should pass queries.
You can specify options to mysql-proxy either on the command line, or by using a configuration file and the --defaults-file command-line option to specify the file location.
If you use a configuration file, format it as follows:
- Specify the options within a
[mysql-proxy]configuration group. For example:
[mysql-proxy] admin-address =
host:port - Specify all configuration options in the form of a configuration name and the value to set.
- For options that are a simple toggle on the command line (for example,
--proxy-skip-profiling), usetrueorfalse. For example, the following is invalid:
[mysql-proxy]
proxy-skip-profiling
But this is valid:
[mysql-proxy]
proxy-skip-profiling = true
- Give the configuration file Unix permissions of
0660(readable and writable by user and group, no access for others).
Failure to adhere to any of these requirements causes mysql-proxy to generate an error during startup.
The following tables list the supported configuration file and command-line options.
Table 14.3. mysql-proxy Help Options
| Format | Option File | Description | Introduction | Deprecated | Removed |
|---|---|---|---|---|---|
| --help | help | Show help options | |||
| --help-admin | help-admin | Show admin module options | |||
| --help-all | help-all | Show all help options | |||
| --help-proxy | help-proxy | Show proxy module options |
Table 14.4. mysql-proxy Admin Options
| Format | Option File | Description | Introduction | Deprecated | Removed |
|---|---|---|---|---|---|
| --admin-address=host:port | admin-address=host:port | The admin module listening host and port | |||
| --admin-lua-script=file_name | admin-lua-script=file_name | Script to execute by the admin module | |||
| --admin-password=password | admin-password=password | Authentication password for admin module | |||
| --admin-username=user_name | admin-username=user_name | Authentication user name for admin module | |||
| --proxy-address=host:port | proxy-address=host:port | The listening proxy server host and port |
Table 14.5. mysql-proxy Proxy Options
| Format | Option File | Description | Introduction | Deprecated | Removed |
|---|---|---|---|---|---|
| --no-proxy | no-proxy | Do not start the proxy module | |||
| --proxy-backend-addresses=host:port | proxy-backend-addresses=host:port | The MariaDB server host and port | |||
| --proxy-fix-bug-25371 | proxy-fix-bug-25371 | Enable the fix for Bug #25371 for older libmysql versions | 0.8.1 | ||
| --proxy-lua-script=file_name | proxy-lua-script=file_name | Filename for Lua script for proxy operations | |||
| --proxy-pool-no-change-user | proxy-pool-no-change-user | Do not use the protocol CHANGE_USER command to reset the connection when coming from the connection pool | |||
| --proxy-read-only-backend-addresses=host:port | proxy-read-only-backend-addresses=host:port | The MariaDB server host and port (read only) | |||
| --proxy-skip-profiling | proxy-skip-profiling | Disable query profiling |
Table 14.6. mysql-proxy Applications Options
| Format | Option File | Description | Introduction | Deprecated | Removed |
|---|---|---|---|---|---|
| --basedir=dir_name | basedir=dir_name | The base directory prefix for paths in the configuration | |||
| --daemon | daemon | Start in daemon mode | |||
| --defaults-file=file_name | The configuration file to use | ||||
| --event-threads=count | event-threads=count | The number of event-handling threads | |||
| --keepalive | keepalive | Try to restart the proxy if a crash occurs | |||
| --log-backtrace-on-crash | log-backtrace-on-crash | Try to invoke the debugger and generate a backtrace on crash | |||
| --log-file=file_name | log-file=file_name | The file where error messages are logged | |||
| --log-level=level | log-level=level | The logging level | |||
| --log-use-syslog | log-use-syslog | Log errors to syslog | |||
| --lua-cpath=dir_name | lua-cpath=dir_name | Set the LUA_CPATH | |||
| --lua-path=dir_name | lua-path=dir_name | Set the LUA_PATH | |||
| --max-open-files=count | max-open-files=count | The maximum number of open files to support | |||
| --pid-file=file_name | pid-file=file_name | File in which to store the process ID | |||
| --plugin-dir=dir_name | plugin-dir=dir_name | Directory containing plugin files | |||
| --plugins=plugin,... | plugins=plugin,... | List of plugins to load | |||
| --user=user_name | user=user_name | The user to use when running mysql-proxy | |||
| --version | version | Show version information |
Except as noted in the following details, all of the options can be used within the configuration file by supplying the option and the corresponding value. For example:
[mysql-proxy]
log-file = /var/log/mysql-proxy.log log-level = message
--help,-h
Command-Line Format --help-hOption-File Format helpShow available help options.
--help-admin
Command-Line Format --help-adminOption-File Format help-adminShow options for the admin module.
--help-all
Command-Line Format --help-allOption-File Format help-allShow all help options.
--help-proxy
Command-Line Format --help-proxyOption-File Format help-proxyShow options for the proxy module.
--admin-address=host:port
Command-Line Format --admin-address=host:portOption-File Format admin-address=host:portPermitted Values Type stringDefault :4041The host name (or IP address) and port for the administration port. The default is
localhost:4041.--admin-lua-script=file_name
Command-Line Format --admin-lua-script=file_nameOption-File Format admin-lua-script=file_namePermitted Values Type file nameDefault The script to use for the proxy administration module.
--admin-password=password
Command-Line Format --admin-password=passwordOption-File Format admin-password=passwordPermitted Values Type stringDefault The password to use to authenticate users wanting to connect to the MariaDB Proxy administration module. This module uses the MariaDB protocol to request a user name and password for connections.
--admin-username=user_name
Command-Line Format --admin-username=user_nameOption-File Format admin-username=user_namePermitted Values Type stringDefault rootThe user name to use to authenticate users wanting to connect to the MariaDB Proxy administration module. This module uses the MariaDB protocol to request a user name and password for connections. The default user name is
root.--basedir=dir_name
Command-Line Format --basedir=dir_nameOption-File Format basedir=dir_namePermitted Values Type directory nameThe base directory to use as a prefix for all other file name configuration options. The base name should be an absolute (not relative) directory. If you specify a relative directory, mysql-proxy generates an error during startup.
--daemon
Command-Line Format --daemonOption-File Format daemonStarts the proxy in daemon mode.
--defaults-file=file_name
Command-Line Format --defaults-file=file_nameThe file to read for configuration options. If not specified, MariaDB Proxy takes options only from the command line.
--event-threads=count
Command-Line Format --event-threads=countOption-File Format event-threads=countPermitted Values Type numericDefault 1The number of event threads to reserve to handle incoming requests.
--keepalive
Command-Line Format --keepaliveOption-File Format keepaliveCreate a process surrounding the main mysql-proxy process that attempts to restart the main mysql-proxy process in the event of a crash or other failure.Note
The
--keepaliveoption is not available on Microsoft Windows. When running as a service, mysql-proxy automatically restarts.--log-backtrace-on-crash
Command-Line Format --log-backtrace-on-crashOption-File Format log-backtrace-on-crashLog a backtrace to the error log and try to initialize the debugger in the event of a failure.
--log-file=file_name
Command-Line Format --log-file=file_nameOption-File Format log-file=file_namePermitted Values Type file nameThe file to use to record log information. If this option is not given, mysql-proxy logs to the standard error output.
--log-level=level
Command-Line Format --log-level=levelOption-File Format log-level=levelPermitted Values Type enumerationValid Values errorwarninginfomessagedebugThe log level to use when outputting error messages. Messages with that level (or lower) are output. For example,
messagelevel also outputs message withinfo,warning, anderrorlevels.--log-use-syslog
Command-Line Format --log-use-syslogOption-File Format log-use-syslogLog errors to the syslog (Unix/Linux only).
--lua-cpath=dir_name
Command-Line Format --lua-cpath=dir_nameOption-File Format lua-cpath=dir_namePermitted Values Type directory nameThe
LUA_CPATHto use when loading compiled modules or libraries for Lua scripts.--lua-path=dir_name
Command-Line Format --lua-path=dir_nameOption-File Format lua-path=dir_namePermitted Values Type directory nameThe
LUA_CPATHto use when loading modules for Lua.--max-open-files=count
Command-Line Format --max-open-files=countOption-File Format max-open-files=countPermitted Values Type numericThe maximum number of open files and sockets supported by the mysql-proxy process. Certain scripts might require a higher value.
--no-proxy
Command-Line Format --no-proxyOption-File Format no-proxyDisable the proxy module.
--plugin-dir=dir_name
Command-Line Format --plugin-dir=dir_nameOption-File Format plugin-dir=dir_namePermitted Values Type directory nameThe directory to use when loading plugins for mysql-proxy.
--plugins=plugin,...
Command-Line Format --plugins=plugin,...Option-File Format plugins=plugin,...Permitted Values Type stringA comma-separated list of plugins to load.
--proxy-address=,host:port-Phost:port
Command-Line Format --proxy-address=host:port-P host:portOption-File Format proxy-address=host:portPermitted Values Type stringDefault :4040The listening host name (or IP address) and port of the proxy server. The default is
:4040(all IPs on port 4040).--proxy-read-only-backend-addresses=,host:port-rhost:port
Command-Line Format --proxy-read-only-backend-addresses=host:port-r host:portOption-File Format proxy-read-only-backend-addresses=host:portPermitted Values Type stringThe listening host name (or IP address) and port of the proxy server for read-only connections. The default is for this information not to be set.Note
Setting this value only configures the servers within the corresponding internal structure (see
proxy.global.backends). You can determine the backend type by checking thetypefield for each connection.You should therefore only use this option in combination with a script designed to make use of the different backend types.
When using this option on the command line, you can specify the option and the server multiple times to specify multiple backends. For example:
shell>
mysql-proxy --proxy-read-only-backend-addresses 192.168.0.1:3306 --proxy-read-only-backend-addresses 192.168.0.2:3306When using the option within the configuration file, you should separate multiple servers by commas. The equivalent of the preceding example would be:
...
proxy-read-only-backend-addresses = 192.168.0.1:3306,192.168.0.2:3306
--proxy-backend-addresses=,host:port-bhost:port
Command-Line Format --proxy-backend-addresses=host:port-b host:portOption-File Format proxy-backend-addresses=host:portPermitted Values Type stringDefault 127.0.0.1:3306The host name (or IP address) and port of the MariaDB server to connect to. You can specify multiple backend servers by supplying multiple options. Clients are connected to each backend server in round-robin fashion. For example, if you specify two servers A and B, the first client connection will go to server A; the second client connection to server B and the third client connection to server A.
When using this option on the command line, you can specify the option and the server multiple times to specify multiple backends. For example:
shell>
mysql-proxy --proxy-backend-addresses 192.168.0.1:3306 --proxy-backend-addresses 192.168.0.2:3306When using the option within the configuration file, you should separate multiple servers by commas. The equivalent of the preceding example would be:
...
proxy-backend-addresses = 192.168.0.1:3306,192.168.0.2:3306
--proxy-pool-no-change-user
Command-Line Format --proxy-pool-no-change-userOption-File Format proxy-pool-no-change-userDisable use of the MariaDB protocol
CHANGE_USERcommand when reusing a connection from the pool of connections specified by theproxy-backend-addresseslist.--proxy-skip-profiling
Command-Line Format --proxy-skip-profilingOption-File Format proxy-skip-profilingDisable query profiling (statistics time tracking). The default is for tracking to be enabled.
--proxy-fix-bug-25371
Version Removed 0.8.1 Command-Line Format --proxy-fix-bug-25371Option-File Format proxy-fix-bug-25371Enable a workaround for an issue when connecting to a MariaDB server later than 5.1.12 when using a MariaDB client library of any earlier version.
This option was removed in mysql-proxy 0.8.1. Now, mysql-proxy returns an error message at the protocol level if it sees a
COM_CHANGE_USERbeing sent to a server that has a version from 5.1.14 to 5.1.17.--proxy-lua-script=,file_name-sfile_name
Command-Line Format --proxy-lua-script=file_name-s file_nameOption-File Format proxy-lua-script=file_namePermitted Values Type file nameThe Lua script file to be loaded. Note that the script file is not physically loaded and parsed until a connection is made. Also note that the specified Lua script is reloaded for each connection; if the content of the Lua script changes while mysql-proxy is running, the updated content is automatically used when a new connection is made.
--pid-file=file_name
Command-Line Format --pid-file=file_nameOption-File Format pid-file=file_namePermitted Values Type file nameThe name of the file in which to store the process ID.
--user=user_name
Command-Line Format --user=user_nameOption-File Format user=user_namePermitted Values Type stringRun mysql-proxy as the specified
user.--version,-V
Command-Line Format --version-VOption-File Format versionShow the version number.
The most common usage is as a simple proxy service (that is, without additional scripting). For basic proxy operation, you must specify at least one proxy-backend-addresses option to specify the MariaDB server to connect to by default:
shell> mysql-proxy --proxy-backend-addresses=MySQL.example.com:3306
The default proxy port is 4040, so you can connect to your MariaDB server through the proxy by specifying the host name and port details:
shell> mysql --host=localhost --port=4040
If your server requires authentication information, this will be passed through natively without alteration by mysql-proxy, so you must also specify the required authentication information:
shell>mysql --host=localhost --port=4040 \--user=user_name --password=password
You can also connect to a read-only port (which filters out UPDATE and INSERT queries) by connecting to the read-only port. By default the host name is the default, and the port is 4042, but you can alter the host/port information by using the --proxy-read-only-backend-addresses command-line option.
For more detailed information on how to use these command-line options, and mysql-proxy in general in combination with Lua scripts, see , "Using MariaDB Proxy".
MySQL Proxy Scripting
- Proxy Scripting Sequence During Query Injection
- Internal Structures
- Capturing a Connection with
connect_server()- Examining the Handshake with
read_handshake()- Examining the Authentication Credentials with
read_auth()- Accessing Authentication Information with
read_auth_result()- Manipulating Queries with
read_query()- Manipulating Results with
read_query_result() - Internal Structures
You can control how MariaDB Proxy manipulates and works with the queries and results that are passed on to the MariaDB server through the use of the embedded Lua scripting language. You can find out more about the Lua programming language from the Lua Web site.
The following diagram shows an overview of the classes exposed by MariaDB Proxy.
The primary interaction between MariaDB Proxy and the server is provided by defining one or more functions through an Lua script. A number of functions are supported, according to different events and operations in the communication sequence between a client and one or more backend MariaDB servers:
connect_server(): This function is called each time a connection is made to MariaDB Proxy from a client. You can use this function during load-balancing to intercept the original connection and decide which server the client should ultimately be attached to. If you do not define a special solution, a simple round-robin style distribution is used by default.read_handshake(): This function is called when the initial handshake information is returned by the server. You can capture the handshake information returned and provide additional checks before the authorization exchange takes place.read_auth(): This function is called when the authorization packet (user name, password, default database) are submitted by the client to the server for authentication.read_auth_result(): This function is called when the server returns an authorization packet to the client indicating whether the authorization succeeded.read_query(): This function is called each time a query is sent by the client to the server. You can use this to edit and manipulate the original query, including adding new queries before and after the original statement. You can also use this function to return information directly to the client, bypassing the server, which can be useful to filter unwanted queries or queries that exceed known limits.read_query_result(): This function is called each time a result is returned from the server, providing you have manually injected queries into the query queue. If you have not explicitly injected queries within theread_query()function, this function is not triggered. You can use this to edit the result set, or to remove or filter the result sets generated from additional queries you injected into the queue when usingread_query().
The following table describes the direction of information flow at the point when the function is triggered.
| Function | Supplied Information | Direction |
|---|---|---|
connect_server()
| None | Client to Server |
read_handshake()
| None | Server to Client |
read_auth()
| None | Client to Server |
read_auth_result()
| None | Server to Client |
read_query()
| Query | Client to Server |
read_query_result()
| Query result | Server to Client |
By default, all functions return a result that indicates whether the data should be passed on to the client or server (depending on the direction of the information being transferred). This return value can be overridden by explicitly returning a constant indicating that a particular response should be sent. For example, it is possible to construct result set information by hand within read_query() and to return the result set directly to the client without ever sending the original query to the server.
In addition to these functions, a number of built-in structures provide control over how MariaDB Proxy forwards queries and returns the results by providing a simplified interface to elements such as the list of queries and the groups of result sets that are returned.
Proxy Scripting Sequence During Query Injection
The following figure gives an example of how the proxy might be used when injecting queries into the query queue. Because the proxy sits between the client and MariaDB server, what the proxy sends to the server, and the information that the proxy ultimately returns to the client, need not match or correlate. Once the client has connected to the proxy, the sequence shown in the following diagram occurs for each individual query sent by the client.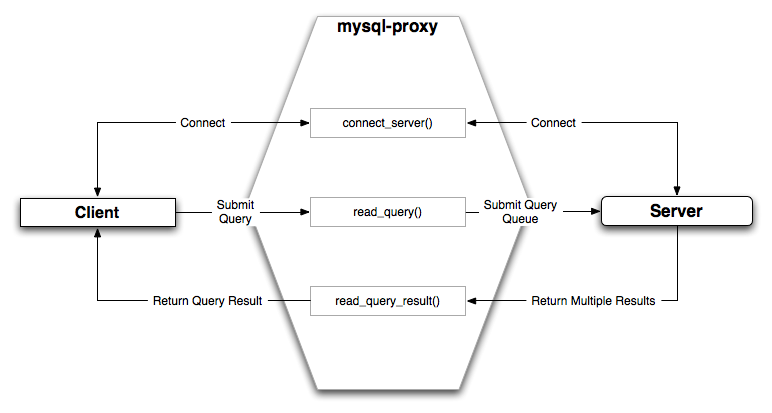
- When the client submits one query to the proxy, the
read_query()function within the proxy is triggered. The function adds the query to the query queue. - Once manipulation by
read_query()has completed, the queries are submitted, sequentially, to the MariaDB server. - The MariaDB server returns the results from each query, one result set for each query submitted. The
read_query_result()function is triggered for each result set, and each invocation can decide which result set to return to the client
For example, you can queue additional queries into the global query queue to be processed by the server. This can be used to add statistical information by adding queries before and after the original query, changing the original query:
SELECT * FROM City;
Into a sequence of queries:
SELECT NOW();
SELECT * FROM City;
SELECT NOW();
You can also modify the original statement; for example, to add EXPLAIN to each statement executed to get information on how the statement was processed, again altering our original SQL statement into a number of statements:
SELECT * FROM City;
EXPLAIN SELECT * FROM City;
In both of these examples, the client would have received more result sets than expected. Regardless of how you manipulate the incoming query and the returned result, the number of queries returned by the proxy must match the number of original queries sent by the client.
You could adjust the client to handle the multiple result sets sent by the proxy, but in most cases you will want the existence of the proxy to remain transparent. To ensure that the number of queries and result sets match, you can use the MariaDB Proxy read_query_result() to extract the additional result set information and return only the result set the client originally requested back to the client. You can achieve this by giving each query that you add to the query queue a unique ID, then filter out queries that do not match the original query ID when processing them with read_query_result().
Internal Structures
There are a number of internal structures within the scripting element of MariaDB Proxy. The primary structure is proxy and this provides an interface to the many common structures used throughout the script, such as connection lists and configured backend servers. Other structures, such as the incoming packet from the client and result sets are only available within the context of one of the scriptable functions.
| Attribute | Description |
|---|---|
connection
| A structure containing the active client connections. For a list of attributes, see proxy.connection.
|
servers
| A structure containing the list of configured backend servers. For a list of attributes, see proxy.global.backends.
|
queries
| A structure containing the queue of queries that will be sent to the server during a single client query. For a list of attributes, see proxy.queries.
|
PROXY_VERSION
| The version number of MariaDB Proxy, encoded in hex. You can use this to check that the version number supports a particular option from within the Lua script. Note that the value is encoded as a hex value, so to check the version is at least 0.5.1 you compare against 0x00501. |
proxy.connection
The proxy.connection object is read only, and provides information about the current connection, and is split into a client and server tables. This enables you to examine information about both the incoming client connections to the proxy (client), and to the backend servers (server).
| Attribute | Description |
|---|---|
client.default_db
| Default database requested by the client |
client.username
| User name used to authenticate |
client.scrambled_password
| The scrambled version of the password used to authenticate |
client.dst.name
| The combined address:port of the Proxy port used by this client (should match the --proxy-address configuration parameter)
|
client.dst.address
| The IP address of the of the Proxy port used by this client |
client.dst.port
| The port number of the of the Proxy port used by this client |
client.src.name
| The combined address:port of the client (originating) TCP/IP endpoint
|
client.src.address
| The IP address of the client (originating) TCP/IP port |
client.src.port
| The port of the client (originating) TCP/IP endpoint |
server.scramble_buffer
| The scramble buffer used to scramble the password |
server.mysqld_version
| The MariaDB version number of the server |
server.thread_id
| The ID of the thread handling the connection to the current server |
server.dst.name
| The combined address:port for the backend server for the current connection (i.e. the connection to the MariaDB server)
|
server.dst.address
| The address for the backend server |
server.dst.port
| The port for the backend server |
server.src.name
| The combined address:port for the TCP/IP endpoint used by the Proxy to connect to the backend server
|
server.src.address
| The address of the endpoint for the proxy-side connection to the MariaDB server |
server.src.port
| The port of the endpoint for the proxy-side connection to the MariaDB server |
proxy.global.backends
The proxy.global.backends table is partially writable and contains an array of all the configured backend servers and the server metadata (IP address, status, etc.). You can determine the array index of the current connection using proxy.connection['backend_ndx'] which is the index into this table of the backend server being used by the active connection.
The attributes for each entry within the proxy.global.backends table are shown in this table.
| Attribute | Description |
|---|---|
dst.name
| The combined address:port of the backend server.
|
dst.address
| The IP address of the backend server. |
dst.port
| The port of the backend server. |
connected_clients
| The number of clients currently connected. |
state
| The status of the backend server. See Backend State/Type Constants. |
type
| The type of the backend server. You can use this to identify whether the backed was configured as a standard read/write backend, or a read-only backend. You can compare this value to the proxy.BACKEND_TYPE_RW and proxy.BACKEND_TYPE_RO. |
proxy.queries
The proxy.queries object is a queue representing the list of queries to be sent to the server. The queue is not populated automatically, but if you do not explicitly populate the queue, queries are passed on to the backend server verbatim. Also, if you do not populate the query queue by hand, the read_query_result() function is not triggered.
The following methods are supported for populating the proxy.queries object.
| Function | Description |
|---|---|
append(id,packet,[options])
| Appends a query to the end of the query queue. The id is an integer identifier that you can use to recognize the query results when they are returned by the server. The packet should be a properly formatted query packet. The optional options should be a table containing the options specific to this packet.
|
prepend(id,packet)
| Prepends a query to the query queue. The id is an identifier that you can use to recognize the query results when they are returned by the server. The packet should be a properly formatted query packet.
|
reset()
| Empties the query queue. |
len()
| Returns the number of query packets in the queue. |
For example, you could append a query packet to the proxy.queries queue by using the append():
proxy.queries:append(1,packet)
The optional third argument to append() should contain the options for the packet. To have access to the result set through the read_query_result() function, set the resultset_is_needed flag to true:
proxy.queries:append( 1, packet, { resultset_is_needed = true } )
If that flag is false (the default), proxy will:
- Send the result set to the client as soon as it is received
- Reduce memory usage (because the result set is not stored internally for processing)
- Reduce latency of returning results to the client
- Pass data from server to client unaltered
The default mode is therefore quicker and useful if you only want to monitor the queries sent, and the basic statistics.
To perform any kind of manipulation on the returned data, you must set the flag to true, which will:
- Store the result set so that it can be processed.
- Enable modification of the result set before it is returned to the client.
- Enable you to discard the result set instead of returning it to the client.
proxy.response
The proxy.response structure is used when you want to return your own MariaDB response, instead of forwarding a packet that you have received a backend server. The structure holds the response type information, an optional error message, and the result set (rows/columns) to return.
| Attribute | Description |
|---|---|
type
| The type of the response. The type must be either MYSQLD_PACKET_OK or MYSQLD_PACKET_ERR. If the MYSQLD_PACKET_ERR, you should set the value of the mysql.response.errmsg with a suitable error message.
|
errmsg
| A string containing the error message that will be returned to the client. |
resultset
| A structure containing the result set information (columns and rows), identical to what would be returned when returning a results from a SELECT query. |
When using proxy.response you either set proxy.response.type to proxy.MYSQLD_PACKET_OK and then build resultset to contain the results to return, or set proxy.response.type to proxy.MYSQLD_PACKET_ERR and set the proxy.response.errmsg to a string with the error message. To send the completed result set or error message, you should return the proxy.PROXY_SEND_RESULT to trigger the return of the packet information.
An example of this can be seen in the tutorial-resultset.lua script within the MariaDB Proxy package:
if string.lower(command) == 'show' and string.lower(option) == 'querycounter' then
 ---
 -- proxy.PROXY_SEND_RESULT requires
 --
 -- proxy.response.type to be either
 -- * proxy.MYSQLD_PACKET_OK or
 -- * proxy.MYSQLD_PACKET_ERR
 --
 -- for proxy.MYSQLD_PACKET_OK you need a resultset
 -- * fields
 -- * rows
 --
 -- for proxy.MYSQLD_PACKET_ERR
 -- * errmsg
 proxy.response.type = proxy.MYSQLD_PACKET_OK
 proxy.response.resultset = {
 fields = {
 { type = proxy.MYSQL_TYPE_LONG, name = 'global_query_counter', },
 { type = proxy.MYSQL_TYPE_LONG, name = 'query_counter', },
 },
 rows = {
 { proxy.global.query_counter, query_counter }
 }
 }
 -- we have our result, send it back
 return proxy.PROXY_SEND_RESULT elseif string.lower(command) == 'show' and string.lower(option) == 'myerror' then
 proxy.response.type = proxy.MYSQLD_PACKET_ERR
 proxy.response.errmsg = 'my first error'
 return proxy.PROXY_SEND_RESULT
proxy.response.resultset
The proxy.response.resultset structure should be populated with the rows and columns of data to return. The structure contains the information about the entire result set, with the individual elements of the data shown in the following table.
| Attribute | Description |
|---|---|
fields
| The definition of the columns being returned. This should be a dictionary structure with the type specifying the MariaDB data type, and the name specifying the column name. Columns should be listed in the order of the column data that will be returned.
|
flags
| A number of flags related to the result set. Valid flags include auto_commit (whether an automatic commit was triggered), no_good_index_used (the query executed without using an appropriate index), and no_index_used (the query executed without using any index).
|
rows
| The actual row data. The information should be returned as an array of arrays. Each inner array should contain the column data, with the outer array making up the entire result set. |
warning_count
| The number of warnings for this result set. |
affected_rows
| The number of rows affected by the original statement. |
insert_id
| The last insert ID for an auto-incremented column in a table. |
query_status
| The status of the query operation. You can use the MYSQLD_PACKET_OK or MYSQLD_PACKET_ERR constants to populate this parameter. |
For an example showing how to use this structure, see proxy.response.
Proxy Return State Constants
The following constants are used internally by the proxy to specify the response to send to the client or server. All constants are exposed as values within the main proxy table.
| Constant | Description |
|---|---|
PROXY_SEND_QUERY
| Causes the proxy to send the current contents of the queries queue to the server. |
PROXY_SEND_RESULT
| Causes the proxy to send a result set back to the client. |
PROXY_IGNORE_RESULT
| Causes the proxy to drop the result set (nothing is returned to the client). |
As constants, these entities are available without qualification in the Lua scripts. For example, at the end of the read_query_result() you might return PROXY_IGNORE_RESULT:
return proxy.PROXY_IGNORE_RESULT
Packet State Constants
The following states describe the status of a network packet. These items are entries within the main proxy table.
| Constant | Description |
|---|---|
MYSQLD_PACKET_OK
| The packet is OK |
MYSQLD_PACKET_ERR
| The packet contains error information |
MYSQLD_PACKET_RAW
| The packet contains raw data |
Backend State/Type Constants
The following constants are used either to define the status or type of the backend MariaDB server to which the proxy is connected. These items are entries within the main proxy table.
| Constant | Description |
|---|---|
BACKEND_STATE_UNKNOWN
| The current status is unknown |
BACKEND_STATE_UP
| The backend is known to be up (available) |
BACKEND_STATE_DOWN
| The backend is known to be down (unavailable) |
BACKEND_TYPE_UNKNOWN
| Backend type is unknown |
BACKEND_TYPE_RW
| Backend is available for read/write |
BACKEND_TYPE_RO
| Backend is available only for read-only use |
Server Command Constants
The following values are used in the packets exchanged between the client and server to identify the information in the rest of the packet. These items are entries within the main proxy table. The packet type is defined as the first character in the sent packet. For example, when intercepting packets from the client to edit or monitor a query, you would check that the first byte of the packet was of type proxy.COM_QUERY.
| Constant | Description |
|---|---|
COM_SLEEP
| Sleep |
COM_QUIT
| Quit |
COM_INIT_DB
| Initialize database |
COM_QUERY
| Query |
COM_FIELD_LIST
| Field List |
COM_CREATE_DB
| Create database |
COM_DROP_DB
| Drop database |
COM_REFRESH
| Refresh |
COM_SHUTDOWN
| Shutdown |
COM_STATISTICS
| Statistics |
COM_PROCESS_INFO
| Process List |
COM_CONNECT
| Connect |
COM_PROCESS_KILL
| Kill |
COM_DEBUG
| Debug |
COM_PING
| Ping |
COM_TIME
| Time |
COM_DELAYED_INSERT
| Delayed insert |
COM_CHANGE_USER
| Change user |
COM_BINLOG_DUMP
| Binlog dump |
COM_TABLE_DUMP
| Table dump |
COM_CONNECT_OUT
| Connect out |
COM_REGISTER_SLAVE
| Register slave |
COM_STMT_PREPARE
| Prepare server-side statement |
COM_STMT_EXECUTE
| Execute server-side statement |
COM_STMT_SEND_LONG_DATA
| Long data |
COM_STMT_CLOSE
| Close server-side statement |
COM_STMT_RESET
| Reset statement |
COM_SET_OPTION
| Set option |
COM_STMT_FETCH
| Fetch statement |
COM_DAEMON
| Daemon (MySQL 5.1 only) |
COM_ERROR
| Error |
MySQL Type Constants
These constants are used to identify the field types in the query result data returned to clients from the result of a query. These items are entries within the main proxy table.
| Constant | Field Type |
|---|---|
MYSQL_TYPE_DECIMAL
| Decimal |
MYSQL_TYPE_NEWDECIMAL
| Decimal (MySQL 5.0 or later) |
MYSQL_TYPE_TINY
| Tiny |
MYSQL_TYPE_SHORT
| Short |
MYSQL_TYPE_LONG
| Long |
MYSQL_TYPE_FLOAT
| Float |
MYSQL_TYPE_DOUBLE
| Double |
MYSQL_TYPE_NULL
| Null |
MYSQL_TYPE_TIMESTAMP
| Timestamp |
MYSQL_TYPE_LONGLONG
| Long long |
MYSQL_TYPE_INT24
| Integer |
MYSQL_TYPE_DATE
| Date |
MYSQL_TYPE_TIME
| Time |
MYSQL_TYPE_DATETIME
| Datetime |
MYSQL_TYPE_YEAR
| Year |
MYSQL_TYPE_NEWDATE
| Date (MySQL 5.0 or later) |
MYSQL_TYPE_ENUM
| Enumeration |
MYSQL_TYPE_SET
| Set |
MYSQL_TYPE_TINY_BLOB
| Tiny Blob |
MYSQL_TYPE_MEDIUM_BLOB
| Medium Blob |
MYSQL_TYPE_LONG_BLOB
| Long Blob |
MYSQL_TYPE_BLOB
| Blob |
MYSQL_TYPE_VAR_STRING
| Varstring |
MYSQL_TYPE_STRING
| String |
MYSQL_TYPE_TINY
| Tiny (compatible with MYSQL_TYPE_CHAR)
|
MYSQL_TYPE_ENUM
| Enumeration (compatible with MYSQL_TYPE_INTERVAL)
|
MYSQL_TYPE_GEOMETRY
| Geometry |
MYSQL_TYPE_BIT
| Bit |
Capturing a Connection with connect_server()
When the proxy accepts a connection from a MariaDB client, the connect_server() function is called.
There are no arguments to the function, but you can use and if necessary manipulate the information in the proxy.connection table, which is unique to each client session.
For example, if you have multiple backend servers, you can specify which server that connection should use by setting the value of proxy.connection.backend_ndx to a valid server number. The following code chooses between two servers based on whether the current time in minutes is odd or even:
function connect_server()
 print('--> a client really wants to talk to a server')
 if (tonumber(os.date('%M')) % 2 == 0) then
 proxy.connection.backend_ndx = 2
 print('Choosing backend 2')
 else
 proxy.connection.backend_ndx = 1
 print('Choosing backend 1')
 end
 print('Using ' .. proxy.global.backends[proxy.connection.backend_ndx].dst.name)
end
This example also displays the IP address/port combination by accessing the information from the internal proxy.global.backends table.
Examining the Handshake with read_handshake()
Handshake information is sent by the server to the client after the initial connection (through connect_server()) has been made. The handshake information contains details about the MariaDB version, the ID of the thread that will handle the connection information, and the IP address of the client and server. This information is exposed through the proxy.connection structure.
proxy.connection.server.mysqld_version: The version of the MariaDB server.proxy.connection.server.thread_id: The thread ID.proxy.connection.server.scramble_buffer: The password scramble buffer.proxy.connection.server.dst.name: The IP address of the server.proxy.connection.client.src.name: The IP address of the client.
For example, you can print out the handshake data and refuse clients by IP address with the following function:
function read_handshake()
 print('<-- let's send him some information about us')
 print(' mysqld-version: ' .. proxy.connection.server.mysqld_version)
 print(' thread-id : ' .. proxy.connection.server.thread_id)
 print(' scramble-buf : ' .. string.format('%q',proxy.connection.server.scramble_buffer))
 print(' server-addr : ' .. proxy.connection.server.dst.name)
 print(' client-addr : ' .. proxy.connection.client.dst.name)
 if not proxy.connection.client.src.name:match('^127.0.0.1:') then
 proxy.response.type = proxy.MYSQLD_PACKET_ERR
 proxy.response.errmsg = 'only local connects are allowed'
 print('we don't like this client');
 return proxy.PROXY_SEND_RESULT
 end end
Note that you must return an error packet to the client by using proxy.PROXY_SEND_RESULT.
Examining the Authentication Credentials with read_auth()
The read_auth() function is triggered when an authentication handshake is initiated by the client. In the execution sequence, read_auth() occurs immediately after read_handshake(), so the server selection has already been made, but the connection and authorization information has not yet been provided to the backend server.
You can obtain the authentication information by examining the proxy.connection.client structure. For more information, see proxy.connection.
For example, you can print the user name and password supplied during authorization using:
function read_auth()
 print(' username : ' .. proxy.connection.client.username)
 print(' password : ' .. string.format('%q', proxy.connection.client.scrambled_password))
end
You can interrupt the authentication process within this function and return an error packet back to the client by constructing a new packet and returning proxy.PROXY_SEND_RESULT:
proxy.response.type = proxy.MYSQLD_PACKET_ERR proxy.response.errmsg = 'Logins are not allowed'
return proxy.PROXY_SEND_RESULT
Accessing Authentication Information with read_auth_result()
The return packet from the server during authentication is captured by read_auth_result(). The only argument to this function is the authentication packet returned by the server. As the packet is a raw MariaDB network protocol packet, you must access the first byte to identify the packet type and contents. The MYSQLD_PACKET_ERR and MYSQLD_PACKET_OK constants can be used to identify whether the authentication was successful:
function read_auth_result(auth)
 local state = auth.packet:byte()
 if state == proxy.MYSQLD_PACKET_OK then
 print('<-- auth ok');
 elseif state == proxy.MYSQLD_PACKET_ERR then
 print('<-- auth failed');
 else
 print('<-- auth ... don't know: ' .. string.format('%q', auth.packet));
 end end
If a long-password capable client tries to authenticate to a server that supports long passwords, but the user password provided is actually short, read_auth_result() will be called twice. The first time, auth.packet:byte() will equal 254, indicating that the client should try again using the old password protocol. The second time time read_auth_result()/ is called, auth.packet:byte() will indicate whether the authentication actually succeeded.
Manipulating Queries with read_query()
The read_query() function is called once for each query submitted by the client and accepts a single argument, the query packet that was provided. To access the content of the packet, you must parse the packet contents manually.
For example, you can intercept a query packet and print out the contents using the following function definition:
function read_query( packet )
 if packet:byte() == proxy.COM_QUERY then
 print('we got a normal query: ' .. packet:sub(2))
 end end
This example checks the first byte of the packet to determine the type. If the type is COM_QUERY (see Server Command Constants), we extract the query from the packet and print it. The structure of the packet type supplied is important. In the case of a COM_QUERY packet, the remaining contents of the packet are the text of the query string. In this example, no changes have been made to the query or the list of queries that will ultimately be sent to the MariaDB server.
To modify a query, or add new queries, you must populate the query queue (proxy.queries), then execute the queries that you have placed into the queue. If you do not modify the original query or the queue, the query received from the client is sent to the MariaDB server verbatim.
When adding queries to the queue, you should follow these guidelines:
- The packets inserted into the queue must be valid query packets. For each packet, you must set the initial byte to the packet type. If you are appending a query, you can append the query statement to the rest of the packet.
- Once you add a query to the queue, the queue is used as the source for queries sent to the server. If you add a query to the queue to add more information, you must also add the original query to the queue or it will not be executed.
- Once the queue has been populated, you must set the return value from
read_query()to indicate whether the query queue should be sent to the server. - When you add queries to the queue, you should add an ID. The ID you specify is returned with the result set so that you identify each query and corresponding result set. The ID has no other purpose than as an identifier for correlating the query and result set. When operating in a passive mode, during profiling for example, you identify the original query and the corresponding result set so that the results expected by the client can be returned correctly.
- Unless your client is designed to cope with more result sets than queries, you should ensure that the number of queries from the client match the number of results sets returned to the client. Using the unique ID and removing result sets you inserted will help.
Normally, the read_query() and read_query_result() function are used in conjunction with each other to inject additional queries and remove the additional result sets. However, read_query_result() is only called if you populate the query queue within read_query().
Manipulating Results with read_query_result()
The read_query_result() is called for each result set returned by the server only if you have manually injected queries into the query queue. If you have not manipulated the query queue, this function is not called. The function supports a single argument, the result packet, which provides a number of properties:
id: The ID of the result set, which corresponds to the ID that was set when the query packet was submitted to the server when usingappend(id)on the query queue. You must have set theresultset_is_neededflag toappendto intercept the result set before it is returned to the client. See proxy.queries.query: The text of the original query.query_time: The number of microseconds required to receive the first row of a result set since the query was sent to the server.response_time: The number of microseconds required to receive the last row of the result set since the query was sent to the server.resultset: The content of the result set data.
By accessing the result information from the MariaDB server, you can extract the results that match the queries that you injected, return different result sets (for example, from a modified query), and even create your own result sets.
The following Lua script, for example, will output the query, followed by the query time and response time (that is, the time to execute the query and the time to return the data for the query) for each query sent to the server:
function read_query( packet )
 if packet:byte() == proxy.COM_QUERY then
 print('we got a normal query: ' .. packet:sub(2))
 proxy.queries:append(1, packet )
 return proxy.PROXY_SEND_QUERY
 end end function read_query_result(inj)
 print('query-time: ' .. (inj.query_time / 1000) .. 'ms')
 print('response-time: ' .. (inj.response_time / 1000) .. 'ms')
end
You can access the rows of returned results from the result set by accessing the rows property of the resultset property of the result that is exposed through read_query_result(). For example, you can iterate over the results showing the first column from each row using this Lua fragment:
for row in inj.resultset.rows do
 print('injected query returned: ' .. row[1])
end
Just like read_query(), read_query_result() can return different values for each result according to the result returned. If you have injected additional queries into the query queue, for example, remove the results returned from those additional queries and return only the results from the query originally submitted by the client.
The following example injects additional SELECT NOW() statements into the query queue, giving them a different ID to the ID of the original query. Within read_query_result(), if the ID for the injected queries is identified, we display the result row, and return the proxy.PROXY_IGNORE_RESULT from the function so that the result is not returned to the client. If the result is from any other query, we print out the query time information for the query and return the default, which passes on the result set unchanged. We could also have explicitly returned proxy.PROXY_IGNORE_RESULT to the MariaDB client.
function read_query( packet )
 if packet:byte() == proxy.COM_QUERY then
 proxy.queries:append(2, string.char(proxy.COM_QUERY) .. 'SELECT NOW()', {resultset_is_needed = true} )
 proxy.queries:append(1, packet, {resultset_is_needed = true})
 proxy.queries:append(2, string.char(proxy.COM_QUERY) .. 'SELECT NOW()', {resultset_is_needed = true} )
 return proxy.PROXY_SEND_QUERY
 end end function read_query_result(inj)
 if inj.id == 2 then
 for row in inj.resultset.rows do
 print('injected query returned: ' .. row[1])
 end
 return proxy.PROXY_IGNORE_RESULT
 else
 print('query-time: ' .. (inj.query_time / 1000) .. 'ms')
 print('response-time: ' .. (inj.response_time / 1000) .. 'ms')
 end end
For further examples, see , "Using MariaDB Proxy".
Using MariaDB Proxy
There are a number of different ways to use MariaDB Proxy. At the most basic level, you can allow MariaDB Proxy to pass queries from clients to a single server. To use MariaDB Proxy in this mode, you just have to specify on the command line the backend server to which the proxy should connect:
shell> mysql-proxy --proxy-backend-addresses=sakila:3306
If you specify multiple backend MariaDB servers, the proxy connects each client to each server in a round-robin fashion. Suppose that you have two MariaDB servers, A and B. The first client to connect is connected to server A, the second to server B, the third to server A. For example:
shell>mysql-proxy \--proxy-backend-addresses=narcissus:3306 \--proxy-backend-addresses=nostromo:3306
When you specify multiple servers in this way, the proxy automatically identifies when a MariaDB server has become unavailable and marks it accordingly. New connections are automatically attached to a server that is available, and a warning is reported to the standard output from mysql-proxy:
network-mysqld.c.367: connect(nostromo:3306) failed: Connection refused network-mysqld-proxy.c.2405: connecting to backend (nostromo:3306) failed, marking it as down for ...
Lua scripts enable a finer level of control, both over the connections and their distribution and how queries and result sets are processed. When using an Lua script, you must specify the name of the script on the command line using the --proxy-lua-script option:
shell> mysql-proxy --proxy-lua-script=mc.lua --proxy-backend-addresses=sakila:3306
When you specify a script, the script is not executed until a connection is made. This means that faults with the script are not raised until the script is executed. Script faults will not affect the distribution of queries to backend MariaDB servers.Note
Because a script is not read until the connection is made, you can modify the contents of the Lua script file while the proxy is still running and the modified script is automatically used for the next connection. This ensures that MariaDB Proxy remains available because it need not be restarted for the changes to take effect.
Using the Administration Interface
The mysql-proxy administration interface can be accessed using any MariaDB client using the standard protocols. You can use the administration interface to gain information about the proxy server as a whole - standard connections to the proxy are isolated to operate as if you were connected directly to the backend MariaDB server.
In mysql-proxy 0.8.0 and earlier, a rudimentary interface was built into the proxy. In later versions this was replaced so that you must specify an administration script to be used when users connect to the administration interface.
To use the administration interface, specify the user name and password required to connect to the admin service, using the --admin-username and --admin-password options. You must also specify the Lua script to be used as the interface to the administration service by using the admin-lua-script script option to point to a Lua script.
For example, you can create a basic interface to the internal components of the mysql-proxy system using the following script, written by Diego Medina:
--[[
 Copyright 2008, 2010, Oracle and/or its affiliates. All rights reserved.
 This program is free software; you can redistribute it and/or modify
 it under the terms of the GNU General Public License as published by
 the Free Software Foundation; version 2 of the License.
 This program is distributed in the hope that it will be useful,
 but WITHOUT ANY WARRANTY; without even the implied warranty of
 MERCHANTABILITY or FITNESS FOR A PARTICULAR PURPOSE. See the
 GNU General Public License for more details.
 You should have received a copy of the GNU General Public License
 along with this program; if not, write to the Free Software
 Foundation, Inc., 51 Franklin Street, Fifth Floor, Boston, MA 02110-1301 USA
--]]
-- admin.lua
--[[
 See http://forge.mysql.com/tools/tool.php?id=78
 (Thanks to Jan Kneschke)
 See http://www.chriscalender.com/?p=41
 (Thanks to Chris Calender)
 See http://datacharmer.blogspot.com/2009/01/mysql-proxy-is-back.html
 (Thanks Giuseppe Maxia)
--]]
function set_error(errmsg)
 proxy.response = {
 type = proxy.MYSQLD_PACKET_ERR,
 errmsg = errmsg or 'error'
 }
end function read_query(packet)
 if packet:byte() ~= proxy.COM_QUERY then
 set_error('[admin] we only handle text-based queries (COM_QUERY)')
 return proxy.PROXY_SEND_RESULT
 end
 local query = packet:sub(2)
 local rows = { }
 local fields = { }
 -- try to match the string up to the first non-alphanum
 local f_s, f_e, command = string.find(packet, '^%s*(%w+)', 2)
 local option
 if f_e then
 -- if that match, take the next sub-string as option
 f_s, f_e, option = string.find(packet, '^%s+(%w+)', f_e + 1)
 end
 -- we got our commands, execute it
 if command == 'show' and option == 'querycounter' then
 ---
 -- proxy.PROXY_SEND_RESULT requires
 --
 -- proxy.response.type to be either
 -- * proxy.MYSQLD_PACKET_OK or
 -- * proxy.MYSQLD_PACKET_ERR
 --
 -- for proxy.MYSQLD_PACKET_OK you need a resultset
 -- * fields
 -- * rows
 --
 -- for proxy.MYSQLD_PACKET_ERR
 -- * errmsg
 proxy.response.type = proxy.MYSQLD_PACKET_OK
 proxy.response.resultset = {
 fields = {
 { type = proxy.MYSQL_TYPE_LONG, name = 'query_counter', },
 },
 rows = {
 { proxy.global.query_counter }
 }
 }
 -- we have our result, send it back
 return proxy.PROXY_SEND_RESULT
 elseif command == 'show' and option == 'myerror' then
 proxy.response.type = proxy.MYSQLD_PACKET_ERR
 proxy.response.errmsg = 'my first error'
 return proxy.PROXY_SEND_RESULT
 elseif string.sub(packet, 2):lower() == 'select help' then
 return show_process_help()
 elseif string.sub(packet, 2):lower() == 'show proxy processlist' then
 return show_process_table()
 elseif query == 'SELECT * FROM backends' then
 fields = {
 { name = 'backend_ndx',
 type = proxy.MYSQL_TYPE_LONG },
 { name = 'address',
 type = proxy.MYSQL_TYPE_STRING },
 { name = 'state',
 type = proxy.MYSQL_TYPE_STRING },
 { name = 'type',
 type = proxy.MYSQL_TYPE_STRING },
 }
 for i = 1, #proxy.global.backends do
 local b = proxy.global.backends[i]
 rows[#rows + 1] = {
 i, b.dst.name, b.state, b.type
 }
 end
 else
 set_error()
 return proxy.PROXY_SEND_RESULT
 end
 proxy.response = {
 type = proxy.MYSQLD_PACKET_OK,
 resultset = {
 fields = fields,
 rows = rows
 }
 }
 return proxy.PROXY_SEND_RESULT end function make_dataset (header, dataset)
 proxy.response.type = proxy.MYSQLD_PACKET_OK
 proxy.response.resultset = {
 fields = {},
 rows = {}
 }
 for i,v in pairs (header) do
 table.insert(proxy.response.resultset.fields, {type = proxy.MYSQL_TYPE_STRING, name = v})
 end
 for i,v in pairs (dataset) do
 table.insert(proxy.response.resultset.rows, v )
 end
 return proxy.PROXY_SEND_RESULT end function show_process_table()
 local dataset = {}
 local header = { 'Id', 'IP Address', 'Time' }
 local rows = {}
 for t_i, t_v in pairs (proxy.global.process) do
 for s_i, s_v in pairs ( t_v ) do
 table.insert(rows, { t_i, s_v.ip, os.date('%c',s_v.ts) })
 end
 end
 return make_dataset(header,rows)
end function show_process_help()
 local dataset = {}
 local header = { 'command', 'description' }
 local rows = {
 {'SELECT HELP', 'This command.'},
 {'SHOW PROXY PROCESSLIST', 'Show all connections and their true IP Address.'},
 }
 return make_dataset(header,rows)
end function dump_process_table()
 proxy.global.initialize_process_table()
 print('current contents of process table')
 for t_i, t_v in pairs (proxy.global.process) do
 print ('session id: ', t_i)
 for s_i, s_v in pairs ( t_v ) do
 print ( '\t', s_i, s_v.ip, s_v.ts )
 end
 end
 print ('---END PROCESS TABLE---')
end
--[[ Help we use a simple string-match to split commands are word-boundaries mysql> show querycounter is split into command = 'show'
option = 'querycounter'
spaces are ignored, the case has to be as is.
mysql> show myerror returns a error-packet
--]]
The script works in combination with a main proxy script, reporter.lua:
--[[
 Copyright 2008, 2010, Oracle and/or its affiliates. All rights reserved.
 This program is free software; you can redistribute it and/or modify
 it under the terms of the GNU General Public License as published by
 the Free Software Foundation; version 2 of the License.
 This program is distributed in the hope that it will be useful,
 but WITHOUT ANY WARRANTY; without even the implied warranty of
 MERCHANTABILITY or FITNESS FOR A PARTICULAR PURPOSE. See the
 GNU General Public License for more details.
 You should have received a copy of the GNU General Public License
 along with this program; if not, write to the Free Software
 Foundation, Inc., 51 Franklin Street, Fifth Floor, Boston, MA 02110-1301 USA
--]]
-- reporter.lua
--[[
 See http://forge.mysql.com/tools/tool.php?id=78
 (Thanks to Jan Kneschke)
 See http://www.chriscalender.com/?p=41
 (Thanks to Chris Calender)
 See http://datacharmer.blogspot.com/2009/01/mysql-proxy-is-back.html
 (Thanks Giuseppe Maxia)
--]]
proxy.global.query_counter = proxy.global.query_counter or 0
function proxy.global.initialize_process_table()
 if proxy.global.process == nil then
 proxy.global.process = {}
 end
 if proxy.global.process[proxy.connection.server.thread_id] == nil then
 proxy.global.process[proxy.connection.server.thread_id] = {}
 end end function read_auth_result( auth )
 local state = auth.packet:byte()
 if state == proxy.MYSQLD_PACKET_OK then
 proxy.global.initialize_process_table()
 table.insert( proxy.global.process[proxy.connection.server.thread_id],
 { ip = proxy.connection.client.src.name, ts = os.time() } )
 end end function disconnect_client()
 local connection_id = proxy.connection.server.thread_id
 if connection_id then
 -- client has disconnected, set this to nil
 proxy.global.process[connection_id] = nil
 end end
---
-- read_query() can return a resultset
--
-- You can use read_query() to return a result-set.
--
-- @param packet the mysql-packet sent by the client
--
-- @return
-- * nothing to pass on the packet as is,
-- * proxy.PROXY_SEND_QUERY to send the queries from the proxy.queries queue
-- * proxy.PROXY_SEND_RESULT to send your own result-set
--
function read_query( packet )
 -- a new query came in in this connection
 -- using proxy.global.* to make it available to the admin plugin
 proxy.global.query_counter = proxy.global.query_counter + 1
end
To use the script, save the first script to a file (admin.lua in the following example) and the other to reporter.lua, then run mysql-proxy specifying the admin script and a backend MariaDB server:
shell>mysql-proxy --admin-lua-script=admin.lua --admin-password=password \ »--admin-username=root --proxy-backend-addresses=127.0.0.1:3306 -proxy-lua-script=reporter.lua
In a different window, connect to the MariaDB server through the proxy:
shell> mysql --user=root --password=password --port=4040
Welcome to the MariaDB monitor. Commands end with ; or \g.
Your MariaDB connection id is 1798669
Server version: 5.0.70-log Gentoo Linux mysql-5.0.70-r1
Type 'help;' or '\h' for help. Type '\c' to clear the buffer.
mysql>
In another different window, connect to the mysql-proxy admin service using the specified user name and password:
shell> mysql --user=root --password=password --port=4041 --host=localhost
Welcome to the MariaDB monitor. Commands end with ; or \g.
Your MariaDB connection id is 1
Server version: 5.0.99-agent-admin Type 'help;' or '\h' for help. Type '\c' to clear the buffer.
mysql>
To monitor the status of the proxy, ask for a list of the current active processes:
mysql> show proxy processlist;
+---------+---------------------+--------------------------+
| Id | IP Address | Time |
+---------+---------------------+--------------------------+
| 1798669 | 192.168.0.112:52592 | Wed Jan 20 16:58:00 2010 |
+---------+---------------------+--------------------------+
1 row in set (0.00 sec)
mysql>
For more information on the example, see MySQL Proxy Admin Example.
MySQL Proxy FAQ
Questions
- : In load balancing, how can I separate reads from writes?
- : How do I use a socket with MariaDB Proxy? Proxy change logs mention that support for UNIX sockets has been added.
- : Can I use MariaDB Proxy with all versions of MySQL?
- : Can I run MariaDB Proxy as a daemon?
- : Do proxy applications run on a separate server? If not, what is the overhead incurred by Proxy on the DB server side?
- : With load balancing, what happens to transactions? Are all queries sent to the same server?
- : Is it possible to use MariaDB Proxy with updating a Lucene index (or Solr) by making TCP calls to that server to update?
- : Is the system context switch expensive, how much overhead does the Lua script add?
- : How much latency does a proxy add to a connection?
- : Do you have to make one large script and call it at proxy startup, can I change scripts without stopping and restarting (interrupting) the proxy?
- : If MariaDB Proxy has to live on same machine as MySQL, are there any tuning considerations to ensure both perform optimally?
- : I currently use SQL Relay for efficient connection pooling with a number of Apache processes connecting to a MariaDB server. Can MariaDB Proxy currently accomplish this? My goal is to minimize connection latency while keeping temporary tables available.
- : Are these reserved function names (for example,
error_result()) that get automatically called? - : As the script is re-read by MariaDB Proxy, does it cache this or is it looking at the file system with each request?
- : Given that there is a
connect_server()function, can a Lua script link up with multiple servers? - : Is the MariaDB Proxy an API?
- : The global namespace variable example with quotas does not persist after a reboot, is that correct?
- : Can MariaDB Proxy handle SSL connections?
- : Could MariaDB Proxy be used to capture passwords?
- : Are there tools for isolating problems? How can someone figure out whether a problem is in the client, the database, or the proxy?
- : Is MariaDB Proxy similar to what is provided by Java connection pools?
- : So authentication with connection pooling has to be done at every connection? What is the authentication latency?
- : If you have multiple databases on the same box, can you use proxy to connect to databases on default port 3306?
- : What about caching the authorization information so clients connecting are given back-end connections that were established with identical authorization information, thus saving a few more round trips?
- : Is there any big web site using MariaDB Proxy? For what purpose and what transaction rate have they achieved?
- : How does MariaDB Proxy compare to DBSlayer?
- : I tried using MariaDB Proxy without any Lua script to try a round-robin type load balancing. In this case, if the first database in the list is down, MariaDB Proxy would not connect the client to the second database in the list.
- : Is it "safe" to use
LuaSocketwith proxy scripts? - : How different is MariaDB Proxy from DBCP (Database connection pooling) for Apache in terms of connection pooling?
- : MariaDB Proxy can handle about 5000 connections, what is the limit on a MariaDB server?
- : Would the Java-only connection pooling solution work for multiple web servers? With this, I would assume that you can pool across many web servers at once?
Questions and Answers
15.7.6.1: In load balancing, how can I separate reads from writes?
There is no automatic separation of queries that perform reads or writes to the different backend servers. However, you can specify to mysql-proxy that one or more of the "backend" MariaDB servers are read only.
shell> mysql-proxy \
--proxy-backend-addresses=10.0.1.2:3306 \
--proxy-read-only-backend-addresses=10.0.1.3:3306 &
15.7.6.2: How do I use a socket with MariaDB Proxy? Proxy change logs mention that support for UNIX sockets has been added.
Specify the path to the socket:
--proxy-backend-addresses=/path/to/socket
15.7.6.3: Can I use MariaDB Proxy with all versions of MySQL?
MySQL Proxy is designed to work with MariaDB 5.0 or higher, and supports the MariaDB network protocol for 5.0 and higher.
15.7.6.4: Can I run MariaDB Proxy as a daemon?
Use the --daemon option. To keep track of the process ID, the daemon can be started with the --pid-file=file option to save the PID to a known file name. On version 0.5.x, the Proxy cannot be started natively as a daemon.
15.7.6.5: Do proxy applications run on a separate server? If not, what is the overhead incurred by Proxy on the DB server side?
You can run the proxy on the application server, on its own box, or on the DB-server depending on the use case.
15.7.6.6: With load balancing, what happens to transactions? Are all queries sent to the same server?
Without any special customization the whole connection is sent to the same server. That keeps the whole connection state intact.
15.7.6.7: Is it possible to use MariaDB Proxy with updating a Lucene index (or Solr) by making TCP calls to that server to update?
Yes, but it is not advised for now.
15.7.6.8: Is the system context switch expensive, how much overhead does the Lua script add?
Lua is fast and the overhead should be small enough for most applications. The raw packet overhead is around 400 microseconds.
15.7.6.9: How much latency does a proxy add to a connection?
In the range of 400 microseconds per request.
15.7.6.10: Do you have to make one large script and call it at proxy startup, can I change scripts without stopping and restarting (interrupting) the proxy?
You can just change the script and the proxy will reload it when a client connects.
15.7.6.11: If MariaDB Proxy has to live on same machine as MySQL, are there any tuning considerations to ensure both perform optimally?
MySQL Proxy can live on any box: application, database, or its own box. MariaDB Proxy uses comparatively little CPU or RAM, with negligible additional requirements or overhead.
15.7.6.12: I currently use SQL Relay for efficient connection pooling with a number of Apache processes connecting to a MariaDB server. Can MariaDB Proxy currently accomplish this? My goal is to minimize connection latency while keeping temporary tables available.
Yes.
15.7.6.13: Are these reserved function names (for example, error_result()) that get automatically called?
Only functions and values starting with proxy.* are provided by the proxy. All others are user provided.
15.7.6.14: As the script is re-read by MariaDB Proxy, does it cache this or is it looking at the file system with each request?
It looks for the script at client-connect and reads it if it has changed, otherwise it uses the cached version.
15.7.6.15: Given that there is a connect_server() function, can a Lua script link up with multiple servers?
MySQL Proxy provides some tutorials in the source package; one is examples/tutorial-keepalive.lua.
15.7.6.16: Is the MariaDB Proxy an API?
No, MariaDB Proxy is an application that forwards packets from a client to a server using the MariaDB network protocol. The MariaDB Proxy provides a API allowing you to change its behavior.
15.7.6.17: The global namespace variable example with quotas does not persist after a reboot, is that correct?
Yes. If you restart the proxy, you lose the results, unless you save them in a file.
15.7.6.18: Can MariaDB Proxy handle SSL connections?
No, being the man-in-the-middle, Proxy cannot handle encrypted sessions because it cannot share the SSL information.
15.7.6.19: Could MariaDB Proxy be used to capture passwords?
The MariaDB network protocol does not allow passwords to be sent in cleartext, all you could capture is the encrypted version.
15.7.6.20: Are there tools for isolating problems? How can someone figure out whether a problem is in the client, the database, or the proxy?
You can set a debug script in the proxy, which is an exceptionally good tool for this purpose. You can see very clearly which component is causing the problem, if you set the right breakpoints.
15.7.6.21: Is MariaDB Proxy similar to what is provided by Java connection pools?
Yes and no. Java connection pools are specific to Java applications, MariaDB Proxy works with any client API that talks the MariaDB network protocol. Also, connection pools do not provide any functionality for intelligently examining the network packets and modifying the contents.
15.7.6.22: So authentication with connection pooling has to be done at every connection? What is the authentication latency?
You can skip the round-trip and use the connection as it was added to the pool. As long as the application cleans up the temporary tables it used. The overhead is (as always) around 400 microseconds.
15.7.6.23: If you have multiple databases on the same box, can you use proxy to connect to databases on default port 3306?
Yes, MariaDB Proxy can listen on any port, provided that none of the MariaDB servers are listening on the same port.
15.7.6.24: What about caching the authorization information so clients connecting are given back-end connections that were established with identical authorization information, thus saving a few more round trips?
There is an --proxy-pool-no-change-user option that provides this functionality.
15.7.6.25: Is there any big web site using MariaDB Proxy? For what purpose and what transaction rate have they achieved?
Yes, gaiaonline. They have tested MariaDB Proxy and seen it handle 2400 queries per second through the proxy.
15.7.6.26: How does MariaDB Proxy compare to DBSlayer?
DBSlayer is a REST->MySQL tool, MariaDB Proxy is transparent to your application. No change to the application is needed.
15.7.6.27: I tried using MariaDB Proxy without any Lua script to try a round-robin type load balancing. In this case, if the first database in the list is down, MariaDB Proxy would not connect the client to the second database in the list.
This issue is fixed in version 0.7.0.
15.7.6.28: Is it "safe" to use LuaSocket with proxy scripts?
You can, but it is not advised because it may block.
15.7.6.29: How different is MariaDB Proxy from DBCP (Database connection pooling) for Apache in terms of connection pooling?
Connection Pooling is just one use case of the MariaDB Proxy. You can use it for a lot more and it works in cases where you cannot use DBCP (for example, if you do not have Java).
15.7.6.30: MySQL Proxy can handle about 5000 connections, what is the limit on a MariaDB server?
The server limit is given by the value of the max_connections system variable. The default value is version dependent.
15.7.6.31: Would the Java-only connection pooling solution work for multiple web servers? With this, I would assume that you can pool across many web servers at once?
Yes. But you can also start one proxy on each application server to get a similar behavior as you have it already.Copyright 1997, 2012, Oracle and/or its affiliates. All rights reserved. Legal Notices
| Prev | Next | |
| Storage Engines | Home | Chapter 15. Replication |