Sharing Files Using Wi-Fi Direct
Home > Connecting Using Wi-Fi Direct > Sharing Files With Wi-fi Direct
Sharing Files With Wi-Fi Direct(USB doesn't support Wi-Fi Direct)
The Mediatek Utility lets you share files using Wi-Fi Direct. You can use the Mediatek Media Server to share media files such as music, video, and image files, or use Windows to share files.
Instructions
Follow these instructions to share media files using the Mediatek Media Server, or share all file types using Windows Vista/7 or Windows XP.
- Ensure you have a Wi-Fi Direct connection set up. See Connecting Using Wi-Fi Direct for instructions on how to do this.
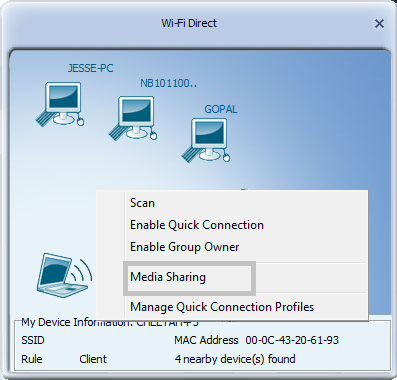
- In the Wi-Fi Direct screen, right-click on the notebook icon and select Media Sharing.
- In the Media Sharing screen, cllick the right arrow to enable the server and begin sharing media files located in the Media Sharing folder.
- The files shared by the media server can now be accessed on the connecting computer. Use a media player on the connecting computer to locate the server and the media files, and view them or begin playback.
- To finish sharing using the Mediatek Media Server, in the Media Sharing screen, press the stop button
 .
.
To use Windows Vista or 7 to share files using Wi-Fi Direct, ensure you have a Wi-Fi Direct connection between two computers and then follow these instructions to locate and share files on a network drive.
- Open the My Computer folder, by clicking 'Start' in the bottom left corner of your screen, and then clicking on the 'My Computer' icon.
- Navigate to the Network window.
- The connected computers, devices and folders display. Double-click a computer or device icon to browse to and share folders and files.
To use Windows XP to share files using Wi-Fi Direct, ensure you have a Wi-Fi Direct connection between two computers and then follow these instructions to locate and share files on a network drive.
- Note the name of the computer you are accessing, and the workgroup of which it is part. Do this by right-clicking on the My Computer icon on your desktop and click "Properties" to display the following screen. The workgroups for both computers should be the same to allow file-sharing.
- Open the My Computer folder, by clicking 'Start' in the bottom left corner of your screen, and then clicking on the 'My Computer' icon.
- In the My Computer folder, click 'My Network Places'.
- Click 'Entire Network'.
- Double-click the Microsoft Windows Network icon.
- Double-click on the name of the workgroup assigned to your computer. In this case the workgroup name has been left to its default name 'Workgroup', but your settings may differ.
- The connected computers, devices and folders display. Double-click an icon to browse to and share folders and files.
Troubleshooting
For suggestions on problems using Windows to share files, visit the Microsoft support web site http://support.microsoft.com/.