Using Image Preview
When accessed through the Export Wizard, the Image Preview displays recommended optimization and export options for the current document. When selected directly from the File menu, the Image Preview displays the current document export settings as defined in the optimize panel.
The preview area of the Image Preview displays the document or graphic exactly as it will be exported and estimates file size and download time with the current export settings.
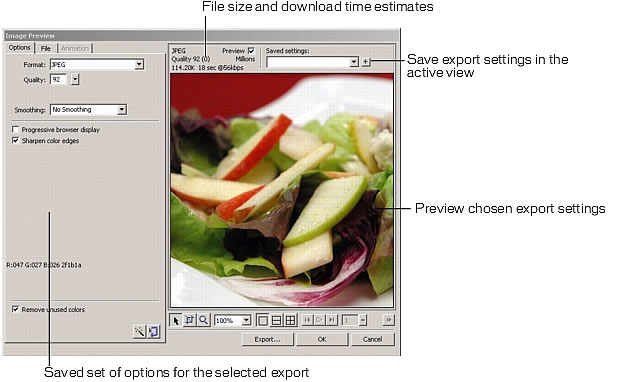
You can use split views to compare various settings to find the smallest file size that maintains an acceptable level of quality. You can also constrain the file size using the Optimize to Size wizard.
When you export animated GIFs or JavaScript rollovers, the estimated file size represents the total size across all frames.
|
NOTE |
To increase redraw speed of the Image Preview, deselect Preview. To stop the redraw of the preview area when changing settings, press Escape. |
To export using Image Preview:
- Select File > Image Preview to open the Image Preview.
- To edit optimization settings, click the Options tab. For information about the options available on this tab, see the following procedures.
- To edit the size and area of the exported image, click the File tab and change the desired settings. For information about the options available on this tab, see the following procedures.
- To edit animation settings for the image, click the Animation tab and change the desired settings. For information about the options available on this tab, see the following procedures.
 Use the Zoom button at the bottom of the dialog box to zoom in or out in the preview. Click this button to activate the Zoom magnification tool and then click in the preview to magnify the preview. Alt-click (Windows) or Option-click (Macintosh) the button in the preview to zoom out.
- Do one of the following to pan the preview area:
 Click the Pointer button at the bottom of the dialog box and drag in the preview.
- Hold down the Spacebar when the Zoom pointer is active and drag in the preview.
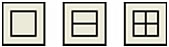
- Click a split-view button to divide the preview area into two or four previews to compare settings.
Each preview window can display a preview of the graphic with different export settings.
NOTE
When you zoom or pan while multiple views are open, all views zoom and pan simultaneously.
- Click Export when you have finished changing settings.
- In the Export dialog box, type a name for the file, select a destination, set any other options if desired, and click Save.
For more information about the options in the Export dialog box, see Exporting from Fireworks.
To set optimization settings using Image Preview:
- Click the Options tab. Most of the options available here are similar to those in the Optimize panel. For more about these options, see Using optimization settings.
 Click the Optimize to Size Wizard button to optimize a graphic based on a target file size.
Enter a file size in kilobytes and click OK.
The Optimize to Size Wizard attempts to match the requested file size using these methods:
- Adjusting JPEG quality
- Modifying JPEG smoothing
- Altering the number of colors in 8-bit images
- Changing dither settings in 8-bit images
- Enabling or disabling optimization settings
To set exported image dimensions using Image Preview:
- Click the File tab.
- Specify a scale percentage or enter the desired width and height in pixels. Select Constrain to scale the width and height proportionally.

To define only a portion of an image for export using Image Preview:
- Click the File tab.
- Select the Export Area option and do one of the following to specify the export area:
- Drag the dotted border that appears around the preview until it encloses the desired export area. (Drag inside the preview to move hidden areas into view.)
- Enter pixel coordinates for the boundaries of the export area.
To set animation settings using Image Preview:
- Click the Animation tab.
- Use the following techniques to preview animation frames:
- To display a single frame, select the desired frame in the list on the left side of the dialog box, or use the frame controls in the lower right area of the dialog box.
- To play the animation, click the Play/Stop control in the lower right area of the dialog box.
- Make edits to the animation:
- To specify the frame disposal method, select the desired frame in the list and select an option from the pop-up menu (indicated by the trash can icon).
- To set the frame delay, select the desired frame in the list and enter the delay time in hundredths of a second in the Frame Delay field.
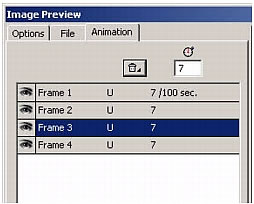
- To set the animation to play repeatedly, click the Looping button and select the desired number of repetitions from the pop-up menu.
- Select the Auto-Crop option to crop each frame as a rectangular area, so that only the image area that differs between frames is output. Selecting this option reduces file size.
- Select the Auto-Difference option to output only pixels that change between frames. Selecting this option reduces file size.

