Using optimization settings
You can select from common optimization settings in the Property inspector or the Optimize panel to quickly set a file format and apply several format-specific settings. When you select an option from the Default export options pop-up menu in the Property inspector, the rest of the options in the Optimize panel are automatically set for you. You can further adjust each option individually if desired.
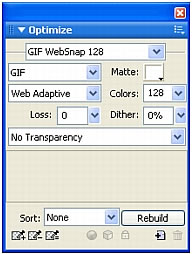
If you need more custom optimization control than the preset options offer, you can create custom optimization settings in the Optimize panel. You can also modify a graphic's color palette using the color table in the Optimize panel.
To select a preset optimization:
- Select a preset from the Settings pop-up menu in the Property inspector or the Optimize panel:
GIF Web 216 forces all colors to websafe colors. The color palette contains up to 216 colors (see Optimizing GIF, PNG, TIFF, BMP, and PICT files).
GIF WebSnap 256 converts non-websafe colors to their closest websafe color. The color palette contains up to a maximum of 256 colors.
GIF WebSnap 128 converts non-websafe colors to their closest websafe color. The color palette contains up to 128 colors.
GIF Adaptive 256 is a color palette that contains only the actual colors used in the graphic. The color palette contains up to a maximum of 256 colors.
JPEG - Better Quality sets quality to 80 and smoothing to 0, resulting in a high-quality but larger graphic.
JPEG - Smaller File sets quality to 60 and smoothing to 2, resulting in a graphic less than half the size of a Better Quality JPEG but with reduced quality.
Animated GIF Websnap 128 sets the file format to Animated GIF and converts non-websafe colors to their closest websafe color. The color palette contains up to 128 colors.
For more information about file types, see Choosing a file type.
To specify custom optimization settings:
- In the Optimize panel, select an option from the Export File Format pop-up menu.
- Set format-specific options, such as color depth, dither, and quality.
- Select other optimization settings from the Optimize panel Options menu, as necessary.
For more information about specific optimization controls, see the appropriate sections in Optimizing in the workspace.
- You can name and save custom optimization settings. Names of saved settings are displayed in the preset optimization settings in the Settings pop-up menu in the Optimize panel and the Property inspector when slices, buttons, or the canvas are selected. For more information, see Saving and reusing optimization settings.
To modify the color palette:
- If the Optimize panel isn't already open, select Window > Optimize to view and edit a document's color palette.
For more information, see Optimizing GIF, PNG, TIFF, BMP, and PICT files.
To optimize individual slices:
- Click a slice to select it. Shift-click to select more than one slice.
- Optimize the selected slices using the Optimize panel.

