Slice the document
Graphic designers use a process called slicing to cut an image into smaller pieces. Smaller images download more quickly over the web, so users can watch a page load progressively rather than waiting for one large image to download. In addition, slicing makes it possible to optimize various parts of a document differently. Slicing is also necessary for adding interactivity.
In this step, you create slices for some of the graphic elements on the web page. Later you'll add interactivity to these slices as well as set optimization and compression settings for them.
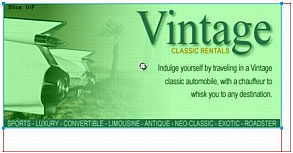
- With the Vintage graphic still selected on the canvas, select Edit > Insert > Rectangular Slice.
A rectangular slice is inserted on top of the graphic. Slices have a green overlay by default.
- Click anywhere outside the slice to deselect it.
Red slice guides define the slice, spanning the width and height of the document. When you created the slice, Fireworks autosliced the rest of the document for you.
NOTE
If you don't see the red slice guides, select View > Slice Guides.
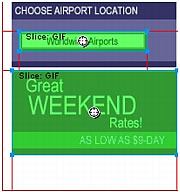
- Shift-click the Worldwide Airports button graphic and the Great Weekend Rates graphic on the left side of the document to select both at the same time.
- Select Edit > Insert > Rectangular Slice, and then select Multiple in the message box that appears.
This step allows you to insert multiple slices at the same time.
Slices are inserted on top of each of the selected graphics. Adding more slices changes the layout of autoslices in the rest of the document.
- Click anywhere outside the slices to deselect them.
There is now a space between the Vintage slice and the Great Weekend Rates slice. This is a thin autoslice.
- Place the pointer over the Vintage image's left slice guide.
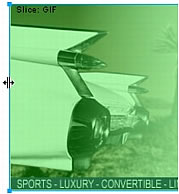
The pointer changes to the guide movement pointer, indicating that you can grab the slice guide and drag it. By dragging a slice guide, you can change the shape of a slice.
- Select View > Guides > Snap to Guides to enable Snap to Guides if it is not already selected.
- Drag the slice guide to the left until it snaps with the right slice guide on the Great Weekend Rates graphic, as shown in the following illustration:
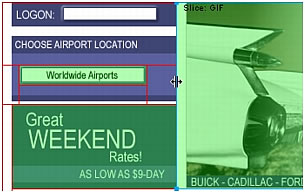
- Release the mouse button.
The Vintage slice now extends all the way to the edge of the Great Weekend Rates slice, and the tiny autoslice is deleted. Think of slices as table cells in a spreadsheet application or word processor. For example, dragging slice guides to resize a slice resizes other slices just as dragging cell borders in a table resizes other table cells. If you drag a slice guide over and beyond autoslices, the slice guides merge and the unnecessary autoslices are deleted.
- If the Layers panel is minimized or isn't visible, select Window > Layers to open it.
At the top of the panel is the Web Layer. It contains all of a document's web objects. The three slices you created are listed here. The Web Layer is always the topmost layer in any document. It can't be moved, renamed, or deleted.

- Save your work.

