Create a rollover
Now that you sliced your document, you can create interactive elements. You decide to use two of your slices to create a rollover.
There are two kinds of rollovers: simple rollovers and disjoint rollovers. A simple rollover displays a different image when the pointer moves over it in a web browser. A disjoint rollover causes another image to change in a different part of the screen when the pointer moves over it. You'll create a disjoint rollover here.
- Select the slice that covers the Vintage graphic.
The round icon in the center of the slice is called a behavior handle. It allows you to add behaviors, or interactivity, to a slice. If you are familiar with behaviors in Adobe Dreamweaver, you'll recognize many of the same behaviors in Fireworks.
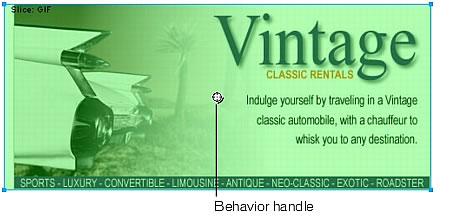
You can also apply behaviors by using the Behaviors panel. However, for simple interactivity like rollovers, it's faster and easier to apply a behavior by using the slice's behavior handle.
- Drag the behavior handle onto the Great Weekend Rates slice, and release the mouse button.

A blue behavior line extends from the behavior handle to the corner of the slice, and the Swap Image dialog box appears.
- Ensure that Frame 2 is selected in the Swap Image From pop-up menu, and click OK.
When the pointer moves over the Vintage slice in a browser, the image in Frame 2 replaces the Great Weekend Rates graphic. The Vintage graphic is considered the trigger for the rollover effect, and the image that replaces the Great Weekend Rates graphic is considered the swap image.
The next step is to add the swap image to Frame 2.
- If the Frames panel is minimized or isn't visible, select Window > Frames to open it.
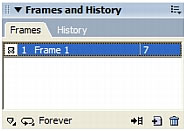
The Frames panel lists the frames available in the current document. Currently there is only one frame in the document. The Frames panel is typically used for animation. In the case of rollovers, it is used to hold swap images.
- Click the New/Duplicate Frame button at the bottom of the panel.

A new frame, named Frame 2, is created in the Frames panel. As indicated by the workspace, the frame is empty except for the slices you inserted (slices are shared across all frames).
- Select File > Import, and then browse to the following folder:
local_sites/global/Assets folder.
- Select the rates.gif file and click Open.
- Place the pointer over the slice where the Great Weekend Rates graphic was located in Frame 1.
Align the pointer as best you can with the upper-left corner of the slice.

- Click to insert the graphic.
The Vintage Classic Rates graphic appears.

- Click the Preview button at the top of the Document window, and hide the slices in the document by clicking the Hide Slices and Hotspots button in the Web section of the Tools panel.

- Move the pointer over the Vintage graphic.
The Great Weekend Rates image changes when the pointer rolls over the Vintage graphic.
TIP
If the image seems to jump a bit or the transition between graphics doesn't look smooth, hide the slices and adjust the position of the swap image in Frame 2 with the Property inspector. Its x and y coordinates should match the coordinates of the Great Weekend Rates image (11, 202).
- When you are finished, click the Original button at the top of the Document window to return to normal view, and turn slices back on by clicking the Show Slices and Hotspots button in the Tools panel.
- Save your work.
You have successfully created a disjoint rollover. You can create simple rollovers in a similar manner: When dragging a slice's behavior handle as you did in step 2, you simply drag it back onto the same slice.
Generally, web designers add a rollover effect to an image to provide users with a visual cue that the graphic is clickable. If the Global website were an actual site on the Internet, you'd probably want the Vintage and Rates images to link to other pages that provide more information. For the purposes of this tutorial, you leave the disjoint rollover as it is. You'll get plenty of practice attaching links to other web objects in the following section.

