Selectively compressing areas of a JPEG
Selective JPEG compression lets you compress different areas of a JPEG at different levels. Areas of particular interest in an image can be compressed at a higher quality level. Areas of lesser significance, such as backgrounds, can be compressed at a lower quality level, reducing the overall size of the image while retaining the quality of the more important areas.
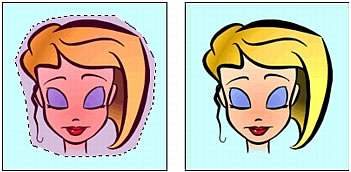
The selected area in this image is being compressed at a quality level of 90, while the unselected area is being compressed at a quality level of 50.
To compress selected areas of a JPEG:
- In Original view, select an area of the graphic for compression using one of the Marquee tools.
- Select Modify > Selective JPEG > Save Selection as JPEG Mask.
- Select JPEG from the Export File Format pop-up menu in the Optimize panel, if it's not already selected.
- Click the Edit Selective Quality Options button in the Optimize panel.
The Selective JPEG Settings dialog box opens.
- Select Enable Selective Quality and enter a value in the text box.
Entering a low value compresses the Selective JPEG area more than the rest of the image. Entering a high value compresses the Selective JPEG area less than the rest of the image.
- Change the Overlay Color for the Selective JPEG area if desired. This does not affect the output.
- Select Preserve Text Quality. All text items will automatically be exported at a higher level, regardless of the Selective Quality value.
- Select Preserve Button Quality. All button symbols will automatically be exported at a higher level.
- Click OK.
To modify the selective JPEG compression area:
- Select Modify > Selective JPEG > Restore JPEG Mask as Selection.
The selection is highlighted.
- Use the Marquee tool or another selection tool to make changes to the size of the area.
- Select Modify > Selective JPEG > Save Selection as JPEG Mask.
- Change selective quality settings in the Optimize panel if desired.
NOTE
To undo a selection, select Modify > Selective JPEG > Remove JPEG Mask.

