Create a slanted edge effect
You want to create a slanted edge effect in the banner, as shown in the banner sketch (see Review your task). To produce this effect, you decide to create a shape and use it as a mask.
- In the Layers panel, select the Graphics layer.
- In the Tools panel, select the Pen tool.

- In the Property inspector, set the following properties for the Pen tool:
- Click the Stroke Color box next to the pencil icon and click the Transparent button.
- In the Fill Category pop-up menu, select Solid.
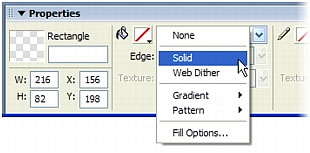
- Click the Fill Color box next to the bucket icon and select the black swatch with the eyedropper pointer.
- In the Document window outside the canvas, click four times to draw a rectangular shape, and then click on the first point to close the shape.
Your rectangle should be a little taller than the banner graphic and about a third of its length.
- Select the Pointer tool (or press V) and move the shape so that it covers the left side of the banner.
NOTE
Because the shape is on the Graphics layer, it obscures the background image but not the logo. According to the stacking order shown in the Layers panel, the Logo layer is above the Graphics layer while the Background layer is below it.
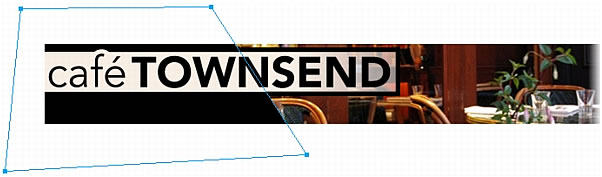
- Select the Subselection tool (or press A) and click the shape's anchor points to adjust its shape so that its right side is slanted, as follows.
- Save your work.

