Building an Insert bar pop-up menu
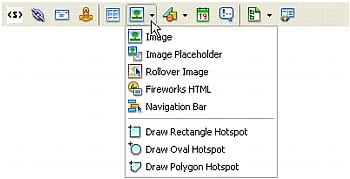
The Adobe Dreamweaver Insert bar introduces a new organization for objects and now supports pop-up menus to help organize objects into smaller groups, as shown in the following figure.
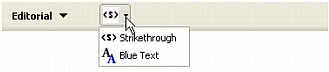
The following example builds a new category on the Insert bar called Editorial and then adds a pop-up menu to that category. The pop-up menu contains the Strikethrough object you already created and groups it with a Blue Text object you will create. The objects in the Editorial category let users make editorial comments in a file and either strike through the content they want to remove or make new content blue.
To organize the files:
- Create a new Configuration/Objects/Editorial folder in your Adobe Dreamweaver installation folder.
- Copy the files for the Strikethrough object example you created (Strikethrough.htm, Strikethrough.js, and Strikethrough.gif) to the Editorial folder.
To create the Blue Text object:
- Create a new HTML file.
- Add the following code:
<html><head><title>Blue Text</title><script language="javascript">//--------------- API FUNCTIONS ---------------function isDOMRequired() { // Return false, indicating that this object is available in Code view. return false;}function objectTag() { // Manually wrap tags around selection. var dom = dw.getDocumentDOM(); if (dw.getFocus() == 'textView' || dw.getFocus(true) == 'html'){ var upCaseTag = (dw.getPreferenceString("Source Format", "Tags Upper Case", "") == 'TRUE'); // Manually wrap tags around selection. if (upCaseTag){ dom.source.wrapSelection('<FONT COLOR="#0000FF">','</FONT>'); }else{ dom.source.wrapSelection('<font color="#0000FF">','</font>'); } }else if (dw.getFocus() == 'document'){ dom.applyFontMarkup("color", "#0000FF"); } // Just return -- don't do anything else. return;}</script></head><body></body></html> - Save the file as AddBlue.htm in the Editorial folder.
Now you can create an image for the Blue Text Object.
To create the image:
- Create a GIF file that is 18 x 18 pixels, which will look like the following figure:

- Save the image as AddBlue.gif in the Editorial folder.
Next, you edit the insertbar.xml file. This file defines the objects on the Insert bar and their locations. Notice the various menubutton tags and their attributes within the category tags; these menubutton tags define each pop-up menu in the HTML category. Within the menubutton tags, each button tag defines an item in the pop-up menu.
To edit insertbar.xml:
- Find the following line of code near the beginning of the file:
<insertbar xmlns:MMString="http://www.macromedia.com/schemes/data/string/">
The
insertbartag defines the beginning of all the Insert bar contents. - After that line, add a new
categorytag for the Editorial category you want to create, giving it unique ID, name, and folder attributes, and then add a closingcategorytag, as shown in the following example:<category id="DW_Insertbar_Editorial" name="Editorial" folder="Editorial"></category>
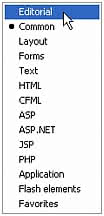
- Reload extensions. For information on reloading extensions, see Reloading extensions.
The Editorial category appears on the Insert bar:
- Within the opening and closing
categorytags, add the pop-up menu by using themenubuttontag and the following attributes, including a unique ID.<menubutton id="DW_Insertbar_Markup" name="markup" image="Editorial\Strikethrough.gif" folder="Editorial">
For more information about attributes, see Insert bar definition tag attributes.
- Add the objects for the new pop-up menu using the
buttontag, as follows:<button id="DW_Editorial_Strikethrough" image="Editorial\Strikethrough.gif" file="Editorial\Strikethrough.htm"/>
- After the Strikethrough object button tag, add the hypertext object, as follows:
<button id="DW_Blue_Text" image="Editorial\AddBlue.gif name="Blue Text" file="Editorial\AddBlue.htm"/>
NOTE
The button tag does not have a separate closing tag; it simply ends with
"/>". - End the pop-up menu with the
</menubutton>closing tag.
The following code shows your entire category with the pop-up menu and the two objects:
<category id="DW_Insertbar_Editorial" name="Editorial" folder="Editorial"> <menubutton id="DW_Insertbar_Markup" name="markup"
 image="Editorial\Strikethrough.gif" folder="Editorial"> <button id="DW_Editorial_Strikethrough"
 image="Editorial\Strikethrough.gif" file="Editorial\Strikethrough.htm"/> <button id="DW_Blue_Text" image="Editorial\AddBlue.gif" name="Blue Text"
 file="Editorial\AddBlue.htm"/>  </menubutton></category>
To test the new pop-up menu:
- Reload extensions. For information on reloading extensions, see Reloading extensions.
- Click the Editorial menu.
The following pop-up menu appears: