Next
Another Servlet Example
In our next example, the servlet will utilize DOM and XSLT to create its web pages. This achieves our goal of separation between data and presentation, making it possible to fully customize the HTML output without making any changes to the Java code. Although an XML approach makes the code more complex for a small example program such as this, the benefits quickly outweigh the costs as web applications get more sophisticated. The same is true for an Enterprise JavaBeans approach. For a trivial program, the configuration requirements seem very complex; but as the application complexity increases, the benefits of a sophisticated architecture become obvious.
Our program will consist of two web pages, allowing visitors to enter personal information. The first page will prompt for their name, phone, and email, and the second page will display a summary of the data that was entered. The first page does validation, forcing the user to enter all of the required fields.
Design
The primary goal of this small application is to demonstrate how to use XSLT from a servlet. Specifically, JAXP will be used with DOM to create some dynamic XML data, then XSLT stylesheets will be used to transform that data into HTML. The design is presented in Figure 6-4. 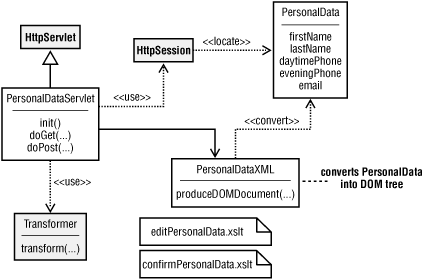
Figure 6-4. Personal data design
As Figure 6-4 shows, PersonalDataServlet is a subclass of HttpServlet. This servlet overrides both doGet( ) and doPost( ). When the visitor first visits this website, an HTTP GET request causes the doGet( ) method to be called, which shows a form that allows the user to enter his or her information. When they hit the submit button on the web page, the doPost( ) method validates all form fields and shows the confirmation page if everything is valid. If one or more fields are missing, the form is redisplayed with an error message.
The PersonalData class simply holds data that the user has entered, and is located via the HttpSession. Each visitor gets his or her own copy of HttpSession, therefore they get their own copy of PersonalData. In order to convert this data to XML, a separate helper class called PersonalDataXML was created.
The decision to use a separate helper class for XML generation was not arbitrary. Many people like to put code directly into classes like PersonalData, such as a getXML( ) method, that performs this task. By placing the XML generation logic into a totally separate class, however, it will be easier to migrate to a technology like JDOM without breaking current clients in any way. A new class called PersonalDataJDOM could be added to the system while preserving all of the existing code. This approach also keeps the PersonalData class smaller, since all it has to do is hang on to the data.
The first web page is shown in Figure 6-5. As you can see, required fields are marked with an asterisk (*). This screen is rendered using editPersonalData.xslt. 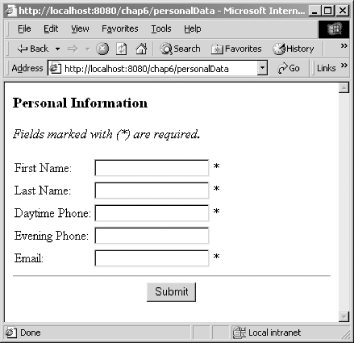
Figure 6-5. Blank personal information form
Figure 6-6 shows how this same screen looks after the user clicks on the Submit button. If data is missing, an error message is displayed in red and required fields are marked in bold. Any other error messages are also displayed in red. This view is also rendered using editPersonalData.xslt. 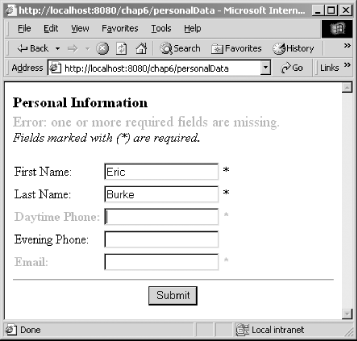
Figure 6-6. Personal information form with errors
Once all of the data has been entered properly, the screen shown in Figure 6-7 is displayed. Unlike the previous examples, this screen is rendered using confirmPersonalData.xslt. To make changes to any of these screens, one needs to edit only the appropriate stylesheet. 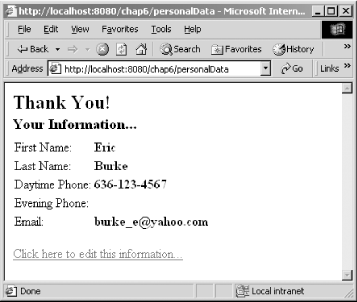
Figure 6-7. Confirmation page
XML and Stylesheets
Deciding how to structure your XML can have significant impact on your ability to customize the output of a web application. In our current example, the same XML file is used for all web pages. This XML is shown in Example 6-3.
Example 6-3. Example XML output
<?xml version="1.0" encoding="UTF-8"?>
<page>
<!-- the next element is optional: -->
<!-- <requiredFieldsMissing/> -->
<personalData>
<firstName required="true">Eric</firstName>
<lastName required="true">Burke</lastName>
<daytimePhone required="true">636-123-4567</daytimePhone>
<eveningPhone/>
<email required="true">burke_e@yahoo.com</email>
</personalData>
</page>
As you can see, the XML is very minimal. None of the captions, such as "First Name:", are included, because they are all specified in the XSLT stylesheets. Even the asterisk character (*) is omitted, giving the XSLT author complete control over how things are rendered. The XML is used only for data, so you can use the stylesheets to include graphics, render the output in a foreign language, or combine page fragments from other sources, such as headers and footers, into your web pages.
The <requiredFieldsMissing/> element is optional. If omitted, the XSLT stylesheet will not display error messages about missing fields. This is useful when the data is generated the first time because all fields will be blank, and you probably don't want to show a bunch of error messages. In our servlet, the doGet( ) method is called when the user first requests this web page, so it is here where we disable this element.
It is important to mention that this XML is used only for documentation purposes and for testing the XSLT stylesheets. Once you move into a production environment, the XML will be generated dynamically using the PersonalData and PersonalDataXML classes, so this static file will not be required. You will probably want to hang on to your static XML, however, as this will make it easier to experiment with changes to the XSLT.
The XSLT stylesheet that creates the HTML form is shown in Example 6-4. The stylesheets are substantially longer than the XML data, which is typical. In a more simplistic approach to servlet development, all of this logic would be hardcoded into the source code as a series of println( ) statements, making the servlet much larger and less flexible.
Example 6-4. editPersonalData.xslt
<?xml version="1.0" encoding="UTF-8"?>
<xsl:stylesheet version="1.0" xmlns:xsl="http://www.w3.org/1999/XSL/Transform" xmlns="http://www.w3.org/1999/xhtml">
<xsl:output method="xml" indent="yes" encoding="UTF-8" doctype-public="-//W3C//DTD XHTML 1.0 Transitional//EN" doctype-system="http://www.w3.org/TR/xhtml1/DTD/xhtml1-transitional.dtd"/>
<!-- *************************************************************** ** Top level template. Creates the framework for the XHTML page ************************************************************-->
<xsl:template match="/">
<html>
<head><title>Edit Personal Information</title></head>
<body>
<xsl:apply-templates select="page/personalData"/>
</body>
</html>
</xsl:template>
<!-- *************************************************************** ** Match the <personalData> element. ************************************************************-->
<xsl:template match="personalData">
<h3>Personal Information</h3>
<xsl:if test="../requiredFieldsMissing">
<div > Error: one or more required fields are missing. </div>
</xsl:if>
<i>Fields marked with (*) are required.</i>
<form action="/chap6/personalData" method="post">
<table >
<!-- Select all immediate children, such as firstName, lastName, daytimePhone, etc... -->
<xsl:apply-templates/>
</table>
<div >
<hr/>
<input type="submit" name="submitBtn" value="Submit"/>
</div>
</form>
</xsl:template>
<!-- *************************************************************** ** Output a new row in the table for each field. ************************************************************-->
<xsl:template match="firstName|lastName|daytimePhone|eveningPhone|email">
<tr>
<xsl:if test="@required="true" and ../../requiredFieldsMissing and .=""">
<xsl:attribute name="style">
<xsl:text>color:red; font-weight:bold;</xsl:text>
</xsl:attribute>
</xsl:if>
<td>
<xsl:choose>
<xsl:when test="name( )="firstname""> First Name:</xsl:when>
<xsl:when test="name( )="lastname""> Last Name:</xsl:when>
<xsl:when test="name( )="daytimephone""> Daytime Phone:</xsl:when>
<xsl:when test="name( )="eveningphone""> Evening Phone:</xsl:when>
<xsl:when test="name( )="email""> Email:</xsl:when>
</xsl:choose>
</td>
<td>
<input type="text" name="{name( )}" value="{.}"/>
</td>
<td>
<xsl:if test="@required="true"">*</xsl:if>
</td>
</tr>
</xsl:template>
</xsl:stylesheet>
The first seven lines of editPersonalData.xslt contain boilerplate code that configures the XSLT processor to produce XHTML 1.0 using the transitional DTD. In particular, our result tree uses the <i>...</i> tag, so we cannot use the XHTML strict DTD. The top level template matches the "/" pattern as usual, outputting the framework for the XHTML document.
The next template matches the <personalData> element, producing a heading followed by an optional error message. The error message is displayed if the XML data contains the <requiredFieldsMissing/> element, which is easily determined via the <xsl:if> element:
<xsl:template match="personalData">
<h3>Personal Information</h3>
<xsl:if test="../requiredFieldsMissing">
<div > Error: one or more required fields are missing. </div>
</xsl:if>
This template then produces the <form> element, which specifies that HTTP POST should be used to submit the information. The action attribute indicates that this form will send its data to our servlet. As you will see, the form action[24] matches the URL pattern that we will set up in the deployment descriptor later in this chapter:
[24] To avoid hardcoding the form action in the XSLT stylesheet, pass it as a stylesheet parameter.
<i>Fields marked with (*) are required.</i>
<form action="/chap6/personalData" method="post">
The template finally produces a table so that all of the headings and text fields are properly aligned. As in earlier stylesheet examples, this template creates the table, while another template creates each row in the table:
<table >
<!-- Select all immediate children, such as firstName, lastName, daytimePhone, etc... -->
<xsl:apply-templates/>
</table>
<div >
<hr/>
<input type="submit" name="submitBtn" value="Submit"/>
</div>
</form>
</xsl:template>
Since this particular instance of <xsl:apply-templates/> does not utilize the select attribute, all child elements will be selected. The next template is designed to match each of the possible types of elements that can appear and will be instantiated once for each occurrence of <firstName>, <lastName>, etc.:
<xsl:template match="firstName|lastName|daytimePhone|eveningPhone|email">
This template first produces a <tr> element. If this particular element has a required="true" attribute, the XML data contains <requiredFieldsMissing/>. The value of this element is an empty string, the font is changed to bold and red. This indicates to the user that a required field was missing. The font weight and color are inserted as the style attribute on the <tr> element as follows:
<tr>
<xsl:if test="@required="true" and ../../requiredFieldsMissing and .=""">
<xsl:attribute name="style">
<xsl:text>color:red; font-weight:bold;</xsl:text>
</xsl:attribute>
</xsl:if>
The template then produces its first <td> tag, which contains the caption for the current field. It would be nice if XSLT offered a lookup table mechanism for situations such as this, but <xsl:choose> does get the job done:
<td>
<xsl:choose>
<xsl:when test="name( )="firstname""> First Name:</xsl:when>
<xsl:when test="name( )="lastname""> Last Name:</xsl:when>
<xsl:when test="name( )="daytimephone""> Daytime Phone:</xsl:when>
<xsl:when test="name( )="eveningphone""> Evening Phone:</xsl:when>
<xsl:when test="name( )="email""> Email:</xsl:when>
</xsl:choose>
</td>
This is still better than hardcoding the captions into the XML or servlet because we can make changes to the stylesheet without recompiling anything. You can even change the captions to a foreign language without affecting any of the Java code, offering remarkable flexibility to web page designers.
Design Choices
The two stylesheets, editPersonalData.xslt and confirmPersonalData.xslt, had a lot in common. To keep things simple, they were written as two independent stylesheets. This is not the only way to implement this code, however. For instance, we could have searched for common functionality and included that functionality from both stylesheets using <xsl:import> or <xsl:include>. This approach did not work here because, although the stylesheets were structured similarly, each template produced different output. As the website gets more sophisticated, however, you will begin to encounter common page elements such as navigation bars that should not be duplicated in multiple places.
Another approach would be to combine both stylesheets into a single stylesheet and pass a top-level parameter indicating whether to use "edit" mode or "confirm" mode. In this approach, the servlet would pass the parameter to the stylesheet via JAXP's Transformer class and the <xsl:param> element. Inside of the stylesheet, we would write lots of <xsl:choose> or <xsl:if> elements to control the output based on the value of the parameter. The JAXP code would look something like this:
javax.xml.transform.Transformer trans = ... trans.setParameter("personalDataMode", "edit");
While this approach has its place, it did not make sense for this particular example because every template produced different output. It would have resulted in a more complex solution than simply writing two separate stylesheets. On the other hand, if you encounter a situation where several web pages are almost identical except for a small section that changes, passing a stylesheet parameter is probably the way to go, because you only have to write the conditional logic around the section that changes. |
The next column in the table contains the input field:
<td>
<input type="text" name="{name( )}" value="{.}"/>
</td>
In the XHTML output, this yields a cell containing <input type="text" name="firstName" value="Eric"/>. Finally, the last column in the table contains an asterisk if the field has the required="true" attribute:
<td>
<xsl:if test="@required="true"">*</xsl:if>
</td>
</tr>
</xsl:template>
The next stylesheet, confirmPersonalData.xslt, is listed in Example 6-5. This stylesheet is shorter because it shows only a summary of what the user entered on the previous page. It does not have to display any error messages or show an HTML form. The overall structure of the stylesheet is identical to editPersonalData.xslt, however, so a line-by-line description is not necessary.
Example 6-5. confirmPersonalData.xslt
<?xml version="1.0" encoding="UTF-8"?>
<xsl:stylesheet version="1.0" xmlns:xsl="http://www.w3.org/1999/XSL/Transform" xmlns="http://www.w3.org/1999/xhtml">
<xsl:output method="xml" indent="yes" encoding="UTF-8" doctype-public="-//W3C//DTD XHTML 1.0 Strict//EN" doctype-system="http://www.w3.org/TR/xhtml1/DTD/xhtml1-strict.dtd"/>
<!-- *************************************************************** ** Top level template. Creates the framework for the XHTML page ************************************************************-->
<xsl:template match="/">
<html>
<head>
<title>Personal Data Summary</title>
</head>
<body>
<xsl:apply-templates select="page/personalData"/>
</body>
</html>
</xsl:template>
<!-- *************************************************************** ** Match the <personalData> element. ************************************************************-->
<xsl:template match="personalData">
<h2>Thank You!</h2>
<h3>Your Information...</h3>
<table >
<!-- Select all immediate children, such as firstName, lastName, daytimePhone, etc... -->
<xsl:apply-templates/>
</table>
<p><a href="/chap6/personaldata">Click here to edit this information...</a></p>
</xsl:template>
<!-- *************************************************************** ** Output a new row in the table for each field. ************************************************************-->
<xsl:template match="firstName|lastName|daytimePhone|eveningPhone|email">
<tr>
<td>
<xsl:choose>
<xsl:when test="name( )="firstname""> First Name:</xsl:when>
<xsl:when test="name( )="lastname""> Last Name:</xsl:when>
<xsl:when test="name( )="daytimephone""> Daytime Phone:</xsl:when>
<xsl:when test="name( )="eveningphone""> Evening Phone:</xsl:when>
<xsl:when test="name( )="email""> Email:</xsl:when>
</xsl:choose>
</td>
<td>
<b><xsl:value-of select="."/></b>
</td>
</tr>
</xsl:template>
</xsl:stylesheet>
Source Code
The first piece of source code to examine is shown in Example 6-6. The PersonalData class is simply a data holder and does not contain any XML code or database code. By keeping classes like this simple, you can easily write standalone unit tests that verify if your code is written properly. If this code were written as part of the servlet instead of a standalone class, it would be very difficult to test outside of the web browser environment.
Example 6-6. PersonalData.java
package chap6; /** * A helper class that stores personal information. XML generation * is intentionally left out of this class. This class ensures * that its data cannot be null, nor can it contain extra * whitespace. */ public class PersonalData {
 private String firstName; private String lastName; private String daytimePhone; private String eveningPhone; private String email;
public PersonalData( ) {
 this("", "", "", "", "");
}
public PersonalData(String firstName, String lastName, String daytimePhone, String eveningPhone, String email) {
 this.firstName = cleanup(firstName); this.lastName = cleanup(lastName); this.daytimePhone = cleanup(daytimePhone); this.eveningPhone = cleanup(eveningPhone); this.email = cleanup(email);
}
/** * <code>eveningPhone</code> is the only optional field. * * @return true if all required fields are present. */ public boolean isValid( ) {
 return this.firstName.length( ) > 0 && this.lastName.length( ) > 0 && this.daytimePhone.length( ) > 0 && this.email.length( ) > 0;
}
public void setFirstName(String firstName) {
 this.firstName = cleanup(firstName);
}
public void setLastName(String lastName) {
 this.lastName = cleanup(lastName);
}
public void setDaytimePhone(String daytimePhone) {
 this.daytimePhone = cleanup(daytimePhone);
}
public void setEveningPhone(String eveningPhone) {
 this.eveningPhone = cleanup(eveningPhone);
}
public void setEmail(String email) {
 this.email = cleanup(email);
}
public String getFirstName( ) {
 return this.firstName;
}
public String getLastName( ) {
 return this.lastName;
}
public String getDaytimePhone( ) {
 return this.daytimePhone;
}
public String getEveningPhone( ) {
 return this.eveningPhone;
}
public String getEmail( ) {
 return this.email;
}
/** * Cleanup the String parameter by replacing null with an * empty String, and by trimming whitespace from non-null Strings. */ private static String cleanup(String str) {
 return (str != null) ? str.trim( ) : "";
}
}
Although the PersonalData class is merely a data holder, it can include simple validation logic. For example, the default constructor initializes all fields to non-null values:
public PersonalData( ) {
 this("", "", "", "", "");
}
Additionally, all of the set methods make use of the private cleanup( ) method:
private static String cleanup(String str) {
 return (str != null) ? str.trim( ) : "";
}
As a result, instances of this class will avoid null references and whitespace, eliminating the need to perform constant error checking in the servlet and XML generation classes. Trimming whitespace is particularly helpful because a user may simply press the spacebar in one of the required fields, potentially bypassing your validation rules. The PersonalData class also contains an explicit validation method that checks for all required fields:
public boolean isValid( ) {
 return this.firstName.length( ) > 0 && this.lastName.length( ) > 0 && this.daytimePhone.length( ) > 0 && this.email.length( ) > 0;
}
The only field that is not required is eveningPhone, so it is not checked here. By putting this method into this class, we further reduce the work required of the servlet.
The next class, PersonalDataXML, is presented in Example 6-7. It is responsible for converting PersonalData objects into DOM Document objects. By converting to DOM instead of a text XML file, we avoid having to parse the XML as it is fed into an XSLT processor. Instead, we will use the javax.xml.transform.DOMSource class to pass the DOM tree directly.
Example 6-7. PersonalDataXML.java
package chap6; import javax.xml.parsers.*; import org.w3c.dom.*; /** * Responsible for converting a PersonalData object into an XML * representation using DOM. */ public class PersonalDataXML {
 /** * @param personalData the data to convert to XML. * @param includeErrors if true, an extra field will be included in * the XML, indicating that the browser should warn the user about * required fields that are missing. * @return a DOM Document that contains the web page. */ public Document produceDOMDocument(PersonalData personalData, boolean includeErrors) throws ParserConfigurationException { // use Sun's JAXP to create the DOM Document DocumentBuilderFactory dbf = DocumentBuilderFactory.newInstance( ); DocumentBuilder docBuilder = dbf.newDocumentBuilder( ); Document doc = docBuilder.newDocument( ); // create <page>, the root of the document Element pageElem = doc.createElement("page"); doc.appendChild(pageElem); // if needed, append <requiredFieldsMissing/> if (includeErrors && !personalData.isValid( )) {
 pageElem.appendChild(doc.createElement( "requiredFieldsMissing"));
}
Element personalDataElem = doc.createElement("personalData"); pageElem.appendChild(personalDataElem); // use a private helper function to avoid some of DOM's // tedious code addElem(doc, personalDataElem, "firstName", personalData.getFirstName( ), true); addElem(doc, personalDataElem, "lastName", personalData.getLastName( ), true); addElem(doc, personalDataElem, "daytimePhone", personalData.getDaytimePhone( ), true); addElem(doc, personalDataElem, "eveningPhone", personalData.getEveningPhone( ), false); addElem(doc, personalDataElem, "email", personalData.getEmail( ), true);
return doc;
}
/** * A helper method that simplifies this class. * * @param doc the DOM Document, used as a factory for * creating Elements. * @param parent the DOM Element to add the child to. * @param elemName the name of the XML element to create. * @param elemValue the text content of the new XML element. * @param required if true, insert 'required="true"' attribute. */ private void addElem(Document doc, Element parent, String elemName, String elemValue, boolean required) {
 Element elem = doc.createElement(elemName); elem.appendChild(doc.createTextNode(elemValue)); if (required) {
 elem.setAttribute("required", "true");
}
parent.appendChild(elem);
}
}
The following code begins with its two import statements. The javax.xml.parsers package contains the JAXP interfaces, and the org.w3c.dom package contains the standard DOM interfaces and classes:
import javax.xml.parsers.*; import org.w3c.dom.*;
The key to this class is its public API, which allows a PersonalData object to be converted into a DOM Document object:
public Document produceDOMDocument(PersonalData personalData, boolean includeErrors) throws ParserConfigurationException {
The includeErrors parameter indicates whether or not to include the <requiredFieldsMissing/> element in the result. If this method throws a ParserConfigurationException, the most likely cause is a CLASSPATH problem. This frequently occurs when an older version of JAXP is present.
When using JAXP, it takes a few lines of code to obtain the appropriate implementation of the DocumentBuilder abstract class. By using the factory pattern, our code is safely insulated from vendor-specific DOM implementations:
// use Sun's JAXP to create the DOM Document DocumentBuilderFactory dbf = DocumentBuilderFactory.newInstance( ); DocumentBuilder docBuilder = dbf.newDocumentBuilder( ); Document doc = docBuilder.newDocument( );
Once the doc object has been created, we use it to create all remaining elements in the XML data. For example, the <page> element is created first:
// create <page>, the root of the document Element pageElem = doc.createElement("page"); doc.appendChild(pageElem);
Since <page> is the root element, it is the only thing added directly to our document. All remaining elements will be added as children or descendents of <page>. Even though we are not adding anything else directly to the doc object, we must continue using it as the factory for creating the remaining elements:
// if needed, append <requiredFieldsMissing/> if (includeErrors && !personalData.isValid( )) {
 pageElem.appendChild(doc.createElement( "requiredFieldsMissing"));
}
Since DOM can be tedious, the children of <personalData> are created in a helper method called addElem( ) :
Element personalDataElem = doc.createElement("personalData"); pageElem.appendChild(personalDataElem); // use a private helper function to avoid some of DOM's // tedious code addElem(doc, personalDataElem, "firstName", personalData.getFirstName( ), true); ...
You can refer back to Example 6-7 for the complete implementation of the addElem( ) method. A sample of its output is:
<firstName required="true">Eric</firstName>
The final piece of code, PersonalDataServlet.java, is presented in Example 6-8. This is a basic approach to servlet development that works for smaller programs such as this, but has a few scalability problems that we will discuss later in this chapter. Although we have removed all of the HTML and XML generation from this servlet, it is still responsible for handling incoming requests from the browser. As your web application grows to more and more screens, the code gets correspondingly larger.
Example 6-8. PersonalDataServlet.java
package chap6; import java.io.*; import java.net.*; import javax.servlet.*; import javax.servlet.http.*; import javax.xml.transform.*; import javax.xml.transform.dom.*; import javax.xml.transform.stream.*; /** * A demonstration servlet that produces two pages. In the first page, * the user is prompted to enter "personal information", including * name, phone number, and Email. In the second page, a summary of this * information is displayed. XSLT is used for all HTML rendering, * so this servlet does not enforce any particular look and feel. */ public class PersonalDataServlet extends HttpServlet {
 private PersonalDataXML personalDataXML = new PersonalDataXML( ); private Templates editTemplates; private Templates thanksTemplates; /** * One-time initialization of this Servlet. */ public void init( ) throws UnavailableException {
 TransformerFactory transFact = TransformerFactory.newInstance( ); String curName = null; try {
 curName = "/WEB-INF/xslt/editPersonalData.xslt"; URL xsltURL = getServletContext( ).getResource(curName); String xsltSystemID = xsltURL.toExternalForm( ); this.editTemplates = transFact.newTemplates( new StreamSource(xsltSystemID)); curName = "/WEB-INF/xslt/confirmPersonalData.xslt"; xsltURL = getServletContext( ).getResource(curName); xsltSystemID = xsltURL.toExternalForm( ); this.thanksTemplates = transFact.newTemplates( new StreamSource(xsltSystemID));
}
catch (TransformerConfigurationException tce) {
 log("Unable to compile stylesheet", tce); throw new UnavailableException("Unable to compile stylesheet");
}
catch (MalformedURLException mue) {
 log("Unable to locate XSLT file: " + curName); throw new UnavailableException( "Unable to locate XSLT file: " + curName);
}
} /** * Handles HTTP GET requests, such as when the user types in * a URL into his or her browser or clicks on a hyperlink. */ protected void doGet(HttpServletRequest request, HttpServletResponse response) throws IOException, ServletException {
 PersonalData personalData = getPersonalData(request); // the third parameter, 'false', indicates that error // messages should not be displayed when showing the page. showPage(response, personalData, false, this.editTemplates);
}
/** * Handles HTTP POST requests, such as when the user clicks on * a Submit button to update his or her personal data. */ protected void doPost(HttpServletRequest request, HttpServletResponse response) throws IOException, ServletException {
 // locate the personal data object and update it with // the information the user just submitted. PersonalData pd = getPersonalData(request); pd.setFirstName(request.getParameter("firstName")); pd.setLastName(request.getParameter("lastName")); pd.setDaytimePhone(request.getParameter("daytimePhone")); pd.setEveningPhone(request.getParameter("eveningPhone")); pd.setEmail(request.getParameter("email")); if (!pd.isValid( )) {
 // show the 'Edit' page with an error message showPage(response, pd, true, this.editTemplates);
}
else {
 // show a confirmation page showPage(response, pd, false, this.thanksTemplates);
}
} /** * A helper method that sends the personal data to the client * browser as HTML. It does this by applying an XSLT stylesheet * to the DOM tree. */ private void showPage(HttpServletResponse response, PersonalData personalData, boolean includeErrors, Templates stylesheet) throws IOException, ServletException {
 try {
 org.w3c.dom.Document domDoc = this.personalDataXML.produceDOMDocument( personalData, includeErrors); Transformer trans = stylesheet.newTransformer( ); response.setContentType("text/html");
printWriter writer = response.getWriter( ); trans.transform(new DOMSource(domDoc), new StreamResult(writer));
}
catch (Exception ex) {
 showErrorPage(response, ex);
}
} /** * If any exceptions occur, this method can be called to display * the stack trace in the browser window. */ private void showErrorPage(HttpServletResponse response, Throwable throwable) throws IOException {
 PrintWriter pw = response.getWriter( ); pw.println("<html><body><h1>An Error Has Occurred</h1><pre>"); throwable.printStackTrace(pw); pw.println("</pre></body></html>");
}
/** * A helper method that retrieves the PersonalData object from * the HttpSession. */ private PersonalData getPersonalData(HttpServletRequest request) {
 HttpSession session = request.getSession(true); PersonalData pd = (PersonalData) session.getAttribute( "chap6.PersonalData"); if (pd == null) {
 pd = new PersonalData( ); session.setAttribute("chap6.PersonalData", pd);
}
return pd;
}
}
Our servlet begins with a long list of import statements, indicating dependencies on the servlet API as well as the JAXP package. The servlet itself is a subclass of HttpServlet, as usual, and has three private fields:
public class PersonalDataServlet extends HttpServlet {
 private PersonalDataXML personalDataXML = new PersonalDataXML( ); private Templates editTemplates; private Templates thanksTemplates;
It is important to ensure that each of these fields is thread-safe. Because many clients share the same servlet instance, it is highly probable that these fields will be accessed concurrently. Instances of PersonalDataXML are thread-safe because they are stateless, meaning they contain no data that can be concurrently modified. The Templates instances are compiled representations of the two stylesheets this servlet uses and are also designed to be thread-safe.
As the comments indicate, the init( ) method performs a one-time initialization of the servlet. A servlet container will invoke this method before this servlet is asked to handle any client requests. The init( ) method is further guaranteed to execute to completion before any other threads can access this servlet, so concurrency is not an issue at this point. If anything fails during initialization, an instance of UnavailableException is thrown:
public void init( ) throws UnavailableException {
 TransformerFactory transFact = TransformerFactory.newInstance( ); String curName = null; ...
This exception is provided in the javax.servlet package and indicates that the servlet could not be loaded successfully. In our case, the most common cause of this error is a configuration problem. For example, your XSLT stylesheets may be installed in the wrong directory, or some JAR file was not found.
The next thing the init( ) method does is load the two stylesheets into memory. The XSLT stylesheets are stored on the file system, so StreamSource will be used to read them into JAXP. But you definitely do not want to hardcode the absolute pathname of the stylesheets. If you do this, your code will probably work on your personal machine but will fail once it is deployed onto a production web server. For example, C:/java/tomcat/webapps/chap6/WEB-INF is a Windows-specific absolute pathname. Using something so specific would cause the servlet to fail on all non-Windows platforms, as well as other Windows machines that have Tomcat installed in a different directory. The best approach is to use a relative pathname such as /WEB-INF, so the stylesheets can be located regardless of where your web application is deployed.
A relative pathname has to be relative to some starting location, so we use the ServletContext class. ServletContext has the ability to locate resources relative to the deployed directory of the current web application, so you can avoid absolute pathnames in your code. The details of mapping the relative pathname to the absolute pathname are taken care of by the servlet container, thus making your code more portable.
In this example, chap6.war is deployed to Tomcat's webapps directory. Tomcat will expand it into the webapps/chap6 directory, which contain subdirectories that match the directory structure of the WAR file. We start by assigning the current XSLT filename to the curName variable, using the following pathname:
try {
 curName = "/WEB-INF/xslt/editPersonalData.xslt";
Two options are available at this point. The ServletContext can provide either an InputStream or a URL, both of which represent the XSLT stylesheet. If you use an InputStream, however, the XSLT processor sees your stylesheet as a stream of bytes. It will not know where this datastream originated, so it will not automatically know how to resolve URI references. This becomes a problem if your stylesheet imports or includes another stylesheet because this other stylesheet will not be located. To resolve this problem when using InputStream, the javax.xml.transform.Source interface provides the setSystemId( ) method. This allows the XSLT processor to resolve URI references in the stylesheet (see "XSLT Processing with Java").
For this servlet, we avoid this issue by using a URL instead of an InputStream. The URL is converted into a system identifier, which makes it possible to create a StreamSource instance. That is, in turn, used to create a Templates instance for this stylesheet:
URL xsltURL = getServletContext( ).getResource(curName); String xsltSystemID = xsltURL.toExternalForm( ); this.editTemplates = transFact.newTemplates( new StreamSource(xsltSystemID));
The same process is repeated for the second stylesheet, followed by basic exception handling:
curName = "/WEB-INF/xslt/confirmPersonalData.xslt"; xsltURL = getServletContext( ).getResource(curName); xsltSystemID = xsltURL.toExternalForm( ); this.thanksTemplates = transFact.newTemplates( new StreamSource(xsltSystemID));
}
catch (TransformerConfigurationException tce) {
 log("Unable to compile stylesheet", tce); throw new UnavailableException("Unable to compile stylesheet");
}
catch (MalformedURLException mue) {
 log("Unable to locate XSLT file: " + curName); throw new UnavailableException( "Unable to locate XSLT file: " + curName);
}
}
The log() method causes messages to be written to one of Tomcat's log files, found in the TOMCAT_HOME/logs directory. The UnavailableException simply indicates that this servlet is unavailable, so it will not be loaded into memory. The user will see an error page in their browser at this point.
If the init( ) method completes successfully, the servlet will be available to handle requests from clients. In this servlet, the doGet( ) and doPost( ) methods have been implemented; therefore, both HTTP GET and POST protocols are supported. When the user first enters the application, they will click on a hyperlink, type a URL into their browser, or visit a saved tutorialmark. In all of these cases, the browser issues an HTTP GET request that ultimately causes the doGet( ) method to be invoked:
protected void doGet(HttpServletRequest request, HttpServletResponse response) throws IOException, ServletException {
 PersonalData personalData = getPersonalData(request); // the third parameter, 'false', indicates that error // messages should not be displayed when showing the page. showPage(response, personalData, false, this.editTemplates);
}
The first thing the doGet( ) method does is retrieve the instance of PersonalData associated with this particular user. The appropriate code has been factored out into the getPersonalData( ) helper method, since this same functionality is required by the doPost( ) method as well. You can refer back to Example 6-8 to see how getPersonalData( ) is implemented. It basically uses HttpSession to locate the appropriate instance of PersonalData. If the object is not found in the session, a new instance is created and stored.
The doGet( ) method then calls the showPage( ) method, which does the actual work of sending the web page to the browser. The parameters to showPage( ) include:
- The
HttpServletResponse, which provides access to the PrintWriter. The result of the transformation will be sent to this writer.
- The instance of
PersonalData, so the showPage( ) method knows what data to display.
- A
false parameter, indicating that error messages should not be shown. That makes sense because doGet( ) is called when the page is first displayed, and users should not be warned about invalid data before they type something.
- A reference to the appropriate stylesheet. In this case, the stylesheet will show the HTML form so the user can fill out his or her information.
Once the user fills out the form and submits it to the servlet, the doPost( ) method is invoked. The code for doPost( ) is similar to doGet( ) (see Example 6-8). The only difference here is that all incoming data is validated via the PersonalData class. If the request is valid, the "Thank You" page is displayed. Otherwise, the current page is redisplayed with error messages enabled. As you can see in the code, the only distinction between these two pages is that they use different stylesheets.
The final piece to this puzzle resides in the showPage( ) method. This method begins by creating a DOM Document instance by delegating to the PersonalDataXML helper class. As you can see in the following code, the servlet stays quite small because the DOM generation is factored out into the helper class:
private void showPage(HttpServletResponse response, PersonalData personalData, boolean includeErrors, Templates stylesheet) throws IOException, ServletException {
 try {
 org.w3c.dom.Document domDoc = this.personalDataXML.produceDOMDocument( personalData, includeErrors);
This method then proceeds to create a new instance of Transformer. You may recall from "XSLT Processing with Java" that Transformer instances are very lightweight and merely hold state information for the current transformation. Since Transformer instances are not thread-safe, the instance is a local variable in this method. With local variables, each thread gets its own copy:
Transformer trans = stylesheet.newTransformer( );
Next, the content type is configured for the HttpServletResponse, a PrintWriter is obtained, and the transformation is performed. The result tree is sent directly to the response's PrintWriter:
response.setContentType("text/html");
printWriter writer = response.getWriter( ); trans.transform(new DOMSource(domDoc), new StreamResult(writer));
}
catch (Exception ex) {
 showErrorPage(response, ex);
}
}
If any exception occurs, the showErrorPage( ) method is invoked. Since an exception can indicate that some XML library is unavailable, the showErrorPage( ) does not attempt to use XML or XSLT for its output. If it does, another similar exception would almost certainly occur. Instead, it uses hardcoded println( ) statements to generate its HTML (see Example 6-8).
Deployment
Figure 6-8 shows the complete contents of the WAR file used in this example. You may notice that SplashScreenServlet.class is still listed in this WAR file. This example is merely an extension of the example created earlier in this chapter. As in the earlier example, placing the class files under the classes directory made them available to the ClassLoader used by this web application. 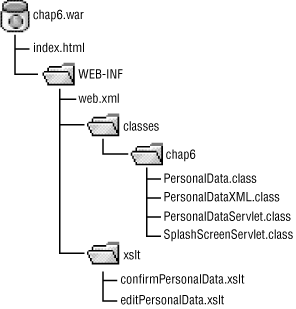
Figure 6-8. WAR file for PersonalDataServlet
The XSLT stylesheets are placed under the WEB-INF/xslt directory. Since anything under the WEB-INF directory is hidden from clients, the XSLT stylesheets are not directly visible to anyone visiting your website. If you want to make these stylesheets publicly visible, move them out of the WEB-INF directory. The index.html file, for example, is the publicly visible "home page" for this web application. It merely contains a link that the user can click on to view the servlet. Although the stylesheets are hidden from clients, they are accessible from your Java code. Referring back to the code in Example 6-8, the init( ) method used the following to locate the stylesheets:
curName = "/WEB-INF/xslt/editPersonalData.xslt"; URL xsltURL = getServletContext( ).getResource(curName);
As this code illustrates, the locations of the stylesheets are entirely relative to their position in the WAR file. Therefore, your servlet will still work as the web application is moved onto a production web server.
The deployment descriptor, listed in Example 6-9, has been expanded to include the new PersonalDataServlet class. The lines that have changed from our first iteration are emphasized.
Example 6-9. Expanded deployment descriptor
<?xml version="1.0" encoding="UTF-8"?>
<!DOCTYPE web-app PUBLIC "-//Oracle, Inc.//DTD Web Application 2.2//EN" "http://java.oracle.com/j2ee/dtds/web-app_2.2.dtd">
<web-app> <servlet>
<servlet-name>personalDataServlet</servlet-name>
<servlet-class>chap6.PersonalDataServlet</servlet-class>
</servlet> <servlet>
<servlet-name>splashScreen</servlet-name>
<servlet-class>chap6.SplashScreenServlet</servlet-class>
</servlet> <servlet-mapping>
<servlet-name>personalDataServlet</servlet-name>
<url-pattern>/personalData/*</url-pattern>
</servlet-mapping> <servlet-mapping>
<servlet-name>splashScreen</servlet-name>
<url-pattern>/splash/*</url-pattern>
</servlet-mapping>
</web-app>
How to Compile, Deploy, and Run
In Java, it often seems that half of the battle is devoted to figuring out CLASSPATH issues. In order to compile this example, the following JAR files must be listed on the CLASSPATH:
- jaxp.jar
- Java API for XML Processing (JAXP) 1.1
- xalan.jar
- Xalan XSLT processor (use the one included with JAXP)
- crimson.jar
- Crimson XML parser (use the one included with JAXP)
- servlet.jar
- Included with the Tomcat servlet container
Of course, the directory containing your own source code must also be listed on the CLASSPATH. Once everything is set up, you can compile PersonalData.java, PersonalDataXML.java, and PersonalDataServlet.java by typing javac *.java. Whether you also wish to include SplashScreenServlet.java is entirely up to you.
As mentioned earlier in this chapter, use the jar command to create the WAR file. To create chap6.war, simply arrange your files into the directory structure shown in Figure 6-8 and issue the following command from the directory that contains index.html:
jar -cvfM ../chap6.war .
This command places chap6.war in the parent of your current working directory; the forward slash (/) works on Windows as well as Unix clients. Once the WAR file has been created, you can view its contents by changing to its directory and issuing the following command:
jar -tvf chap6.war
This shows the table of contents for the WAR file, which must match the structure shown in Figure 6-8.
Deployment to Tomcat is easy: just copy chap6.war to the TOMCAT_HOME/webapps directory while Tomcat is not running. You can attempt to execute the servlet now, but it will probably not work because jaxp.jar, xalan.jar, and crimson.jar must be installed in the TOMCAT_HOME/lib directory before they can be available for your web application.
The most difficult aspect of this step is installing the correct versions of these JAR files. Depending on which version of Tomcat you are running, older versions of jaxp.jar and crimson.jar may already be found in the TOMCAT_HOME/lib directory. The safest approach is to download JAXP 1.1, which includes all three of these JAR files, and copy them from the JAXP distribution to the TOMCAT_HOME/lib directory.
Once these steps are complete, start Tomcat and access the following URL:
http://localhost:8080/chap6/personalData
This should bring up the personal information page with a blank form, ready for input.
Locating Stylesheets with Initialization Parameters
As you just saw, an easy way to locate stylesheets is simply to place them somewhere underneath the WEB-INF directory of a WAR file. While this is an ideal solution for solitary web applications, there are situations where the same stylesheets are shared across a whole group of web apps. In this case, embedding the stylesheets into various WAR files is not viable.
Ideally, the stylesheets will be located in a shared directory somewhere, but that directory location will not be hardcoded into any servlets. The simple way to accomplish this is via initialization parameters. These are name/value pairs of strings specified in the deployment descriptor and retrieved via the Servlet or ServletContext.
Servlet initialization parameters are tied to specific servlets, and context initialization parameters are tied to an entire web application. For the purposes of specifying the XSLT stylesheet location, it makes sense to use context parameters. These can be specified in the deployment descriptor as follows:
<web-app> <context-param> <param-name>xslt_directory</param-name> <param-value>C:/dev/xslt</param-value> </context-param> <servlet> ... </servlet>
</web-app>
And the values of these parameters can be retrieved using the following methods on the javax.servlet.ServletContext interface:
public interface ServletContext {
 // if the parameter name does not exist, return null String getInitParameter(String name); Enumeration getInitParameterNames( ); ...remaining methods omitted }
So in order to locate the stylesheet, one might write the following code in a servlet's init( ) method:
public class MyServlet extends HttpServlet {
 private String xsltDirectory;
public void init(ServletConfig config) throws ServletException {
 super.init(config); this.xsltDirectory = config.getServletContext( ).getInitParameter( "xslt_directory"); if (this.xsltDirectory == null) {
 throw new UnavailableException( "xslt_directory is a required context-param");
}
} ...remainder of code omitted }
Now that the actual location of the stylesheets has been moved into the deployment descriptor, changes can be made without any edits to the servlet.
|