| Previous | Next
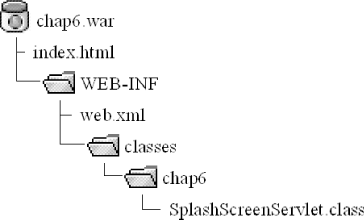
WAR Files and DeploymentIn the servlet model, Web Application Archive (WAR) files are the unit of deployment. WAR files enable portability across a wide range of servlet containers regardless of the vendor. The good news is that WAR files are very easy to create and require only that you carefully follow the guidelines for file and directory names. If you are careful to avoid spelling errors and misplaced files, you should not have any problem with WAR files. WAR FilesFigure 6-2 shows the standard structure of a WAR file. Since a WAR file is really just a JAR file with a war extension, you can utilize the jar command to create your WAR files. Figure 6-2. WAR file structureTo create a WAR file, simply arrange your files into the directory structure shown in Figure 6-2 and issue the following command from the directory that contains index.html:[23]
jar -cvfM ../appname.war This command assumes that the WAR file will be placed in the parent of your current working directory; the forward slash ( jar -tvf appname.war . This shows the table of contents for the WAR file, which must match the structure shown in Figure 6-2. The topmost directory in the WAR file is publicly accessible to web browsers and should contain your JSP and HTML files. You can also create subdirectories, which will also be visible to the client. A common practice is to create an images directory for storing your graphic files. The WEB-INF directory is always hidden from clients that access your web application. The deployment descriptor, web.xml, is located here, as are the classes and lib directories. As Figure 6-2 indicates, the classes directory becomes available to your application's Deployment DescriptorThe deployment descriptor is always called web.xml and must be placed directly in the WEB-INF directory of your web application. The job of the deployment descriptor is to provide the servlet container with complete configuration information about a web application. This may include security attributes, aliases for servlets and other resources, initialization parameters, and even graphical icons for Integrated Development Environments (IDEs) to utilize. For our needs, a very small subset of this functionality will be sufficient. For Example 6-2. web.xml for SplashScreenServlet.java<?xml version="1.0" encoding="UTF-8"?> <!DOCTYPE web-app PUBLIC "-//Oracle, Inc.//DTD Web Application 2.2//EN" "http://java.oracle.com/j2ee/dtds/web-app_2.2.dtd"> <web-app> <servlet> <!-- define an alias for the Servlet --> <servlet-name>splashScreen</servlet-name> <servlet-class>chap6.SplashScreenServlet</servlet-class> </servlet> <servlet-mapping> <!-- associate the Servlet with a URL pattern --> <servlet-name>splashScreen</servlet-name> <url-pattern>/splash/*</url-pattern> </servlet-mapping> </web-app> The A servlet definition lists the fully qualified package and class name of the servlet class, as well a name for that servlet. Whenever another section in the deployment descriptor wishes to reference this particular servlet, it uses the name specified here: <servlet> <servlet-name>splashScreen</servlet-name> <servlet-class>chap6.SplashScreenServlet</servlet-class> </servlet> As you can see in Example 6-2, the servlet mapping uses this name in order to associate a URL pattern with this particular servlet. This pattern will show up in the address that users type into their web browsers when they access this servlet. In this case, the URL to
This is the form that Tomcat defaults to, having the following components:
Wildcards in the URL pattern indicate that any text will match. Since the deployment descriptor listed
Deploying SplashScreenServlet to TomcatThe simple steps for getting Figure 6-3. SplashScreenServlet WAR fileOnce you have created chap6.war, be sure to execute NOTE: If a WAR file is copied into the webapps directory while Tomcat is running, it will not be recognized. Simply restart Tomcat to begin using the web application. Once the WAR file has been copied, you can execute startup.bat or startup.sh in Tomcat's bin directory and then enter http://localhost:8080/chap6/splash into your favorite web browser. If you see error messages, check to see that the JAVA_HOME and TOMCAT_HOME environment variables are properly set. You can also look in Tomcat's webapps directory to see if the WAR file is properly expanded. When a web application is first invoked, Tomcat expands the WAR file into its actual directory structure. When you look in the webapps directory, you should see chap6.war as well as the chap6 directory. If all else fails, check the documentation for Tomcat, double check your deployment descriptor, and try the example servlets that come with Tomcat. To see the Tomcat home page, start Tomcat and visit http://localhost:8080. If this does not work, then something more fundamental is wrong with your Tomcat installation. Servlet API HighlightsWe will see more complex servlets throughout this tutorial, but a recurring theme is to minimize dependence on obscure servlet tricks and focus instead on using XML and XSLT to generate a majority of the content in your web application. To make this happen, it is necessary to look at a few of the commonly used classes that are part of the servlet package. The public void init(ServletConfig config) throws ServletException The
Since Another important class is // config is an instance of ServletConfig ServletContext ctx = config.getServletContext( ); Later in this tutorial, we will focus on
to load a stylesheet from the current WAR file. Regardless of where Tomcat was installed, this approach will always locate the stylesheet without hardcoding a path name such as C:\path\.... |

