Stronger security for NFS
The security mechanisms described so far in this chapter are essentially refinements of the standard Unix login/password and file permission constraints, extended to handle distributed environments. Some additional care is taken to restrict superuser access over the network, but nothing in RPC's AUTH_SYS authentication protocol ensures that the user specified by the UID in the credential structure is permitted to use the RPC service, and nothing verifies that the user (or user running the application sending RPC requests) is really who the UID professes to be. Simply checking user credentials is like giving out employee badges: the badge holder is given certain access rights. Someone who is not an employee could steal a badge and gain those same rights. Validating the user credentials in an NFS request is similar to making employees wear badges with their photographs on them: the badge grants certain access rights to its holder, and the photograph on the badge ensures that the badge holder is the "right" person. Stronger RPC security mechanisms than AUTH_SYS exist, which add credential validation to the standard RPC system. These stronger mechanisms can be used with NFS. We will discuss two of the stronger RPC security mechanisms available with Solaris 8, AUTH_DH, and RPCSEC_GSS. Both mechanisms rely on cryptographic techniques to achieve stronger security.Security services
Before we describe AUTH_DH and RPCSEC_GSS, we will explain the notion of security services, and which services RPC provides. Security isn't a monolithic concept, but among others, includes notions like authorization, auditing, and compartmentalization. RPC security is concerned with four services: identification, authentication, integrity, and privacy. Identification is merely the name RPC gives to the client and the server. The client's name usually corresponds to the UID. The server's name usually corresponds to the hostname. Authentication is the service that proves that the client and server are who they identify themselves to be. Integrity is the service that ensures the messages are not tampered with, or at least ensures that the receiver knows they have been tampered with. Privacy is the service that prevents eavesdropping.Brief introduction to cryptography
Before we describe how the AUTH_DH and RPCSEC_GSS mechanisms work, we will explain some of the general principles of cryptography that apply to both mechanisms. A complete treatment of the topic can be found in the tutorial Applied Cryptography, by Bruce Schneier (John Wiley and Sons, Inc., 1996). There are four general cryptographic techniques that are pertinent: symmetric key encryption, asymmetric key encryption, public key exchange, and one way hash functions.Symmetric key encryption
In a symmetric encryption scheme, the user knows some secret value (such as a password), which is used to encrypt a value such as a timestamp. The secret value is known as a secret key. The problem with symmetric encryption is that to get another host to validate your encrypted timestamp, you need to get your secret key (password) onto that host. Think of this problem as a password checking exercise: normally your password is verified on the local machine. If you were required to get your password validated on an NFS server, you or the system administrator would somehow have to get your password on that machine for it to perform the validation. An example of a symmetric key encryption scheme is the Data Encryption Standard (DES).Asymmetric key encryption
Asymmetric key encryption involves the use of a public key to encrypt a secret value, such as a symmetric key, and, a private key to decrypt the same value. A public key and private key are associated as a pair. One half of the pair gets generated from the other via a series of arithmetic operations. The private key is never equal to the public key, hence the term asymmetric. As the names suggest, the public key is well-known to everyone, whereas the private key is known only to its owner. This helps solve the problem of getting a secret key on both hosts. You choose a symmetric secret key, encrypt it with the server's public key, send the result to the server and the server decrypts the secret key with its own private key. The secret key can then be used to encrypt a value like a timestamp, which the server validates by decrypting with the shared secret key. Alternatively, we could have encrypted the timestamp value with the server's public key, sent it to the server, and let the server decrypt it with the server's private key. However, asymmetric key encryption is usually much slower than symmetric key encryption. So, typically software that uses asymmetric key encryption uses symmetric key encryption once the shared secret key is established The public key is published so that it is available for authentication services. The encryption mechanism used for asymmetric schemes typically uses a variety of exponentiation and other arithmetic operators that have nice commutative properties. The encryption algorithm is complex enough, and the keys themselves should be big enough (at least 1024 bits), to guarantee that a public key can't be decoded to discover its corresponding private key. Asymmetric key encryption is also called public key encryption. An example of an asymmetric key encryption is RSA.Public key exchange
Public key exchange is similar to asymmetric key encryption in all ways but one: it does not encrypt a shared secret key with either public or private key. Instead, two agents, say a user and a server, generate a shared symmetric secret key that uniquely identifies one to the other but cannot be reproduced by a third agent, even if the initial agents' public keys are grabbed and analyzed by some attacker. Here is how the shared secret key, also called a common key, is computed. The user sends to the server the user's public key, and the server sends to the user the server's public key. The user creates a common key by applying a set of arithmetic operations onto the server's public key and the user's private key. The server generates the same key by applying the same arithmetic onto the user's public key and the server's private key. Because the algorithm uses commutative operations, the operation order does not matter -- both schemes generate the same key, but only those two agents can recreate the key because it requires knowing at least one private key. An example of a public key exchange algorithm is Diffie-Hellman or DH for short.One-way hash functions and MACs
A one-way hash function takes a string of octets of any length and produces a fixed width value called the hash. The function is designed such that given the hash, it is hard to find the string used as input to the one-way hash function, or for that matter, any string that produces the same hash result. Let's say you and the server have established a common symmetric secret key using one of the three previously mentioned techniques. You now want to send a message to the server, but want to make sure an attacker in the middle cannot tamper with the message without the server knowing. What you can do is first combine your message with the secret key (you don't have to encrypt your message with the secret key), and then take this combination and apply the one way hash function to it.[22] This computation is called a message authentication code or MAC. Then send both the MAC and the message (not the combination with the secret key) to the server. The server can then verify that you sent the message, and not someone who intercepted it by taking the message, combining it with the shared secret key in the same way you did, and computing the MAC. If the server's computed MAC is the same as the MAC you sent, the server has verified that you sent it.[22]For brevity, we don't describe how a secret key and a message are combined, nor how the one-way hash function is applied. Unless you are a skilled cryptographer, you should not attempt to invent your own scheme. Instead, use the algorithm described in RFC2104.Even though your message and MAC are sent in the clear to the server, an attacker in the middle cannot change the message without the server knowing it because this would change the result of the MAC computation on the server. The attacker can't change the MAC to match a tampered message because he doesn't know the secret key that only the server and you know. An example of a one-way hash function is MD5. An example of a MAC algorithm is HMAC-MD5. Note that when you add a MAC to a message you are enabling the security service of integrity.
NFS and IPSec
IPSec is the standard protocol for security at the IP network level. With IPSec you can beef up your trusted host relationships with strong cryptography. IPSec was invented by the Internet Engineering Task Force (IETF) to deal with three issues:- Attackers are becoming quite adept at spoofing IP addresses. The attacker targets a host to victimize. The victim shares some resources (such as NFS exports) to only a specific set of clients and uses the source IP address of the client to check access rights. The attacker selects the IP address of one of these clients to masquerade as. Sometimes the attacker is lucky, and the client is down, so this is not too difficult. Or the attacker has to take some steps such as disabling a router or loading the targeted client. If the attacker fails, you might see messages like:
IP: Hardware address '%s' trying to be our address %s!
or:
IP: Proxy ARP problem? Hardware address '%s' thinks it is %s
on the legitimate client's console.Once the legitimate client is disabled, the attacker then changes the IP address on a machine that he controls to that of the legitimate client and can then access the victim. - An attacker that controls a gateway can easily engineer attacks where he tampers with the IP packets.
- Finally, if the Internet is to be a tool enabling more collaboration between organizations, then there needs to be a way to add privacy protections to sensitive traffic.
- Via per-host keys, allows hosts to authenticate each other. This frustrates IP spoofing attacks.
- Using a session key derived from per-host keys as input to a MAC, protects the integrity of IP traffic to frustrate packet tampering.
- Using a session key, encrypts all the data in the IP packet to frustrate eavesdropping.
- If you use the AH feature, then all NIS lookups are safe from tampering on the NIS server, or the NIS traffic. So the attacker cannot fool your NFS server into believing that client gonzo has IP address 192.4.5.6, instead of 10.1.2.3.
- Enabling AH on NFS clients and servers prevents attackers from spoofing the clients you list on servers' rw=, ro=, and root= lists.
- ESP used on the NFS client and server makes operating through firewalls safer when accessing sensitive data.
AUTH_DH: Diffie-Hellman authentication
AUTH_DH is an RPC security flavor that uses encryption techniques to improve on AUTH_SYS.Old terms: AUTH_DES, secure RPC, and, secure NFS
AUTH_DH was originally called AUTH_DES, and indeed, you'll find that most documentation of AUTH_DH still calls it AUTH_DES. However, the _DES part of the name is a misnomer. While the DES algorithm is used in AUTH_DH, as we will see later, it is the Diffie-Hellman algorithm that is central to the workings of the AUTH_DH. We will not refer to AUTH_DES again. When AUTH_DH is combined with RPC, the combination is often referred to as "Secure RPC." When RPC, and AUTH_DH are combined with NFS, the result is often referred to as "Secure NFS." However, in the 13 years since AUTH_DH was invented, two things have occurred:- AUTH_DH is no longer considered secure by many security experts. After you read the material on AUTH_DH, you might concur.
- RPCSEC_GSS, a stronger, more secure security flavor for RPC is now available with Solaris 8 and other NFS implementations.
Diffie-Hellman key exchange
AUTH_DH uses Diffie-Hellman public key exchange. Using this encryption scheme, RPC can be made more secure by requiring each client to establish a valid common key before making RPC requests to the server. Diffie-Hellman key exchange relies on each agent that wants to establish a common key to agree on two pieces of information beforehand. For AUTH_DH these pieces are:- A base for the exponentiation part of the calculation. AUTH_DH uses a base of 3.
- A modulus used for the remainder part of the calculation. AUTH_DH uses a modulus of
xd4a0ba0250b6fd2ec626e7efd637df76c716e22d0944b88b. Let's label this constant as AUTH_DH_MOD.
(1) PUBLIC_C = ( 3 PRIV_C ) modAUTH_DH_MOD
Let PRIV_S be the private key of the server. Then the public key of the server is:
(2) PUBLIC_S = ( 3 PRIV_S ) modAUTH_DH_MOD
The client computes a common key between the client and server as:
(3) COMMON_C_S = ( PUBLIC_S PRIV_C ) modAUTH_DH_MOD
The server computes the common key between the server and client as:
(4) COMMON_S_C = ( PUBLIC_C PRIV_S ) mod AUTH_DH_MOD
To prove that COMMON_C_S equals COMMON_S_C, we replace PUBLIC_S in statement (3) with the expression it was derived from in statement (2) and drop the MOD part of the expression. We do the same for PUBLIC_C in statement (4) with the expression from statement (2):
(3.1) COMMON_C_S_PRIME = ( 3 PRIV_S )PRIV_C = 3 PRIV_S * PRIV_C (4.1) COMMON_S_C_PRIME = ( 3 PRIV_C )PRIV_S = 3 PRIV_C * PRIV_S
Because multiplication is a commutative operation, it is obvious that COMMON_C_S_PRIME equals COMMON_S_C_PRIME. Therefore, COMMON_C_S equals COMMON_S_C.
How RPC/DH works
RPC/DH uses a combination of Diffie-Hellman key exchange and DES encryption. User validation is performed by the server, based on information in the RPC request. The client and server decide on the common key via the Diffie-Hellman algorithm discussed previously in "Diffie-Hellman key exchange". The common key will be used to construct a shared secret DES key. Note that because AUTH_DH_MOD is 192 bits, the common key will be 192 bits. However, DES uses 64 bit keys, such that the low order bit of each octet is a parity bit, making DES effectively a 56-bit symmetric key algorithm. AUTH_DH deals with this by selecting the middle 64 bits of the common key. These 64 bits are split into eight octets. Parity is added to the low order bit of each octet. In addition the high order bit of each octet is unused, making this effectively a 48-bit shared secret key. The first time the client contacts the server, it generates a random session key, and encrypts it with the shared secret DES key. The session key is also a DES key. The client also generates a time-to-live value (in seconds) called the window, and a window value that is one second less than the first window value. The two window values are encrypted with the session key. The encrypted session key and the encrypted window values are sent to the server. The server can decrypt the encrypted session key because it knows the common key, and therefore the shared secret DES key. With the session key, it can decrypt the window values. If the second window value is not one less than the first, the server knows something odd is going on, and it rejects the client's request. The first time, and on every subsequent contact to the server, the client encrypts the current time using the session key. It sends its RPC request to the server. The server decrypts the timestamp, using the same session key, and verifies that it is accurate. If the decrypted timestamp falls outside of the time to live window, the server rejects the request. So far we've described how RPC/DH does authentication. We will now look at how identity works in RPC/DH. Recall that AUTH_SYS sends a UID, GID, and a list of supplementary GIDs. The first time RPC/DH contacts the server to establish the session key, it sends no UIDs or GIDs. Instead it sends a string, called a netname, which identifies two items:- The user (albeit, the username is a UID expressed in ASCII-decimal)
- The domain name of the user (usually this is an NIS domain name)
- Locates an NIS server serving the specified domain that knows about the user.
- Looks up the user's netname in the NIS netid map for the user's UID, GID, and list of supplementary groups.
- Looks up the user's netname in the NIS publickey map for the user's Diffie-Hellman public key. With that, and the server's private key, the server can determine the common key, then the shared secret key, then decrypt the session key, and use that to verify that the request came from a user corresponding to the netname.
RPC/DH state and NFS statelessness
The title of the section says it all. How can we reconcile the fact that NFS is stateless, and yet RPC/DH clearly establishes state in the form of a session key, with a time to live? This state has to be kept on the server. The answer is that this is not state that has to be recovered in the event of a server crash, which is in stark contrast to file locking state. If the server reboots, or if it even decides to throw away an RPC/DH session, it is not a disaster. The client simply gets an error indicating that the server has no knowledge of the session, and the client establishes a new session key as if it was the first contact between the client and server. We'll now look at how NFS/dh works by first seeing how to add the security features to NFS, and then seeing how the public and private keys are managed within this system.Enabling NFS/dh
Enabling NFS/dh on a filesystem is quite simple: export and mount the filesystem with the sec=dh option. On the NFS server, the /etc/dfs/dfstab entry looks like this:share -o sec=dh,rw /export/home/thud
When a filesystem is exported with the sec=dh option, clients using NFS Version 2 must mount it with the sec=dh option if they are to enjoy normal user access privileges in the filesystem. On the NFS client, add the sec=dh option in the automounter map entry, or the /etc/vfstab entry for the filesystem:
automounter auto_home entry: thud -sec=dh bonk:/export/home/thud vfstab entry: bonk:/export/home/thud - /thud nfs - no sec=dh,rw
If the client is using NFS Version 3, it will use Version 3 of the MOUNT protocol. MOUNT Version 3 will return the RPC security flavor that the directory is exported with, along with the filehandle of the directory. Thus, with NFS Version 3, the sec=dh mountoption is not necessary. If a user accessing the filesystem can generate a session key with the NFS server, it is used to encrypt the timestamps sent with that user's NFS requests. If the server decrypts the timestamps successfully, the netname presented by the user is trusted and is used to derive normal Unix-style credentials for the purpose of file access. It's possible, though, that the user can't exchange a session key with the server. This will be the case if the user doesn't have a public key defined, or if the user cannot supply the proper private key to generate a common key using Diffie-Hellman key exchange. When there is no valid common key, some NFS servers remap the user to nobody. However, by default, Solaris 8 rejects such users. If you want to give such users anonymous access you can export the filesystem with the following line in /etc/dfs/dfstab :
share -o sec=dh:none,rw /export/home/thud
Within the NFS/dh system, a user without a valid public/private key pair becomes an anonymous user on the NFS server and is subject to the same access restrictions (discussed earlier in this chapter) that apply to the anonymous user nobody. To utilize NFS/dh without impairing a user's ability to do work, you must define public and private key pairs for trusted users and trusted hosts.
Public and private keys
Public and private keys are maintained in the publickey.byname NIS map, which is built from /etc/publickey on the master NIS server.[23] The only key that is defined by default is one for nobody, which is required for the anonymous user mapping. Public and encrypted secrets keys are contained in the /etc/publickey file, along with a unique identifier for the machine or user owning these keys.[23]If you are not running NIS or NIS+, you can still create keys, and use NFS/dh with the publickey entry in nsswitch.conf set to files. You will need to set up an NIS domain name on each NFS client and server (see "Enabling NIS on client hosts" for how to set up a domain name on a host). You will also have to devise a means for keeping all the /etc/publickey files on each client and server synchronized, since the encrypted private key field must change every time the user's password changes.
unix.10461@nesales publickey:privatekey
The keys are long strings of hexadecimal digits, representing the encrypted key values. Obviously, the NIS map cannot contain the actual private keys, or the entire encryption mechanism would be baseless. Instead, the /etc/publickey file's private key field contains the user's private key, encrypted with the user's login password. For host entries, the private key is encrypted using the root password. The private keys themselves are large random numbers, just like the session key that is used by RPC/DH. Identifiers in /etc/publickey are called netnames and take one of two forms:
unix.uid@NISdomain unix.host@NISdomain
The first form is used for user keys; it defines a key valid in the current NIS domain. The host key is used to create a RPC/DH key for the superuser on the named host. No user key is required for root -- only a host key. The /etc/publickey file is changed by the RPC/DH utilities that create and manage key values. Because it contains encrypted key strings, it is not easily edited by the superuser, just as the password fields in /etc/passwd cannot be hand-edited. The publickey file should exist only on the NIS master server, or else users' private keys will become out of date when they change their passwords (and therefore change the encryption key used to store their private keys).
Creating keys
The superuser can add user keys (on the NIS master server) using newkey -u user. As root, run newkey with the user's login name:nismaster#newkey -u sternAdding new key for unix.1461@nesales.East.oracle.com. Enter stern's login password:
The password is used to encrypt the private key so that it can be safely placed in the publickey maps. Unfortunately, the user's existing password in the NIS passwd maps must be supplied, requiring you to know the user's password. This is fine if you are adding the user to passwd map anyway; he is therefore a new user. However, it is very inconvenient if you are adding NFS/dh security and have a large pool of existing users because:
- You could change every user's login password to the same value. The problem with that is that for a period of time every user has the same password, and you can expect that some of your users will take malicious advantage of that.
- You could change every user's login password to a unique value. The problem with that is you have to somehow securely get the new passwords to each user. Unless you have a secure email system like PGP or S/MIME installed that pretty much leaves you to walk to every user's office or telephone them. That you are considering NFS/dh suggests that you have a large user base. This is simply not practical.
nismaster#newkey -u templateAdding new key for unix.66666@nesales.East.oracle.com. Enter template's login password:
If you look at the /etc/publickey on host nismaster you should see something like:
unix.66666@nesales.East.oracle.com 74365f4e03701cf96de938a59baa39f1039ada407b4ab3a3:9b7130a3f38c6e86f431f81ce1cf64b5e59991d3d5d1ce0596fd5167cb878b51
The netname of template is unix.66666@nesales.East.oracle.com. Each of your users will have a similar netname, except for the number between the unix prefix, and the @nesale.East.oracle.com suffix. The last long hexadecimal number after the colon (:) is user template 's private key, encrypted with template 's login password. Now for each user, make a copy of template 's entry in the /etc/publickey file, but change the netname to match the user. Let's say that your set of users is stern, labiaga, and mre, with UIDs of 1461, 15124, and 23154, respectively. You then edit the /etc/publickey file to look like:
unix.66666@nesales.East.oracle.com 74365f4e03701cf96de938a59baa39f1039ada407b4ab3a3:9b7130a3f38c6e86f431f81ce1cf64b5e59991d3d5d1ce0596fd5167cb878b51 unix.1461@nesales.East.oracle.com 74365f4e03701cf96de938a59baa39f1039ada407b4ab3a3:9b7130a3f38c6e86f431f81ce1cf64b5e59991d3d5d1ce0596fd5167cb878b51 unix.15124@nesales.East.oracle.com 74365f4e03701cf96de938a59baa39f1039ada407b4ab3a3:9b7130a3f38c6e86f431f81ce1cf64b5e59991d3d5d1ce0596fd5167cb878b51 unix.23514@nesales.East.oracle.com 74365f4e03701cf96de938a59baa39f1039ada407b4ab3a3:9b7130a3f38c6e86f431f81ce1cf64b5e59991d3d5d1ce0596fd5167cb878b51
You now want to push the publickey file changes into the publickey NIS maps:
nismaster#cd /var/ypnismaster#make publickeyupdated publickey pushed publickey
You have now almost effortlessly fully populated the publickey maps, but each entry has the same public key, same private key, and the same password. This is not what you want for the long term. So now you tell your users to expend some effort. Each user should be told to:
- Change his or her RPC/DH password that the private key is encrypted with (changing the password to the user's login password is recommended).
- Change his or her public and private key.
client%chkey -pUpdating nis publickey database. Reencrypting key for 'unix.1461@nesales.East.oracle.com'. Please enter the Secure-RPC password for stern: Please enter the login password for stern: Sending key change request to nismaster ... client%chkeyUpdating nis publickey database. Generating new key for 'unix.1461@nesales.East.oracle.com'. Please enter the Secure-RPC password for stern: Sending key change request to nismaster ...
The first chkey command invocation reencrypts his private key with his login password. The second chkey invocation generates a brand new and unique private key and public key pair. If the user supplies an invalid password, no password or key will be created. If the user's password is valid, and the NIS master server is receiving key updates, the key will be added to, or modified in, the NIS publickey maps. Both the chkey and newkey utilities update the /etc/publickey file on the NIS master server. To ensure that your users are following the chkey instructions, you can check the publickey.byname map to see if both the private key and the public key fields of each user have changed, by comparing them to that of the user template. The only way to create host keys (for superuser verification) is to use newkey -h as root :
#newkey -h bitatronAdding new key for unix.bitatron@nesales.East.oracle.com. New password:
You must create a host key for every NFS client (so that the client can mount filesystems shared with sec=dh) and NFS server (so that the server can generate the common key). To receive NIS map updates from newkey or chkey, the master NIS server must be able to run rpc.ypupdated. On Solaris 8, this daemon is started as part of the /usr/lib/netsvc/yp/ypstart script, which in turn is started by the /etc/init.d/rpc boot script. On every machine that will be using NFS/dh, make sure you are running the keyserv daemon. This process is used to cache private and common keys, and is also started out of /etc/init.d/rpc with lines of the form:
if [ -x /usr/sbin/keyserv -a \ -n "'/usr/bin/domainname 2>/dev/null'" ]; then /usr/sbin/keyserv >/dev/msglog 2>&1 echo " keyserv\c" fi
As you can see, keyserv will not start if there is no domain name established. Make sure keyserv can start, or you will not be able to create session keys, even if you have a valid public and private key pair in the publickey NIS maps.
Establishing a session key
When you log into a machine that is running NFS/dh, the password you supply to login is used to attempt to decrypt your encrypted private key (in the publickey map). If the login and RPC/DH passwords do not match you get errors like:Password does not decrypt secret key (type = 192-0) for 'unix.23514@nesales.East.oracle.com'. Password does not decrypt any secret keys for unix.23514@nesales.East.oracle.com.
The private key is given to the keyserv daemon, which caches it for generating common keys. The common keys are used to exchange session keys with NFS servers, as described earlier in this section. Therefore, the entire session key generation procedure goes like this:
- You define a public and private key pair, using newkey or chkey. The private key is a large, random number; it is stored in the publickey map by encrypting it with your password.
- When you log into a machine, your password is used to decrypt your private key. The private key is given to the keyserv daemon, where it is cached until you log out.
- To access an NFS filesystem mounted with the sec=dh option, you must establish a common key with the NFS server. You form a common key using your private key and the public key for the NFS server. This is done automatically by the RPC/DH system.
- From the common key, you derive a shared secret key by taking a subset of the bits of the common key. This secret key is used to encrypt a randomly generated session key, which is passed to the NFS server. All of your NFS requests to that server contain a timestamp encrypted with the session key. The server decrypts this timestamp to validate your NFS requests.
remote%keyloginPassword:
Note that if your login and RPC/DH passwords are different, whether you use rlogin or not, you must use keylogin to allow keyserv to see your private key. Or else you can use chkey -p to change your RPC/DH password to your login password. Keys that are decrypted via keylogin are also passed to keyserv, where they remain until the user executes a keylogout. If you are going to be logging into nontrusted hosts, use keylogin to decrypt your key, and add keylogout to your logout file (in your home directory) so that your key is destroyed when you log out. You must reference the NIS passwd map in order for the automatic private key caching to occur. For proper operation of NFS/dh, do not put users in the local file /etc/passwd, or their encrypted private keys may become out-of-date when they change their local passwords but do not change the NIS-managed password used to encrypt the private key in the publickey map. On the NIS master server, make sure you use an alternate password source file, instead of the default /etc/passwd. There's one thing missing: how does the root, or host, private key get decrypted? You establish a session key using the host key for the NFS server. In order for the server to exchange keys with you, it must be able to decrypt the host's private key, and this requires the root password or a "hidden" copy of the root key. One obvious approach is to force someone to supply the root password when the machine boots, so that the host private key in the publickey map can be decrypted and given to the keyserv daemon. However, this is often too restrictive: if an NFS server boots and no system administrator is present to supply the root password, no NFS/dh services will be available. You can solve this dilemma by using the -r option to keylogin to store the host's private key in the protected /etc/.rootkey file of the NFS server. Note that this is not the root password; it's the large, random number used as the host's private key. When the keyserv daemon starts up, it reads the host's key out of this file so that clients of the host can establish session keys with it. A similar issue applies to the NFS client when you are using the automounter to access NFS mounted filesystems. Unless the superuser has logged into the system, and thus manually established his private key into keyserv, users will not be able use the automounter to access filesystems exported with sec=dh. Once again, you use keylogin -r, this time running it on the NFS client. When the keyserv daemon starts up, it reads the host's key out of this file so that the automounter can establish session keys on NFS servers.
NFS/dh checklist
This list summarizes what you need to do to create the various daemons and files that must be in place for proper operation of NFS/dh:- Create keys for users with chkey or newkey -u. Create a host key for each machine on which you need secure root access using newkey -h.
- Make sure the NIS master server is running rpc.ypupdated.
- Push the publickey map to all NIS slaves after making any changes to it, so that NFS/dh is operating before the next NIS map transfer.
- Establish a /etc/.rootkey file on every NFS server and client via keylogin -r.
- If you are using NFS/dh on trusted hosts, make sure that users perform a keylogin to produce a temporary private key. If users do not supply a password when they log into a host, the local keyserv process on that host must be given the user's private key explicitly. Also, have users add keylogout to their logout files to remove the temporary keys given to keyserv.
- Ensure that each client that is using NFS/dh is running the keyserv daemon.
- To export a filesystem using NFS/dh, add the sec=dh option to its entry in /etc/dfs/dfstab. On NFS Version 2 clients, mount the filesystem with the sec=dh option in the mount options field of the automounter map or /etc/vfstab.
* 10 minutes set rpcsec:authdes_win = 600
You can also set it on a live system without rebooting by:
#echoauthdes_win/W 0t600| adb -k -wauthdes_win: 0x12c = 0x258
The shorter the window, the less time a would-be network spoofer has to attempt to replay any request, but on the other hand, the less clock drift you can tolerate.
How secure is RPC/DH?
RPC/DH is flawed for several reasons:- It uses a 192-bit modulus for its public and private keys. In 1987, 192 bits was appropriate because for larger sizes, it was found that common key generation took several minutes to complete on Motorola 68010 processors, which were still used in a significant number of Sun's installed base of systems. However, by 1990, advances in RISC processors produced workstation machines that could, by brute force, derive the private key from any public key in under a day.
- It uses only a 48-bit shared secret key for encrypting the session key. This can be brute forced in less than a day as well.
- Recall the discussion about requiring users to do a keylogin if they are using rlogin between trusted hosts. The point of rlogin with trusted hosts is to avoid constant password challenges. Also, the more times the same password is entered, the more opportunity for someone to look over your shoulder (or to eavesdrop on the network) to see it.
- RPC/DH does a better job of authentication than AUTH_SYS, but there is no support for integrity or privacy. It is obvious why privacy is desirable, but why is integrity so important to NFS? Say we are using NFS/dh, and our attacker in the middle intercepts a request to read a particular file. He prevents the read from proceeding. However, he takes the RPC/DH header, and concatenates it with a new NFS request to write the same file (this is known as a splicing attack). As we discussed earlier in "One-way hash functions and MACs", this would not be possible if RPC/DH had integrity services.
- It's impossible to extend RPC/DH to fix the above issues.
- NIS
- DNS (that is, DNS without DNSSEC)
- NFS over AUTH_SYS
- Transparent security discussed earlier in "User-oriented network security"
- Password-based security such as what imap, telnet, and ftp offer
RPCSEC_GSS: Generic security services for RPC
The previous section described a complete security system for NFS and RPC, and the subsection "How secure is RPC/DH?" discusses its flaws. Sun decided to develop a new RPC security flavor that would address the problems, with one added feature: it would be infinitely extendable, so that key size limitations, and problems with cryptographic algorithms (cryptographers are constantly finding problems with various algorithms) would not slow development of new security mechanisms. The new security flavor is called RPCSEC_GSS. Note that it does not have the AUTH_ prefix like AUTH_SYS and AUTH_DH. This is because it provides integrity and privacy services in addition to authentication. RPCSEC_GSS is based on the Generic Security Services API (GSS-API). GSS-API provides the ability to write applications that can authenticate clients and servers, integrity protect the messages they exchange, and also privacy protect the messages they exchange. GSS-API also permits one to "plug in" different security mechanisms or providers without changing the application that uses GSS-API. Figure 12-2 depicts the GSS-API multiplex applications that are consumers of GSS-API, and mechanisms that are providers for GSS-API.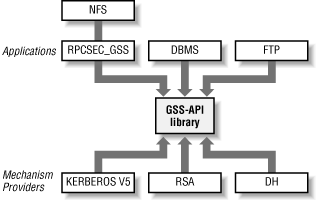
Figure 12-2. GSS-API architecture
RPCSEC_GSS leverages GSS-API capabilities to provide authentication, integrity, and privacy if the security mechanism provider supports those services. Currently Kerberos V5 is the mostly widely deployed GSS-API security provider, and it does support all three services. NFS over RPCSEC_GSS can use Kerberos V5's capabilities. At the time this tutorial was written:- Solaris (2.6, 7, and 8) was the only known Unix operating system offering an NFS implementation that supported Kerberos V5 security.
- At least two PC/NFS implementations -- Hummingbird's Maestro, and Netmanage's Interdrive -- supported Kerberos V5 security.
Kerberos V5
The Kerberos V5 system was developed at the Massachusetts Institute of Technology. It is another mechanism for enforcing security within a service, but it differs from RPC/DH in several ways:- Kerberos uses multiple levels of DES encryption to exchange keys and passwords. No public key encryption is used.
- A Key Distribution Center (KDC ) is required to maintain Kerberos V5 service passwords; this server must be kept safe from attack to preserve the integrity of the Kerberos system. RPC/DH uses the publickey map, which is available to all NIS clients. The data in the publickey map is encrypted using user's login passwords, not an additional RPC/DH password.
- Kerberos V5 authentication is built into the entire service, or application, not just into the session layer. For example, you can use Kerberos to make the line printer spooling daemon secure. Doing so, however, requires the source code to the line printer software.
- Kerberos V5 has the notion of forwardable credentials. Think back to earlier in this chapter (see "Establishing a session key") when we talked about rlogin, transparent access, and the fact that when using NFS/dh, you still had to provide a password to keylogin even though (or rather, because) rlogin didn't prompt for one. Kerberos V5 has replacements for programs like rlogin and telnet that work like that which they replace, but also support some extra features:
- Kerberos V5 is used to authenticate the user, not passwords.
- Traffic between the client and server is optionally encrypted as a way to provide privacy protection.
- Credentials can be forwarded from the client to the server. This feature, known as a forwardable ticket granting ticket, allows the following sequence of events:
- The user logs into his desktop machine. He is prompted for his Unix login password, which also happens to be his Kerberos V5 password. This results in a ticket granting ticket (TGT) being sent from the KDC to his desktop. His home directory is NFS-mounted but exported with Kerberos V5 security (sec=krb5).
- The NFS filesystem uses the TGT to get an NFS service ticket from the KDC, which allows the user to be authenticated to the NFS server. The service ticket is encrypted with the NFS server's key, which both the KDC and the NFS server know about. The NFS server can decrypt the service ticket from the client because the server stores the server's key in its /etc/krb5/krb5.keytab file, which is analogous to RPC/DH's /etc/.rootkey file.
- The user now wishes to log onto a remote system. He uses a Kerberized version of rlogin to do so, passing a command-line option that indicates that he wants his TGT to be forwarded.
- The NFS filesystem on the remote system must do an NFS mount of the user's home directory, which is still exported with sec=krb5. It needs an NFS service ticket to authenticate the user to the NFS server. Because the TGT has been forwarded, no password prompt to the user is necessary. Thus the user, having authenticated himself once when he logged into his desktop, can roam freely and securely among the network, as he did in the days when the network was using simple host-based trust for rlogin and NFS.
SEAM: Kerberos V5 for Solaris
Sun's Kerberos V5 implementation is called Sun Enterprise Authentication Mechanism (SEAM). For this chapter to completely explain how to set up SEAM for running Kerberos V5 and NFS secured with Kerberos V5, it would have to include as much material as was written in this chapter about NIS and NFS/dh, and all the chapters leading up to it. In other words, the title of this tutorial would be Managing NIS, Kerberos V5, and NFS. Fortunately, the SEAM documentation is well-written, and the installation fairly turnkey.[24] Thus it is not clear that much value could be added in this tutorial to explain minutiae of SEAM.[24]This appraisal is the opinion of one of the co-authors of this tutorial, Mike Eisler, who was the project lead for SEAM while employed by Oracle, Inc.However, the rest of this section collects some practical overview information on SEAM that you might find useful as you approach the issue of deploying Kerberos V5. SEAM 1.0 is available for Solaris 2.6 and Solaris 7, and is packaged with the Solaris Easy Access Server (SEAS) 3.0 product, which is unbundled from Solaris 2.6 and Solaris 7. If you bought a server from Sun, you might find SEAS 3.0 preinstalled. At the time this tutorial was written, SEAM 1.0.1 was available for Solaris 8 as a free download from Sun's website. Look for the product called Solaris 8 Admin Pack. Do not attempt to run SEAM 1.0 on Solaris 8. If you upgrade to Solaris 8 from a Solaris 2.6 or Solaris 7 system that has SEAM 1.0 installed, then you should immediately install SEAM 1.0.1. SEAM 1.0 and SEAM 1.0.1 rely on a GUI-based installation technology that is similar to Installshield for Windows systems. What you do not want to do is go ahead and install SEAM without reading the documentation. A couple of notes:
- SEAM 1.0 comes on the SEAS 3.0 tutorial. Install the SEAS 3.0 documentation first, and read through the SEAM 1.0 documentation.
- SEAM 1.0.1 is part of the Solaris 8 Admin Pack, and at the time this tutorial was written, the only way to get SEAM 1.0.1 was to download it. You can download SEAM 1.0.1 separately from the rest of the Admin Pack. However, be warned that it comes in a self-extracting shell script, otherwise known as a shar file; the term shar stands for shell archive. The shar file proceeds to run the GUI installer, and the installer does not let you install the documentation first, because it doesn't have the documentation. Instead, you first need to download the documentation separately (which includes all the documentation of the Admin Pack, so it is a large download). Once you've downloaded the documentation, start reading it. There is also documentation on SEAM in the Solaris 8 administration documents. It is worth reading this as well.
- Both have master servers (SEAM has a master KDC, and NIS has a master NIS server).
- Both recommend one or more slave servers.
- Both have a distinct client component.
- Both have a client-side daemon for managing session keys (SEAM has gssd, RPC/DH has keyserv).
Table 12-1. SEAM progression
| Solaris Release | Unbundled Product | SEAM Version | Features Integrated with Solaris | Features Integrated in Unbundled Product |
|---|---|---|---|---|
| Solaris 2.6 | SEAS 3.0 | SEAM 1.0 | RPCSEC_GSS hooks | KDC, Remote KDC administration, Kerberized networking utilities, Kerberos client utilities, RPCSEC_GSS, GSS-API, Kerberos V5 GSS provider, Kerberos V5 PAM module |
| Solaris 7 | SEAS 3.0 | SEAM 1.0 | RPCSEC_GSS, GSS-API | KDC, Remote KDC administration, Kerberized networking utilities, Kerberos client utilities, Kerberos V5 GSS provider, Kerberos V5 PAM module |
| Solaris 8 | Solaris 8 Admin Pack | SEAM 1.0.1 | RPCSEC_GSS, GSS-API, Kerberos client utilities, Kerberos V5 GSS provider, Kerberos V5 PAM module | KDC, Remote KDC administration, Kerberized networking utilities |
Presumably the progression in Table 12-1 will continue with future versions of Solaris and other operating systems.The fifth column of Table 12-1 consistently lists "Kerberized networking utilities." These are utilities like rlogin, rsh, rcp, ftp, and telnet (and their server daemons) that have been modified to understand Kerberos V5 security. The reason they are there is that they facilitate the deployment of an Intranet that sends no passwords in the clear over the wire, and indeed, via forwardable TGTs, enables you to send no passwords at all. Without these utilities, there would be less point in having strong NFS security, since passwords would often appear on your network. This is another drawback of RPC/DH: it does not add strong security to the basic networking utilities. By now, we've mentioned PAM several times without explaining it. Recall that your RPC/DH password is used to decrypt your private key. If your RPC/DH password is the same as your Unix login password, then you don't need to provide your RPC/DH password separately. How does this happen? The Solaris login command has code in it to try to decrypt the user's private key with the Unix login password. Now suppose you've installed Kerberos V5 and would like the system to attempt to use the Unix login password as the key that decrypts your TGT from the KDC. One way would be for your operating system vendor to change the login command to do so. But then, you decide you'd like the su command and the desktop lock screen feature to do the same. After a while, it gets to be a lot of utilities to maintain. A better way is to have pluggable framework that calls security mechanism specific code in shared objects and has them take care of acquiring credentials. This is what PAM does. SEAM provides a Kerberos V5 PAM module. Check out your system's documentation for information on PAM; PAM is common to many Unix systems. Here are some final recommendations for and observations about SEAM installation:
- SEAM allows you to use it without DNS running. Don't do that. If you ever change your mind, you'll have to repopulate the entire principal (analogous to an RPC/DH netname) database in the KDC.
- It is better to install SEAM clients (which can be NFS clients or NFS servers) by utilizing the preconfiguration steps that the documentation talks about, and the GUI installer tries to walk you through. Keep in mind that the preconfiguration information need only, and should only, be established once, on an NFS server. You then run the SEAM installer on each host, pointing it at the preconfigured information on an NFS mounted or automounted filesystem (usually same filesystem where the installer lives). This reduces per-host installation tedium.
- The SEAM documentation is very task-oriented, and hence very practical. Even if you ultimately want to do things differently, practice first, and follow the documentation examples as close to verbatim as possible before you try something complex or a little bit different.
- Do not skip any steps. SEAM is rather unforgiving if a small, but critical step is missed. You'll find that you can cut and paste from the web-based documentation into your command shell, and if you make that a habit, you'll stay out of trouble.
Enabling Kerberized NFS
This section assumes that you've gone through the installation and configuration that the SEAM documentation describes. Enabling Kerberized NFS on a filesystem is quite simple: export and mount the filesystem with the sec=krb5 option. On the NFS server, the /etc/dfs/dfstab entry looks like this:share -o sec=krb5,rw /export/home/thud
When a filesystem is exported with the sec=krb5 option, clients using NFS Version 2 must mount it with the sec=krb5 option if they are to enjoy normal user access privileges in the filesystem. On the NFS client, add the sec=krb5 option in the automounter map entry or the /etc/vfstab entry for the filesystem:
automounter auto_home entry: thud -sec=krb5 bonk:/export/home/thud vfstab entry: bonk:/export/home/thud - /thud nfs - no sec=krb5
As was the case for enabling NFS/dh (see "Enabling NFS/dh") with NFS Version 3, the sec=krb5 option is not necessary in the automounter map or vfstab entries. The krb5 option uses a combination of DES symmetric key encryption and the MD5 one-way hash function to produce the RPC credentials that are sent to, and authenticated by, the NFS server. Not only is there a krb5 option to sec=, but there are krbi and krbp as well. Like the krb5 option, krb5i uses Kerberos V5 to authenticate users to NFS servers when the filesystem is exported with sec=krb5i. Unlike krb5, it also computes an MD5-based MAC on every remote procedure call request to the server, and every response to the client. The MAC is computed on an entire message: RPC header, plus NFS arguments or results. Thus krb5i provides integrity protection, hence the trailing i in krb5i. Like krb5 and krb5i, krb5p uses Kerberos V5 to authenticate. Like krb5i it uses Kerberos V5 to provide integrity. Unlike krb5 and krb5i, krb5p uses Kerberos V5's DES encryption to provide privacy. Note that only the NFS arguments and results are encrypted; the RPC headers go in the clear. So an attacker could deduce which NFS operation is being performed, but not on what file, nor what the file or directory content is.
Security and performance
So, why wouldn't a client want to always mount with krb5p ? It is, after all, the most secure of sec= options we've seen in this tutorial. The reason is that as soon as you involve cryptography in data processing, you slow down the processing. This is because cryptography tends to be a highly CPU-bound function. Consider the performance results in Table 12-2. The NFS client and server were each running Solaris 8 with SEAM. Both the systems were Sun Ultra 5 systems, each with 128 megabytes of RAM, and one 270 Mhz CPU. A 200 megabyte file was written from the client to the server to the server's /tmp file system, via the mkfile utility. NFS Version 3 over TCP was used. As we can see from Table 12-2, the krb5 option does not cost much to use relative to sys. But krb5i and krb5p added increasingly significant overhead. Some people have the reasonable perspective that drop off in throughput is not as important as the increased CPU utilization.Table 12-2. Kerberized NFS performance
| sec= value | Throughput in MB/sec | Throughput Degradation Relative to sec=sys | Percent CPU Utilization on Server |
|---|---|---|---|
| sys | 5.40 | N/A | 69% |
| krb5 | 5.26 | 2.6% | 70% |
| krb5i | 4.44 | 17.7% | 77% |
| krb5p | 1.45 | 73.1% | 99% |
Combining krb5, krb5i, krb5p
You can combine the krb5 * options with each other. Let's suppose /export/home on server labrador contains the home directories of security conscious folks, though some are less paranoid than others. You can accommodate everyone by adding the following to /etc/dfs/dfstab:share -o sec=krb5p:krb5i:krb5,rw /export/home
This means the clients pick any of the three flavors of krb5 when they mount the NFS filesystem. Note that this is one instance where even if the client is using NFS Version 3, that the administrator on the client may want to specify a sec= option in their automounter maps or vfstab or on their mount command line. The reason is that the client (at least the Solaris 8 client) will pick from the array of security flavors that mountd returns the first security flavor that the client supports. So if a client prefers krb5 but krb5p is first, sec= is needed for the mount command to override the automatic choice. Given the results in Table 12-2, you might want to be careful about exporting filesystems with krb5i or krb5p security enabled. If you have data that can go in the clear on the network, then never export it with krb5p. If your users are writing data over the network, and very bad things could happen if an attacker spliced the RPC header from a sec=krb5 NFS request onto a forged set of destructive arguments, then enable krb5i. Otherwise krb5 should be sufficient. Indeed, for certain kinds of read-only data, sec=sys or sec=none are fine.
IPSec versus krb5i and krb5p
As discussed earlier in "NFS and IPSec", IPSec can provide integrity (AH) and privacy (ESP) services. If you are enabling AH and ESP then do you need to use krb5i or krb5p ? Note that the session keys for AH and ESP are derived from per-host keys, whereas the session keys for krb5i and krb5p are derived from per user keys. If you are paranoid about attacks on hosts to find the IPSec keys, then you'll want to run krb5i and krb5p in addition to AH and ESP. However, it will cost you double in CPU utilization to do so. In general, it is not necessary to use krb5i if AH is used, and not necessary to use krb5p is ESP is used. However, even if AH or ESP is used to protect NFS traffic, it still makes sense to use krb5 protection on your NFS traffic if you want strong authentication.Planning a transition from NFS/sys to stronger NFS security
Perhaps you've been exporting filesystems with sec=sys (the default if sec= is not specified) for some time, and now decide to start using better NFS security, such as NFS/dh or Kerberized NFS. One issue is that it takes less time to reconfigure servers to use stronger NFS security than to reconfigure clients, because there are more client machines, and more user ids than host ids to add to the various tables that RPC/DH and Kerberos V5 require. Also, some NFS client implementations may not be running Solaris 8, and may support the stronger NFS security that you decide to switch to. So even after you get your servers reconfigured to use Kerberos V5 security, it won't be practical to simply change:share -o rw /export/home
to:
share -o sec=krb5,rw /export/home
and not expect some chaos. That you can combine any two or more sec= options on the same dfstab entry allows you to stage some graceful transitions. For example, suppose you've decided to use NFS/dh. You may have some legacy software running on some NFS clients that is stuck on older systems. Thus you can't upgrade the client systems to an operating system that can support stronger NFS security. You can do the following:
share -o sec=sys,rw=legacy-group,sec=dh,rw=upgrade-group /export/home
such that the legacy machines and upgrade machines are each placed in their own netgroup.
NFS security futures
In "Asymmetric key encryption", we mentioned the RSA public key algorithm, but did not talk about any NFS security that uses RSA. RSA is arguably the best asymmetric key encryption algorithm known to us. It is the foundation of most Public Key Infrastructure (PKI) products, as well as networking protocols like SSL/TLS and S/MIME. So why doesn't NFS use it? The main issue with RSA is that it was patented and so royalties were due to its rights holders. Now that the patent has expired, expect to see the following features in the future:- Asymmetric key technology integrated with Kerberos V5. Without asymmetric key technology, a physical compromise of the KDC effectively compromises all of the principals listed in KDC, as it stores each user's symmetric key. With asymmetric key technology, only the public key needs to be stored in the KDC.
- The NFS Version 4 protocol specifies an SSL-like GSS-API mechanism provider called LIPKEY as one of the two required security providers to RPCSEC_GSS (Kerberos V5 being the other). LIPKEY uses asymmetric key algorithms. So when NFS Version 4 is deployed widely, expect to see RSA used to secure it. Like SSL, LIPKEY can be easily used through a firewall.