To set the object's background color, double-click on the BackgroundColor setting, type #5987c0, and press Enter.
8 ) I n t h e S cr ollb ar s ca t e go ry , s e t V er t i ca l t o " O ff . "
We don't want the paragraph object to have a vertical scroll bar. Although we'll be making the paragraph object larger than the text inside it, which should prevent the scroll bar from appearing even if it's set to "Auto," it doesn't hurt to turn the scroll bar off just to be sure.
9 ) S e t L e ft t o 255 , Top t o 17 , Wid t h t o 345 a nd He igh t t o 44 .
This will place the paragraph object above the panel image, near the top of the page.
10 ) R igh t- c li ck on t h e p ara g ra ph obj ec t a nd c hoo s e Lo ck .
Locking the object will keep it out of your way for the rest of this lesson.
Adding a Video Object
AutoPlay's video object lets you display full-motion video right on the page. You can use it to show all sorts of media files, from training videos and product previews, to home movies and music videos.
Tip: You can also use a File.Open or File.Run action to display a video in an external viewer program. Of course, displaying a video right on the page results in a more seamless user experience.
Note: Video objects will always appear on top of other kinds of objects, no matter how you arrange the objects on the page (i.e. regardless of the z-order). There are technical reasons why this is so, but suffice it to say that it has to do with the way videos are drawn on the screen.
1 ) C hoo s e Obj ec t > V id e o. Wh e n t h e S e l ec t Fil e di a log a pp ear s , c li ck t h e G a ll ery bu tt on.
Choosing Object > Video opens the Select File dialog. Clicking the Gallery button allows you to access a small sample video that comes with AutoPlay.
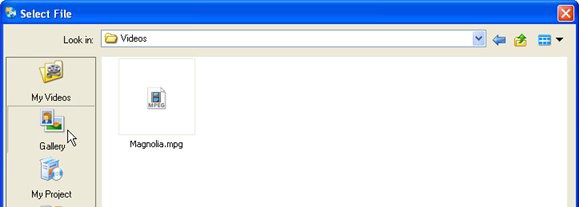
2 ) S e l ec t t h e M a gnoli a . m pg f il e , a nd c li ck O K .
After you click OK, the new video object appears in the upper left corner of the page. A single frame from the video appears in the object, so that as you work on the project you can have a general idea of what it's going to look like when it starts.
(In this case, the frame happens to be black, since the Magnolia.mpg video begins with a fade from black.)
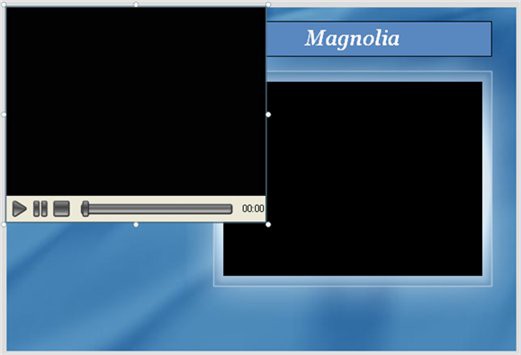
Notice the standard video controls at the bottom of the video object. This is the object's control panel. On the control panel, there is a play/pause button, a stop button, a position slider, and an elapsed time readout.
![]()
Note: The play button toggles between play and pause: it switches to the pause button when the video is playing, and then switches back to the play button when the video is paused.
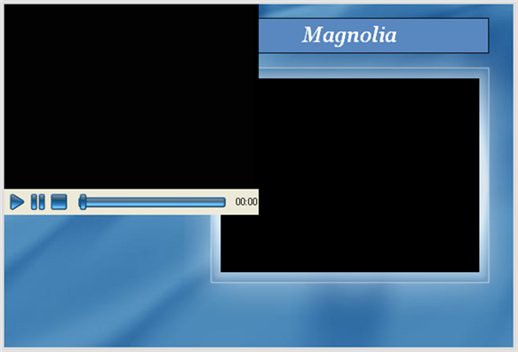
3 ) I n t h e p r op er t i e s p a n e , c h a ng e t h e C on t r ol St y l e s e tt ing f r o m " A M S- G ray " t o " A M S- B lu e . "
The ControlStyle setting lets you select from a list of control panel styles. You can use this setting to change the appearance of the built-in video controls, or to hide the control panel completely.
Each style in the list corresponds to a skin file located in the Plugins\Transports subfolder, inside the folder where AutoPlay was installed.
A skin file is just an image with different "control panel parts" arranged in a row. Each individual part of the control panel is represented by a different section of the image. AutoPlay extracts the parts from this image, and then uses them to build the control panel.
![]()

The AMS-Bl ue control panel ski n
Tip: You can build your own control panel skins for AutoPlay using a paint program. The easiest way is to use one of the existing images as a template. Simply make a copy of an existing skin file, and then modify the copy, replacing each section of the image with your own corresponding
control panel part.
4 ) T ry c h a nging t h e s e tt ing s in s id e t h e C on t r ol P a n e l ca t e go ry .
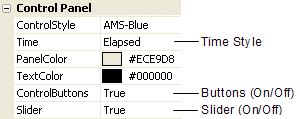
The Control Panel category has six settings inside it: ControlStyle, Time, PanelColor, TextColor, ControlButtons, and Slider. You can use these settings to show or hide the different parts of the control panel and adjust what they look like.
![]()
Note: The control panel, and the controls on it, are all completely optional. You can choose to hide the whole control panel, or hide any of the individual parts.