You can click on this blue text to get more information about the action from the online help. (Go
ahead and click on the blue Application.Exit to see the online help topic for this action. When you're done, just close the online help window and return to the AutoPlay design environment.)
5 ) C li ck Nex t t o a d va n ce t o s t e p 3 in t h e ac t ion wi z ar d.
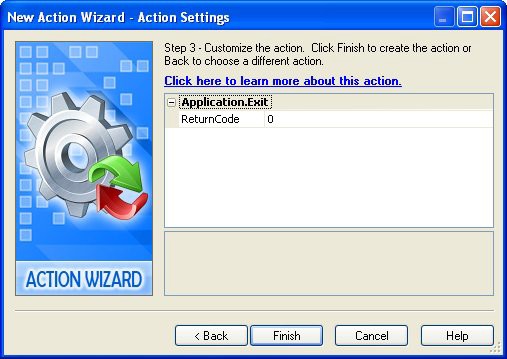
Some actions have one or more settings that you can configure in step 3 of the action wizard. When that is the case, you can click the Next button to advance to step 3, where you can customize the action.
In this case, the Application.Exit action allows you to specify a return code that will be returned by your AutoPlay application after it exits. (This allows you to pass information back to the program or batch file that launched the application, for example if an error occurred you could return an error code so the batch file could proceed accordingly.)
For our purposes, the default return code of 0 is fine. (This is the standard return code that programs use to indicate that everything's okay.)
6 ) C li ck Fini s h t o a dd t h e A ppli ca t ion. E x i t ac t ion t o t h e On C li ck eve n t , a nd t h e n c li ck O K t o c lo s e t h e s cr ip t e di t o r .
Clicking Finish on the New Action wizard will close the wizard and add the action to the script editor.
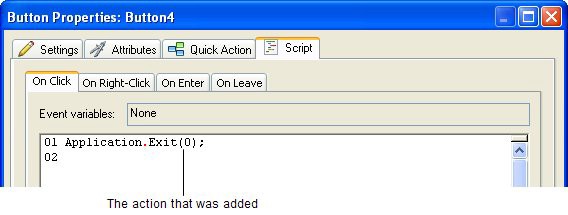
When you click OK on the script editor, the script editor will close, and the On Click setting in the properties pane will have 1 Line next to it. The properties pane always shows how many lines of script there are in each of the selected objects events.
7 ) C hoo s e P ubli s h > P rev i e w. Wh e n t h e a ppli ca t ion op e n s , c li ck on t h e E x i t bu tt on t o c lo s e i t .
It works! Clicking on the Exit button triggers that objects On Click event, which causes the On Click script to be performed. Since you put an Application.Exit action in the script for that event, the application closes.
Note: The Application.Exit action causes an immediate exit from the application.
![]()
8 ) S e l ec t t h e T e d S e ll er s Onlin e bu tt on a nd a dd a Fil e .Op e n UR L ac t ion t o i t s On C li ck eve n t . S e t t h e ac t ion s UR L p arame t er t o
" h ttp : //www.a u t oplays t udio.c om" a nd l eave t h e Window M od e p arame t er s e t t o S W _ S H OW N O R M A L.
Adding a File.OpenURL action to the Ted Sellers Online button object (the one named Button1) is a lot like adding an Application.Exit action to the Exit button object. Just select the button object, click on the On Click setting, and click the edit button to bring up the script editor.
When the script editor opens, click the Add Action button to open the New Action wizard. Choose the File category from the drop-down list to see the list of File actions, and then click on File.OpenURL.

Once you have the File.OpenURL action selected, click Next to move on to step 3 of the New Action wizard. This is where you can configure the actions parameters.
Parameters are just values that get passed to an action. They tell the action the information it needs to know in order to do what we want it to do. For instance, in the case of our File.OpenURL action, the action needs to know what URL we want it to open. So, the first parameter lets you specify the URL of a website.
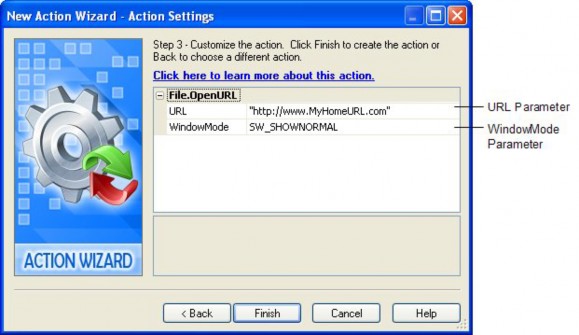
Since Ted doesn't actually have a website, well use the AutoPlay Media Studio website for this parameter, just for testing purposes. To do that, simply double-click on the URL setting and type "http://www.indigorose.com/ams" into the text field. (Feel free to substitute another websites URL if you want.) When the action is performed, it will open the users default web browser and navigate to this URL.
Note: Make sure you include the quotes! Text strings need to be quoted in action parameters.
![]()