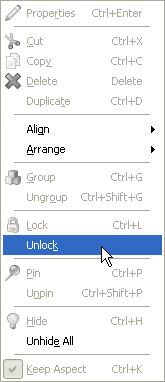
If you're wondering how you would ever get the object back, don't worry...you can unlock an object by right-clicking on it and choosing Unlock from the right-click menu.
To illustrate this, lets lock all of the objects on the page, except for one label object that you will be working with in another lesson.
1 ) P re ss C t r l + A t o s e l ec t a ll o f t h e obj ec t s on t h e p a g e .
When you press Ctrl+A, all of the objects on the page are selected.
Note: This is the same as choosing Edit > Select > All.
![]()
2 ) C hoo s e E di t > Lo ck .
All of the objects become locked. Since locked objects cant be selected, their bounding boxes disappear.
3 ) T ry t o s e l ec t on e o f t h e obj ec t s .
Go ahead. Bet you cant select any.
No, really...you can't. Locked objects don't respond to left mouse button clicks at all. You cant even select them using the project explorer.
Its like the objects aren't even there. But they still are, of course...they're just locked.
4 ) R igh t- c li ck on t h e E ma il A dd re ss l a b e l obj ec t a nd c hoo s e U nlo ck t o unlo ck i t .
When you right-click on a locked object, a menu appears enabled so you can unlock it. Note that the object also contains a locked icon in the Project Explorer to indicate it is currently locked.

Choosing Unlock from this menu toggles the objects locked status off - in other words, it unlocks the object. It also automatically selects the object for you, so you can see that it has been unlocked.
Tip: You can unlock all of the locked objects on a page at once by choosing Edit > Unlock All.
![]()
5 ) C hoo s e Fil e > S ave t o s ave t h e p r oj ec t .
Be sure to save the project so the work you've done in this lesson isn't lost.
In this lesson, you learned how to:
· Select multiple objects
· Move more than one object at a time
· Change the settings of several objects at once
· Align objects to each other
· Align objects to the page
· Arrange objects in the z-order
· Remove unused files from the project
· Group objects together