By default, AutoPlay remembers the last 10 changes that were made, so at any given moment you should be able to step back like this up to 10 times in a row.
![]()
Tip: You can give AutoPlay a longer undo memory by choosing Edit > Preferences, clicking on the Document category, and setting Undo/Redo Levels to a higher value.
2 ) C hoo s e Fil e > S ave t o s ave t h e p r oj ec t .
Saving the project is important, because it creates a point that you can come back to if you make a mistake or want to undo your changes. (Well actually use this feature later in the lesson, to return the project to the state its in right at this very moment.)
3 ) R igh t- c li ck on t h e p a g e s u r f ace a nd c hoo s e I ma g e . I n t h e Fil e S e l ec t di a log s e l ec t t h e I c on - 003 .png f il e , a nd c li ck O K .
Choosing Image from the right-click menu opens the Select File dialog, allowing you to select an image file.
In this case, we want to temporarily add another image file to demonstrate how the arrange tools work. A good image for this purpose is Icon-003.png, located in the Gallery\Images\Elements folder. (Some of our image files have such romantic names.)
Since you're selecting a file for an image object, the Select File dialog automatically starts at the last location where you browsed for an image file. Unless you've browsed to a different location since we added the first image object in Lesson 2, the Select File dialog should open directly to the Gallery\Images\Elements folder. Simply click on the Icon-003.png file, and click OK. The new image object will appear on the page.
4 ) U s e t h e n e w i ma g e obj ec t t o c o m pl e t e l y c o ver t h e logo.
Using the mouse, resize the image object so its big enough to cover the entire logo. Then drag it on top of the logo, so it covers all three of the logos objects.

![]()
Tip: You can resize the object proportionally by holding the Shift and Ctrl keys down while dragging one of its resize handles.
5 ) R igh t- c li ck on t h e i ma g e obj ec t a nd c hoo s e Arra ng e > S e nd t o Back .
Abracadabra! The logo objects reappear.

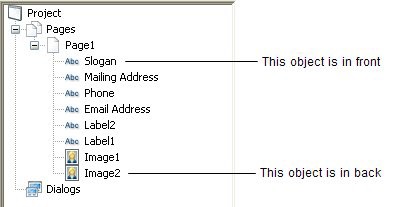
Choosing Arrange > Send to Back moved the new image object to the very back of the z-order, putting it at the bottom of the stack of objects on the page. (Note that this includes all of the objects on the page, and not just the four objects that happen to be overlapping.)
You can actually see the z-order in the Project Explorer. The objects in the project explorer tree are listed according to the z-order, with the front object at the top of the tree, and the back object at the bottom of the tree. When you sent the image object to the back of the z-order, it was moved to the bottom of the tree.
![]()
Tip: The other commands in the Arrange menu let you move an object forward or back by one position in the z-order stack, or send it straight to the front of the pile.
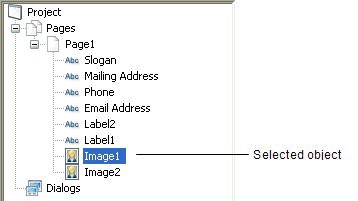
6 ) C hoo s e E di t > S e l ec t > Nex t Obj ec t A bo ve .
Choosing Edit > Select > Next Object Above selects the object that is one level higher in the z- order, in other words, the object that is one step further from the page.
![]()
Note: If you look at the project explorer, you can see which object you have selected and what position it occupies in the z-order.
7 ) P re ss S hi ft + T a b.
You can also select the next object higher in the z-order by pressing Shift+Tab.
![]()
Tip: You can cycle through all of the objects on the page by pressing Tab and Shift+Tab. Pressing Tab selects one level forward in the z-order, and pressing Shift-Tab selects one level back.