
The other way to duplicate a color is to copy and paste the hexadecimal value from one setting to another.
4 ) D oubl e - c li ck on t h e N o rma l c olo r s e tt ing a nd p re ss C t r l + C .
When you double-click on a color setting, all of the text in its text field is highlighted for you. In this case, the text is the hexadecimal value that describes the Normal color.
Pressing Ctrl+C copies this text into the clipboard so you can paste it somewhere else.
5 ) C li ck on t h e M a iling A dd re ss l a b e l obj ec t . I n t h e p r op er t i e s p a n e , doubl e - c li ck on t h e N o rma l c olo r s e tt ing a nd p re ss C t r l + V .
Once again, when you double-click on the Normal color setting, its hexadecimal value is highlighted. Pressing Ctrl+V pastes the text from the clipboard into the text field, replacing the highlighted text.
Note: This time, instead of copying the hexadecimal text into the clipboard, you're replacing it with the value that you copied from the other label object.
Tip: Unlike the new color square on the color chooser, which only works for colors that you've selected with the Colors dialog, you can always copy and paste the hexadecimal value between two colors.
6 ) P re ss E n t er , o r ju s t c li ck s o me wh ere e l s e .
To accept the change that you made to the Normal setting, you can either press the Enter key, or click away from the Normal setting. (In other words, click on another setting, or another object, or on the page surface.)
Tip: If you wanted to cancel the change, you could press Esc instead.
![]()
Matching Colors
Unlike the Email Address object, we don't want these labels to appear interactive, so we need to make all three state colors the same. Otherwise, the text colors will change when the user moves the mouse over the labels or clicks on them, which will give the wrong impression.
To make all three colors the same, you could just copy the hexadecimal color value from one of the states and then paste it into the other two - just like copying a color from one object to another. But there's an even easier way to make the colors match: just use the Match Normal button on the objects double-click dialog.
1 ) D oubl e - c li ck on t h e P hon e l a b e l obj ec t .
Double-clicking on the label object opens the Label Properties dialog. There are four color choosers on the Settings tab which allow you to set each of the four state colors, just like you can in the properties pane.
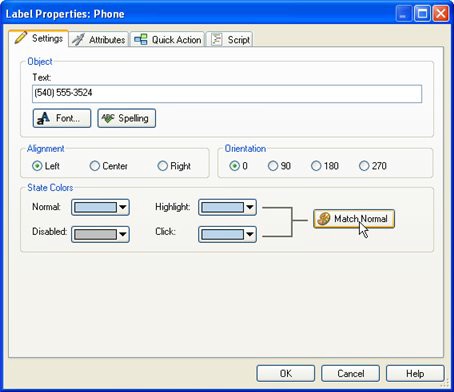
Next to the Highlight and Click colors is the Match Normal button.
2 ) C li ck t h e M a t c h N o rma l bu tt on.
Clicking the Match Normal button makes the Highlight and Click colors both match the Normal color.
3 ) C li ck O K t o acce p t t h e c h a ng e s .
Clicking OK closes the dialog and locks in the new Highlight and Click colors.
4 ) D o t h e s ame f o r t h e M a iling A dd re ss l a b e l obj ec t s .
Double-click on each Mailing Address label object and make its Highlight and Click colors match its Normal color, too.
While were at it, lets change the color of our first two label objects as well.
5 ) D oubl e - c li ck on t h e L a b e l 1 obj ec t t o op e n t h e L a b e l P r op er t i e s
di a log. S e t t h e N o rma l c olo r t o whi t e , a nd t h e n c li ck t h e M a t c h N o rma l
bu tt on t o make t h e H ighligh t a nd C li ck c olo r s ma t c h.
The Label1 object is the one with Ted Sellers on it. In the next lesson, were going to use it with Label2 and the image object to create a little logo. Since its going to be used as part of a logo, we don't want it to appear interactive, so the Normal, Highlight and Click colors should all be the same.
6 ) D o t h e s ame f o r t h e L a b e l 2 obj ec t .
The Label2 object is the one with R E A L T Y L T D . on it.
Adding a Slogan
Remember when I mentioned that duplicating an object was a good way to add a similar object to the page? Essentially, you use an existing object as a starting point to create a new one. Lets take advantage of that trick to add another label object with the same color settings as our Mailing Address label object.
Well use this label object to display Teds slogan: Building communities one home at a time.
1 ) S e l ec t t h e M a iling A dd re ss l a b e l obj ec t a nd p re ss C t r l + D .
Pressing Ctrl+D creates a duplicate of the Mailing Address object, and automatically selects the new object.
2 ) Dra g t h e n e w obj ec t o ver t o t h e l e ft c o r n er o f t h e p a g e .
Moving it away from the Mailing Address label object will make it easier to see what's going on.
3 ) I n t h e p r op er t i e s p a n e , c h a ng e t h e n e w obj ec t s n ame t o S log a n.
Were starting to accumulate a fair number of objects. We might as well give this object a name so the list in the object browser doesn't get too confusing.
4 ) C li ck on t h e T ex t s e tt ing, a nd c li ck t h e e di t bu tt on. Wh e n t h e E di t T ex t di a log a pp ear s , re pl ace t h e ma iling a dd re ss wi t h t h e f ollowing t ex t:
" B uilding c o mm uni t i e s on e ho me a t a t i me "
Clicking the edit button in the Text setting opens the Edit Text dialog. When the dialog appears, all of the text in it is already highlighted for you. To replace the text, you just have to type in the new text.
5 ) C li ck O K t o c lo s e t h e E di t T ex t di a log.
When you're done changing the text, click OK to close the Edit Text dialog. The new text should appear in the label object immediately.
6 ) S e t t h e f on t S i z e t o 9 , a nd t h e A lign me n t t o Ce n t er .
We want the text in the label object to be centered, and we don't want it to be very big.
7 ) I n t h e P o s i t ion ca t e go ry , s e t L e ft t o 46 a nd Top t o 358 .
This positions the object down near the bottom left corner of the page.
![]()
Note: This will place the slogan below the four button objects well be adding in Lesson 4.