If you set this target media size to match the size of the media you're using, you'll have a visual
indicator of how much space is left in your project as the project grows in size.
Note that this preference doesn't affect the project in any way; the target media size only affects the size meter on the Project Size pane. It also doesn't matter how big the disc in your burner is…if you want the size meter to match the size of the media you're using, you'll need to change the target media size manually whenever you switch from one media size to another.
4 ) F ee l f ree t o ex plo re s o me o f t h e o t h er ca t e go r i e s . Wh e n y ou' re don e , c li ck O K t o c lo s e t h e P re f ere n ce s di a log.
There are many other preferences that you can set, such as the number of undo levels for the program (in the Document category) and what happens when you drag a file onto the page (in the Drag and Drop category). Take some time to look through the categories and familiarize yourself with the different options that are available.
Remember that you can click Help or press F1 to get more information about any of the settings in a specific category.
Modifying the Project Settings
The project settings affect the appearance and behavior of your application at run time.
![]()
Note: Each project has a number of settings that can be configured on a per-project basis. These project-wide settings can be accessed from the Project menu.
1 ) C hoo s e P r oj ec t > S e tt ing s .
This opens the Project Settings dialog.
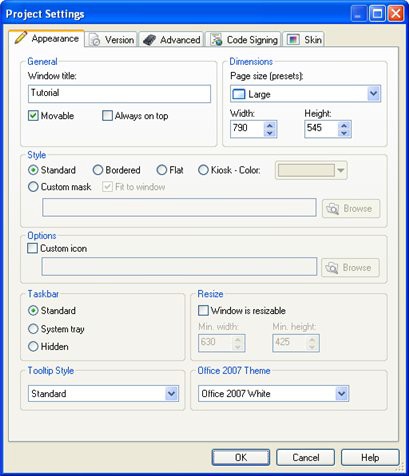
Project Setti ngs di al og
2 ) C h a ng e t h e Window Ti t l e t o T e d S e ll er s - A n A g e n t Y ou Ca n T r u s t .
By default, the window title is the same as the name of the project. This project is going to be a CD business card for a (fake) real estate agent named Ted Sellers, so let's make the title something more appropriate.
To change the window title, replace the text in the Window Title field with Ted Sellers - An Agent You Can Trust.
Note: This text will appear in the application's title bar when the user runs your application.
![]()
3 ) M ake s u re t h e p a g e s i z e i s s e t t o " M e diu m . "
Setting the page size to "Medium" sets the Width and Height settings to 630 and 425, respectively. This is a good "safe" size for an application, since it will fit on every common Windows screen resolution from 640x480 and up.
Note: This sets the width and height for all of the pages in your project.
![]()
4 ) C li ck O K t o c lo s e t h e P r oj ec t S e tt ing s di a log.
The rest of the settings are fine, so click OK to close the Project Settings dialog and return to the main program window.
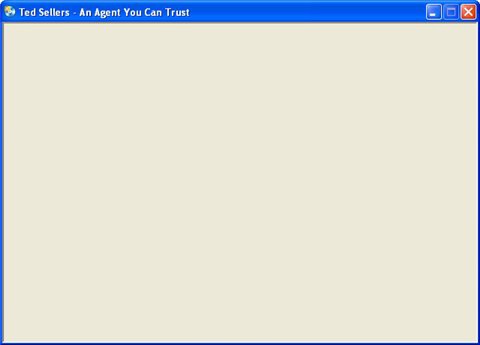
5 ) C hoo s e P ubli s h > P rev i e w.
AutoPlay's preview feature lets you take a "sneak peek" at your application, without actually building or burning the project. At this point, there isn't much to see, since the project still consists of a single blank page. But the text you entered for the window title does appear in the title bar, and if you could measure the page, you'd find that it is indeed 630 pixels wide by 425 pixels tall.
6 ) C li ck t h e C lo s e bu tt on on t h e t i t l e b ar t o ex i t t h e p rev i e w.
When you exit the preview, you're returned to the AutoPlay program window.
7 ) C hoo s e Fil e > S ave .
When you save the project, all of the changes that you've made to it are stored in the project file. You can open that project file at any time to continue working on the project.
In this lesson, you learned how to:
• Create a new project
• Make sure you have the latest version of AutoPlay Media Studio
• Recognize the different parts of the program interface
• Customize the workspace
• Load a pre-configured workspace layout
• Take advantage of self-help resources
• Change the project's window title
• Set the page size for the project
L ess o n 2 : G r a p h i cs a n d T ex t
This lesson will introduce you to objects, the basic building blocks that make every AutoPlay application unique. The two easiest objects to use are images and labels. Together, they let you populate your project with graphics and text. Although they're simple to use, they allow you to do some very advanced things, and by the end of this lesson, you'll be well on your way to manipulating these objects like a pro.
Most of the skills you'll learn in this lesson can be applied to all of the objects you'll use in AutoPlay, so pay attention, this is very useful information. For instance, all of the objects in AutoPlay can be resized and repositioned freely, and in this lesson you'll learn how to do that. You'll also learn how to rename objects, and how to quickly create a clone of an existing object by duplicating it...a real time saver that you'll find yourself using time and time again.
In this lesson, you'll learn how to:
· Change the page background
· Add an image object
· Resize objects
· Add label objects
· Duplicate objects
· Change the text in a label object
· Rename objects
· Use custom font settings
· Use different text colors