Each lesson begins with a brief overview and a list of the things you will learn in that lesson. The lessons are divided into a number of exercises, which are broken down into individual steps. Each step appears in bolded text, with a number beside it so you don't lose your place. Additional information or explanation for each step is included in the non-bolded text that follows it.
Document Conventions
This user's guide follows some simple rules for presenting information such as keyboard shortcuts and menu commands.
Key bo ar d S ho r t c u t s
Keyboard shortcuts are described like this: press Ctrl+V. The "+" means to hold the Ctrl key down while you press the V key.
M e nu C o mma nd s
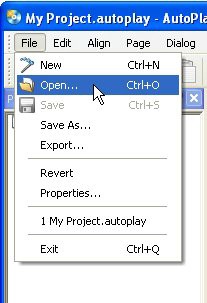
Menu commands are described like this: choose File > Open. This means to click on the File menu at the top of the AutoPlay program window, and then click on the Open command in the list that appears.

"Fil e > Open" means cli ck on the Fil e menu, then cli ck on the Open command
T y p e d - I n T ex t
When you're meant to type something into a text field, it will be presented in italics, like this: type "AutoPlay makes me happy" into the Message setting. This means to type in "AutoPlay makes me happy", including the quotes.
A u t o P l ay = A u t o P l ay M e di a St udio
Throughout this user's guide, the name "AutoPlay" has been used as a short form of "AutoPlay Media Studio." Whenever I refer to "AutoPlay," I'm referring to the actual product.
L ess o n 1 : G e tt i n g S t a r t e d
Every journey begins with a first step. In this lesson, I'll walk you through the creation of a new project, and introduce you to the AutoPlay program interface.
What You'll Learn
In this lesson, you'll learn how to:
• Create a new project
• Make sure you have the latest version of AutoPlay Media Studio
• Recognize the different parts of the program interface
• Customize the workspace
• Load a pre-configured workspace layout
• Take advantage of self-help resources
• Change the project's window title
• Set the page size for the project
How Long Will It Take?
This lesson takes approximately 20 minutes to do.
Since this is the first lesson, there isn't anything you need to do before you get started. So let's dive right in and start learning AutoPlay!
Starting a New Project
Everything has to start somewhere, and in AutoPlay, the design process starts with the creation of a new project.
A project is just the collection of files and settings and everything else that makes up an AutoPlay application. A typical project will consist of several pages, with different objects on each page. Each page, and each object on it, has individual settings that you can edit and adjust to make the application do what you want it to. These settings are all stored in a single file, called the project file.
This file, along with any images, videos, or other files that you add to your project, are collected inside a special folder called the project folder. The project folder contains everything that belongs to the project, including the project file. Each project has its own project folder, which serves as a container for the project.
Throughout this tutorial, you'll be working on a single project. This project will start out simple and then gradually become a fully working example as you learn more of AutoPlay's advanced features.
But before you can start adding cool things to your application, you need a project to work on. So let's open the AutoPlay Media Studio program and start a new blank project.
1 ) Op e n A u t o P l ay .
Use the Start menu to launch the AutoPlay Media Studio program.
Start > All Programs > Indigo Rose Corporation > AutoPlay Media Studio 8
2 ) Wh e n t h e W e l c o me di a log a pp ear s , c li ck on " Crea t e a Ne w P r oj ec t . "
The Welcome dialog appears whenever you run AutoPlay Media Studio.
It easily lets you create a new project, open an existing one, or restore the last project that you worked on. (Restoring the last project automatically opens the project you had open the last time you ran AutoPlay.)
When you click on "Create a New Project," the Welcome dialog closes and the Create New Project dialog appears.
3 ) E x plo re t h e Crea t e Ne w P r oj ec t di a log.
The Create New Project dialog lets you name your project and choose what kind of project you'd like to start.
At the top of the Create New Project dialog, there is a scrollable list with a bunch of thumbnail images on it. Each thumbnail image represents a different project template. A project template is a ready-made "starter project" that you can use to get your own project off the ground. As you can see, the project templates come in many different styles and themes.
4 ) C h a ng e t h e p r oj ec t n ame t o Tu t o r i a l.
You want to replace the default text "My Project" with the correct name for this project, so highlight all of the text in the Name your project field and type Tutorial.
This will be the name of the project folder, which is the folder that will be used to keep all of the project's files together, and of the project file, which is the file that contains all of the settings and options that make up your project. (This is the file that you will "open" whenever you want to load this project into AutoPlay.)
Every project needs a name, and that name has to be unique. You can't give two projects the same name (and in fact AutoPlay won't let you).
6 ) C li ck on t h e t hu m bn a il f o r t h e B l a n k P r oj ec t t em pl a t e .
You'll be starting the tutorial project from scratch, so select the Blank Project template.
Note: To select a template, just click on its thumbnail.
![]()
7 ) C li ck t h e " O K " bu tt on.
When you click OK, the Create New Project dialog closes, AutoPlay sets up the project folder and project file with the name you chose, and the project is loaded into the design environment.
Note: The AutoPlay Media Studio program interface is also known as the design environment.
![]()