Hosting Rails with Apache 2.2, mod_proxy_balancer,
and Mongrel
Problem
You want to run the latest stable version of Apache (currently 2.2.2) to serve your Rails application. For performance reasons you want to incorporate some kind of load balancing. Because of financial limitations, or just preference, you're willing to go with a software-based load balancer.
Solution
Use the latest version of Apache (currently 2.2.2) along with the mod_proxy_balancer module, and proxy requests to a cluster of Mongrel processes running on a single server, or on several physical servers. Start by downloading the latest version of Apache from a local mirror and unpacking it into your local source directory. (See http://httpd.apache.org/download.cgi for details.)
$ cd /usr/local/src
$ wget http://www.ip97.com/apache.org/httpd/httpd-2.2.2.tar.gz
$ tar xvzf httpd-2.2.2.tar.gz
$ cd httpd-2.2.2
A useful convention when installing Apache (or any software where you anticipate working with different versions) is to create an installation directory named after the Apache version, and then create symbolic links to the commands in the bin directory of the version you are currently using. Another timesaver is to create a build script in each Apache source directory; this script should contain the specifics of the configure command that you used to build Apache. This script allows you to recompile quickly and also serves as a reminder of what options were used for your most recent Apache build.
To enable proxying of HTTP traffic, install mod_proxy and mod_proxy_http. For load balancing, install mod_proxy_balancer. For flexibility, you can choose to compile these modules as shared objects (DSOs) by using the option --enable-module=shared. This allows you to load or unload these modules at runtime. Here's an example of a build script:
/usr/local/src/httpd-2.2.2/1-BUILD.sh:
#!/bin/sh
./configure --prefix=/usr/local/www/apache2.2.2 \
 --enable-proxy=shared \
 --enable-proxy_http=shared \
 --enable-proxy-balancer=shared
Remember to make this script executable:
$ chmod +x 1-BUILD.sh
Make sure that the directory used with the prefix option exists (/usr/local/www/apache2.2.2 in this case). Then proceed with building Apache by running this script. When configuration finishes, run make and make install.
$ ./1-BUILD.sh
$ make
$ sudo make install
Once Apache is compiled and installed, you configure it by editing the conf/httpd.conf file. First, make sure the modules you enabled during the build are loaded when apache starts. Do this by adding the following to your httpd.conf (the comments in this file make it clear where these directives go if you're unsure):
/usr/local/www/apache2.2.2/conf/httpd.conf:
LoadModule proxy_module modules/mod_proxy.so LoadModule proxy_http_module modules/mod_proxy_http.so LoadModule proxy_balancer_module modules/mod_proxy_balancer.so
You'll need to define a balancer cluster directive that lists the members that will share the load with each other. In this example, the cluster is named blogcluster, and consists of four processes, all running on the local host but listening on different ports (4000 through 4003). To specify a member, specify its URL and port number:
<Proxy balancer://blogcluster>
 # cluster members
 BalancerMember http://127.0.0.1:4000
 BalancerMember http://127.0.0.1:4001
 BalancerMember http://127.0.0.1:4002
 BalancerMember http://127.0.0.1:4003
</Proxy>
Note that the members of the cluster may be on different servers, as long as the IP/PORT address is available from the server hosting Apache.
Next, create a VirtualHost directive that contains ProxyPass directives to forward incoming requests to the blogcluster balancer cluster:
ExtendedStatus On
<Location /server-status>
 SetHandler server-status
</Location>
<Location /balancer-manager>
 SetHandler balancer-manager
</Location>
<VirtualHost *:80>
 ServerName blog
 ProxyRequests Off
 ProxyPass /balancer-manager !
 ProxyPass /server-status !
 ProxyPass / balancer://blogcluster/
 ProxyPassReverse / balancer://blogcluster/
</VirtualHost>
The two optional Location directives provide some status information about the server, as well as a management page for the cluster. To access these status pages without the ProxyPass catchall (/) attempting to forward these requests to the cluster, use a ! after the path to indicate that these are exceptions to the proxying rules (these rules also need to be defined before the / catchall).
Now configure the cluster. You can do that with one command; the following command creates a configuration for a four-server cluster, listening on consecutive ports starting with port 4000:
$ mongrel_rails cluster::configure -e production -p 4000 -N 4 \
> -c /var/www/blog -a 127.0.0.1
This command generates the following Mongrel cluster configuration file:
config/mongrel_cluster.yml:
---
cwd: /var/www/blog port: "4000"
environment: production address: 127.0.0.1
pid_file: log/mongrel.pid servers: 4
Start the cluster with:
$ mongrel_rails cluster::start
Then start Apache with:
$ sudo /usr/local/www/apache2.2.2/apachectl start
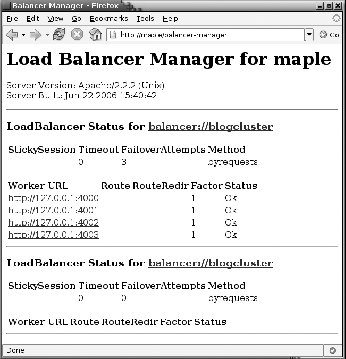
Once you have Apache running, test it from a browser or view the balancer-manager to verify that you have configured your cluster as expected and that the status of each node is "OK."
Discussion
The balancer-manager is a web-based control center for your cluster. You can disable and re-enable cluster nodes or adjusts the load factor to allow more or less traffic to specific nodes. Figure 13-1 shows the status of the cluster configured in the solution.
While the balancer-manager and server-status utilities are informative for site administrators, the same information can be used against you if they are publicly available. It's best to disable or restrict access to these services in a production environment.
To restrict access to balancer-manager and server-status to a list of IP addresses or a network range, modify the location directives for each service to include network access control (using mod_access).
<Location /server-status>
 SetHandler server-status
 Order Deny,Allow
 Deny from all
 # allow requests from localhost and one other IP
 Allow from 127.0.0.1, 192.168.0.50
</Location>
<Location /balancer-manager>
 SetHandler balancer-manager
 Order Deny,Allow
 Deny from all
 # allow requests from an IP range
 Allow from 192.168.0
</Location>
See Also
|