Running Rails in OS X with LocomotiveProblemYou don't have administrative privileges to install Rails and its dependencies, system-wide. You want to install Rails on Mac OS X in a self-contained and isolated environment. SolutionUse Locomotive to run a fully functional Rails environment within Mac OS X. Obtain a copy of the latest version of Locomotive from http://locomotive.raaum.org. The latest version as of this writing is Locomotive 2.0.8. Open and attach the downloaded disk image (we used Locomotive_1.0.0a.dmg for Figure 1-2) by double-clicking on it. In the disk image, you should see a Locomotive directory and another directory containing license information. Copy the Locomotive directory into your Applications folder. It's important to copy the entire Locomotive directory and not just Locomotive.app because the Bundles directory is required to exist next to the Locomotive application under your Applications directory. Once installed, launching Locomotive opens up a project control window with a list of the Rails projects you have configured, their port numbers, and their status (running or not). You can add existing Rails projects or create new ones by selecting "Create New..." or "Add Existing..." from the Rails menu. Creating a new project opens up a dialog box prompting you for the name of your Rails application and its location on your filesystem. If you already have a Rails project on your filesystem, you can add it to your Locomotive projects, specifying its server and environment settings. Locomotive assumes you have a Rails-compatible database installed and that you've created three databases based on the name of your Rails application. For example, if your application is named MyBooks, the default configuration expects databases named MyBooks_development, MyBooks_test, and MyBooks_production. The default configuration connects to these databases with the root user and no password. Click Create to create the structure of your Rails application in the directory you specified. The MyBooks application now appears in the project control window. With that project selected, you can open the project files in your preferred editing environment. View these options by right-clicking to bring up the contextual menu. To edit the properties of a project, such as the port it runs on or the Rails environment it uses, select a project and click Info to open the project Inspector. Finally, start your application by clicking Run. If it starts successfully, you'll see a green ball next to that project, and you should be able to access the project in your browser with http://localhost:3000. DiscussionWith your Locomotive projects initially configured you can start developing your Rails application just as if you had a native Rails installation. Figure 1-2 show the options in this menu. Figure 1-2. The project options menu in Locomotive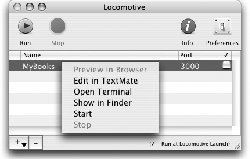
Locomotive ships with Bundles. Bundles are add-ons to the main Locomotive application that include gems and libraries. The Min bundle contains the essential Rails gems, some database adapters, and a few others. For a 45 MB download, the Max bundle adds about two dozen more gems to your arsenal. See Also
|