Niels Horn's Blog
Random thoughts, tips & tricks about Slackware-Linux, Lego and Star WarsSnort / Barnyard2 / BASE - Complete installation on Slackware
September 23rd, 2010 by Niels Horn in ARMedslack, Slackware, snort
Introduction
I have set up Snort a few times on a network to check for possible intrusion attempts. It is a very powerful tool to discover these attempts, based on rules that are frequently updated. Snort is a so-called "Intrusion Detection System" (=IDS), that can also be setup as a "Intrusion Prevention System".
Recently I needed Snort again and decided to finally organize my notes and write down everything in a single document, so that I would spend less time if I ever needed it do this all over again.
Snort is powerful, but to effectively use it, you need some extra tools.
First of all, there is Barnyard2, a tool that reads Snorts binary logs (which are much faster than writing directly to a database)
Second, you will probably want an easy web interface to see the result remotely, for which I use BASE.
Preparations
You will need a working setup of your httpd server - with php - and MySQL.
I won't explain how to do this, there are many tutorials available on the web. And - being quite honest - if you don't know how to setup these programs, you're probably not ready to setup or use an IDS ![]()
Installing and setting up Snort
 This part is actually quite simple:
1) Get or build the Snort package and install it on your system
2) Download recent snort-rules (*) and install them manually or with my script (**)
(*) You will need to register for free or buy a subscription to get the rules file.
(**) I use a small script that is certainly not perfect, but you can download it and improve it as you wish.
3) Start Snort
You can use the following command to start Snort:
# /etc/rc.d/rc.snort start
You can check if Snort is running with this command:
# ps -ef | grep snort
Which should return something like:
7874 ? 00:18:46 snort
Installing and setting up Barnyard2
 The default setup of Snort creates binary logs in the "unified2″ format. This is the fastest way Snort can work, handling even heavy traffic.
Snort could also write directly to a database, but this takes some processor time and delays could cause packages to be missed.
The solution is to use a separate program to read the binary logs and save the information to a database for research, statistics, browsing, etc.
Enter Barnyard2 to the rescue!
Barnyard2 is based on the original Snort Barnyard program, but modified to read the newer "unified2″ log format.
1) Get or build the barnyard2 package and install it on the same system you installed Snort on
Now let's do a basic test to check if Snort is identifying intrusions and if Barnyard2 is parsing the log.
Start Barnyard2 from the command line like this:
# barnyard2 -d /var/log/snort -f snort.log
The parameters we passed are:
- -d /var/log/snort - the standard directory where Snort stores its log files
- -f snort.log - the "base" name of the Snort log file (it is appended with a time-stamp)
Barnyard2 will read its configuration file and start processing the Snort log. If there are already events in the log, they will be displayed.
Let's check if Snort is working by doing a port-scan from another computer on the same network (doing this from the computer Snort is installed on won't have any effect, as it wont pass through the network adapter and Snort will never notice it).
You can do this with the following command:
# nmap -A <ip_address_of_snort_server>
Snort should detect the port scan, write the event in its log, and Barnyard2 should display it.
If all works fine, you can continue with the next step.
2) Create the database to store the events
You will need to set up the structure of the database:
(replace the <…> with your real passwords)
# cd /usr/doc/barnyard2-*/schemas


# mysql -p


Enter password: <your_mysql_root_password>
Now inside MySQL:
mysql> create database snort;


mysql> grant create,select,update,insert,delete on snort.* to snort@localhost;


mysql> set password for snort@localhost=PASSWORD('<your_mysql_snort_password>');


mysql> exit
Back at the prompt:
# mysql -p < create_mysql snort


Enter password: <your_mysql_root_password>
This will create the snort database and tables.
3) Configure Barnyard2
Open the /etc/barnyard2.conf file with your favorite editor (that's VIm, of course…), go to the end of the file and edit one of the sample lines so that it looks like this:
output database: log, mysql, user=snort password=<your_mysql_snort_password> dbname=snort host=localhost
4) Start the Barnyard2 daemon
The package created with the SlackBuild script includes a file to start the daemon. use it like this:
# /etc/rc.d/rc.barnyard2 start
The script only parses the new events from the log, to avoid duplicate entries in the database.
You can now check your MySQL database to see if the entries are saved there. I personally use phpmysql to check the database, but other tools exist.
If needed, run the port-scan again.
If all is fine, we can now start installing BASE, the web front-end for Snort.
Installing and setting up BASE
 BASE stands for Basic Analysis and Security Engine. It is a web-based tool to display and filter all events captured by Snort.
1) Install dependencies
BASE needs some other files to work properly. The first one is adodb, the PHP database abstraction library. A SlackBuild for this can be found on SlackBuilds.org or a pre-built package can be downloaded from my site.
You will also need a few modules from the PHP "pear" library. Use these commands to download & install them:
# pear install Image_Color-1.0.4


# pear install Image_Canvas-0.3.2


# pear install Image_Graph-0.7.2
2) Get or build BASE and install the package
3) Configure BASE
After installing the dependencies and the package, point your web browser to http://<your_snort_server>/base and the first configuration screen should show up:

For safety, the directory where the configuration file will be stored does not give write access to the web server, so after finishing the next steps, you will need to create this file by copying the parameters and pasting them into a text file on the console.
Click on "continue" and select your language in the next screen:
If you installed adodb from the standard SlackBuild or package, use /var/www/htdocs/adodb for its location, and click on continue.
The next screen will ask the parameters to connect to your database:
Since we set up the database on the same server as Snort and Barnyard2, use "localhost" as the database host.
After clicking on continue, screen number 3 will appear:
Select the check-box and choose whatever name you prefer for the administrator (I used "admin" in this example) and create a password and a full name (like "Administrator" in my example).
Click on continue again to go to the next step:
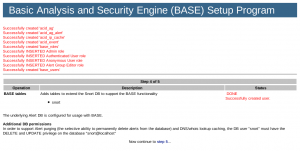
Here BASE will try to include some extra needed tables for the "Alert Groups" in the database we created before. Click on "Create BASE AG" and you should see this screen:
The messages show that everything went fine. The text that the "snort" user needs DELETE and UPDATE privileges in the database is nothing to worry about, as we took care of that when we installed Barnyard2 a few steps back.
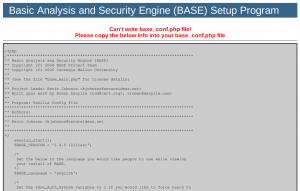
Click on "step 5″ to continue to the next screen:
Copy the text of the configuration and paste it using your favorite text editor to create the file /var/www/htdocs/base/base_conf.php
After saving it, click on "click here to access your install" to enter your newly set-up BASE! The following screen should show up, asking for login and password:
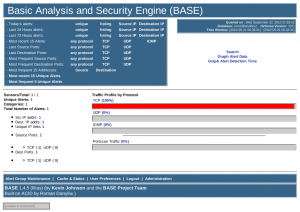
Since we only have the administrator account for now, let's use the login we created and the password we set. After clicking on "login", we're in the "home" screen of BASE:
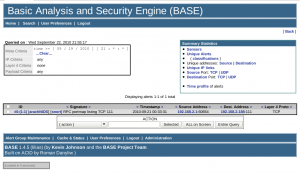
We already have one captured event, so let's see what it is by clicking on "listing" for today's events:
So that event was our port-scan we tried earlier ![]()
Where to go from here
This concludes our basic Snort / Barnyard2 / BASE set-up and we now have a working IDS - Intrusion Detection System.
There are many more things to configure, but there are some great books out there teaching what you can do with Snort and how to configure it. I can personally recommend "The Snort Cookbook" and "Managing Security with Snort & IDS Tools", both by O'Reilly but there are several other options.
And don't forget: Google is your friend!
Links
For Snort, Barnyard2, adodb and BASE, I submitted SlackBuild scripts to SlackBuilds.org.
If you prefer pre-built packages for Slackware, Slackware64 or ARMedslack, you can find them on my site.
To read more about these programs, visit their sites:


