Using the Kernel Dump Configuration Utility
To start the Kernel Dump Configuration utility, select Applications → → Kdump from the panel, or type system-config-kdump at a shell prompt (for example, xterm or GNOME Terminal). Unless you are already authenticated, you will be prompted to enter the superuser password.

Kernel Dump Configuration
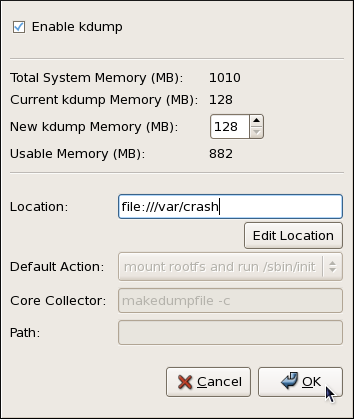
Figure 44.2. The Kernel Dump Configuration utility
The utility allows you to configure kdump as well as to enable or disable starting the service at boot time. When you are done, click OK to save the changes. The system reboot will be requested.
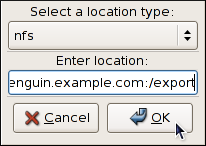
Unless the system has enough memory, the utility will not start, and you will be presented with an error message. For the information on minimum memory requirements, refer to the Required minimums section of the Community Enterprise Linux comparison chart. Note that when the To start the To configure the amount of memory that is reserved for the When a kernel crash is captured, the core dump can be either stored as a file in a local file system, written directly to a device, or sent over a network using the NFS (Network File System) or SSH (Secure Shell) protocol. To change this, click the Edit Location button, and select a location type as described below.
Edit Location To save the dump to the local file system, select file from the pulldown list. Optionally, if you wish to write the file to a different partition, select ext3 or ext2 from the pulldown list according to the file system you are using, and enter a valid device name to the Enter location field. Note that after clicking OK, you can then customize the destination directory by changing the value in the Path field at the bottom.
To write the dump directly to a device, select raw from the pulldown list, and enter a valid device name (for example, To store the dump to a remote machine using the NFS protocol, select nfs from the pulldown list, and enter a valid target in the To store the dump to a remote machine using the SSH protocol, select ssh from the pulldown list, and enter a valid username and hostname in the Refer to OpenSSH for information on how to configure an SSH server, and how to set up a key-based authentication. To reduce the size of the To enable the dump file compression, make sure the To remove certain pages from the dump, add the Refer to the manual page for To choose what action to perform when kdump crash recovery is enabled, the minimum memory requirements increase by the amount of memory reserved for it. This value is determined by a user, and defaults to 128 MB.
Enabling the Service
kdump daemon at boot time, select the Enable kdump check box. This will enable the service for runlevels 2, 3, 4, and 5, and start it for the current session. Similarly, unselecting the check box will disable it for all runlevels and stop the service immediately.Configuring the Memory Usage
kdump kernel, click the up and down arrow buttons next to the New kdump Memory field to increase or decrease the value. Notice that the Usable Memory field changes accordingly showing you the remaining memory that will be available to the system.Configuring the Target Type

Figure 44.3. The Edit Location dialog
/dev/sdb1). When you are done, click OK to confirm your choice.
hostname:directory form (for example, penguin.example.com:/export). Clicking the OK button will confirm your changes. Finally, edit the value of the Path field to customize the destination directory (for instance, cores).
username@hostname form (for example, john@penguin.example.com). Clicking the OK button will confirm your changes. Finally, edit the value of the Path field to customize the destination directory (for instance, /export/cores).
Configuring the Core Collector
vmcore dump file, kdump allows you to specify an external application (that is, a core collector) to compress the data, and optionally leave out all irrelevant information. Currently, the only fully supported core collector is makedumpfile.
-c parameter is listed after the makedumpfile command in the Core Collector field (for example, makedumpfile -c).
-d parameter after the valuemakedumpfile command in the Core Collector field. The value is a sum of values of pages you want to omit as described in Table 44.1, "Supported filtering levels". For example, to remove both zero and free pages, use makedumpfile -d 17.
makedumpfile for a complete list of available options.Changing the Default Action
kdump fails to create a core dump, select the appropriate option from the Default Action pulldown list. Available options are mount rootfs and run /sbin/init (the default action), reboot (to reboot the system), shell (to present a user with an interactive shell prompt), and halt (to halt the system).