JumpStart II: Setting Up a Domain Using system-config-bind (FEDORA)
JumpStart II: Setting Up a Domain Using system-config-bind (FEDORA)To display the BIND Configuration GUI window, enter system-config-bind on a command line (Figure 24-6). From KDE select Main menu: Administration Figure 24-6. The BIND Configuration GUI window[View full size image]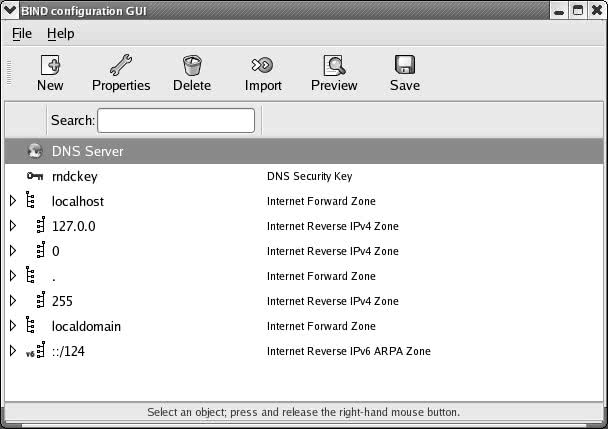 If /etc/named.conf does not exist, system-config-bind displays a dialog box that informs you that it is installing a default configuration. Click OK. NotesThe /etc/named.caching-nameserver.conf file, which is installed with the FEDORA bind-config package, is not recognized by system-config-bind as a named configuration file. See "named.conf" on page 733 for more information about this file. Tip: Using this JumpStart The system-config-bind utility is a complex tool that you may find helpful for setting up BIND. Run this utility and click Help This section explains how to use system-config-bind but does not go into detail about what each of the files and settings does; that information is covered elsewhere in this chapter.
Each zone file that system-config-bind creates has a filename extension of .db. Because the windows displayed by system-config-bind contain a lot of information, you may find it helpful to expand or maximize these windows so that you can view the information more easily. The system-config-bind utility creates files in the /var/named/chroot directory hierarchy so that you can run named in a chroot jail. See page 750 for more information. Using the BIND Configuration GUI WindowRight-click on an object (line) in the BIND Configuration GUI window to display a pop-up context menu. This menu always has an Edit selection, which displays a window in which you can edit information pertaining to the object you clicked on. You can display the same window by double-clicking on the object or by highlighting the object and clicking Properties on the Icon menu. This pop-up menu also always has an Add selection that displays a submenu with choices appropriate to the object you are working with. Figure 24-7 (next page) shows the pop-up menu for the DNS Server object along with the Add submenu. Figure 24-7. The BIND Configuration GUI window with a right-click menu[View full size image]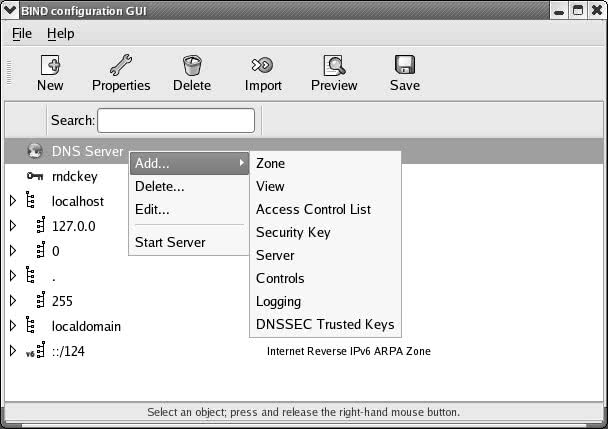 In the BIND Configuration GUI window, a triangle at the left end of a line indicates that the object holds other objects. Click a triangle so that it points down to expand an entry. Click it so that it points to the right to collapse an entry. Setting Up a Domain ServerHighlight DNS Server in the BIND Configuration GUI window and click New Figure 24-8. The first New Zone window
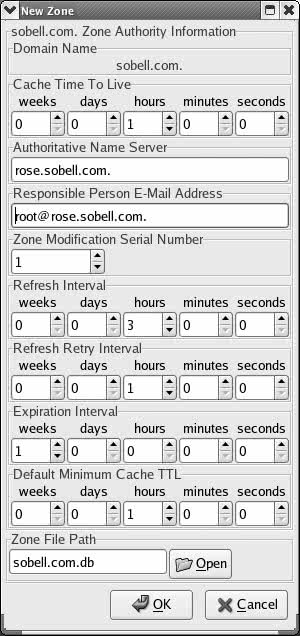
With the Class combo box displaying IN Internet, click OK under this box. Next select the origin type from the combo box under Origin Type. The most common choices are Forward or IPV4 Reverse. Click OK under this box. Assuming you selected a forward zone, the Forward Zone Origin text box replaces the origin type information. Enter the domain name of the zone, including a trailing period, in the text box. Finally select the type of zone you want to set up by clicking the combo box in the Zone Type frame. You can select from master, slave, forward, hint, and other types of zones. Refer to "Servers" page 724 and type on page 741 for information on types of zones. After you make your selections and click OK, system-config-bind displays the second New Zone window (Figure 24-9). This window enables you to set up SOA information for the zone. Refer to "SOA" on page 727 for information about the fields in the SOA record, including the serial number and the various times (refresh intervals). In this window, the authoritative (primary) nameserver (page 724) defaults to the local system and the email address of the person responsible for the zone defaults to root on the local system. If you enter names that do not end with a period in these text boxes, system-config-bind appends the domain name of the zone to the name you have entered. Change the values in this window as necessary. All zone files that system-config-bind creates have a filename extension of .db by default. The default filename for the zone file is the name of the domain you are setting up with an extension of .db. Click OK to close the window when you are done making changes. Figure 24-9. The second New Zone window
After you add a new zone, the information about this zone appears in the BIND Configuration GUI window (Figure 24-6, page 735). Click Save on the toolbar to save the changes you made before you close the window. To view information about the new zone, you can by expand the object that holds the name of the new zone. You can further expand the Zone Authority Information and Name Server objects that appear when you expand the new zone object. Right-click any object to add to or modify the information in the object or to delete the object. Adding Resource RecordsYou can add any of an extensive list of resource records to a domain. Right-click on the object representing the domain you just added to display a pop-up menu. Slide the mouse pointer over Add to display the domain Add menu (Figure 24-10). The uppercase letters at the left end of each selection specify the type of resource record (page 725) that the selection adds to the domain. Following are some of the choices available on this menu:
Figure 24-10. The domain Add drop-down menu[View full size image]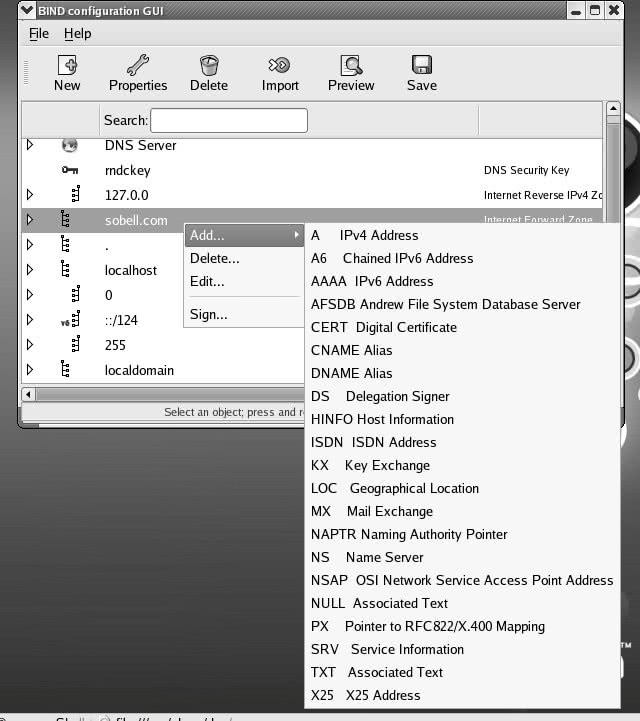 To add a reverse zone (a PTR record [page 727]), add a new zone as before, but this time select IPv4 (or IPv6) Reverse as the origin type. For more information refer to "Reverse Name Resolution" on page 729. Click Save when you are done, close the BIND Configuration GUI window, and start the named daemon as explained on page 731. |
 Server Settings
JumpStart I: Setting Up a DNS Cache
|