Installation Tasks
Installation TasksThis section details some common tasks you may need to perform during or after installation. It covers using Disk Druid to partition the disk during installation, using parted to modify partitions after installation, using Kickstart to automate installation, and setting up a system that will boot either Windows or Linux (a dual-boot system). Using Disk Druid to Partition the DiskDisk Druid, a graphical disk-partitioning program that can add, delete, and modify partitions on a hard disk, is part of the Red Hat installation system. You can use Disk Druid only while you are installing a system: It cannot be run on its own. You can use parted (page 65) to manipulate partitions and system-config-lvm to work with LVs after you install CentOS Linux. As explained earlier, if you want a basic set of partitions, you can allow Anaconda to partition the hard disk automatically. Anaconda runs Disk Druid when you put a check mark in the box labeled Review and modify partitioning layout or if you select Create custom layout in the Partition the Disk screen (page 50). Clone and RAID
Disk Druid includes Clone, a tool that copies the partitioning scheme from a single drive to other drives. Clone is useful for making multiple copies of a RAID partition/drive when you are creating a large RAID array of identical partitions or identically partitioned drives. Click the RAID button to access the Clone tool, which is active only when at least one unallocated RAID partition exists. For more information on RAID, see page 31. Figure 3-12 shows the Disk Druid main screen as it appears when you have chosen the default layout for the hard disk (see "Partition the Disk" on page 50). This screen has three sections (going from top to bottom): a graphical representation of the disk drives showing how each is partitioned (not shown Figure 3-12), a row of buttons, and a graphical table listing one partition or LV per line. Figure 3-12. Disk Druid: main screen, default layout[View full size image]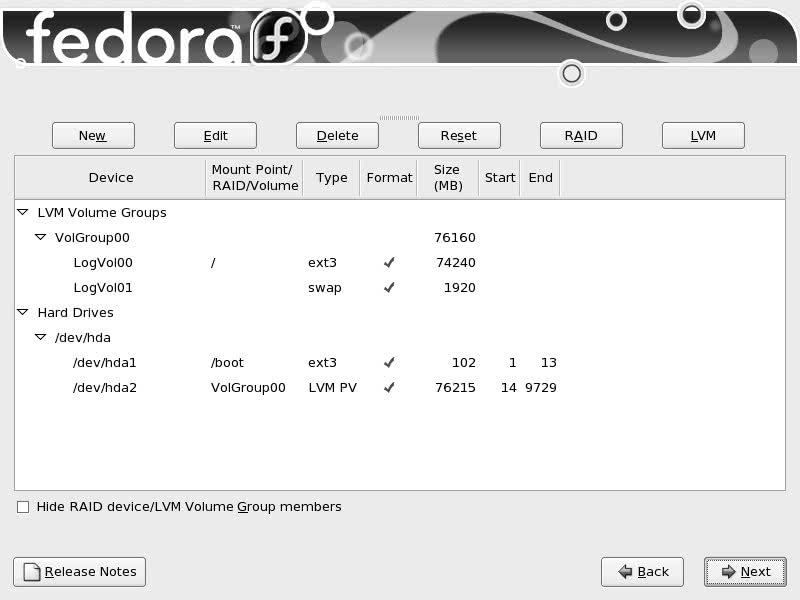 The following buttons appear near the top of the screen:
The Disk Druid table contains the following columns:
At the bottom of the screen is a box that allows you to hide RAID device and LVM volume group members. Do not put a check mark in this box if you want to see all information about the disk drives. Add a new partition
To add a new partition to a hard disk, the hard disk must have enough free space to accommodate the partition. Click the New button to add a partition; Disk Druid displays the Add Partition window (Figure 3-13). Specify the mount point (the name of the directory that the partition will be mounted over [page 466]) and the filesystem type; use the arrow buttons at the right end of these text boxes to display drop-down menus of choices. If there is more than one drive, put a check mark in the box next to the drive you want the partition to be created on in the Allowable Drives frame. Specify the size of the partition and, in the Additional Size Options frame, mark Fixed size to create the partition close to the size you specify. Because of block-size constraints, partitions are not usually exactly the size you specify. Mark Fill all space up to (MB) and fill in the maximum size you want the partition to be to create a partition that takes up the existing free space, up to the maximum size you specify. In other words, Disk Druid does not complain if it cannot create the partition as large as you would like. Mark the third choice, Fill to maximum allowable size, to cause the partition to occupy all the remaining free space on the disk, regardless of size. (If you create another partition after creating a Fill to maximum allowable size partition, the new partition will pull blocks from the existing maximum size partition.) Put a check mark in the box labeled Force to be a primary partition to create a primary partition. Click OK, and Disk Druid adds the partition to its table (but does not write to the hard disk). Figure 3-13. Disk Druid: Add Partition window, ext3 filesystem[View full size image]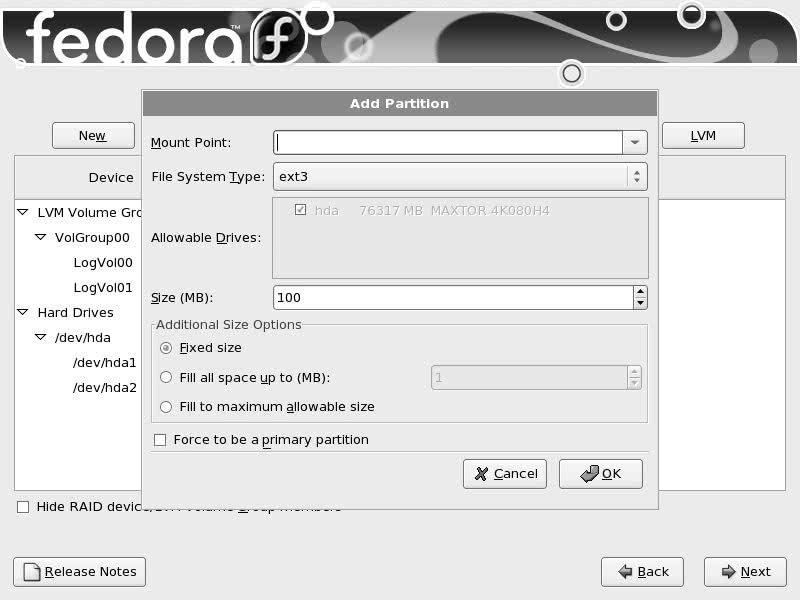 Edit an existing partition
To modify an existing partition, highlight the partition in the Disk Druid table or the graphical representation of the hard disk and click the Edit button; Disk Druid displays the Edit Partition window. From this window, you can change the mount point of a partition or format the partition as another type (ext3, vfat, swap, and so on). You cannot change the size of a partition from this window. To do so you must delete the partition and create a new partition of the desired size. LVs: Logical VolumesWhen you ask Anaconda to partition the hard disk with a default layout (see "Partition the Disk" on page 50), it uses LVM (page 32) to set up most of the hard disk, creating LVs instead of partitions. It places /boot on the first partition on the drive, not under the control of LVM. LVM creates a VG (volume group) named VolGroup00. Within this VG it creates two LVs: swap (LogVol01) and root (/, LogVol00). The swap LV occupies up to a few gigabytes; the root LV takes up the rest of the drive. This section explains how to make the root LV smaller so that you can add additional LVs to VolGroup00. If you click the LVM button with the default setup (with the root LV occupying all of the disk that is not occupied by the swap LV and the /boot partition), Disk Druid displays a dialog box that advises you that there are not enough physical volumes and suggests that you create a new partition. Because the existing partitions occupy the whole disk, you cannot create a new partition. To make the root LV smaller and make room for additional partitions, first highlight the root partition (LogVol00) and then click Edit. Disk Druid displays the Edit LVM Volume Group window (Figure 3-14). The figure shows that VolGroup00 has no free space (see the line in the middle of the window). It shows two LVs: swap, which does not have a mount point, and root, with a mount point of /. Figure 3-14. Disk Druid: Edit LVM Volume Group window[View full size image]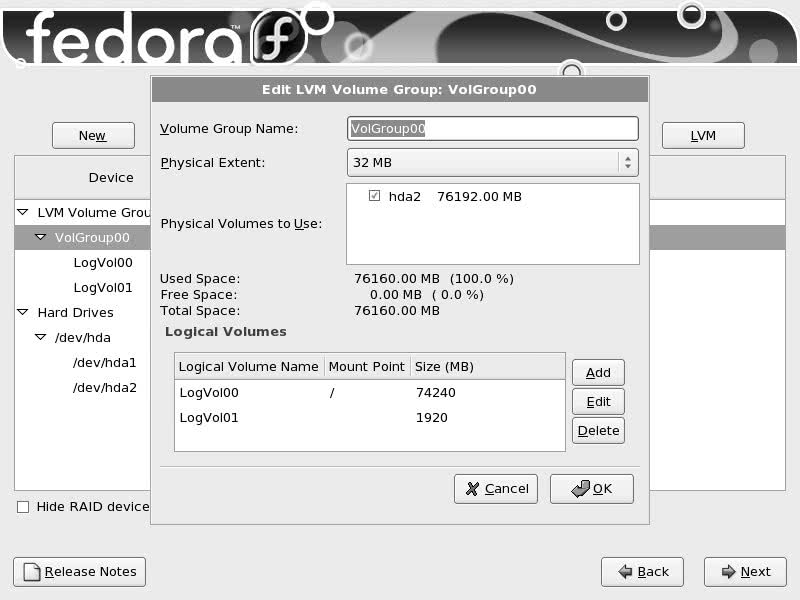 Highlight root (LogVol00) in the Logical Volumes frame and click Edit. Disk Druid displays the Edit Logical Volume window (Figure 3-15), which allows you to change the size of the root partition. Replace the numbers in the Size (MB) text box with the number of megabytes you want to assign to the root partition. Figure 3-15 shows the size of the root partition being changed to 10 gigabytes (10,000 megabytes). Click OK. Figure 3-15. Disk Druid: Edit Logical Volume window[View full size image]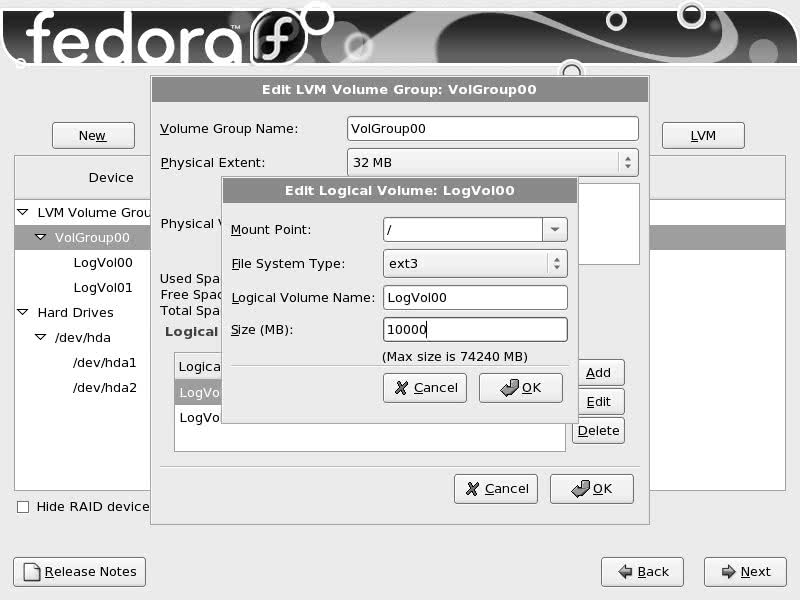 Once you decrease the size of the root partition, the Edit LVM Volume Group window shows that the VG has free space. You can now add another LV to the VG. Click Add in the Edit LVM Volume Group window to display the Make Logical Volume window (Figure 3-16). Select a mount point, filesystem type, and size for the LV. You can change the LV name if you like, although Disk Druid assigns logical, sequential names that are easy to use. Figure 3-16 shows a /home LV being created with a size of 25 gigabytes. Click OK when the LV is set up the way you want. Figure 3-16. Disk Druid: Make Logical Volume window[View full size image]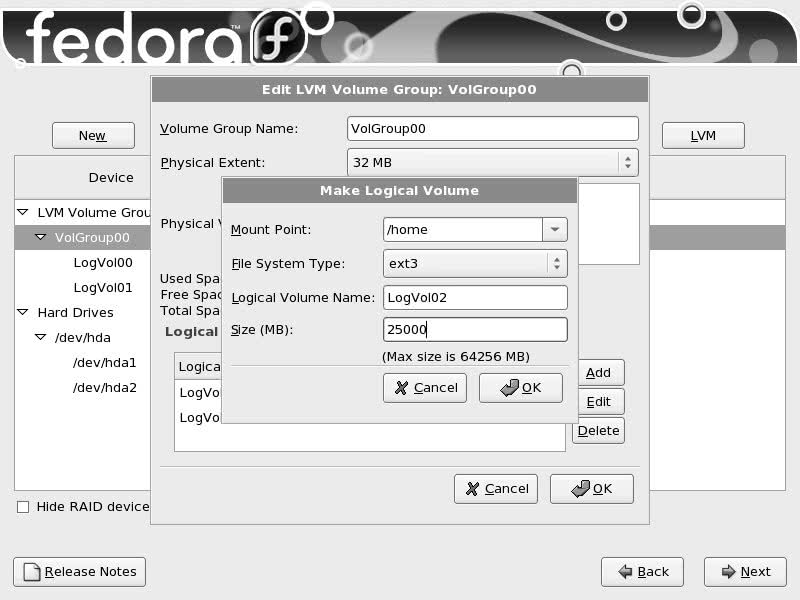 Figure 3-17 (next page) shows the modified Disk Druid main screen with the new /home LV. Figure 3-17. Disk Druid: main screen with the new /home LV[View full size image]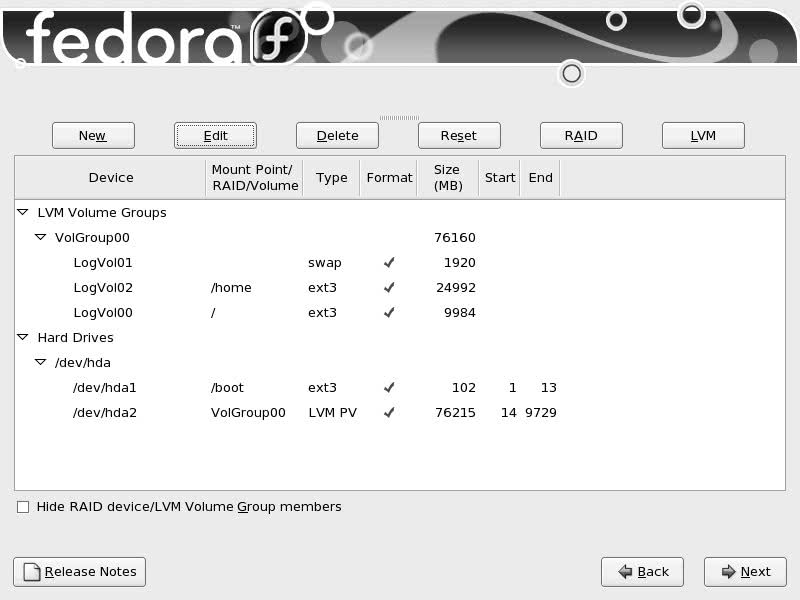 Using the Kickstart ConfiguratorKickstart is Red Hat's program that completely or partially automates the same installation and postinstallation configuration on one or more machines. To use Kickstart, you create a single file that answers all the questions that are normally asked during an installation. Anaconda then refers to this file instead of asking you questions. Using Kickstart, you can automate language selection, network configuration, keyboard selection, boot loader installation, disk partitioning, X Window System configuration, and more. The system-config-kickstart utility (part of the system-config-kickstart package that you can install using yum [page 478]) displays the Kickstart Configurator window (Figure 3-18), which creates a Kickstart installation script. On RHEL systems you may need to download the package that contains Kickstart using Red Hat Network (page 498). Figure 3-18. Kickstart Configurator[View full size image]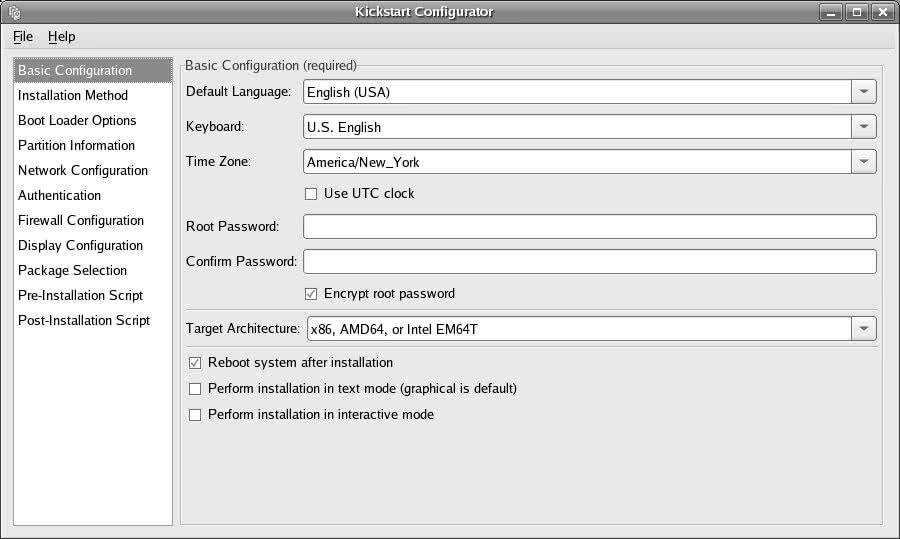 Figure 3-18 shows the first window the Kickstart Configurator displays. To generate a Kickstart file (ks.cfg by default), go through each section of this window (the items along the left side) and fill in the answers and put check marks in the appropriate boxes. Click Help on the menubar for instructions on completing these tasks. When you are finished, click File parted: Reports on and Partitions a Hard DiskThe parted (partition editor) utility reports on and manipulates hard disk partitions. The following example shows how to use parted from the command line. It uses the print command to display information about the partitions on the /dev/hda drive: # /sbin/parted /dev/hda print Disk geometry for /dev/hda: 0kB - 165GB Disk label type: msdos Number Start End Size Type File system Flags 1 32kB 1045MB 1045MB primary ext3 boot 2 1045MB 12GB 10GB primary ext3 3 12GB 22GB 10GB primary ext3 4 22GB 165GB 143GB extended 5 22GB 23GB 1045MB logical linux-swap 6 23GB 41GB 18GB logical ext3 7 41GB 82GB 41GB logical ext3 Information: Don't forget to update /etc/fstab, if necessary. Figure 3-19 graphically depicts the partitions shown in the example. The first line that parted displays specifies the device being reported on (/dev/hda) and its size (165 gigabytes). The print command displays the following columns:
Figure 3-19. The primary and extended partitions from the example
In the preceding example, partition 4 defines an extended partition that includes 143 gigabytes of the 165 gigabyte disk (Figure 3-19). You cannot make changes to an extended partition without affecting all logical partitions within it. In addition to reporting on the layout and size of a disk drive, you can use parted interactively to modify the disk layout. Be extremely careful when using parted in this manner, and always back up the system before starting to work with this utility. Changing the partition information (the partition table) on a disk can destroy the information on the disk. Read the parted info page before modifying a partition table. Caution: parted can destroy everything Be as careful with parted as you would be with a utility that formats a hard disk. Changes you make with parted can easily result in the loss of large amounts of data. If you are using parted and have any question about what you are doing, quit with a q command before making any changes. Once you give parted a command, it immediately makes the change you requested.
To partition a disk, give the command parted followed by the name of the device you want to work with. Following, after starting parted, the user gives a help (or just h) command, which displays a list of parted commands: # /sbin/parted /dev/hdb GNU Parted 1.6.25 ... Using /dev/hda (parted) help check NUMBER do a simple check on the file system cp [FROM-DEVICE] FROM-NUMBER TO-NUMBER copy file system to another partition help [COMMAND] prints general help, or help on COMMAND mklabel LABEL-TYPE create a new disklabel (partition table) mkfs NUMBER FS-TYPE make a FS-TYPE file system on partititon NUMBER mkpart PART-TYPE [FS-TYPE] START END make a partition mkpartfs PART-TYPE FS-TYPE START END make a partition with a file system move NUMBER START END move partition NUMBER name NUMBER NAME name partition NUMBER as NAME print [NUMBER] display the partition table, or a partition quit exit program rescue START END rescue a lost partition near START and END resize NUMBER START END resize partition NUMBER and its file system rm NUMBER delete partition NUMBER select DEVICE choose the device to edit set NUMBER FLAG STATE change a flag on partition NUMBER unit UNIT set the default unit to UNIT (parted) In response to the (parted) prompt you can give the command help followed by the name of the command you want more information about. See the following example. When you give a print (or just p) command, parted displays current partition information just as a print command on the command line does. The parted utility will not allow you to set up overlapping partitions (except for logical partitions overlapping their containing extended partition) and it will not allow you to create a partition that starts at the very beginning of the disk (cylinder 0). Both of these situations can cause loss of data. Following are guidelines to remember when defining a partition table for a disk. For more information refer to "Partitioning a Disk" on page 29.
The following sequence of commands defines a 300-megabyte, bootable, Linux partition as partition 1 on a clean disk: # /sbin/parted /dev/hdb
...
Using /dev/hdb
(parted) mkpart (create new partition)
Partition type? primary/extended? primary (select primary partition)
File system type? [ext2]? (default to an ext2 filesystem)
Start? 1 (start at the beginning of the disk)
End? 300m (specify a 300-megabyte partition)
(parted) help set (use help to check the syntax of the set command)
set NUMBER FLAG STATE change a flag on partition NUMBER
NUMBER is the partition number used by Linux. On msdos disk labels, the primary
partitions number from 1 to 4, logical partitions from 5 onwards.
FLAG is one of: boot, root, swap, hidden, raid, lvm, lba, hp-service, palo,
prep, msftres
STATE is one of: on, off
(parted) set 1 boot on (turn on the boot flag on partition 1)
(parted) print (verify that the partition is correct)
Disk geometry for /dev/hdb: 0kB - 250GB
Disk label type: msdos
Number Start End Size Type File system Flags
1 1kB 300MB 300MB primary ext2 boot
(parted) quit
Information: Don't forget to update /etc/fstab, if necessary.
When you specify a size within parted, you can use a suffix of k (kilobytes), m (megabytes), or g (gigabytes). After creating a partition give a print command to see where the partition ends. Perform this task before defining the next contiguous partition so that you do not waste space or have any overlap. After setting up all the partitions, exit from parted with a quit command. Next, make a filesystem (mkfs, page 419) on each partition that is to hold a filesystem (not swap). Make all partitions, except swap and /boot, type ext3, unless you have a reason to do otherwise. Make the /boot partition type ext2. Use mkswap (page 458) to set up a swap area on a partition. You can use e2label (page 418) to label a partition. Setting Up a Dual-Boot SystemA dual-boot system is one that can boot one of two operating systems. In this section, dual-boot refers to a system that can boot Windows or Linux. The biggest problem in setting up a dual-boot system, assuming you want to add Linux to a Windows system, is finding enough disk space for Linux. The Linux+WindowsNT mini-HOWTO covers installing Linux first and Windows NT second (or the other way around). The next section discusses several ways to create the needed space. Creating Free Space on a Windows SystemTypically you install CentOS Linux in free space on a hard disk. To add CentOS Linux to a Windows system, you must provide enough free space (refer to "Hard disk space" on page 26) on a hard disk that already contains Windows. There are several ways to provide or create this free space. The following ways are ordered from easiest to most difficult: Use existing free space
If there is sufficient free space on the Windows disk, you can install Linux there. This technique is the optimal choice, but there is rarely enough free space on an installed hard disk. Resize Windows partitions
You can use Windows software, such as Partition Magic, to resize existing Windows partitions to open up free space in which to install Linux. Add a new disk drive
Add another disk drive to the system and install Linux on the new disk, which contains only free space. This technique is very easy and clean but requires a new disk drive. Remove a Windows partition
If you can delete a big enough Windows partition, you can install Linux in its place. To delete a Windows partition, you must have multiple partitions under Windows and be willing to lose any data in the partition you delete. In many cases, you can move the data from the partition you will delete to another Windows partition. Once you are sure a partition contains no useful information, you can use Disk Druid to delete it when you install Linux: From the Partition the Disk screen (page 50), choose to create a custom layout with Disk Druid, highlight the partition you want to delete, and click the Delete button. After deleting the partition, you can install CentOS Linux in the free space left by the partition you removed. Installing CentOS Linux as the Second Operating SystemAfter creating enough free space on a Windows system (as discussed in the previous section), you can begin installing CentOS Linux. When you get to the Partition the Disk screen (page 50), choose Use free space on selected drives and create default layout to have Anaconda partition the free space on the hard disk automatically. If you need to delete a Windows partition, you must choose Create custom layout, which calls Disk Druid (page 58) so that you can delete the appropriate Windows partition and create Linux partitions in the free space. When you boot, you will be able to choose which operating system you want to run. |
 Save. The Kickstart Configurator gives you a chance to review the generated script before it saves the file.
Installing CentOS Linux
|