Workshop: Using Image Icons and Toolbars
One of the easiest ways to improve the visual appeal of a graphical user interface is to use icons, or small images used to identify buttons, menu items, and other parts of an interface. With many of the components in the Swing class library, you can label a component with an image instead of text by using the ImageIcon class in the javax.swing package. You can create an ImageIcon from a file on your computer by calling the ImageIcon(String) constructor method. The argument to the method is either the name of the file or its location and name, as in these examples:
ImageIcon stopSign = new ImageIcon("stopsign.gif");
ImageIcon saveFile = new ImageIcon("images/savefile.gif");
Watch Out!Make note of the / separator used in path names when creating an ImageIcon object. Although some operating systems use the \character to separate folders and file names, the ImageIcon constructor requires the / character. |
The graphics file used to create the image icon must be in GIF or JPEG format. Most will be in GIF format, because it is well-suited to displaying small graphics with a limited number of colors. The constructor method of ImageIcon will load the entire image from the file immediately—unlike other graphics-related classes you will work with during Hour 23, "Working with Graphics." You can use image icons as labels and buttons by using the JLabel(ImageIcon) and JButton(ImageIcon) constructor methods, as in the following example:
ImageIcon siteLogo = new ImageIcon("siteLogo.gif");
JLabel logoLabel = new JLabel(siteLogo);
ImageIcon searchWeb = new ImageIcon("searchGraphic.gif");
JButton search = new JTextField(searchWeb);
Several components can have an icon and a text label. The following statement creates a button with both:
JButton refresh = new JButton("Refresh",
 "images/refreshIcon.gif");
Image icons often are used in toolbars, containers that group several components together into a row or column. They also can be added to menus. Call the JMenuItem(Icon) to add an icon to a menu or JMenuItem(String, Icon) to add an icon and text. Toolbars, which are created by using the JToolBar class in Swing, can be designed so that a user can move them from one part of a graphical user interface to another. This process is called docking, and these components are also called dockable toolbars. You can create a toolbar with one of the following constructor methods:
- JToolBar()— Create a toolbar that will line up components in a horizontal direction
- JToolBar(int)— Create a toolbar that will line up components in the specified direction, which is either SwingConstants.HORIZONTAL or SwingConstants. VERTICAL
Components are added to a toolbar in the same way they are added to other containers—the add(Component) method is called with the component to be added. For a toolbar to be dockable, it must be placed in a container that uses BorderLayout as its layout manager. This layout arranges a container into north, south, east, west, and center areas. When you are using a dockable toolbar, however, the container should only use two of these: the center and only one directional area. The toolbar should be added to the directional area. The following statements create a vertical, dockable toolbar with three icon buttons:
BorderLayout border = new BorderLayout();
pane.setLayout(border);
JToolBar bar = new JToolBar(SwingConstants.VERTICAL);
ImageIcon play = new ImageIcon("play.gif");
JButton playButton = new JButton(play);
ImageIcon stop = new ImageIcon("stop.gif");
JButton stopButton = new JButton(stop);
ImageIcon pause = new ImageIcon("pause.gif");
JButton pauseButton = new JButton(pause);
bar.add(playButton);
bar.add(stopButton);
bar.add(pauseButton);
add(bar, BorderLayout.WEST);
The next project you will undertake during this hour is Tool, a Java app that includes image icons and a dockable toolbar around. Open your text editor and enter Listing 16.3, saving the file as Tool.java.
Listing 16.3. The Full Text of Tool.java
 1: import java.awt.*;
 2: import java.awt.event.*;
 3: import javax.swing.*;
 4:
 5: public class Tool extends JFrame {
 6: public Tool() {
 7: super("Tool");
 8: setSize(370, 200);
 9: setDefaultCloseOperation(JFrame.EXIT_ON_CLOSE);
10:
11: // build toolbar buttons
12: ImageIcon image1 = new ImageIcon("newfile.gif");
13: JButton button1 = new JButton(image1);
14: ImageIcon image2 = new ImageIcon("openfile.gif");
15: JButton button2 = new JButton(image2);
16: ImageIcon image3 = new ImageIcon("savefile.gif");
17: JButton button3 = new JButton(image3);
18:
19: // build toolbar
20: JToolBar bar = new JToolBar();
21: bar.add(button1);
22: bar.add(button2);
23: bar.add(button3);
24:
25: // build text area
26: JTextArea edit = new JTextArea(8, 40);
27: JScrollPane scroll = new JScrollPane(edit);
28:
29: // create frame
30: BorderLayout border = new BorderLayout();
31: setLayout(border);
32: add("North", bar);
33: add("Center", scroll);
34: setVisible(true);
35: }
36:
37: public static void main(String[] arguments) {
38: Tool frame = new Tool();
39: }
40: }
The Tool app requires three graphics files that will be used to create the icons on the toolbar: newfile.gif, openfile.gif, and savefile.gif. You can find these files on the tutorial's website at http://www.java24hours.com (open the Hour 16 page). Screenshot and Screenshot show two different screenshots of this app as it runs. The toolbar has been moved from its original location (Screenshot) to another edge of the interface (Screenshot).
Screenshot Using an app with a toolbar.

Screenshot Docking a toolbar at a new location.
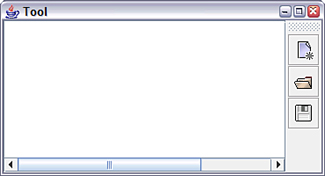
Compile the app and try it out by moving the toolbar around. You can move a toolbar by clicking its handle and dragging the toolbar to a different edge of the text area. When you release the toolbar, it will be placed along that edge and the text area will move over to make room for it.
By the WayYou also can drag a dockable toolbar off an interface entirely. This causes a new window to be opened that contains the toolbar. |
Oracle offers a repository of icon graphics that you can use in your own programs. The three icons used in this hour's workshop are from that collection. To view the graphics, visit the web page http://java.oracle.com/developer/techDocs/hi/repository.