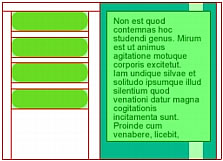
Creating slice objects
You can create a slice object by drawing it with the Slice tool or by inserting a slice based on a selected object.
The lines extending from the slice object are slice guides, which determine the boundaries of the separate image files into which the document is split on export. These guides are red by default.

To insert a rectangular slice based on a selected object:
- Select Edit > Insert > Slice. The slice is a rectangle whose area includes the outermost edges of the selected object.
- If more than one object is selected, select how to apply slices:
Single creates a single slice object that covers all selected objects.
Multiple creates a slice object for each selected object.
To draw a rectangular slice object:
 Select the Slice tool.
- Drag to draw the slice object. The slice object appears on the Web Layer, and the slice guides appear in the document.
NOTE
You can adjust the position of a slice as you drag to draw it. While holding down the mouse button, simply press and hold down the Spacebar, then drag the slice to another location on the canvas. Release the Spacebar to continue drawing the slice.

