Adding a Menu to NNM
Once you have a toolbox of scripts, adding them to an NNM menu makes them easier to access and execute. This trick can be especially useful if you prefer to use NNM's graphical interface. The key to adding custom menus is the directory $OV_REGISTRATION/C. ($OV_REGISTRATION contains directories for all the languages available on your system; C is the directory for the default language and is probably where you should start.) The C directory contains all the files that make up the menu system you see when you run NNM. For example, the file ovw contains the familiar options from the main window (New, Open, Refresh, etc.). Let's look at the $OV_REGISTRATION/C/ovsnmp/xnmloadmib file. It's fairly easy to see how to hook an external command into a menu. Let's jump right in and create a menu that is two levels deep with two menu choices:
Application "Graph Menu" {
 Menubar <100> "Local_Graphs" _p {
 <100> "Network" _N f.menu "network_menu";
}
Menu "network_menu" {
 <90> "5 Minute CPU" _M f.action "5mincpu"; <90> "Bits In and Out For All Up Interfaces" \ _B f.action "bit_for_all_up";
}
Action "5mincpu" {
 Command "/opt/OV/local/scripts/Cisco_5min_cpu \ \"${OVwSelections}\""; MinSelected 1; MaxSelected 7; SelectionRule (isSNMPSupported || isSNMPProxied) ;
}
Action "bit_for_all_up" {
 Command "/opt/OV/local/scripts/Cisco_Line_Up_Bits \ \"${OVwSelections}\""; MinSelected 1; MaxSelected 3; SelectionRule (isSNMPSupported || isSNMPProxied) ;
}
}
Create a file within $OV_REGISTRATION/C and insert the previous code listing. Once this is done, run ovw with the -verify switch, which checks for errors.[74] You may see errors or warnings about your new menu item but, if you're successful, you'll see an item that looks like the menu in Figure B-2.
[74]Do not leave any backup files within any of the directories, because NNM takes each file seriously. Backup or redundant files will produce warnings when you run ovw.
WARNING: NNM can be picky with registration files. If you can't see your menu, try the ovw -verify trick. If it reveals no errors, take some entries out and restart ovw. Keep doing this until your items appear. You should also break up your menu items into multiple files. Do not put all your menus and actions into one file. The more files you have, the easier it will be to diagnose and troubleshoot your new menu items.
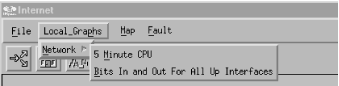
Figure B-2. A new menu
Let's talk about some commonalties within our registration file:- Each menu and menu item is associated with a keyboard shortcut that allows the user to access it. The trigger character is preceded by an underscore. For example, from the "Local_Graphs
 Network" menu, you can hit "M" to go to the "5 Minute CPU" item.
- Each menu item has a precedence number within angle brackets. This allows you to control the order in which items appear. Items with the highest precedence appear first in a menu; items with the same precedence are listed in the order in which they appear in the file. For example, if we reduce the precedence of "5 Minute CPU" from <90> to <80> it will appear after the "Bits In and Out" menu item, because the higher-precedence item comes first.
Menubar entry contains the menus that will appear in the top NNM menu bar. We used the function f.menu to call a submenu. The following code shows how we could have used f.action to call an action directly:
Menubar <precedence> "menubar Label" _MnemonicChar {
 <precedence> "SubMenu Label" _MnemonicChar f.menu "menu-name" <precedence> "Action Name" _MnemonicChar f.action "action-name" }
A
Menu looks and behaves like the menu bar (or menu) that contains it, with a few differences. Menus don't declare mnemonic characters or precedence; these are defined by the containing menu or menu bar. The menu-name is the linking name that appears after f.menu.
Menu "menu-name" {
 <precedence> "SubMenu Label" _MnemonicChar f.menu "menu-name" <precedence> "Action Name" _MnemonicChar f.action "action-name" }
Actions are called just like Menus. The action-name is the linking name of an action that gets called when selected from a previous item (either a Menu or a Menubar):
Action "action-name" {
 Command "/opt/OV/local/scripts/Cisco_5min_cpu \"${OVwSelections}\""; MinSelected 1; MaxSelected 7; SelectionRule (isSNMPSupported || isSNMPProxied) ;
}
There are a few additional parameters in our
Action declaration:
Commandspecifies which program or script should be executed. The"${OVwSelections}\"at the end of the command string passes all currently selected objects to the program as arguments.MinSelecteddeclares how many nodes must be selected before this item becomes available. If nothing is selected, the corresponding menu choice will be grayed out and unclickable.MaxSelectedworks the same way, but declares the maximum number of objects that can be selected.SelectionRuleuses capability fields[75] within a logical statement. These rules declare what is necessary for the selection to be deemed a "good selection."[75]Check out $OV_FIELDS for more definitions of capability fields.
Action declarations can contain many additional parameters, as can registration files. The examples we've given should be enough to get you going in the right direction. The OVwRegIntro (5) manpage defines the syntax of the registration files in detail; read this page carefully if you're serious about adding custom menu items.