Windows B as i cs
![]()
Windows Basics
Overview
In order to use AutoPlay Media Studio to its full potential, you need to have a solid understanding of some basic (and a few not-so-basic) Windows concepts. This chapter is meant to serve as a quick overview of these Windows basics, to help you gauge your current level of knowledge, and to establish some of the terminology used in the AutoPlay Media Studio documentation.
If you need further help on these subjects, please consult your Windows documentation.
Mouse Maneuvers Files, Folders and Paths Shortcuts
Shortcut Folders File Associations The Registry
Command Line Arguments
The Windows Clipboard The AutoRun Feature CRC Values
Mouse Maneuvers
![]()
M ou s e M a n e u ver s
Overview
There are eight basic maneuvers you should be able to perform with your mouse:
Click Double-click
Right-click Ctrl-click Shift-click Drag
Drag Select Drag and Drop
![]()
Back to: Windows Basics
![]()
M ou s e M a n e u ver s
OverviewClick
Clicking the mouse is as simple as it gets. Simply position the mouse pointer over the item that you want to "click" on, and then press and release the left mouse button once. The trick is to do this without moving the mouse.
(If you move the mouse while you click, Windows might think that you meant to perform a drag and drop instead.)

Tip: If you find it difficult to click on something without moving the mouse at the same time, try changing how you grasp the mouse with your hand. Some people like to rest their whole hand on the mouse; others prefer to cradle their hand over the mouse and move it with their thumb and ring finger. If you're right-handed, your index (first) finger should rest softly on the left mouse button, and your middle (second) finger should rest softly on the right mouse button. You don't want to let go of the mouse before you click, or the mouse might move, causing you to click on the wrong thing.
Next: Double-click
![]()
M ou s e M a n e u ver s
OverviewDouble-click
Double-clicking is a lot like clicking. You position the mouse pointer over the item that you want to "double-click" on, and then press and release the left mouse button twice, quickly, without moving the mouse.
You have to click twice quickly, or Windows will see your clicks as two normal clicks, instead of one double-click. And you mustn't move the mouse between clicks, or Windows will think you wanted to click two different things really fast.

Tip: Windows actually "detects" a double-click whenever you click twice in the same place within a certain amount of time. You can lengthen or shorten this time by adjusting the "double-click speed" in your Mouse settings, which you can access from the Windows Control Panel (usually by choosing Start > Settings > Control Panel).
Next: Right-click
![]()
M ou s e M a n e u ver s
OverviewRight-click
A right click is just like a normal click, but instead of pressing the left mouse button, you press the right mouse button instead.
Right-clicking usually displays a pop-up menu with a list of menu items specific to whatever you right- clicked on. We often refer to this pop-up menu as a "right-click menu" or "right-click context menu."

Note: If you're right-handed, you should press the right mouse button with your middle finger (the second finger from the left). Using your index finger (the first finger on the left) for both left- clicking and right-clicking is not only slower, it may actually lead to muscle cramps or more serious medical conditions.
Next: Ctrl-click
![]()
M ou s e M a n e u ver s
OverviewCtrl-click
Ctrl-clicking (pronounced "control clicking") is easy. To do it, you just press and hold the Ctrl key down while you click the mouse.
In AutoPlay Media Studio (as in Windows), you can ctrl-click to add individual items to your current selection. For example, ctrl-clicking on a list item will select that item in addition to any items that are already selected. Similarly, ctrl-clicking on an object will select that object in addition to any other objects that are already selected.
Normally, when you click on five items in a row, you select each of the five items separately, one at a time. But if you ctrl-click on five items in a row, each item is added to your selection, so you end up having all five items selected at once. (Having more than one thing selected at once is known as "multiple selection.")
![]()
Tip: You can subtract individual items from your current selection by ctrl-clicking on items that are selected; ctrl-clicking on a selected item will deselect that item (i.e. it will remove that item from the current selection).
Next: Shift-click
![]()
M ou s e M a n e u ver s
OverviewShift-click
Shift-clicking is easy. To do it, you just press and hold the Shift key down while you click the mouse.
In AutoPlay Media Studio (as in Windows), you can shift-click to extend your current selection in a list box. In other words, shift-clicking lets you select a range of items, or "all of the items between point A and point B."
For example, if you click on a list item and then shift-click on another list item, you will automatically select all of the items between the first item you clicked and the item that you shift-clicked.
![]()
Note: This is only true for selecting items in lists boxes. Shift-clicking has no effect on objects in AutoPlay.
Next: Drag
![]()
M ou s e M a n e u ver s
OverviewDrag
Dragging is simply the act of "grabbing onto" an item with the mouse pointer and dragging it somewhere else.
To drag something, first position the mouse pointer over the item you want to drag. Then, "grab onto" the item by pressing (and holding) the left mouse button. Hold the left mouse button down while you "drag" the item by moving the mouse. When you've positioned the item where you want it, "let go" of it by releasing the mouse button.
You will use this technique often in AutoPlay Media Studio to reposition objects and resize them. (Resizing an object involves dragging one of the drag handles on the "bounding box" that defines the object's width and height.)
![]()
Tip: You can abort a drag by pressing the Esc key. Next: Drag Select
![]()
M ou s e M a n e u ver s
OverviewDrag Select
Drag selecting is a technique you can use to select multiple items at once. It basically involves drawing a temporary "box" around the items that you want to select by dragging the mouse pointer from one point to another.
To drag select a bunch of items, position the mouse pointer somewhere on the "surface" that the items are located on. (Don't position it on an item, or you'll just end up moving that item instead.) Press the left mouse button and hold it down while you move the mouse-the temporary drag-select box will appear to outline the selection area. "Stretch" the drag-select box by dragging the mouse until the selection area includes all of the items that you want to select, and let go of the mouse button. When you release the mouse button, any items within the drag-select box will be selected, and the drag-select box will disappear.

Drag sel ecti ng two l abel objects on an AutoPl ay Medi a Studi o page
Next: Drag and Drop
![]()
M ou s e M a n e u ver s
OverviewDrag and Drop
Dragging and dropping simply means dragging an item from outside AutoPlay Media Studio and "dropping" it into the design environment. You can use this technique to "drag" things like image files or Internet shortcuts onto a page or dialog. (For example, you can drag a text file onto the page or dialog surface to create a paragraph object.)

Tip: To drag an item between applications when their windows are maximized, select the item in the source application, drag it to the task bar at the bottom of your screen, and hold it over the tray button for the desired window. After a moment, that window will come to the front, and you can continue dragging the item to wherever you wanted it to go.
Next: Overview
Files, Folders and Paths
![]()
Fil e s , Fold er s a nd P a t h s
Overview
Working with AutoPlay Media Studio is a lot easier if you have a solid understanding of files, folders, and the "paths" that are used to describe them. If you're new to Windows and hierarchical file systems, you should pay extra attention to this section.
Files Extensions Folders Drives Partitions Root Folder Paths
![]()
Back to: Windows Basics
![]()
Fil e s , Fold er s a nd P a t h s
OverviewFiles
Information on computers is stored in files. A file is simply a collection of data that a computer stores under a specific name, known as the filename. (In other words, a file is a bunch of data that the computer stores as one unit and that you can access by name.)
When you save a file, the data that makes up the file is written out to the hard drive, and whatever name you provided for the file is assigned to that collection of data on the hard drive.
When you load a file, you provide the name of the file that you want to load, and the corresponding data is read off the hard drive.

Warning: It's important to take special care when saving files. If you provide the name of a file that already exists, the new file will replace or "overwrite" the old file. Most applications will warn you before this happens, asking you to verify that you really want to overwrite the existing file. Be sure to heed the warning; once a file is overwritten, it can't be restored.
Files vary in size and can contain all sorts of data, from text, images and sounds, to database records and the "machine language" code that programs are made of.
Next: Extensions
![]()
Fil e s , Fold er s a nd P a t h s
OverviewExtensions
An extension is the part of a filename that is used to indicate what kind or "type" of data is contained within a file.
A file extension consists of a period (.) followed by one or more characters at the end of a filename. Windows uses the file extension to determine what kind of information is contained in a file. For example, in the filename myfile.txt, .txt is the file extension that identifies myfile.txt as a text file.
![]()
Tip: When reading filenames out loud, the period in the extension is usually pronounced "dot." So myfile.txt would be pronounced "myfile dot text" or "myfile dot tee ex tee."
Next: Folders
![]()
Fil e s , Fold er s a nd P a t h s
OverviewFolders
Files are usually organized into groups using folders. Folders are essentially just containers for files. Like files, folders have names that you can use to access them. Each folder can contain any number of files, and even other folders (or "sub-folders").
![]()
Note: A "sub-folder" is just a folder that happens to be located in another folder. You can make any folder a sub-folder by placing it in another folder.
Windows uses a hierarchical file system. This means that storage space can be organized into multiple levels of folders and sub-folders, forming what is often referred to as a "directory tree." The base of the directory structure is known as the root folder, or just the "root" for short. Within this root folder there can be files and sub-folders, and within those sub-folders there can be other files and sub-folders as well.
![]()
Note: Every file on your computer is located in a folder, whether it's the root folder on one of your drives, or some other folder located inside the root folder. (Or a folder inside a folder that is inside the root folder, or a folder inside a folder that is inside a folder that is...well, you get the idea.)
This hierarchy of folders is why every file has a path. A path is a string of text that describes where a file is stored. It's basically just a list of the different folders that you would need to open in order to reach the file.
Each folder acts like a container for all the files and folders that are "in" it. The files and sub-folders in a folder can be copied, moved or deleted all at once by copying, moving or deleting the folder that contains them.
Much like hanging folders in a filing cabinet, folders make it easier to organize and locate your files. If the files on a computer were all kept in one place, it would be very difficult to find a particular file. Folders allow related files to be grouped together so it's easier to find them.
![]()
Note: Folders are also often called directories. In Windows, the terms "folder" and "directory" both refer to the same thing.
Next: Drives
![]()
Fil e s , Fold er s a nd P a t h s
OverviewDrives
A drive is a form of fixed, networked or removable media used as a storage device.
The term "drive" can also refer to the drive letter, which is the letter assigned to the drive during the computer boot process. A single letter of the alphabet is assigned to each drive as it is detected at startup. The letters "A" and "B" are reserved for floppy drives, and the rest of the letters (from C to Z) are assigned in order to the various hard drives, CD-ROM drives, and any other drives attached to the system.
For example, if your system has a single hard drive and a CD-ROM drive, your C: drive is your hard drive, and your D: drive is your CD-ROM. If your hard drive is split into two logical drives or "partitions," then C: and D: would refer to those partitions, and your CD-ROM drive would be E:.
Next: Partitions
![]()
Fil e s , Fold er s a nd P a t h s
OverviewPartitions
A partition is a logical division of a hard drive into smaller parts, where each part is seen as a separate "drive" by the operating system. For example, a single 30 GB hard drive could be separated into three 10 GB partitions, which would appear to the operating system as three drives (C:, D: and E:).
Next: Root Folder
![]()
Fil e s , Fold er s a nd P a t h s
OverviewRoot Folder
The root folder (or "root" for short) is the "base" or "main" folder on any drive. The root folder is where all of the other folders on a drive are located. When you double-click on the C: drive in My Computer, you're opening the root folder of the C: drive. All the folders on the C: drive are located in the "root" of C:.
The root folder is always named "\" in Windows. For example, the path to the root of the D: drive is:
D:\
Next: Paths
![]()
Fil e s , Fold er s a nd P a t h s
OverviewPaths
A path is a string of text that describes where a file or folder is stored in a hierarchical directory structure. There are three kinds of paths you can use in AutoPlay Media Studio: full paths, relative paths and UNC paths.
Full Paths
Full or "absolute" paths provide "complete" directions to locate a file, starting right from the drive letter that the file is located on. A full path begins with the drive letter and includes the name of each folder that would need to be opened, in turn, in order to access the desired folder or file. The folder names are separated by backslash characters (\). Full paths have the following general format:
<drive letter>:\<folder name>\<folder name>\<filename> For example:
· The path to the root folder on the C: drive is:
C:\
· The path where AutoPlay Media Studio is installed by default is:
C:\Program Files\AutoPlay Media Studio X
· The path to Notepad.exe on your system is probably something like:
C:\Windows\Notepad.exe
Relative Paths
Relative paths provide "partial" directions to locate a file starting from a given folder (often the current working directory). Relative paths look just like full paths, but they're missing the drive name and possibly some folder names too. The simplest relative paths consist of a single folder or filename. Relative paths have the following general format:
<folder name>\<folder name>\<filename> For example:
· The relative path to a Data folder in the current working directory would be:
Data
· The relative path to the AutoPlay Media Studio application from the Program Files folder would be:
AutoPlay Media Studio X\AutoPlayDesign.exe
· The relative path to a readme file in a sub-folder named Docs would be:
Docs\readme.txt
· The relative path to the root folder on the same drive is always:
\
Dots and dot-dots
There are two special folder names that you can use in relative paths:
One dot (.) always refers to the current folder.
Two dots (..) refers to the folder that is one level higher than the current folder.
For example:
· The relative path to a program named foo.exe in a folder two levels above the current folder is:
..\..\foo.exe
· The relative path to a folder named Images in a folder three levels above the current folder is:
..\..\..\Images
· The relative path to a file named whatsup.doc in the current folder can either be written as:
whatsup.doc
or as:
.\whatsup.doc
UNC Paths
The Universal Naming Convention (UNC) is a standard method of describing the location of files and other resources shared over a network. In Windows, UNC paths begin with two backslashes (\\), followed by the server name, which is the name assigned to the computer where the shared resources are located. The server name is followed by another backslash (\) and the share name, which is simply the name that was given to the volume or storage device when it was shared. This is then followed by the path to the desired file or folder on that shared volume.
UNC paths have the following general format:
\\<server name>\<share name>\<folder name>\<filename> For example:
· The UNC path to the AutoPlay Media Studio X folder on a C: drive which is shared as "D2" on a computer named "R2" would be:
\\R2\D2\Program Files\AutoPlay Media Studio X
· The UNC path to a file named foo.txt in the temp folder of a drive which is shared as "MAIN" on a computer named "DOROTHY" would be:
\\DOROTHY\MAIN\temp\foo.txt
Next: Overview
![]()
Windows Basics
OverviewShortcuts
A shortcut is a very small file in the Windows operating system that points or "links" to a web site or another file.
Here's what a shortcut to notepad.exe looks like:

Notice the little curly arrow on the icon that tells you this is a shortcut.
Each shortcut file contains information about where the file or web site that it "points" to is located. When a user double-clicks on a shortcut file, the file or web site that it points to is opened instead.
Shortcut files have a .lnk, .url or .pif extension that is hidden by the Windows operating system:
.lnk - shortcuts to files and folders
.url - shortcuts to web sites
.pif - shortcuts to DOS batch files
It's easy to forget that shortcuts are files. Normally the only indication you have that an item is a shortcut is the little curly arrow on its icon, or the fact that it's located in the Start menu or on the Quick Launch desktop toolbar. The fact that shortcuts are actually regular files is very well hidden by Windows.
In fact, the items in your Favorites menu and the "programs" in your Start menu are all shortcuts. Adding a shortcut to the Start menu is nothing more than copying a shortcut file into the designated "Start menu" folder on the user's system.
Next: Shortcut Folders
![]()
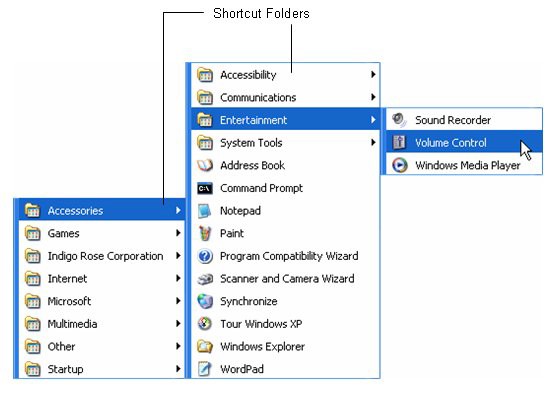
Windows Basics
OverviewShortcut Folders
Shortcuts are often organized into folders, known as shortcut folders. A shortcut folder is simply a folder
that contains shortcut files.
A good example of shortcut folders are the "program groups" that keep your Start -> Programs menu organized. For instance, by default all Indigo Rose product-specific shortcut folders are installed in a shortcut folder named "Indigo Rose Corporation" inside the "Programs" shortcut folder.
Next: File Associations
Windows Basics
OverviewFile Associations
![]()
File associations tell Windows what actions can be performed on different types of files, what programs should be used to carry out each of those actions, and the paths to where those programs can be found.
Each file association associates a specific file extension with a command to use a program to do something to that file. For example, a file association can tell Windows that when files ending with .doc are double- clicked, they should be opened with Microsoft Word.
The program that is associated with a file extension is known as the default viewer for that type of file. For instance, Notepad is the default viewer for .txt files when Windows is installed.
File associations are stored in the Registry under HKEY_CLASSES_ROOT. Next: The Registry
![]()
Windows Basics
OverviewThe Registry
The Registry is a central database provided by the Windows operating system where system and software configuration details are stored. It's arranged into a hierarchical structure that is similar to the way folders and files are organized on a hard drive.
The Registry is organized into six main folders, called main keys. Each of these main keys can contain any number of sub-folders, called sub keys. Information in the Registry is stored inside the main keys and sub keys as values.
There are three different types of values that can be stored in the Registry: String, Binary, and DWORD. String values contain strings of characters, Binary values contain binary data, and each DWORD value contains a single 32-bit ("double word") value.
Each main key in the Registry contains a different kind of information. The six main keys are:
HK EY _C L A SSES _R OOT
HKEY_CLASSES_ROOT is used to store information on different aspects of shell integration, like file associations, OLE, DDE, and drag-and-drop operations.
This key is actually a link to HKEY_LOCAL_MACHINE\SOFTWARE\Classes. Storing information in HKEY_CLASSES_ROOT is the same as storing information in HKEY_LOCAL_MACHINE\SOFTWARE\Classes, and vice-versa.
HK EY _CURR E N T _U SE R
Like HKEY_CLASSES_ROOT, this is actually a link to another key. In this case, it points to the key in HKEY_USERS that belongs to the user who is currently logged onto the system. This is where configuration information for the current user is stored.
HK EY _ LO CA L _ M ACH I N E
HKEY_LOCAL_MACHINE contains information about system hardware, peripherals, installed software, OLE and software configuration, and other Windows configuration details.
HK EY _U SE R S
This is where user-specific configuration information is stored. Individual sub keys hold settings for each user, and the default settings are kept in a sub key named .Default.
HK EY _CURR E N T _C O N F I G
HKEY_CURRENT_CONFIG stores information for plug-and-play devices and the various hardware configurations that have been defined.
HK EY _D Y N_DA T A
HKEY_DYN_DATA is used by Windows to store dynamic information that changes frequently during the normal operation of Windows. It's usually best to leave this key alone.
![]()
Tip: You can use the Registry actions to read from and write to the Registry. Next: Command Line Arguments
![]()
Windows Basics
OverviewCommand Line Arguments
Command line arguments are just values that are passed to an executable file when it is run. Also known as "command line switches" or "command line options," command line arguments are usually used to set program options, or to pass along the location of a file that the program should load.
They're called command line arguments because they are generally used when launching a program from a command line (also known as the "DOS prompt" in Windows). In fact, command line arguments go way back, to the days before computers had fancy graphical user interfaces, when typing stuff into a command line was the only way to run a program.
When a program is running, it can access any command line arguments that were passed to it and make decisions about them. Every executable accepts different arguments and interprets them in different ways.

For example, entering C:\abc.exe /W /F on a command line would run a program called abc.exe and pass two command line arguments to it: /W and /F. The abc.exe program would see those arguments and handle them internally.
Note: Not all executables use command line arguments, and the list of meaningful command line arguments is specific to each program. /W might mean "wait for return" in one program, but it could mean "enable wacky walk animation" in another-or it might not even be recognized at all.
Tip: Many programs will display a list of the command line arguments they support if you run them with the /? option.
You can test command line arguments by running an executable from the "Command Prompt" in Windows NT, 2000, XP, Vista or later, or from the "DOS prompt" in older versions of Windows. You can also use command line arguments in program shortcuts, or when running an application by using Start -> Run.
For example, to run notepad on a typical Windows XP system, you can go to Start > Run and type in:
C:\Windows\notepad.exe
This will start notepad with a blank document. In this case, there are no command line arguments being passed to the program (notepad).
But, if you go to Start > Run and also type in the path to an existing text file:
C:\Windows\notepad.exe C:\Docs\Info.txt
...then notepad will open up with that C:\Docs\Info.txt document loaded into it. In this case, "C:\Docs\Info.txt" is a command line argument being passed to notepad.exe. Notepad detects the

argument, sees that it's the path to a text file, and loads that file automatically (which is what notepad does when you pass it the path to an existing text file).
Tip: Note that command line arguments are separated by spaces. If you need to pass a command line argument that contains one or more spaces, you can surround the argument with quotes. The quotes will make the spaces part of the argument. For example:
abc.exe D:\open this file.txt
...would be seen as 3 arguments: "D:\open", "this" and "file.txt". To pass the path as a single argument, you need to surround it with quotes, like this:
abc.exe "D:\open this file.txt"
Next: The Windows Clipboard
![]()
Windows Basics
OverviewThe Windows Clipboard
The Windows clipboard is a storage area for items the have been cut or copied. Whenever you cut or copy something, it is automatically placed in the clipboard for you. You can then "paste" a copy of the item from the clipboard to anywhere you want.
![]()
Note: If you've ever cut, copied or pasted anything in a Windows application, you've already used the Windows clipboard.
Technically, the clipboard is just a bit of physical memory (i.e. RAM) that has been set aside to hold any stuff that you might happen to copy or cut. It can only hold one item at a time, so when you cut or copy something, it replaces anything that is already in the clipboard.
You can keep pasting the contents of the clipboard as often as you like. Anything you put in the clipboard will remain there until you overwrite the contents by cutting or copying something else into the clipboard. (Or until you empty the clipboard by rebooting Windows.)
![]()
Note: You can cut, copy and paste items from one place to another in the same application, or even to a different application altogether.
There are three clipboard functions that can be performed in virtually all Windows applications: cut, copy and paste.