This lesson is all about interactivity. Interactivity is important-it lifts your AutoPlay application above the limitations of mere pamphlets and traditional business cards that dwell in the lowly realm of paper. Interactivity makes your application seem alive and responsive, and lets it actually perform important tasks for the user, just like any other Windows program.
There are several ways to make your applications interactive, but the three most important tools at your disposal are buttons, actions and pages. Buttons are one of the coolest features of AutoPlay. They look great, are easy to use, and instantly give your application a truly professional polish. Actions, and the events that you add them to, let you make your application do stuff. Pages are the surfaces that you put buttons and other objects on. And since your imagination shouldn't have to fit on one page, we'll show you how to add more pages to your project.
What You'll Learn
In this lesson, you'll learn how to:
· Add interactive buttons
· Match the width and height of several objects at once
· Change the appearance of the button text
· Duplicate multiple objects
· Add simple actions like Application.Exit and File.Open
· Add a blank page to the project
· Duplicate an existing page
· Add navigation buttons using Page.Jump actions
· Copy objects from one page to another
· Send email with a Quick Action
How Long Will It Take?
This lesson takes approximately 30 minutes to do.
Starting the Lesson
If you're continuing from Lesson 3, you should still have AutoPlay running with the Tutorial project open. If so, you're ready to move on to the next exercise: Adding Buttons.
Otherwise, you'll need to open the project file that you saved at the end of Lesson 3.
1 ) Op e n t h e Tu t o r i a l. a u t opl ay f il e t h a t y ou s ave d in L e ss on 3 .
When you save a project, AutoPlay automatically creates a project folder for it inside your "My Documents\AutoPlay Media Studio 8\Projects" folder. This project folder is where everything that belongs to the project is stored including the project file, which contains all of the settings used in the project.
The project folder and the project file always have the same name that you gave to the project when it was created. The project files name ends with a ".autoplay" file extension.
Since you named this project "Tutorial" in Lesson 1, the name of the project folder will be Tutorial, and the name of the project file will be Tutorial.autoplay. So, the path to the project file should be something like:
...\My Documents\AutoPlay Media Studio 8\Projects\Tutorial\Tutorial.autoplay To open the project, you just need to open that project file.
Adding Buttons
Buttons are special interactive objects. They respond automatically to the user by changing their appearance when you move the mouse over them or click on them. In fact, each button has four different appearances, or "states," built into it: Up, Down, Highlight, and Disabled.
There's a different image for each state built right into the button file. By switching between these images, a button can appear animated and interactive-glowing when the user moves the mouse over it, for instance, and appearing pushed in when the user clicks on it. With full support for alpha transparency and variable opacity, buttons can even come with built-in drop shadow effects and have smooth, rounded edges.
Buttons are a great place to put actions, since they usually look like something you would want to click on. And to help the user know what the buttons will do, each button can have custom text on it, just like a label object. The text can even change color in each of the different states, so it fits in with each states appearance perfectly.
Buttons come in all shapes, sizes and colors. The professionally-designed buttons that come with AutoPlay resize well and even look great when they're stacked on top of each other, thanks to the built-in drop shadows which give our buttons a nice, three-dimensional appearance.
In short, buttons rock.
![]()
Tip: If you need more buttons, you can purchase add-on packs from Indigo Rose. Or just build your own buttons using the AutoPlay Media Studio Button Maker, which you can access by choosing Tools > Button Maker.
1 ) C hoo s e Obj ec t > B u tt on t o a dd a n e w bu tt on obj ec t . Wh e n t h e S e l ec t Fil e di a log a pp ear s , c li ck t h e G a ll ery bu tt on.
Choosing Object > Button opens the Select File dialog so you can select a button file to add.
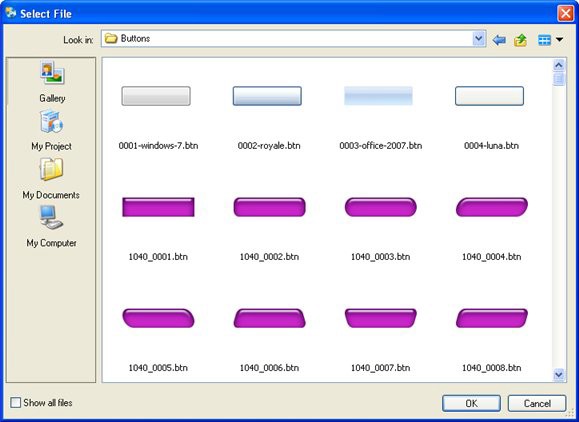
Tip: You can also add a button object by clicking the New Button Object button.

2 ) S e l ec t t h e 0001 - window s - 7 .b t n f il e a nd c li ck O K .
To select the 0001-windows-7.btn file, just find it in the list of button files and click on it. (You may have to scroll the list to find it. As you're scrolling, have a look at the other buttons that are included. There are a lot of cool buttons in there.)
When you click OK on the Select File dialog, the dialog closes and the button is added to the project. Like all objects that you add in this way, it starts out positioned in the upper left corner.

3 ) Re s i z e t h e bu tt on s o i t s 160 pi xe l s wid e a nd 45 pi xe l s t a ll. P o s i t ion i t 14 pi xe l s f r o m t h e l e ft o f t h e p a g e , a nd 89 pi xe l s f r o m t h e t op.
To resize the button object, you can either drag the resize handles, or set the width and height directly in the Position category of the properties pane.
To position the object, either move it into place by dragging it, or edit its Top and Left settings directly.
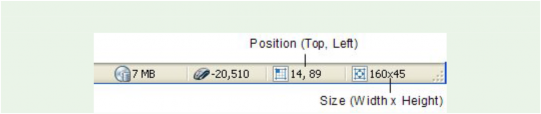

Tip: If you prefer the drag method, you can use the position and size readouts on the status bar to set the object's size and position precisely.